

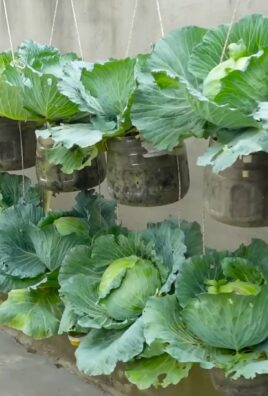
Waterless Lettuce Hanging Garden: Imagine fresh, crisp lettuce just steps from your kitchen, thriving without the daily chore of watering! Sounds like a dream, right? Well, get ready to turn that dream into reality with this incredibly simple and rewarding DIY project. I’m going to show you how to create your very own waterless lettuce hanging garden.
Hanging gardens, in general, have a rich history, evoking images of the legendary Hanging Gardens of Babylon, one of the Seven Wonders of the Ancient World. While our version might be a bit more modest, the principle of maximizing space and bringing greenery closer to home remains the same. For centuries, people have sought innovative ways to cultivate plants, and this waterless method is a modern twist on that age-old pursuit.
In today’s busy world, who has time to constantly water plants? This DIY waterless lettuce hanging garden is perfect for anyone who wants fresh produce without the daily commitment. It’s ideal for small spaces, balconies, or even just adding a touch of green to your patio. Plus, it’s a fantastic way to reduce water consumption and grow your own food sustainably. So, ditch the store-bought lettuce and let’s get started on creating your own thriving, water-wise garden!
DIY Hängender Salatgarten ohne Bewässerung: So geht’s!
Hallo liebe Gartenfreunde! Ich zeige euch heute, wie ihr einen hängenden Salatgarten baut, der fast ohne Bewässerung auskommt. Das ist perfekt für kleine Balkone, Terrassen oder einfach für alle, die wenig Zeit haben, sich um ihre Pflanzen zu kümmern. Und das Beste: Ihr könnt euren eigenen frischen Salat ernten, wann immer ihr wollt!
Was ihr braucht:
* Mehrere Plastikflaschen (am besten 1,5 oder 2 Liter)
* Ein scharfes Messer oder eine Schere
* Ein Bohrer oder ein Nagel und Hammer
* Starke Schnur oder Draht
* Pflanzerde
* Salatsetzlinge (oder Samen, aber Setzlinge sind schneller)
* Optional: Kokosfaser oder anderes Wasserspeicherndes Material
* Optional: Sprühfarbe (wenn ihr die Flaschen verschönern wollt)
* Optional: Handschuhe (um eure Hände sauber zu halten)
Vorbereitung der Flaschen:
1. Reinigung der Flaschen: Zuerst müsst ihr die Plastikflaschen gründlich reinigen. Entfernt alle Etiketten und spült sie mit warmem Seifenwasser aus. Lasst sie gut trocknen. Das ist wichtig, damit keine Rückstände die Pflanzen beeinträchtigen.
2. Schneiden der Flaschen: Jetzt kommt der knifflige Teil. Mit dem Messer oder der Schere schneidet ihr die Flaschen so durch, dass ihr zwei Teile erhaltet: einen oberen Teil mit dem Flaschenhals und einen unteren Teil. Schneidet die Flaschen nicht genau in der Mitte durch, sondern eher im oberen Drittel. Der untere Teil sollte etwas größer sein, da er später die Erde aufnehmen wird. Ich empfehle, Handschuhe zu tragen, um euch nicht zu schneiden.
3. Löcher bohren: Im nächsten Schritt bohrt ihr Löcher in die Flaschen.
* Löcher für die Aufhängung: Bohrt oder nagelt jeweils zwei Löcher gegenüberliegend in den oberen Teil der Flasche, knapp unterhalb des abgeschnittenen Randes. Diese Löcher dienen dazu, die Flaschen später aufzuhängen. Achtet darauf, dass die Löcher groß genug für eure Schnur oder euren Draht sind.
* Löcher für die Drainage: Bohrt oder nagelt mehrere kleine Löcher in den Boden des unteren Teils der Flasche. Diese Löcher sind wichtig, damit überschüssiges Wasser ablaufen kann und die Wurzeln nicht faulen.
4. Optional: Bemalen der Flaschen: Wenn ihr euren hängenden Garten etwas aufpeppen wollt, könnt ihr die Flaschen jetzt mit Sprühfarbe bemalen. Lasst die Farbe gut trocknen, bevor ihr mit dem nächsten Schritt fortfahrt. Ich habe meine Flaschen in verschiedenen Grüntönen und Weiß bemalt, das sieht sehr frisch aus.
Befüllen und Bepflanzen:
1. Vorbereitung des Wasserspeichers (optional): Um die Bewässerung noch weiter zu reduzieren, könnt ihr in den unteren Teil der Flasche etwas Kokosfaser oder anderes wasserspeicherndes Material geben. Das hilft, die Feuchtigkeit länger zu halten.
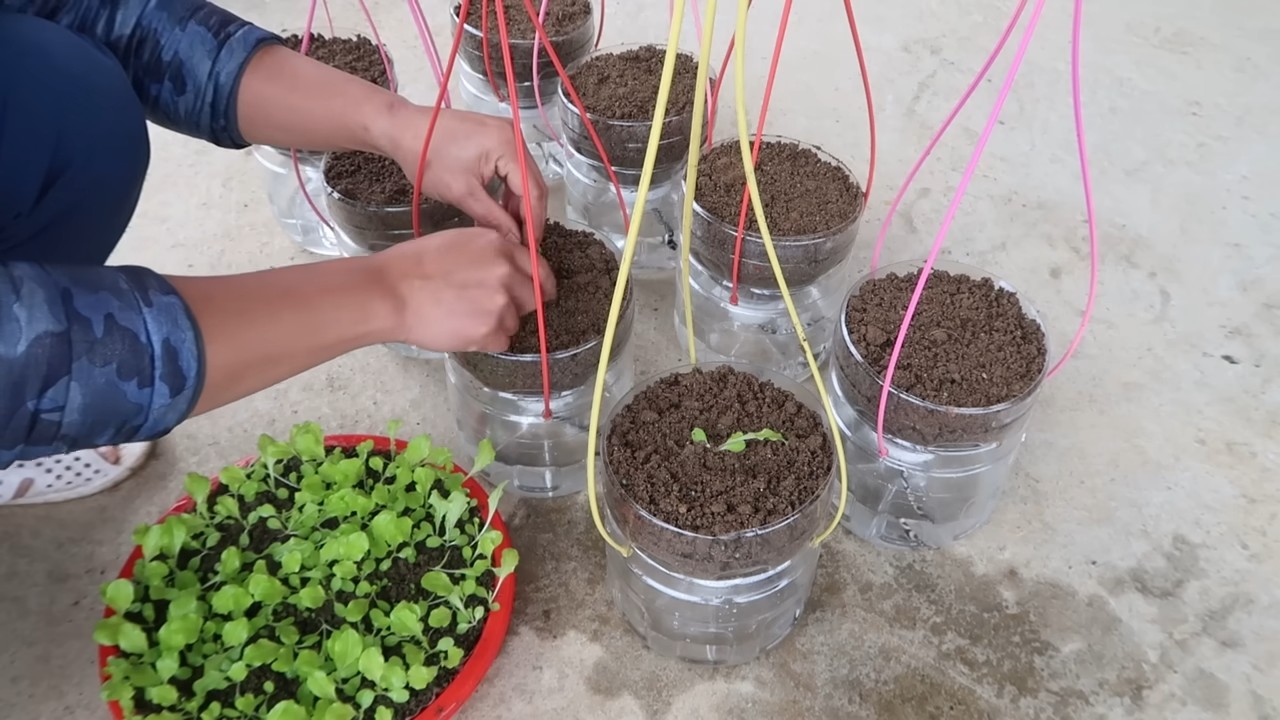
2. Befüllen mit Erde: Füllt den unteren Teil der Flasche mit Pflanzerde. Lasst oben etwa 2-3 cm Platz, damit ihr beim Gießen nicht gleich alles überschwemmt. Drückt die Erde leicht an.
3. Einsetzen der Salatsetzlinge: Macht kleine Löcher in die Erde und setzt die Salatsetzlinge ein. Achtet darauf, dass die Wurzeln gut mit Erde bedeckt sind. Wenn ihr Samen verwendet, streut sie einfach auf die Erde und bedeckt sie leicht mit einer dünnen Schicht Erde.
4. Gießen: Gießt die Setzlinge oder Samen vorsichtig an. Achtet darauf, dass die Erde gut durchfeuchtet ist, aber nicht zu nass.
Zusammenbau und Aufhängen:
1. Zusammenfügen der Flaschenteile: Setzt den oberen Teil der Flasche (mit den Löchern für die Aufhängung) verkehrt herum in den unteren Teil der Flasche (mit der Erde und den Salatsetzlingen). Der Flaschenhals sollte in die Erde hineinragen. Das dient als eine Art Docht, der die Erde von unten mit Wasser versorgt.
2. Aufhängen der Flaschen: Schneidet ausreichend lange Stücke Schnur oder Draht ab. Führt die Schnur oder den Draht durch die Löcher im oberen Teil der Flasche und verknotet sie fest. Achtet darauf, dass die Flaschen sicher hängen und nicht herunterfallen können. Ich habe meine Flaschen an einem Haken an meinem Balkongeländer aufgehängt.
3. Anordnung der Flaschen: Überlegt euch, wie ihr die Flaschen anordnen wollt. Ihr könnt sie nebeneinander aufhängen oder in verschiedenen Höhen, um einen interessanten Effekt zu erzielen. Achtet darauf, dass die Pflanzen genügend Licht bekommen.
Pflege eures Salatgartens:
1. Bewässerung: Da euer Salatgarten über einen Wasserspeicher verfügt, müsst ihr ihn nicht so oft gießen. Überprüft regelmäßig die Feuchtigkeit der Erde. Wenn sie sich trocken anfühlt, gießt ihr vorsichtig von oben. Achtet darauf, dass das Wasser durch die Löcher im Boden ablaufen kann.
2. Düngen: Um sicherzustellen, dass eure Salatpflanzen gut wachsen, könnt ihr sie regelmäßig düngen. Verwendet einen Flüssigdünger für Gemüse und befolgt die Anweisungen auf der Verpackung.
3. Schutz vor Schädlingen: Überprüft eure Pflanzen regelmäßig auf Schädlinge wie Schnecken oder Blattläuse. Bei Bedarf könnt ihr natürliche Schädlingsbekämpfungsmittel verwenden.
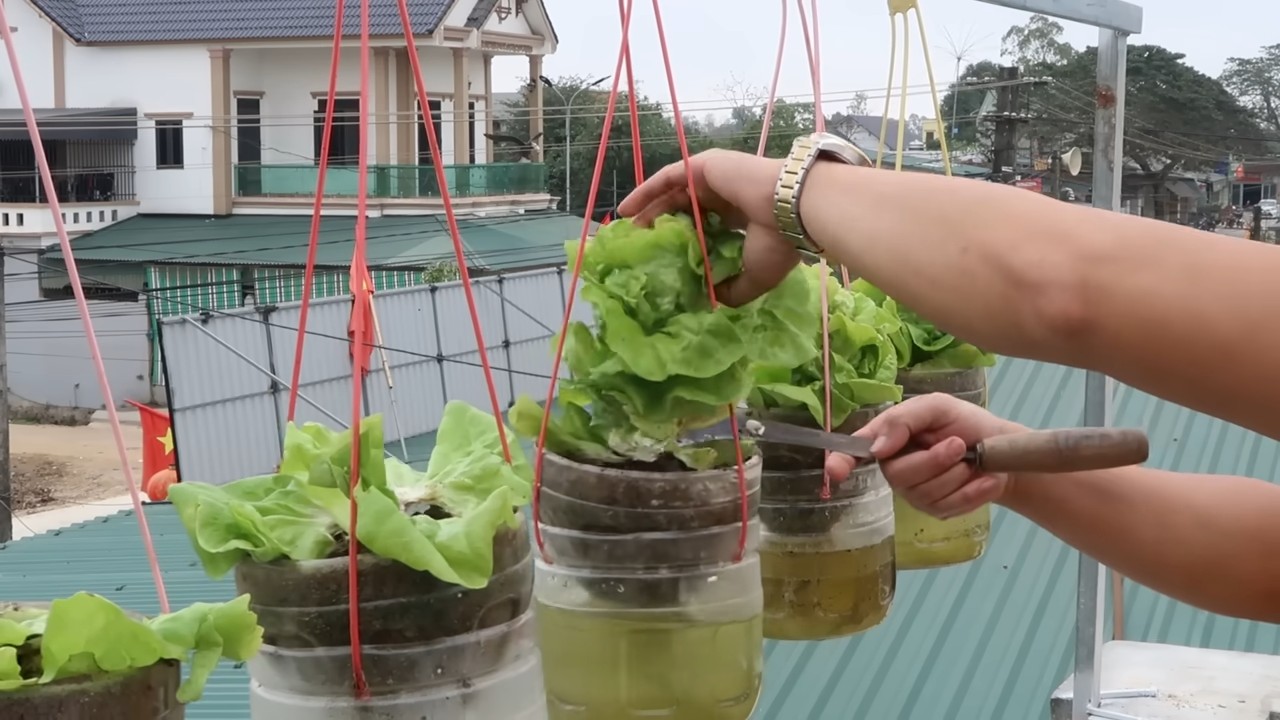
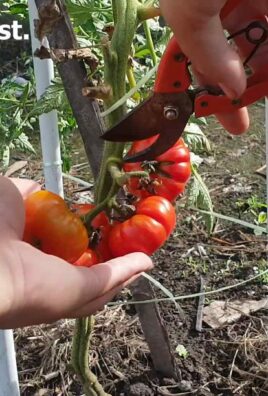
4. Ernte: Sobald euer Salat groß genug ist, könnt ihr ihn ernten. Schneidet einfach die äußeren Blätter ab, die inneren Blätter wachsen weiter. So könnt ihr über einen längeren Zeitraum frischen Salat ernten.
Zusätzliche Tipps:
* Verschiedene Salatsorten: Probiert verschiedene Salatsorten aus, um euren Salatgarten abwechslungsreich zu gestalten.
* Kräuter: Ihr könnt auch Kräuter wie Petersilie, Schnittlauch oder Basilikum in eurem hängenden Garten anpflanzen.
* Standort: Wählt einen sonnigen Standort für euren Salatgarten, aber achtet darauf, dass die Pflanzen nicht der prallen Mittagssonne ausgesetzt sind.
* Winterfest machen: Wenn es draußen kälter wird, könnt ihr euren Salatgarten ins Haus holen oder ihn mit Vlies abdecken, um ihn vor Frost zu schützen.
Häufige Fehler und wie man sie vermeidet:
* Zu viel Wasser: Vermeidet Staunässe, da dies zu Wurzelfäule führen kann. Achtet darauf, dass das Wasser gut ablaufen kann.
* Zu wenig Licht: Salat braucht viel Licht, um gut zu wachsen. Wählt einen sonnigen Standort oder verwendet eine Pflanzenlampe.
* Falsche Erde: Verwendet hochwertige Pflanzerde, die gut drainiert und ausreichend Nährstoffe enthält.
* Vernachlässigung der Pflege: Überprüft eure Pflanzen regelmäßig auf Schädlinge und Krankheiten und düngt sie bei Bedarf.
Ich hoffe, diese Anleitung hilft euch dabei, euren eigenen hängenden Salatgarten zu bauen. Es ist ein tolles Projekt, das nicht nur Spaß macht, sondern euch auch mit frischem, selbst angebautem Salat belohnt. Viel Erfolg und guten Appetit!
Conclusion
So, there you have it! Creating your own waterless lettuce hanging garden is not just a fun project; it’s a game-changer for anyone looking to enjoy fresh, homegrown lettuce without the hassle of traditional gardening. We’ve walked you through the simple steps, highlighting how easy it is to repurpose materials and create a thriving green space, even in the smallest of apartments or balconies.
But why is this DIY trick a must-try? Let’s recap. First and foremost, it’s incredibly space-efficient. Forget sprawling garden beds; this vertical system allows you to maximize your yield in a minimal footprint. Second, it’s waterless, or at least significantly reduces water consumption. This is a huge win for sustainability and your water bill! By eliminating the need for constant watering, you’re also minimizing the risk of overwatering and root rot, common problems in traditional lettuce cultivation. Third, it’s aesthetically pleasing. A lush, green hanging garden adds a touch of natural beauty to any space, transforming a dull corner into a vibrant oasis.
Beyond the basic setup, there are endless possibilities for customization. Want to add some color? Interplant your lettuce with edible flowers like pansies or nasturtiums. Looking for a more compact design? Use smaller containers and create a tiered system. Experiment with different types of lettuce – romaine, butterhead, loose-leaf – to create a diverse and flavorful salad mix. You can even incorporate other herbs like parsley, chives, or basil for a truly versatile hanging garden. Consider adding a slow-release fertilizer to the potting mix for sustained nutrient delivery. This will ensure your lettuce plants receive the nourishment they need to thrive throughout the growing season.
Don’t be afraid to get creative! The beauty of this DIY project is its adaptability. Tailor it to your specific needs and preferences, and watch your lettuce flourish.
We’re confident that once you experience the joy of harvesting your own fresh lettuce, you’ll be hooked. Imagine stepping outside your door and snipping off a handful of crisp, flavorful leaves for your salad or sandwich. It’s a truly rewarding experience.
So, what are you waiting for? Gather your supplies, follow our simple instructions, and embark on your waterless lettuce hanging garden adventure today! We’re eager to hear about your successes, challenges, and creative variations. Share your photos and stories with us in the comments below. Let’s build a community of thriving waterless gardeners! We are sure that you will love this waterless lettuce hanging garden.
Frequently Asked Questions (FAQ)
What type of lettuce grows best in a waterless hanging garden?
While most lettuce varieties will grow well in a hanging garden, some are better suited than others. Loose-leaf varieties like Black Seeded Simpson, Red Sails, and Oakleaf are excellent choices because they are relatively compact and can be harvested continuously by picking individual leaves as needed. Butterhead varieties like Buttercrunch and Bibb are also good options, offering a delicate flavor and texture. Romaine lettuce can be grown, but it may require more space and support as it matures. Avoid head lettuce varieties like iceberg, as they tend to be larger and more prone to bolting (going to seed) in warmer conditions.
How often do I need to water my waterless lettuce hanging garden?
The beauty of this system is its reduced water needs. However, “waterless” doesn’t mean “no water.” You’ll still need to monitor the moisture level of the potting mix and water when it feels dry to the touch. The frequency will depend on factors like the weather, humidity, and the type of potting mix you use. In general, you may need to water every few days during hot, dry periods, and less frequently during cooler, wetter weather. A good rule of thumb is to check the soil moisture daily and water only when necessary. When you do water, water thoroughly until you see water draining from the bottom of the containers.
What kind of potting mix should I use?
A well-draining potting mix is crucial for success. Avoid using garden soil, as it tends to compact and retain too much moisture, which can lead to root rot. Instead, opt for a lightweight potting mix specifically formulated for containers. A mix of peat moss, perlite, and vermiculite is a good option. You can also add some compost to the mix for added nutrients. Consider adding a slow-release fertilizer to the potting mix at planting time to provide a steady supply of nutrients throughout the growing season.
How much sunlight does my waterless lettuce hanging garden need?
Lettuce thrives in partial shade to full sun. Ideally, your hanging garden should receive at least 4-6 hours of direct sunlight per day. However, in hot climates, providing some afternoon shade can help prevent the lettuce from bolting. Observe your plants closely and adjust their location as needed to ensure they are receiving the optimal amount of sunlight. If you’re growing your lettuce indoors, you may need to supplement with grow lights.
How do I prevent pests and diseases in my waterless lettuce hanging garden?
Hanging gardens are generally less susceptible to pests and diseases than traditional gardens, but it’s still important to take precautions. Regularly inspect your plants for signs of pests like aphids, slugs, and snails. Handpick any pests you find or use organic pest control methods like insecticidal soap or neem oil. To prevent fungal diseases, ensure good air circulation around your plants and avoid overwatering. Remove any dead or diseased leaves promptly.
Can I grow other plants in my waterless hanging garden besides lettuce?
Absolutely! The possibilities are endless. Herbs like parsley, chives, basil, and oregano are excellent companions for lettuce. Edible flowers like pansies, nasturtiums, and calendula add color and attract beneficial insects. Strawberries can also be grown in hanging baskets, providing a sweet treat alongside your lettuce. Just be sure to choose plants that have similar growing requirements in terms of sunlight, water, and nutrients.
How do I harvest my lettuce?
Harvesting lettuce from a hanging garden is easy. For loose-leaf varieties, simply snip off individual leaves as needed, starting with the outer leaves. This allows the plant to continue producing new leaves. For butterhead and romaine varieties, you can harvest the entire head when it reaches the desired size. Cut the head off at the base, leaving the roots intact.
How long will my waterless lettuce hanging garden last?
The lifespan of your hanging garden will depend on the type of lettuce you’re growing and the growing conditions. Loose-leaf varieties can be harvested continuously for several weeks or even months. Butterhead and romaine varieties will typically produce one head per plant. To extend the life of your garden, succession plant new lettuce seedlings every few weeks. This will ensure a continuous supply of fresh lettuce throughout the growing season.
What if my lettuce starts to taste bitter?
Bitterness in lettuce is often caused by bolting, which is when the plant starts to produce flowers and seeds. Bolting is typically triggered by hot weather or stress. To prevent bolting, provide your lettuce with some afternoon shade during hot periods, water regularly, and harvest frequently. If your lettuce does start to taste bitter, it’s best to remove the plant and replace it with a new seedling.
How do I overwinter my waterless lettuce hanging garden?
In mild climates, you may be able to overwinter your lettuce hanging garden by providing some protection from frost. Move the hanging baskets to a sheltered location, such as a garage or greenhouse, and cover them with a blanket or tarp on cold nights. In colder climates, it’s best to start new lettuce seedlings indoors in late winter or early spring for transplanting into your hanging garden once the weather warms up.
Leave a Comment