

Thyme Kitchen All Season Cooking: Imagine stepping into your kitchen, the aroma of freshly picked thyme filling the air, ready to transform your everyday meals into culinary masterpieces, no matter the season. Sounds dreamy, right? Well, it’s more achievable than you think! For centuries, cooks have cherished thyme, not just for its distinct flavor, but also for its incredible versatility and ease of cultivation.
From ancient Egyptians using it in embalming rituals to medieval Europeans employing it as a symbol of courage, thyme boasts a rich history. But beyond its historical significance, growing your own thyme offers a practical solution to a common problem: access to fresh, flavorful herbs year-round. Let’s be honest, those dried herbs in the spice rack just don’t compare to the vibrant taste of freshly harvested thyme kitchen all season cooking.
This DIY guide is your passport to a thriving thyme patch, regardless of your gardening experience or the current weather. I’m going to share simple, effective techniques and hacks that will empower you to cultivate a constant supply of this culinary gem. Say goodbye to bland dishes and hello to a world of flavor, all thanks to your very own homegrown thyme!

Thyme Kitchen: Grow Your Own All-Season Herb Garden Indoors!
Hey there, fellow foodies and green thumbs! I’m so excited to share this project with you – creating your very own thriving thyme kitchen garden that will provide fresh herbs all year round, no matter the weather outside. Forget those sad, wilted supermarket herbs! We’re going to have fragrant, flavorful thyme right at our fingertips.
This guide will walk you through every step, from choosing the right thyme varieties to setting up the perfect indoor environment. Let’s get started!
Choosing Your Thyme Varieties
Before we dive into the nitty-gritty, let’s talk thyme! There are so many different types, each with its own unique flavor and aroma. Here are a few of my favorites for indoor growing:
* **English Thyme (Thymus vulgaris):** This is your classic, all-purpose thyme. It has a strong, earthy flavor that’s perfect for soups, stews, and roasted meats. It’s also relatively easy to grow.
* **Lemon Thyme (Thymus citriodorus):** As the name suggests, this thyme has a lovely citrusy aroma and flavor. It’s fantastic in fish dishes, salads, and even desserts.
* **Creeping Thyme (Thymus serpyllum):** While technically a ground cover, creeping thyme can also be grown indoors. It has a milder flavor and is great for adding a subtle thyme note to your dishes. Plus, it looks beautiful cascading over the edge of a pot!
* **Silver Thyme (Thymus argenteus):** This variety is known for its variegated leaves, adding a touch of visual interest to your indoor garden. It has a slightly milder flavor than English thyme.
I recommend choosing at least two or three different varieties to add some variety to your culinary creations.
Gathering Your Supplies
Okay, now that we’ve chosen our thyme, let’s gather everything we need. Here’s a checklist:
* **Thyme Seeds or Seedlings:** You can start from seed or buy small thyme plants from your local nursery. Seedlings are faster and easier, but starting from seed is more economical.
* **Pots:** Choose pots that are at least 6 inches in diameter and have drainage holes. Terracotta pots are a good choice because they allow the soil to breathe.
* **Potting Mix:** Use a well-draining potting mix specifically formulated for herbs. Avoid using garden soil, as it can become compacted and doesn’t drain well.
* **Grow Lights (Optional but Recommended):** Thyme needs plenty of sunlight, so if you don’t have a sunny windowsill, you’ll need to supplement with grow lights. LED grow lights are energy-efficient and work well.
* **Watering Can or Spray Bottle:** For watering your thyme plants.
* **Small Shovel or Trowel:** For planting and transplanting.
* **Plant Labels:** To keep track of your different thyme varieties.
* **Scissors or Pruning Shears:** For harvesting and pruning.
* **Seed Starting Tray (If Starting from Seed):** A tray with individual cells for starting seeds.
* **Humidity Dome (If Starting from Seed):** To help retain moisture during germination.
Planting Your Thyme
Now for the fun part – planting! Here’s how to get your thyme garden started:
Starting from Seed
1. **Prepare Your Seed Starting Tray:** Fill the cells of your seed starting tray with potting mix. Moisten the soil gently with a spray bottle.
2. **Sow the Seeds:** Sprinkle a few thyme seeds into each cell. Thyme seeds are tiny, so don’t overdo it.
3. **Cover the Seeds:** Lightly cover the seeds with a thin layer of potting mix.
4. **Water Gently:** Water the seeds gently with a spray bottle to avoid disturbing them.
5. **Cover with a Humidity Dome:** Place a humidity dome over the seed starting tray to help retain moisture.
6. **Place in a Warm Location:** Place the tray in a warm location with indirect sunlight.
7. **Keep the Soil Moist:** Check the soil daily and water as needed to keep it moist but not soggy.
8. **Germination:** Thyme seeds typically germinate in 14-21 days.
9. **Remove the Humidity Dome:** Once the seedlings emerge, remove the humidity dome.
10. **Thin the Seedlings:** Once the seedlings have a few sets of true leaves, thin them out, leaving only the strongest seedling in each cell.
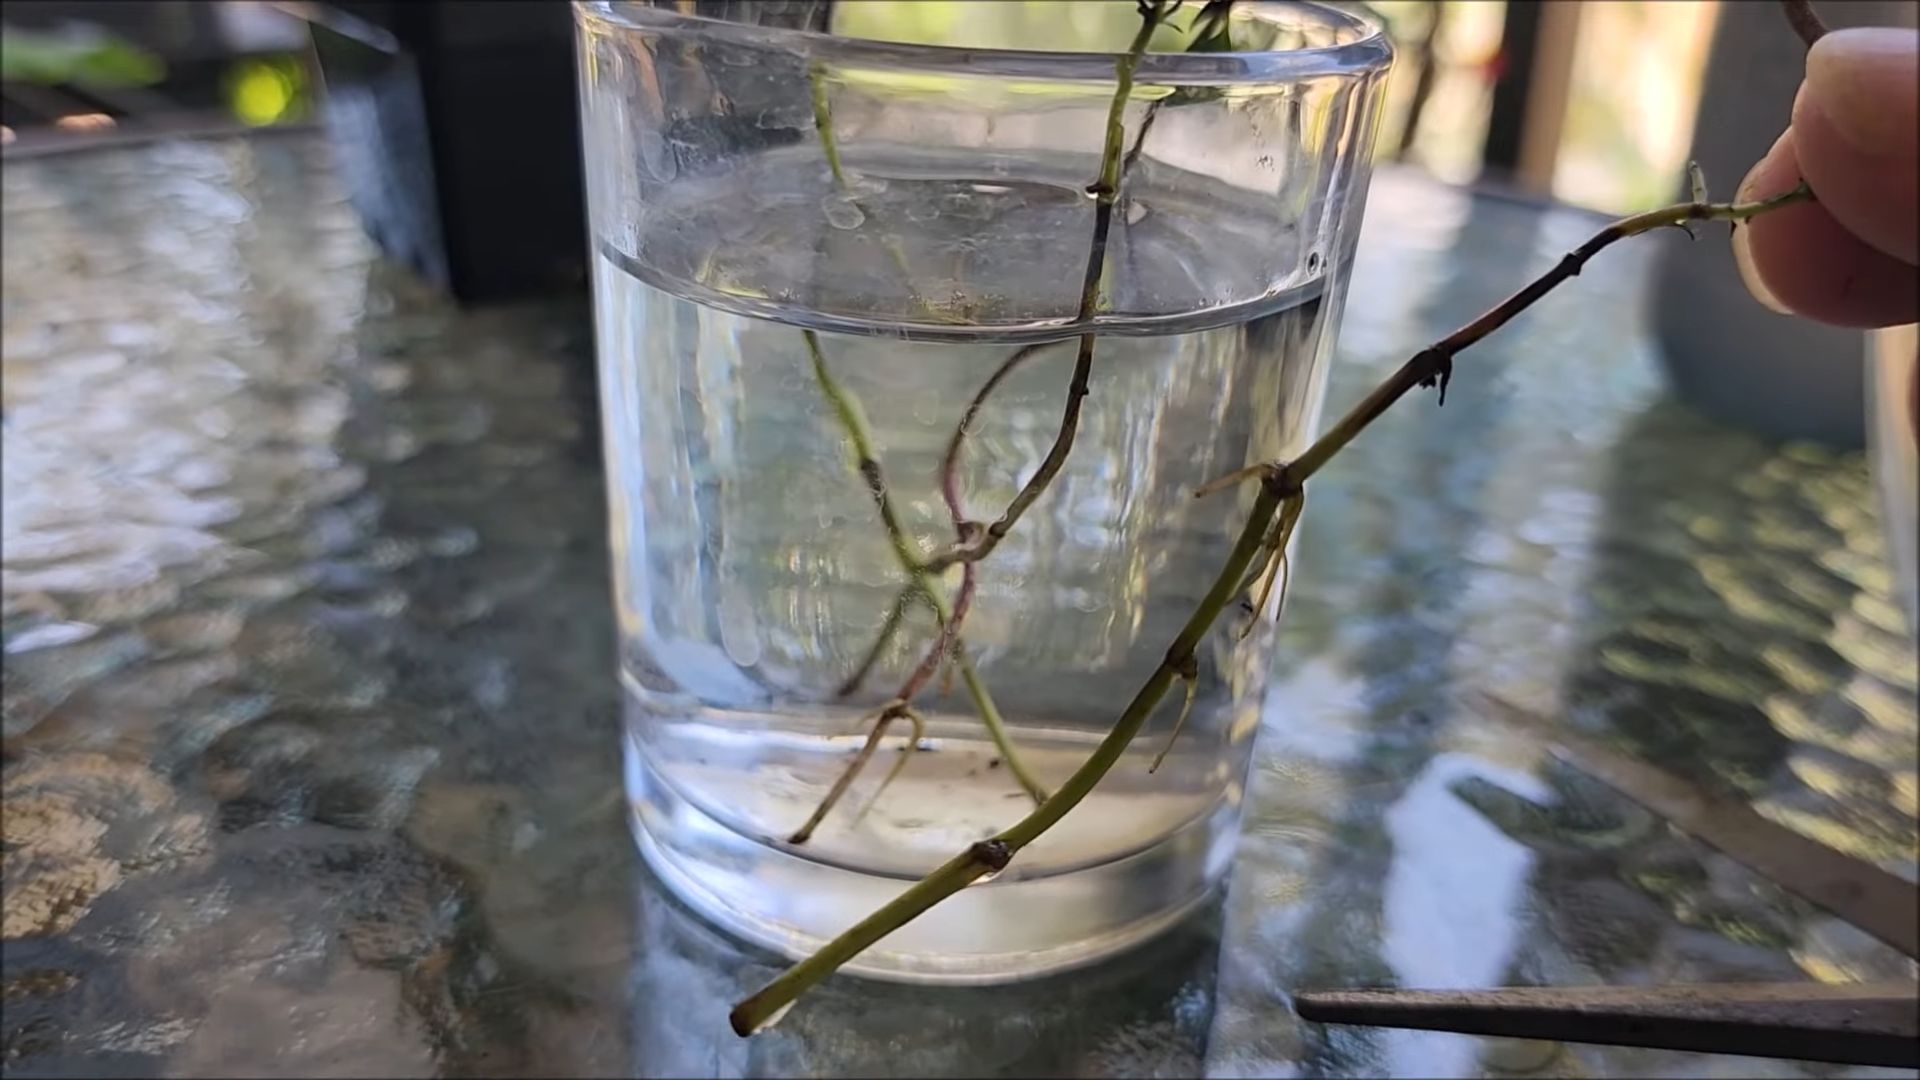
11. **Transplant to Pots:** When the seedlings are about 2-3 inches tall, transplant them into individual pots.
Planting Seedlings
1. **Prepare Your Pots:** Fill your pots with potting mix, leaving about an inch of space at the top.
2. **Remove Seedlings from Nursery Container:** Gently remove the thyme seedlings from their nursery containers. If the roots are tightly bound, gently loosen them with your fingers.
3. **Plant the Seedlings:** Dig a small hole in the center of each pot and place the thyme seedling in the hole. Make sure the top of the root ball is level with the soil surface.
4. **Fill in with Soil:** Fill in the hole with potting mix and gently firm the soil around the seedling.
5. **Water Thoroughly:** Water the seedlings thoroughly until water drains out of the drainage holes.
Caring for Your Thyme Garden
Now that your thyme is planted, it’s time to learn how to care for it. Here are some tips for keeping your thyme garden thriving:
1. **Sunlight:** Thyme needs at least 6-8 hours of sunlight per day. If you don’t have a sunny windowsill, use grow lights to supplement the sunlight. Place the grow lights about 6-12 inches above the plants.
2. **Watering:** Water your thyme plants when the soil is dry to the touch. Avoid overwatering, as this can lead to root rot. Thyme prefers well-drained soil, so make sure your pots have drainage holes.
3. **Fertilizing:** Feed your thyme plants every 2-3 weeks with a diluted liquid fertilizer specifically formulated for herbs. Follow the instructions on the fertilizer label.
4. **Pruning:** Prune your thyme plants regularly to encourage bushier growth. Pinch off the tips of the stems to promote branching. You can also prune your thyme plants to shape them.
5. **Harvesting:** You can start harvesting thyme leaves as soon as the plants are established. Simply snip off the stems with scissors or pruning shears. Harvest regularly to encourage new growth.
6. **Pest Control:** Thyme is relatively pest-resistant, but it can occasionally be affected by aphids or spider mites. If you notice any pests, spray the plants with insecticidal soap.
7. **Repotting:** Repot your thyme plants every year or two as they outgrow their pots. Choose a pot that is slightly larger than the previous one.
Troubleshooting
Even with the best care, you might encounter some problems with your thyme garden. Here are some common issues and how to fix them:
* **Yellowing Leaves:** Yellowing leaves can be a sign of overwatering, underwatering, or nutrient deficiency. Check the soil moisture and adjust your watering accordingly. If the soil is dry, water the plants thoroughly. If the soil is soggy, allow it to dry out before watering again. If the leaves are still yellowing, try fertilizing the plants with a diluted liquid fertilizer.
* **Leggy Growth:** Leggy growth is a sign that the plants are not getting enough sunlight. Move the plants to a sunnier location or supplement with grow lights.
* **Root Rot:** Root rot is a fungal disease that can occur when the soil is too wet. To prevent root rot, make sure your pots have drainage holes and avoid overwatering. If you suspect root rot, repot the plants in fresh potting mix.
* **Pests:** As mentioned earlier, thyme can occasionally be affected by aphids or spider mites. Spray the plants with insecticidal soap to control these pests.
Harvesting and Using Your Thyme
The best part of growing your own thyme is, of course, using it in your cooking! Here are some tips for harvesting and using your fresh thyme:
* **Harvesting:** Harvest thyme leaves in the morning, after the dew has dried. This is when the leaves are at their most flavorful. Simply snip off the stems with scissors or pruning shears.
* **Using Fresh Thyme:** Fresh thyme can be used in a variety of dishes, including soups, stews, roasted meats, vegetables, and sauces. Add thyme to your dishes towards the end of cooking to preserve its flavor.
* **Drying Thyme:** If you have more thyme than you can use fresh, you can dry it for later use. To dry thyme, tie the stems together in small bundles and hang them upside down in a cool, dry place. You can also dry thyme in a dehydrator or in a low oven.
* **Storing Dried Thyme:** Store dried thyme
Conclusion
So, there you have it! Mastering this simple yet transformative DIY trick for preserving your thyme is a game-changer for any home cook, especially those who value fresh, flavorful ingredients year-round. No longer will you be limited by seasonal availability or forced to rely on the often-lackluster taste of dried herbs from the grocery store. This method allows you to enjoy the vibrant, aromatic essence of fresh thyme in all your culinary creations, regardless of the time of year.
Why is this a must-try? Because it’s incredibly easy, cost-effective, and yields superior results compared to other preservation methods. Drying often diminishes the essential oils and delicate flavors of thyme, while freezing can sometimes alter the texture. This DIY trick, however, cleverly circumvents these issues, locking in the herb’s natural goodness and ensuring that each sprig retains its robust flavor profile. Imagine adding a burst of summer sunshine to your winter stews, or infusing your spring roasts with the earthy notes of freshly preserved thyme. The possibilities are endless!
Beyond the basic method, feel free to experiment with variations to suit your personal preferences. Consider infusing your preserved thyme with other complementary flavors. Adding a clove of garlic or a few peppercorns to the preservation medium can create a unique and complex flavor profile that elevates your dishes to new heights. You could also try using different types of oil, such as avocado oil or grapeseed oil, to impart subtle nuances to the final product. For a spicier kick, add a dried chili flake or two.
Another exciting variation involves creating flavored vinegars. Simply substitute the oil with a high-quality vinegar, such as white wine vinegar or apple cider vinegar, and follow the same preservation process. The resulting thyme-infused vinegar is a delightful addition to salads, marinades, and sauces.
We are confident that once you try this DIY trick, you’ll wonder how you ever cooked without it. It’s a simple yet powerful way to elevate your cooking and ensure that you always have fresh, flavorful thyme at your fingertips.
Don’t just take our word for it – give it a try! We encourage you to embark on this culinary adventure and discover the joy of preserving your own thyme. Once you’ve experienced the difference that freshly preserved thyme can make, we’d love to hear about your experience. Share your tips, variations, and culinary creations with us in the comments below. Let’s build a community of thyme-loving cooks and inspire each other to create delicious and unforgettable meals! This is the best way to ensure you have **Thyme Kitchen All Season Cooking**.
Frequently Asked Questions
Q: What type of thyme works best for this preservation method?
A: While this method works well with most varieties of thyme, common thyme (Thymus vulgaris) and lemon thyme (Thymus citriodorus) are particularly well-suited due to their robust flavor and aroma. Creeping thyme, while beautiful, may not retain as much flavor during the preservation process. Experiment with different varieties to discover your personal favorite!
Q: What kind of oil should I use?
A: A good quality olive oil is generally recommended for its neutral flavor and preserving properties. Extra virgin olive oil is a great choice, but a lighter olive oil can also be used if you prefer a less intense flavor. Avoid using oils with strong flavors, such as sesame oil, as they can overpower the taste of the thyme. As mentioned earlier, avocado oil or grapeseed oil are also excellent alternatives.
Q: How long will the preserved thyme last?
A: When stored properly in an airtight container in a cool, dark place, preserved thyme can last for several months, typically up to 6-12 months. The oil acts as a natural preservative, preventing spoilage and maintaining the herb’s flavor. Be sure to check the thyme periodically for any signs of mold or discoloration. If you notice any, discard the batch immediately.
Q: Can I use this method to preserve other herbs?
A: Yes, this method can be adapted for preserving other herbs with similar characteristics to thyme, such as rosemary, oregano, and sage. However, delicate herbs like basil and parsley may not hold up as well to this method and are better suited for other preservation techniques, such as freezing or drying.
Q: Do I need to blanch the thyme before preserving it?
A: Blanching is not necessary for this preservation method. The oil acts as a barrier against oxygen, preventing enzymatic browning and preserving the herb’s color and flavor. Blanching can actually diminish the flavor of the thyme, so it’s best to skip this step.
Q: How do I use the preserved thyme in my cooking?
A: You can use the preserved thyme in a variety of ways. Simply remove the desired amount of thyme from the oil and add it to your dishes as you would fresh thyme. The oil itself is also infused with the flavor of the thyme and can be used as a flavorful cooking oil or salad dressing. Remember to pat the thyme dry with a paper towel before adding it to hot oil to prevent splattering.
Q: What if I don’t have access to fresh thyme? Can I use dried thyme instead?
A: While this method is designed for preserving fresh thyme, you can technically use dried thyme, but the results will not be the same. Dried thyme has a more concentrated flavor than fresh thyme, so you’ll need to use less of it. Also, the oil will not infuse with the flavor of the thyme as effectively as it would with fresh thyme. For the best results, always use fresh thyme when possible.
Q: How do I ensure the thyme is completely submerged in oil to prevent spoilage?
A: To ensure the thyme is fully submerged, use a clean spoon or fork to gently press the thyme down into the oil. You can also add a small weight, such as a clean glass pebble or a small ceramic dish, on top of the thyme to keep it submerged. Make sure the weight is food-safe and won’t react with the oil.
Q: Can I reuse the oil after I’ve used all the thyme?
A: Yes, the oil infused with thyme flavor can be reused for cooking. Strain the oil through a fine-mesh sieve to remove any small pieces of thyme. Store the infused oil in an airtight container in the refrigerator and use it within a few weeks. It’s a fantastic way to add a subtle thyme flavor to your dishes.
Q: Is it safe to store the preserved thyme at room temperature?
A: No, it is not recommended to store the preserved thyme at room temperature. While the oil acts as a preservative, there is still a risk of botulism if the thyme is not properly submerged in oil and stored in a cool environment. Always store the preserved thyme in the refrigerator to ensure its safety and longevity.


Leave a Comment