

Sweet Potato Growing Hack: Unlock the Secrets to Bountiful Harvests!
Have you ever dreamt of harvesting a mountain of sweet potatoes from your own backyard? I know I have! There’s something incredibly satisfying about nurturing a plant from a tiny slip to a sprawling vine laden with delicious, earthy treasures. But let’s be honest, growing sweet potatoes can sometimes feel like a gamble. That’s where this game-changing sweet potato growing hack comes in!
For centuries, sweet potatoes have been a staple in diets around the world, from their origins in Central and South America to their widespread cultivation in Asia and Africa. They’re not just delicious; they’re packed with nutrients and represent a connection to the earth and the traditions of countless cultures. But even with all that history, sometimes traditional methods just don’t cut it in our modern gardens.
That’s why I’m so excited to share this simple yet effective DIY trick that will dramatically increase your sweet potato yield. Forget struggling with poor soil, unpredictable weather, or disappointing harvests. This method is designed to give you the edge you need to grow bigger, healthier, and more abundant sweet potatoes than ever before. Ready to transform your garden into a sweet potato paradise? Let’s dive in!
Grow Sweet Potatoes From Scraps: A Gardener’s Delight!
Hey there, fellow green thumbs! Ever wondered if you could grow more sweet potatoes without buying new slips (those little sprouts that grow into vines)? Well, I’m here to tell you that you absolutely can! This DIY hack is all about maximizing your sweet potato harvest and minimizing waste. We’re going to turn those leftover sweet potato pieces into thriving plants. Get ready to be amazed!
What You’ll Need
Before we dive in, let’s gather our supplies. This is a pretty low-cost project, which is always a win in my book!
* Sweet Potatoes: Obviously! Choose organic sweet potatoes if possible, as they are less likely to be treated with sprout inhibitors. Older sweet potatoes that are already starting to sprout are perfect!
* Clean Jars or Glasses: You’ll need something to suspend the sweet potato in water. Mason jars, drinking glasses, even old vases will work.
* Toothpicks: These are crucial for suspending the sweet potato.
* Water: Tap water is fine, but let it sit out for a few hours to allow chlorine to dissipate.
* Potting Soil: For planting the slips once they’ve developed roots.
* Pots or Garden Bed: Somewhere to plant your sweet potato vines.
* Optional: Rooting Hormone: This can speed up the rooting process, but it’s not essential.
* Spray Bottle: For misting the slips.
Preparing Your Sweet Potato
Okay, let’s get started with prepping our sweet potatoes. This is the most important part, so pay close attention!
1. Choose Your Sweet Potato: Select a healthy-looking sweet potato. If it already has “eyes” (small bumps where sprouts will emerge), that’s a bonus! Even if it doesn’t, don’t worry, it will still work.
2. Cut the Sweet Potato (Optional): You can grow a whole sweet potato, but I find that cutting it in half or even into thirds encourages more sprouts. If you cut it, make sure each piece has at least one “eye” or potential sprouting point.
3. Insert Toothpicks: This is where the toothpicks come in. Insert 3-4 toothpicks evenly spaced around the middle of the sweet potato. These will act as supports to suspend the potato in the water.
4. Submerge in Water: Place the sweet potato in your jar or glass, pointy end down (if applicable), and fill with water until the bottom half of the potato is submerged. The top half should remain dry.
Sprouting Your Sweet Potato
Now comes the waiting game! But don’t worry, it’s a fun waiting game where you get to watch life emerge.
1. Find a Sunny Spot: Place your jar with the sweet potato in a warm, sunny location. A windowsill is perfect.
2. Change the Water Regularly: Change the water every 2-3 days to prevent it from getting cloudy and to provide fresh oxygen.
3. Be Patient: It can take anywhere from a few days to a few weeks for sprouts to appear. Don’t give up! Keep the water fresh and the potato in a sunny spot.
4. Watch for Sprouts and Roots: You’ll start to see small sprouts (slips) emerging from the top of the sweet potato. At the same time, roots will start to grow from the bottom.
Harvesting and Rooting the Slips
Once your slips are a few inches tall and have a good set of leaves, it’s time to harvest them and encourage them to grow their own roots.
1. Gently Remove the Slips: Once the slips are 4-6 inches long, gently twist and pull them off the sweet potato. Try to get as much of the base of the slip as possible.
2. Rooting in Water (Method 1): Place the slips in a glass of water, making sure the bottom inch or two of the stem is submerged. Change the water every 1-2 days. Roots should start to appear within a week or two.
3. Rooting in Soil (Method 2): You can also root the slips directly in soil. Dip the cut end of the slip in rooting hormone (optional) and plant it in a small pot filled with moist potting soil. Keep the soil consistently moist and mist the leaves regularly.
4. Provide Humidity: Whether you’re rooting in water or soil, providing extra humidity can help the slips root faster. You can cover the slips with a clear plastic bag or dome to create a mini-greenhouse. Just make sure to vent it occasionally to prevent mold growth.
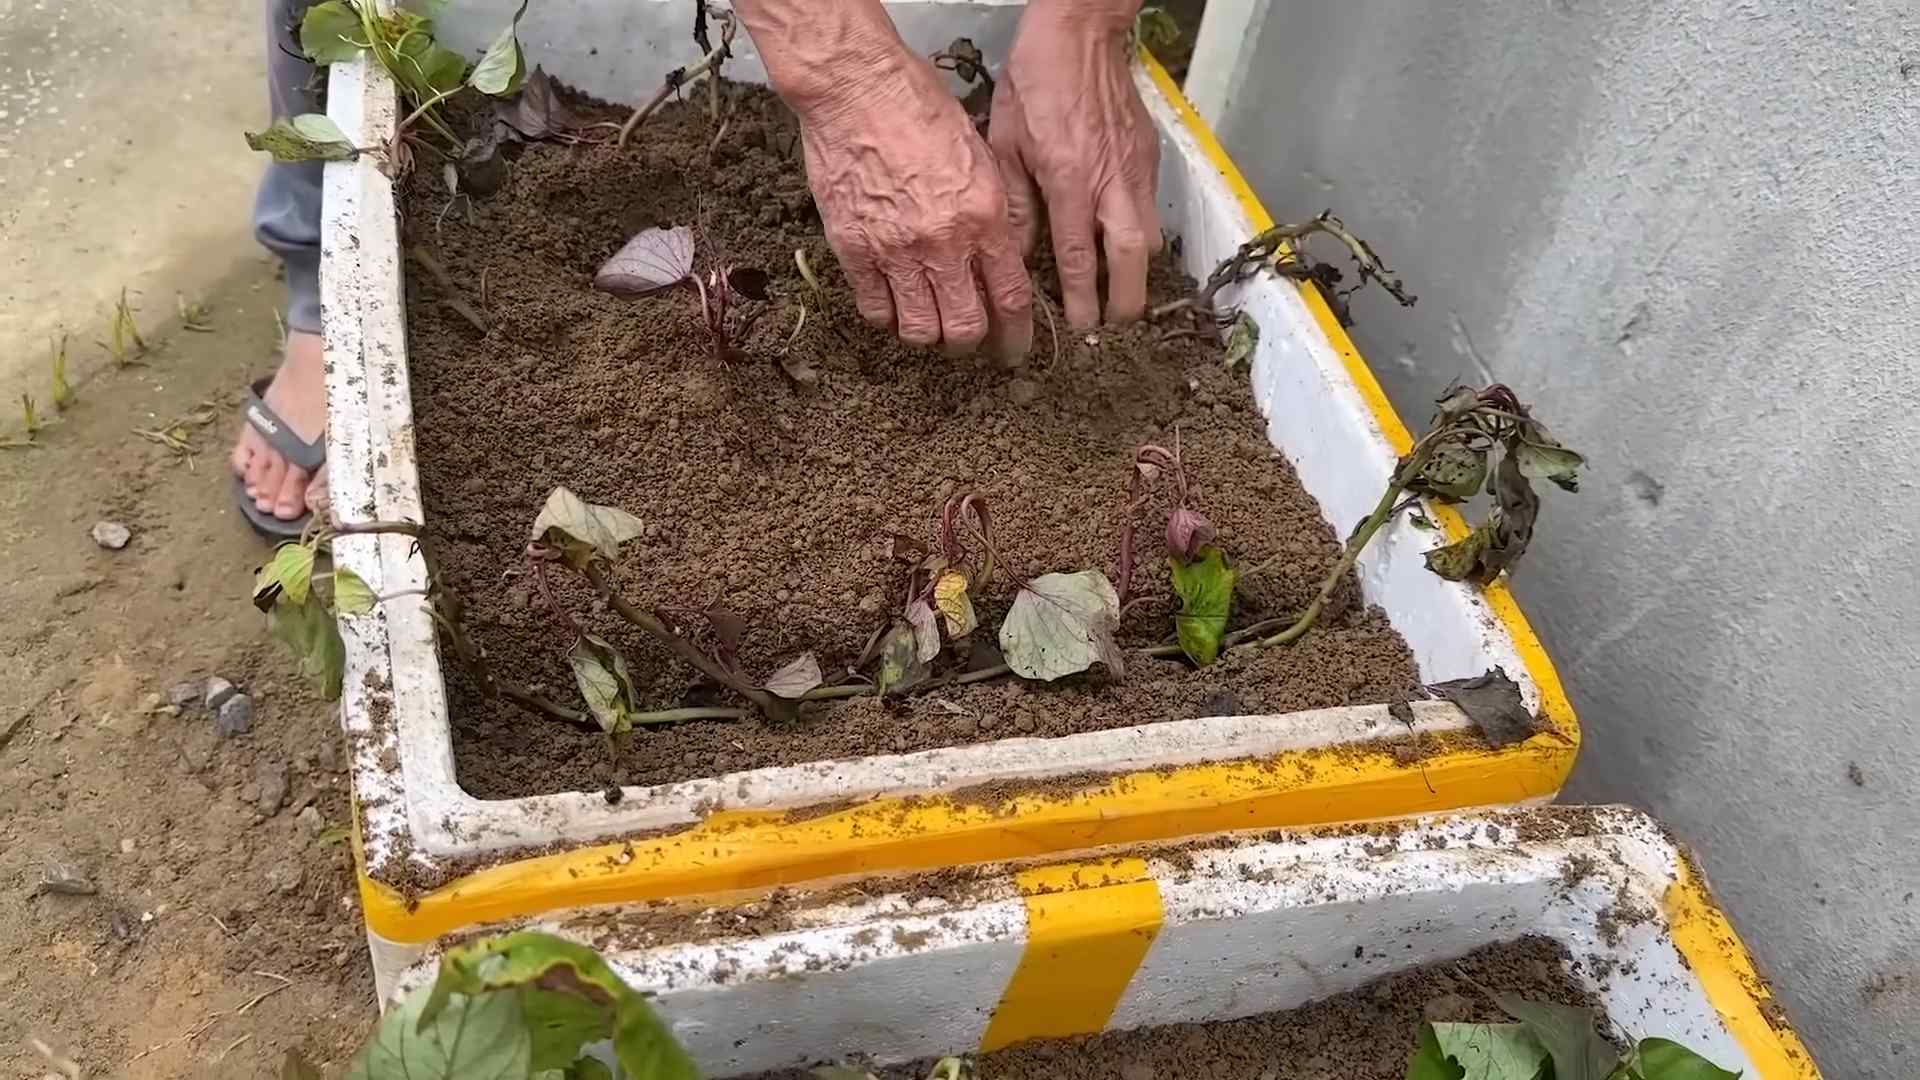
Planting Your Sweet Potato Slips
Once your slips have developed a good root system (at least an inch or two long), they’re ready to be planted in their permanent home.
1. Choose a Sunny Location: Sweet potatoes need at least 6-8 hours of sunlight per day.
2. Prepare the Soil: Sweet potatoes prefer well-drained, sandy loam soil. Amend your soil with compost or other organic matter to improve drainage and fertility.
3. Plant the Slips: Dig a small hole and plant the slip, burying the roots and the bottom inch or two of the stem. Space the slips about 12-18 inches apart.
4. Water Thoroughly: Water the newly planted slips thoroughly.
5. Mulch (Optional): Mulching around the plants can help retain moisture, suppress weeds, and regulate soil temperature.
6. Water Regularly: Keep the soil consistently moist, especially during the first few weeks after planting.
7. Fertilize (Optional): Sweet potatoes are not heavy feeders, but you can fertilize them with a balanced fertilizer a few weeks after planting. Avoid fertilizers that are high in nitrogen, as this can encourage excessive vine growth at the expense of tuber development.
Caring for Your Sweet Potato Plants
Now that your sweet potato plants are in the ground, it’s time to give them some TLC.
1. Watering: Water regularly, especially during dry spells. Sweet potatoes need consistent moisture to produce a good crop.
2. Weeding: Keep the area around your sweet potato plants free of weeds. Weeds can compete with the plants for nutrients and water.
3. Pest Control: Sweet potatoes are relatively pest-resistant, but they can be susceptible to certain pests, such as sweet potato weevils and flea beetles. Inspect your plants regularly and take action if you see any signs of pests.
4. Vine Management: Sweet potato vines can grow quite long and sprawling. You can prune them back to encourage tuber development. You can also train the vines to grow along a trellis or fence.
Harvesting Your Sweet Potatoes
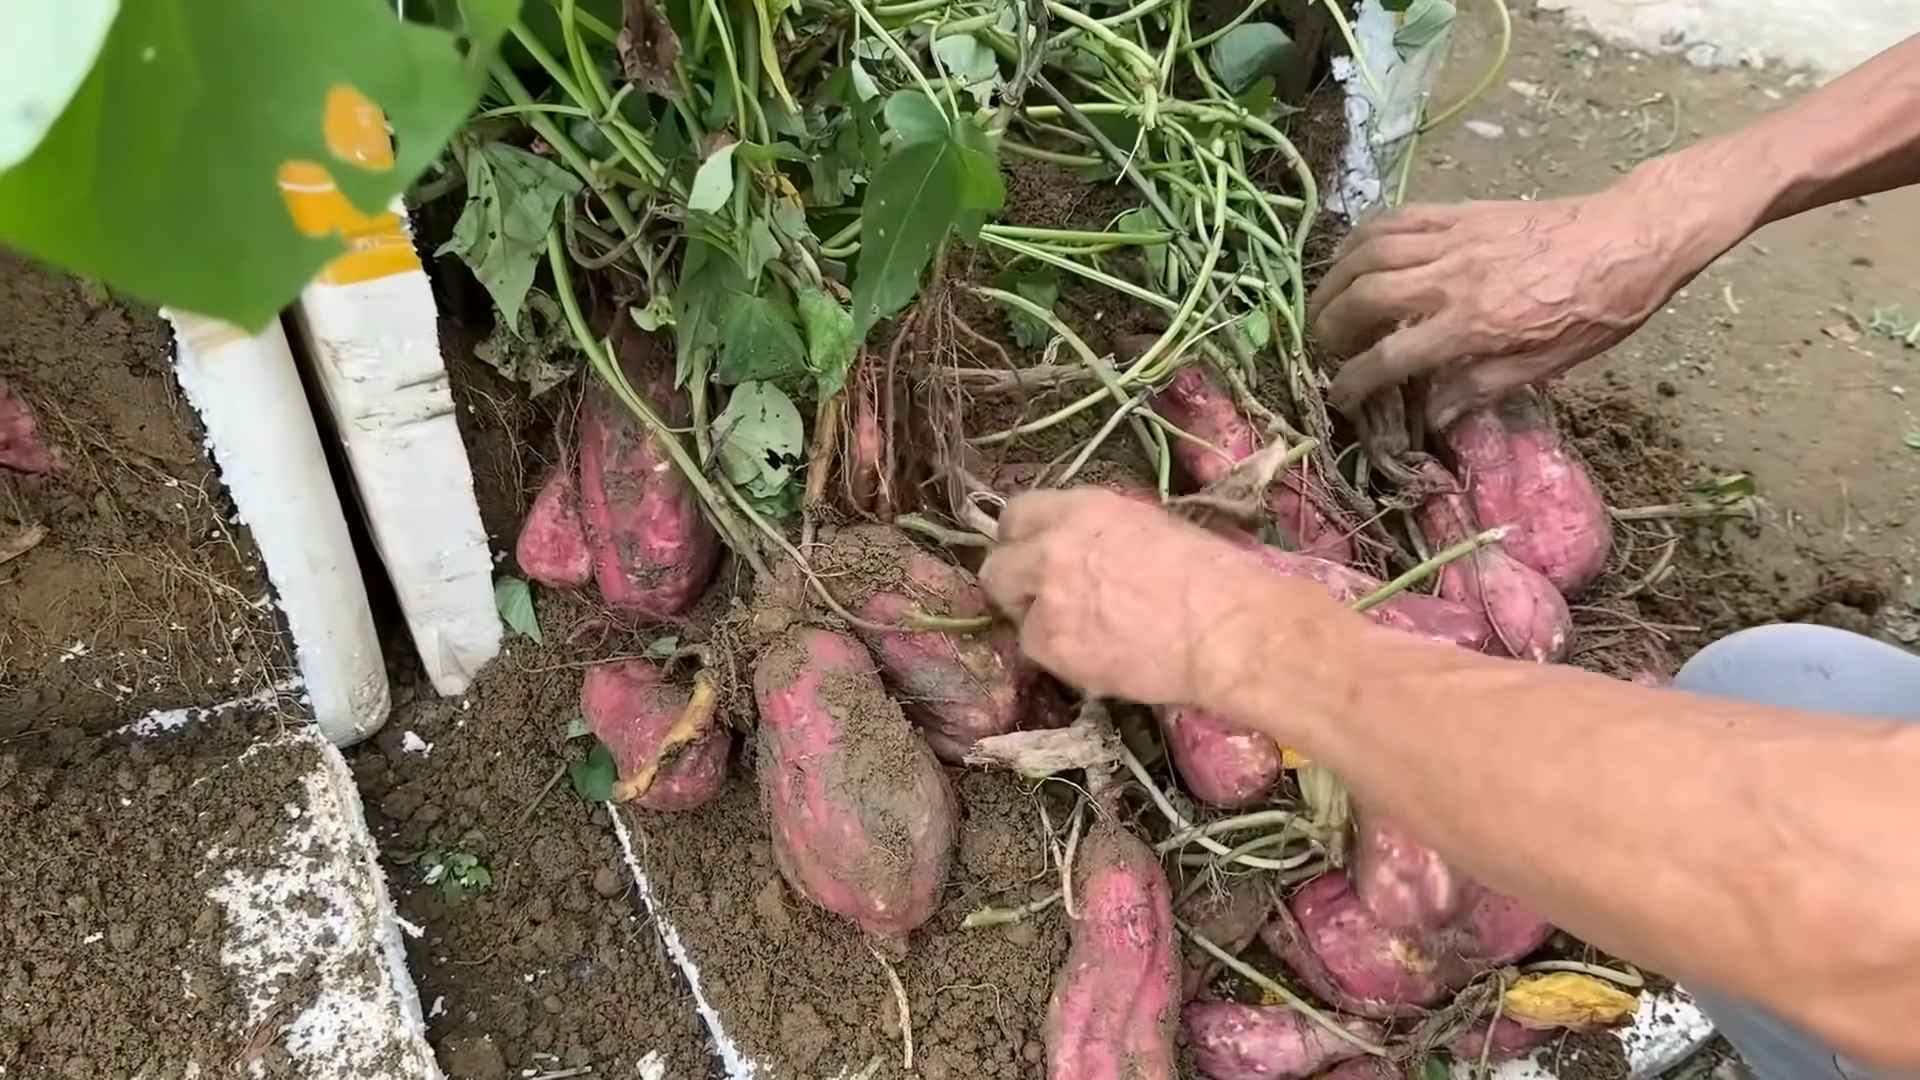
The moment we’ve all been waiting for! Harvesting your sweet potatoes is the most rewarding part of the process.
1. Timing: Sweet potatoes are typically ready to harvest about 90-120 days after planting. The leaves will start to turn yellow and the vines will begin to die back.
2. Dig Carefully: Use a garden fork or shovel to carefully dig around the plants, being careful not to damage the tubers.
3. Lift the Tubers: Gently lift the tubers from the soil.
4. Curing: Curing sweet potatoes is essential for improving their flavor and storage life. Place the harvested sweet potatoes in a warm, humid place (80-85°F and 85-90% humidity) for about a week. This will allow the skins to harden and the starches to convert to sugars.
5. Storage: After curing, store the sweet potatoes in a cool, dry, and dark place (55-60°F). They should keep for several months.
Troubleshooting
Sometimes things don’t go exactly as planned. Here are a few common problems you might encounter and how to fix them:
* Slips Not Sprouting: Make sure the sweet potato is in a warm, sunny location and that the water is changed regularly. If it’s been several weeks and you still don’t see any sprouts, try a different sweet potato.
* Slips Rotting: This is usually caused by overwatering or poor drainage. Make sure the soil is well-drained and avoid overwatering.
* Pests: Inspect your plants regularly and take action if you see any signs of pests. Insecticidal soap or neem oil can be effective for controlling many common pests.
* Poor Tuber Development: This can be caused by a variety of factors, including poor soil, insufficient sunlight, or excessive nitrogen fertilization. Make sure your soil is well-drained and fertile, that your plants are getting plenty of sunlight, and that you’re not over-fertilizing with nitrogen.
Extra Tips and Tricks
Here are a few extra tips and tricks to help you grow the best sweet potatoes ever:
*
Conclusion
So, there you have it! This simple, yet incredibly effective sweet potato growing hack is more than just a gardening tip; it’s a gateway to a bountiful harvest of delicious, homegrown sweet potatoes. We’ve walked you through the process, highlighting the ease and affordability of transforming a single sweet potato into a thriving slip-producing machine. Forget expensive seedlings and unpredictable yields – this method puts you in control, allowing you to cultivate a garden bursting with vibrant, healthy sweet potato plants.
Why is this a must-try? Because it’s efficient, cost-effective, and deeply rewarding. Imagine the satisfaction of nurturing your own sweet potato slips from a single tuber, knowing exactly where your food comes from and how it was grown. It’s a sustainable approach to gardening that minimizes waste and maximizes your harvest. Plus, it’s a fantastic learning experience for gardeners of all levels, from seasoned pros to curious beginners.
But the beauty of this sweet potato growing hack lies not only in its simplicity but also in its adaptability. Feel free to experiment with different varieties of sweet potatoes to discover your favorites. Some gardeners have found success using organic sweet potatoes for even healthier slips. You can also adjust the water level and light exposure to optimize slip production based on your local climate and growing conditions. Consider using a rooting hormone to encourage faster root development on your slips before transplanting them into the garden.
Don’t be afraid to get creative! Try growing your slips in different containers, from repurposed jars to decorative vases. You can even turn it into a fun science project for kids, teaching them about plant propagation and the wonders of nature. The possibilities are endless!
We wholeheartedly encourage you to give this sweet potato growing hack a try. It’s a game-changer for anyone looking to grow their own sweet potatoes, offering a reliable and rewarding way to cultivate these nutritious and versatile vegetables. Once you’ve experienced the joy of harvesting your own homegrown sweet potatoes, you’ll never look back.
And most importantly, we want to hear about your experience! Share your photos, tips, and stories with us in the comments below. Let us know what worked for you, what challenges you faced, and any variations you tried. Your feedback will not only help other gardeners but also contribute to our collective knowledge of this amazing sweet potato growing hack. Let’s build a community of thriving sweet potato growers together! So go ahead, grab a sweet potato, and get growing! You’ll be amazed at what you can achieve.
Frequently Asked Questions (FAQ)
Q: What kind of sweet potato should I use for this hack?
A: Ideally, you should use an organic sweet potato. Non-organic sweet potatoes are sometimes treated to prevent sprouting, which can hinder slip production. However, many gardeners have successfully grown slips from non-organic sweet potatoes as well. If using a non-organic sweet potato, wash it thoroughly before starting the process. Experimenting with different varieties is also encouraged to see which works best in your local climate.
Q: How long does it take for sweet potato slips to grow?
A: The time it takes for slips to grow varies depending on several factors, including the variety of sweet potato, temperature, and light exposure. Generally, you can expect to see slips emerging within 2-4 weeks. Warmer temperatures and ample sunlight will accelerate the process. Be patient and ensure the sweet potato has consistent access to water.
Q: What if my sweet potato starts to rot?
A: If you notice any signs of rot, such as soft spots or mold, remove the affected area immediately. Change the water frequently (every 1-2 days) to prevent further rot. Ensure that only the bottom portion of the sweet potato is submerged in water. If the rot persists, it might be best to start with a fresh sweet potato.
Q: How many slips can I get from one sweet potato?
A: The number of slips you can get from one sweet potato depends on its size and variety. A medium-sized sweet potato can typically produce anywhere from 10 to 20 slips, or even more under optimal conditions. The more sprouts that emerge, the more slips you’ll be able to harvest.
Q: When are the slips ready to be transplanted into the garden?
A: The slips are ready to be transplanted when they are about 6-8 inches long and have developed a good root system. Gently twist or cut the slips off the sweet potato, being careful not to damage the roots. You can also place the slips in a glass of water for a few days to encourage further root development before transplanting.
Q: What kind of soil is best for growing sweet potatoes?
A: Sweet potatoes thrive in well-drained, sandy loam soil. Avoid heavy clay soils, as they can hinder root development. Amend your soil with compost or other organic matter to improve drainage and fertility. Sweet potatoes prefer a slightly acidic soil pH between 6.0 and 6.5.
Q: How much sunlight do sweet potatoes need?
A: Sweet potatoes need at least 6-8 hours of direct sunlight per day to thrive. Choose a sunny location in your garden for planting. Insufficient sunlight can result in smaller yields and less flavorful sweet potatoes.
Q: How often should I water sweet potatoes?
A: Water sweet potatoes regularly, especially during dry periods. Keep the soil consistently moist, but avoid overwatering, which can lead to root rot. A good rule of thumb is to water deeply once or twice a week, depending on the weather conditions.
Q: Are there any common pests or diseases that affect sweet potatoes?
A: Sweet potatoes can be susceptible to pests such as sweet potato weevils, flea beetles, and wireworms. Common diseases include stem rot and black rot. Practice crop rotation and use organic pest control methods to minimize problems. Inspect your plants regularly for signs of pests or diseases and take action promptly.
Q: Can I grow sweet potatoes in containers?
A: Yes, you can grow sweet potatoes in containers, but you’ll need a large container (at least 20 gallons) to accommodate their extensive root system. Choose a container with good drainage and fill it with well-draining potting mix. Provide adequate sunlight and water regularly. Container-grown sweet potatoes may not produce as large of a yield as those grown in the ground, but it’s a great option for gardeners with limited space.
Q: How do I know when my sweet potatoes are ready to harvest?
A: Sweet potatoes are typically ready to harvest about 90-120 days after planting the slips. The leaves will start to turn yellow and the vines may begin to die back. To check for readiness, carefully dig around one plant and feel the size of the potatoes. Harvest on a dry day and handle the sweet potatoes gently to avoid bruising.
Q: How should I cure and store my sweet potatoes?
A: Curing sweet potatoes is essential for improving their flavor and storage life. After harvesting, allow the sweet potatoes to dry in a warm, humid place (80-85°F and 85-90% humidity) for about 7-10 days. This allows the skins to harden and any minor cuts or bruises to heal. After curing, store the sweet potatoes in a cool, dry, and dark place (55-60°F) with good ventilation. Properly cured and stored sweet potatoes can last for several months.
Leave a Comment