

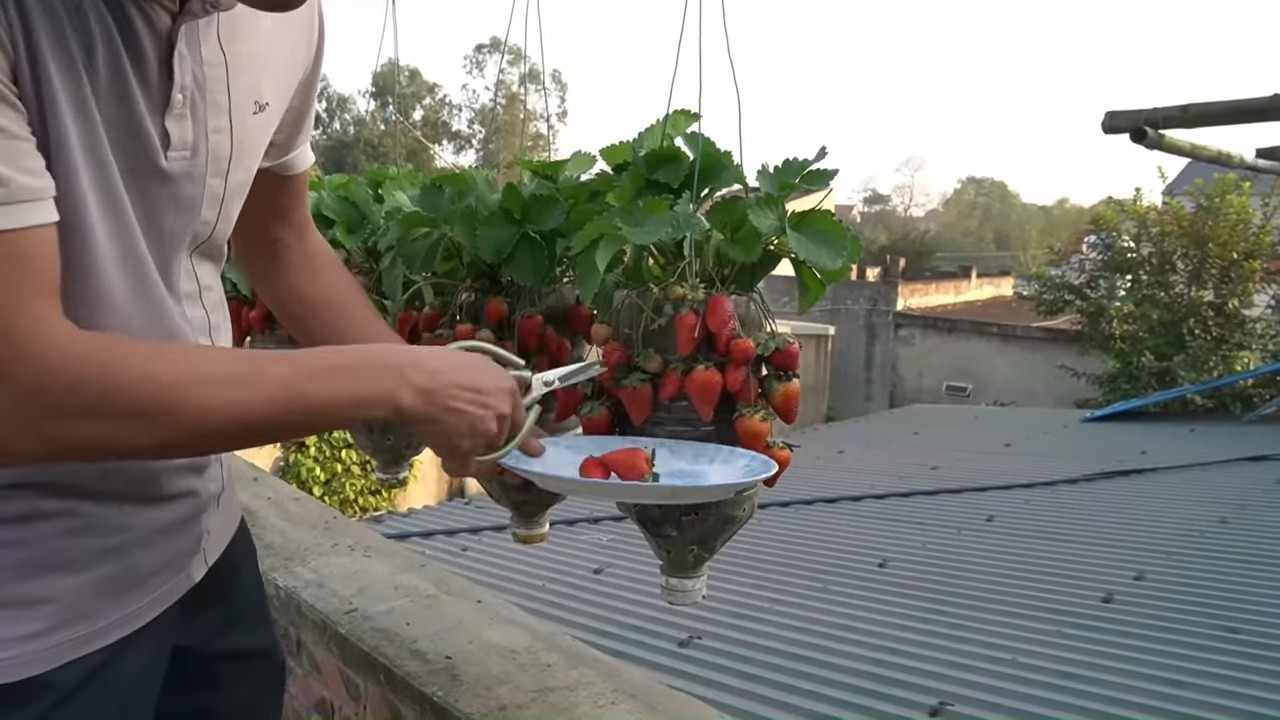
Strawberry plastic bottle gardening: Ever dream of plucking juicy, sun-ripened strawberries right from your own backyard, or even your balcony? I know I have! But the thought of sprawling gardens and endless weeding can be a bit daunting, right? Well, what if I told you there’s a super simple, space-saving, and budget-friendly way to make that dream a reality?
For centuries, humans have cultivated strawberries, cherishing their sweet taste and vibrant color. From ancient Roman gardens to modern-day farms, these little red gems have always held a special place in our hearts (and stomachs!). But you don’t need acres of land to enjoy the fruits of your labor.
That’s where this DIY trick comes in! Strawberry plastic bottle gardening is the perfect solution for urban dwellers, apartment residents, or anyone looking to maximize their gardening potential with minimal effort. Not only is it incredibly easy to set up, but it also repurposes those pesky plastic bottles, turning them into thriving vertical gardens. Imagine the satisfaction of transforming waste into a bountiful harvest! Plus, it’s a fantastic project to get the kids involved in, teaching them about sustainability and the joy of growing their own food. So, ditch the store-bought berries and get ready to embark on a fun and rewarding gardening adventure – one plastic bottle at a time!
Erdbeeranbau im DIY-Stil: So machst du deinen eigenen Erdbeerturm aus Plastikflaschen
Hallo liebe Gartenfreunde! Habt ihr Lust auf frische, saftige Erdbeeren direkt aus dem eigenen Garten, aber wenig Platz? Dann habe ich genau das Richtige für euch: einen Erdbeerturm aus recycelten Plastikflaschen! Das ist nicht nur super nachhaltig, sondern auch ein echter Hingucker. Ich zeige euch, wie ihr diesen vertikalen Garten ganz einfach selbst bauen könnt. Los geht’s!
Was du brauchst: Die Materialliste
Bevor wir loslegen, hier eine Liste mit allen Materialien, die du für dein Erdbeerturm-Projekt benötigst:
* Viele Plastikflaschen: Am besten eignen sich 1,5-Liter-Flaschen. Je mehr Flaschen, desto höher wird dein Turm. Ich empfehle mindestens 10-15 Flaschen für einen ansehnlichen Turm. Achte darauf, dass die Flaschen sauber und trocken sind.
* Ein scharfes Messer oder eine Schere: Zum Schneiden der Löcher in die Flaschen. Ein Cuttermesser ist ideal, aber sei vorsichtig!
* Ein Bohrer oder ein Nagel: Um Löcher für die Entwässerung zu bohren.
* Erde: Hochwertige Blumenerde ist wichtig für das Wachstum deiner Erdbeeren.
* Erdbeerpflanzen: Wähle robuste Sorten, die sich für den Anbau im Topf eignen. Frag am besten in deiner Gärtnerei nach.
* Kies oder Blähton: Für die Drainage am Boden der Flaschen.
* Gießkanne: Zum Bewässern deiner Erdbeeren.
* Handschuhe: Zum Schutz deiner Hände beim Befüllen der Flaschen mit Erde.
* Optional: Sprühfarbe, um die Flaschen zu bemalen und den Turm optisch aufzuwerten.
Schritt-für-Schritt-Anleitung: So baust du deinen Erdbeerturm
Jetzt geht’s ans Eingemachte! Folge diesen Schritten, um deinen eigenen Erdbeerturm zu bauen:
1. Vorbereitung der Flaschen
1. Reinigung: Stelle sicher, dass alle Plastikflaschen sauber und trocken sind. Entferne Etiketten und Klebereste.
2. Löcher schneiden:
* Nimm eine Flasche und markiere mit einem Stift einen Kreis oder ein Rechteck auf der Seite der Flasche. Die Größe des Lochs sollte ausreichend sein, um eine Erdbeerpflanze hindurchzustecken. Ich empfehle einen Durchmesser von etwa 8-10 cm.
* Schneide das Loch vorsichtig mit dem Messer oder der Schere aus. Wiederhole diesen Schritt für alle Flaschen, die du für den Turm verwenden möchtest. Achte darauf, dass die Löcher in den Flaschen versetzt angeordnet sind, damit die Pflanzen später genügend Licht bekommen.
3. Drainagelöcher bohren:
* Bohre mit dem Bohrer oder dem Nagel mehrere kleine Löcher in den Boden jeder Flasche. Diese Löcher sorgen für eine gute Entwässerung und verhindern Staunässe.
2. Aufbau des Turms
1. Die erste Flasche: Stelle die erste Flasche auf den Boden. Sie bildet die Basis deines Turms.
2. Drainage: Fülle die erste Flasche mit einer Schicht Kies oder Blähton. Das sorgt für eine gute Drainage und verhindert, dass die Erde zu nass wird.
3. Erde einfüllen: Fülle die Flasche mit hochwertiger Blumenerde. Lass oben noch etwas Platz, damit du die Erdbeerpflanze später gut einsetzen kannst.
4. Die zweite Flasche: Schneide den Boden der zweiten Flasche ab. Das geht am besten mit einem scharfen Messer oder einer Schere. Achte darauf, dass der Schnitt sauber ist, damit du dich nicht verletzt.
5. Aufsetzen: Setze die zweite Flasche mit dem abgeschnittenen Boden auf die erste Flasche. Die Öffnung der zweiten Flasche sollte nach unten zeigen.
6. Wiederholen: Wiederhole die Schritte 4 und 5 für alle weiteren Flaschen, bis dein Turm die gewünschte Höhe erreicht hat. Achte darauf, dass der Turm stabil steht und nicht umkippen kann.
3. Bepflanzung
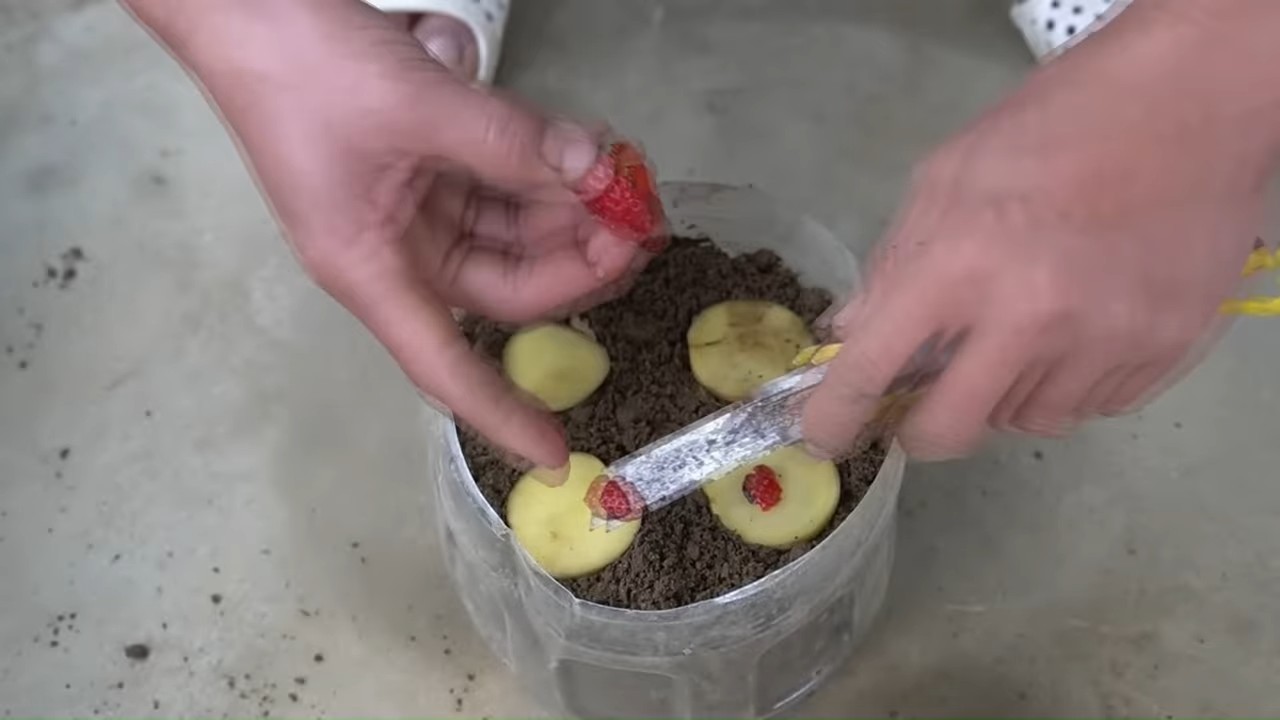
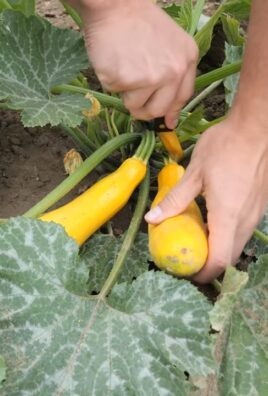
1. Erdbeerpflanzen vorbereiten: Nimm die Erdbeerpflanzen aus ihren Töpfen und lockere die Wurzeln vorsichtig auf.
2. Einsetzen: Stecke die Erdbeerpflanzen vorsichtig durch die Löcher in den Flaschen. Achte darauf, dass die Wurzeln gut mit Erde bedeckt sind.
3. Auffüllen: Fülle die Flaschen mit Erde auf, bis die Wurzeln der Erdbeerpflanzen vollständig bedeckt sind.
4. Gießen: Gieße die Erdbeerpflanzen gründlich an.
4. Pflege
1. Standort: Stelle deinen Erdbeerturm an einen sonnigen Standort. Erdbeeren brauchen viel Sonne, um gut zu wachsen und Früchte zu tragen.
2. Bewässerung: Gieße deine Erdbeeren regelmäßig, besonders an heißen Tagen. Achte darauf, dass die Erde immer leicht feucht ist, aber nicht zu nass.
3. Düngung: Dünge deine Erdbeeren regelmäßig mit einem speziellen Erdbeerdünger. Das sorgt für eine reiche Ernte.
4. Schutz: Schütze deine Erdbeeren vor Schädlingen und Krankheiten. Kontrolliere die Pflanzen regelmäßig und entferne befallene Blätter oder Früchte.
5. Ernte: Ernte deine Erdbeeren, sobald sie reif sind. Reife Erdbeeren sind rot und duften aromatisch.
Zusätzliche Tipps und Tricks für deinen Erdbeerturm
* Farbgestaltung: Du kannst die Plastikflaschen vor dem Aufbau des Turms mit Sprühfarbe bemalen. Das macht den Turm zu einem echten Hingucker. Achte darauf, dass du ungiftige Farbe verwendest.
* Sortenwahl: Wähle Erdbeersorten, die sich für den Anbau im Topf eignen. Es gibt viele verschiedene Sorten, die sich in Geschmack, Größe und Erntezeit unterscheiden. Lass dich am besten in deiner Gärtnerei beraten.
* Schneckenabwehr: Schnecken lieben Erdbeeren! Schütze deine Pflanzen mit Schneckenkorn oder Schneckenzäunen.
* Vogelabwehr: Auch Vögel naschen gerne an Erdbeeren. Schütze deine Pflanzen mit einem Netz.
* Überwinterung: Erdbeeren sind mehrjährig. Du kannst deinen Erdbeerturm im Winter draußen stehen lassen, aber schütze die Pflanzen vor Frost. Decke sie mit Reisig oder Stroh ab.
Häufige Fehler und wie du sie vermeidest
* Staunässe: Achte darauf, dass die Flaschen eine gute Drainage haben, um Staunässe zu vermeiden. Staunässe kann zu Wurzelfäule führen.
* Zu wenig Sonne: Erdbeeren brauchen viel Sonne, um gut zu wachsen und Früchte zu tragen. Stelle deinen Erdbeerturm an einen sonnigen Standort.
* Falsche Erde: Verwende hochwertige Blumenerde, die speziell für Erdbeeren geeignet ist.
* Zu wenig Dünger: Dünge deine Erdbeeren regelmäßig mit einem speziellen Erdbeerdünger.
* Schädlinge und Krankheiten: Kontrolliere deine Pflanzen regelmäßig auf Schädlinge und Krankheiten und bekämpfe sie bei Bedarf.
Fazit
Mit diesem DIY-Erdbeerturm aus Plastikflaschen kannst du auch auf kleinstem Raum frische Erdbeeren anbauen. Es ist ein tolles Projekt, um alte Plastikflaschen wiederzuverwenden und gleichzeitig deinen Garten oder Balkon zu verschönern. Ich wünsche dir viel Spaß beim Bauen und eine reiche Ernte!
Conclusion
So, there you have it! Transforming ordinary plastic bottles into a thriving vertical strawberry garden is not just a fun project; it’s a sustainable, space-saving, and incredibly rewarding way to enjoy fresh, homegrown strawberries. We’ve walked you through the simple steps, from preparing your bottles to planting your seedlings, and hopefully, you’re feeling inspired to give it a try.
Why is this DIY trick a must-try? Because it addresses so many common gardening challenges. Limited space? No problem! This vertical system maximizes your growing area, making it perfect for balconies, patios, or even small indoor spaces with sufficient sunlight. Worried about pests and soil-borne diseases? The elevated structure helps to keep your precious strawberry plants away from ground-level threats. And let’s not forget the environmental benefits – you’re repurposing plastic bottles, reducing waste, and contributing to a greener planet.
But the best part? The taste of those sun-ripened, juicy strawberries you’ve grown yourself. There’s simply nothing like it.
Now, let’s talk about variations and suggestions to truly personalize your **strawberry plastic bottle gardening** experience.
* Experiment with different bottle sizes: While we’ve focused on standard plastic bottles, feel free to use larger containers for bigger plants or to create a more dramatic visual effect.
* Consider different strawberry varieties: Everbearing strawberries are a great choice for continuous harvests throughout the season, while June-bearing varieties offer a larger crop all at once. Research which varieties thrive in your local climate.
* Add companion plants: Plant herbs like basil or thyme alongside your strawberries to deter pests and enhance flavor. Marigolds are also excellent companion plants for their pest-repelling properties.
* Get creative with your design: Paint the bottles in vibrant colors, add decorative elements, or arrange them in unique patterns to create a stunning vertical garden display.
* Automate your watering system: For a truly low-maintenance setup, consider adding a simple drip irrigation system to ensure your plants receive consistent moisture.
This is more than just a gardening project; it’s an opportunity to connect with nature, learn new skills, and enjoy the fruits (literally!) of your labor. Don’t be afraid to experiment, adapt, and make it your own.
We are confident that you will find this project to be both enjoyable and rewarding. So, gather your supplies, unleash your creativity, and get ready to embark on your own strawberry plastic bottle gardening adventure!
We’d love to hear about your experiences! Share your photos, tips, and challenges in the comments below. Let’s build a community of passionate gardeners who are transforming waste into wonderful harvests. Happy gardening!
Frequently Asked Questions (FAQ)
What type of plastic bottles are best for strawberry plastic bottle gardening?
Ideally, you should use food-grade plastic bottles, such as those used for water, juice, or soda. These are generally made from PET (polyethylene terephthalate) or HDPE (high-density polyethylene), which are considered safe for growing food. Avoid using bottles that have contained harsh chemicals or cleaning products. Thoroughly wash and rinse the bottles before using them for planting. The size of the bottle will depend on the size of the strawberry plant you intend to grow. Smaller bottles are suitable for smaller varieties, while larger bottles can accommodate larger, more established plants.
How do I ensure proper drainage in my plastic bottle garden?
Proper drainage is crucial to prevent root rot and ensure healthy plant growth. When creating your planting holes, make sure to include drainage holes at the bottom of each bottle. You can use a drill, a nail, or even a pair of scissors to create these holes. A good rule of thumb is to have at least three to four drainage holes per bottle. Additionally, you can add a layer of gravel or small stones at the bottom of each bottle to further improve drainage. This will help to prevent the soil from becoming waterlogged.
What type of soil should I use for my strawberry plants?
Strawberries thrive in well-draining, slightly acidic soil. A good potting mix specifically formulated for fruits and vegetables is an excellent choice. You can also create your own soil mix by combining equal parts of potting soil, compost, and perlite or vermiculite. Compost provides essential nutrients, while perlite or vermiculite improves drainage and aeration. Avoid using garden soil, as it can be too heavy and may contain pests or diseases. Before planting, amend the soil with a slow-release fertilizer to provide your strawberry plants with a steady supply of nutrients.
How much sunlight do strawberry plants need?
Strawberry plants require at least six to eight hours of direct sunlight per day to produce abundant fruit. Choose a location for your plastic bottle garden that receives ample sunlight throughout the day. If you live in a particularly hot climate, you may need to provide some afternoon shade to prevent the plants from overheating. If you are growing your strawberries indoors, supplement with grow lights to ensure they receive sufficient light. Rotate the bottles regularly to ensure that all sides of the plants receive equal exposure to sunlight.
How often should I water my strawberry plants in a plastic bottle garden?
The frequency of watering will depend on several factors, including the weather, the type of soil, and the size of the bottles. Generally, you should water your strawberry plants when the top inch of soil feels dry to the touch. Avoid overwatering, as this can lead to root rot. Water thoroughly, ensuring that the water drains out of the drainage holes. During hot, dry weather, you may need to water your plants more frequently. Consider using a watering can with a long spout to reach the plants in the upper bottles without disturbing the soil.
How do I fertilize my strawberry plants in a plastic bottle garden?
Strawberry plants are heavy feeders and require regular fertilization to produce abundant fruit. Use a balanced fertilizer specifically formulated for fruits and vegetables. Follow the instructions on the fertilizer package for application rates. You can use a slow-release fertilizer at planting time, followed by regular applications of a liquid fertilizer every two to four weeks during the growing season. Avoid over-fertilizing, as this can burn the roots of the plants. Organic fertilizers, such as compost tea or fish emulsion, are also excellent choices for feeding your strawberry plants.
How do I protect my strawberry plants from pests and diseases?
While the elevated structure of a plastic bottle garden helps to reduce the risk of pests and diseases, it’s still important to take preventative measures. Regularly inspect your plants for signs of pests, such as aphids, spider mites, or slugs. If you find any pests, treat them with an appropriate insecticide or horticultural oil. You can also use natural pest control methods, such as introducing beneficial insects like ladybugs or lacewings. To prevent fungal diseases, ensure good air circulation around your plants and avoid overwatering. Remove any dead or diseased leaves promptly.
Can I grow strawberries in plastic bottles indoors?
Yes, you can grow strawberries in plastic bottles indoors, but you will need to provide them with sufficient light. Place your plastic bottle garden near a sunny window that receives at least six to eight hours of direct sunlight per day. If you don’t have enough natural light, supplement with grow lights. Use full-spectrum LED grow lights for best results. You will also need to ensure good air circulation and maintain a consistent temperature. Indoor strawberry plants may require more frequent watering and fertilization than outdoor plants.
How do I overwinter my strawberry plants in a plastic bottle garden?
In colder climates, you will need to protect your strawberry plants from freezing temperatures during the winter. If your plastic bottle garden is portable, you can move it indoors to a cool, bright location. If you cannot move the garden indoors, you can insulate the bottles with burlap or bubble wrap. Mulch around the base of the plants with straw or leaves to protect the roots from freezing. Water sparingly during the winter months, only when the soil is dry to the touch. In the spring, gradually acclimate your plants to outdoor conditions before moving them back to their permanent location.
How long does it take for strawberry plants to produce fruit in a plastic bottle garden?
The time it takes for strawberry plants to produce fruit will depend on the variety of strawberry, the growing conditions, and the age of the plants. Generally, you can expect to harvest your first strawberries within a few months of planting. Everbearing varieties will produce fruit throughout the growing season, while June-bearing varieties will produce a larger crop all at once. Be patient and provide your plants with the care they need, and you will be rewarded with delicious, homegrown strawberries.
Leave a Comment