

Plastic Bottle Cabbage Growing: Ever dreamt of harvesting plump, juicy cabbages right from your own backyard, even if you’re short on space or gardening experience? I know I have! For centuries, cabbage has been a staple in diets around the world, from the hearty stews of Eastern Europe to the vibrant slaws of Asia. But what if I told you there’s a simple, ingenious way to cultivate these leafy greens using something you probably already have lying around – a plastic bottle?
This isn’t just another gardening fad; it’s a practical solution for urban gardeners, beginners, and anyone looking to maximize their yield with minimal effort. Forget about sprawling garden beds and complicated techniques. With this DIY guide, I’ll show you how to transform discarded plastic bottles into mini-greenhouses, creating the perfect environment for your cabbage seedlings to thrive.
Why is this trick so essential? Well, plastic bottle cabbage growing offers several advantages. It protects young plants from pests and harsh weather, promotes faster growth, and allows you to control the soil conditions more effectively. Plus, it’s a fantastic way to recycle and reduce waste! So, grab your scissors and those empty bottles, and let’s embark on this exciting journey to grow delicious, homegrown cabbages with this simple, effective DIY method!
DIY Plastic Bottle Cabbage Growing: A Beginner’s Guide
Hey there, fellow gardening enthusiasts! Ever thought about growing your own cabbage but felt intimidated by the space requirements or the potential for pests? Well, I’ve got a fantastic solution for you: growing cabbage in repurposed plastic bottles! It’s a fun, eco-friendly, and surprisingly effective way to cultivate these leafy greens, even if you’re short on space. I’m going to walk you through the entire process, step-by-step, so you can enjoy fresh, homegrown cabbage right from your own balcony or patio.
Why Grow Cabbage in Plastic Bottles?
Before we dive in, let’s quickly touch on why this method is so great:
* Space-Saving: Perfect for small gardens, balconies, or even indoor growing.
* Upcycling: Gives plastic bottles a new lease on life, reducing waste.
* Pest Control: Easier to monitor and protect your cabbage from pests compared to traditional gardening.
* Portability: You can easily move your cabbage plants to optimal sunlight conditions.
* Cost-Effective: Uses readily available materials, saving you money.
Materials You’ll Need
Alright, let’s gather our supplies. Here’s what you’ll need to get started:
* Plastic Bottles: 2-liter soda bottles or larger water bottles work best. The number of bottles depends on how many cabbage plants you want to grow.
* Cabbage Seeds or Seedlings: Choose your favorite cabbage variety! I personally love growing ‘Golden Acre’ for its compact size and sweet flavor.
* Potting Mix: A well-draining potting mix is crucial for healthy cabbage growth.
* Scissors or Utility Knife: For cutting the plastic bottles.
* Drill or Nail: To create drainage holes.
* Watering Can or Spray Bottle: For watering your cabbage plants.
* Optional:
* Fertilizer (balanced liquid fertilizer)
* Small pebbles or gravel (for drainage)
* Gloves (to protect your hands)
Preparing the Plastic Bottles
This is where we transform those discarded bottles into mini-cabbage containers!
1. Clean the Bottles: Thoroughly wash the plastic bottles with soap and water to remove any residue. Rinse them well and let them dry completely. This is important to prevent any contamination that could harm your plants.
2. Cut the Bottles: There are a couple of ways you can cut the bottles, depending on your preference:
* Option 1 (Vertical Planter): Cut the bottle in half horizontally. You’ll use the bottom half as the planter. The top half can be discarded or used as a mini-greenhouse cover in the early stages.
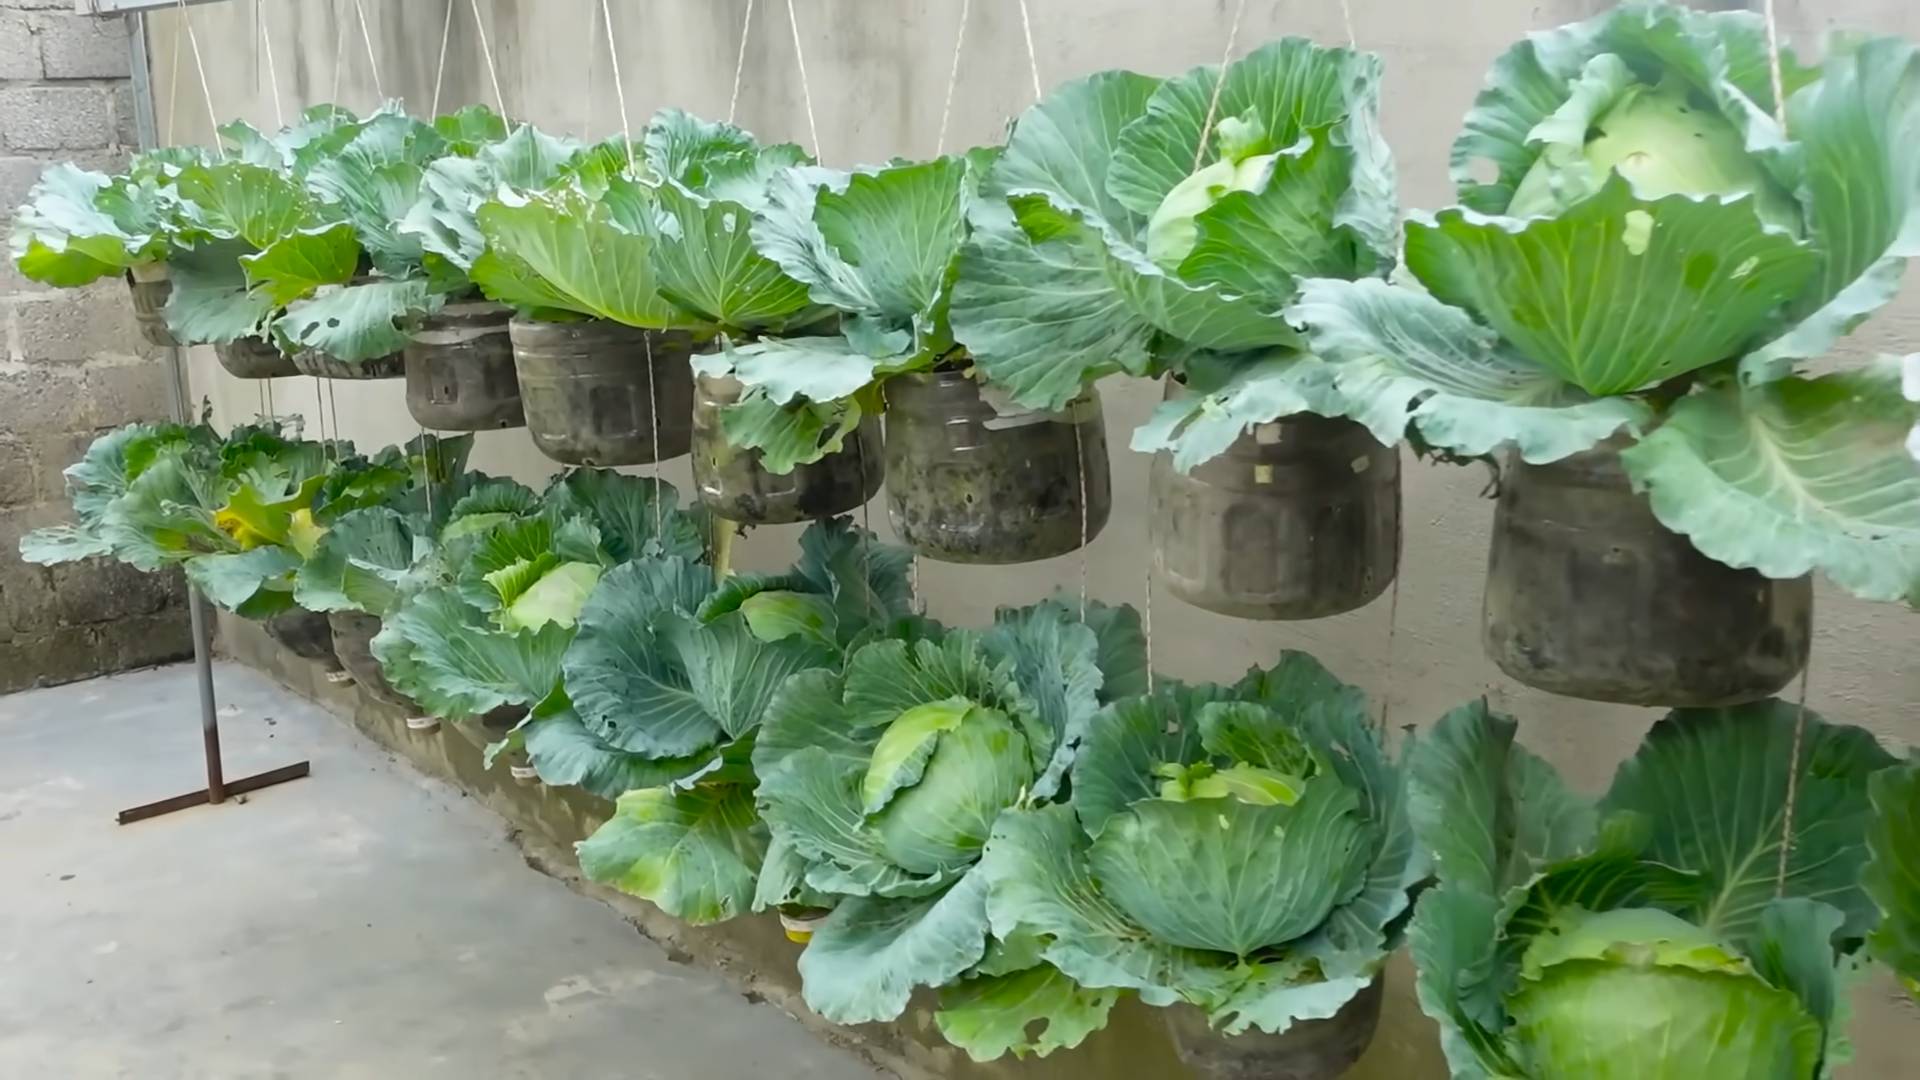
* Option 2 (Hanging Planter): Cut a rectangular opening on one side of the bottle, leaving the top and bottom intact. This creates a “trough” for the soil. You can then create holes near the top to hang the bottle with string or wire.
I personally prefer the vertical planter method because it’s simpler and provides more stability for the cabbage plant.
3. Create Drainage Holes: This is absolutely essential! Cabbage plants need well-draining soil to prevent root rot. Use a drill or a nail to create several drainage holes in the bottom of each bottle. I usually make about 5-6 holes, spaced evenly.
4. Add Drainage Layer (Optional): To further improve drainage, you can add a layer of small pebbles or gravel to the bottom of the bottle before adding the potting mix. This helps prevent the soil from becoming waterlogged.
Planting the Cabbage
Now for the fun part – planting your cabbage!
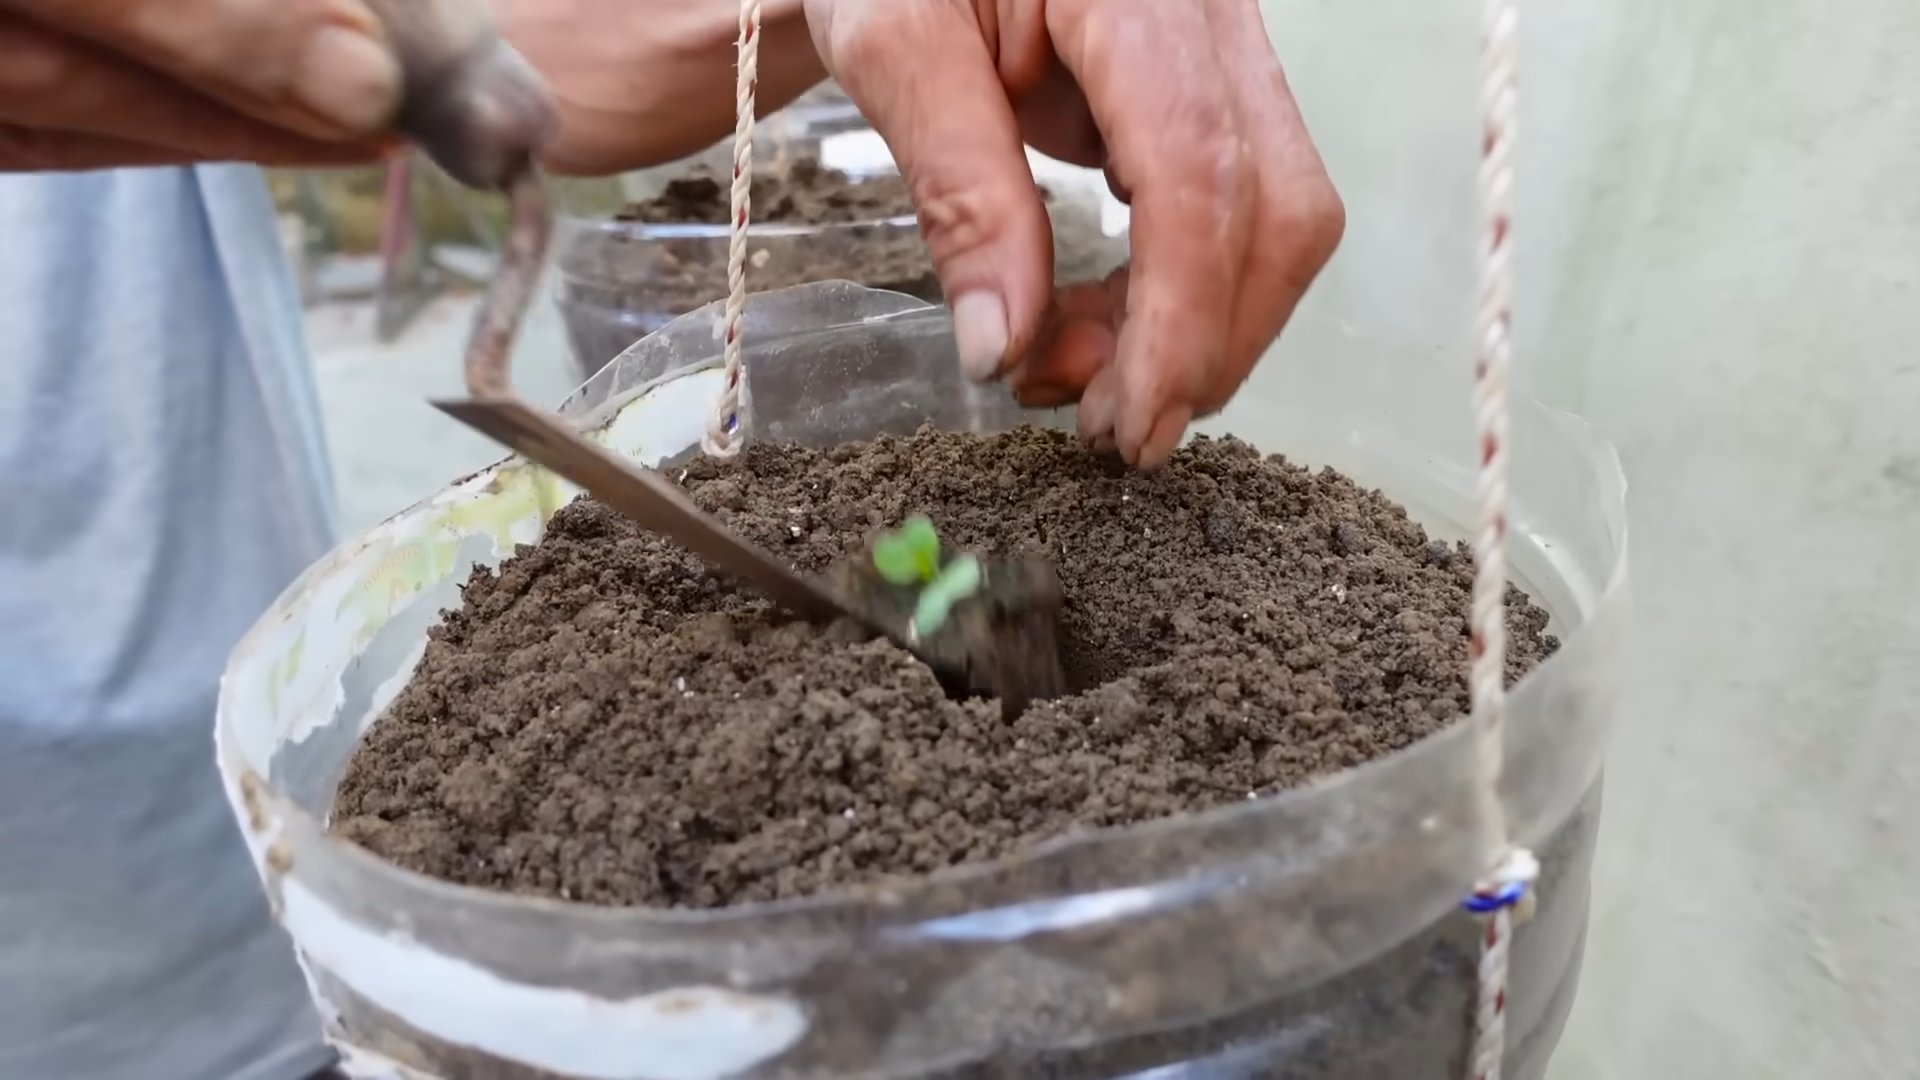
1. Fill with Potting Mix: Fill the prepared plastic bottles with a high-quality potting mix. Leave about an inch of space at the top of the bottle.
2. Plant the Seeds or Seedlings:
* From Seeds: Make a small indentation in the soil (about 1/4 inch deep). Place 2-3 cabbage seeds in each bottle. Gently cover the seeds with soil and water lightly. You’ll need to thin out the seedlings later, keeping only the strongest one.
* From Seedlings: Carefully remove the cabbage seedling from its container. Gently loosen the roots and place the seedling in the center of the bottle. Fill in around the seedling with potting mix, ensuring that the top of the root ball is level with the soil surface. Water thoroughly.
I find that starting with seedlings is a bit easier and faster, but growing from seeds is definitely more rewarding!
3. Water Thoroughly: After planting, water the cabbage plants thoroughly until water drains out of the drainage holes. This helps settle the soil and ensures that the roots are well-hydrated.
Caring for Your Cabbage Plants
Cabbage plants need consistent care to thrive. Here’s what you need to do:
1. Sunlight: Cabbage plants need at least 6 hours of sunlight per day. Place your plastic bottle planters in a sunny location, such as a balcony, patio, or windowsill. If you’re growing indoors, you may need to supplement with grow lights.
2. Watering: Water your cabbage plants regularly, especially during hot and dry weather. The soil should be consistently moist, but not waterlogged. Check the soil moisture by sticking your finger into the soil. If the top inch feels dry, it’s time to water.
3. Fertilizing: Cabbage plants are heavy feeders and benefit from regular fertilization. Use a balanced liquid fertilizer (e.g., 10-10-10) diluted to half strength. Fertilize every 2-3 weeks, following the instructions on the fertilizer label.
4. Pest Control: Keep an eye out for common cabbage pests, such as cabbage worms, aphids, and slugs. You can handpick pests off the plants, use insecticidal soap, or apply Bacillus thuringiensis (Bt) for cabbage worms. Because the plants are in containers, it’s easier to monitor and control pests.
5. Thinning (if starting from seeds): Once the seedlings have developed a few true leaves, thin them out, leaving only the strongest seedling in each bottle. Gently snip off the weaker seedlings at the soil level.
6. Rotating: If you’re growing your cabbage plants on a windowsill, rotate the bottles regularly to ensure that all sides of the plant receive equal sunlight. This will prevent the plant from leaning towards the light source.
Harvesting Your Cabbage
The moment we’ve all been waiting for!
1. Maturity: Cabbage plants typically take 60-100 days to mature, depending on the variety. Check the seed packet or plant label for specific maturity dates.
2. Harvesting: When the cabbage head is firm and reaches the desired size, it’s time to harvest. Use a sharp knife to cut the cabbage head from the stem, leaving a few outer leaves intact.
3. Enjoy! Now you can enjoy your homegrown cabbage in salads, slaws, soups, or any other dish you like!
Troubleshooting
Even with the best care, you might encounter some challenges. Here are a few common problems and how to address them:
* Yellowing Leaves: Could be a sign of overwatering, underwatering, or nutrient deficiency. Check the soil moisture and adjust your watering schedule accordingly. Fertilize with a balanced fertilizer.
* Stunted Growth: Could be due to insufficient sunlight, poor soil, or pest infestation. Ensure your plants are getting enough sunlight, use a high-quality potting mix, and inspect for pests.
* Root Rot: Caused by overwatering and poor drainage. Make sure your bottles have adequate drainage holes and avoid overwatering.
* Cabbage Worms: These little green caterpillars can devour your cabbage leaves. Handpick them off the plants or use Bacillus thuringiensis (Bt).
Tips for Success
Here are a few extra tips to help you succeed with your plastic bottle cabbage growing project:
* Choose the Right Variety: Select cabbage varieties that are well-suited for container gardening, such as ‘Golden Acre’ or ‘Dwarf Morden’.
* Use High-Quality Potting Mix: A well-draining potting mix is essential for healthy cabbage growth. Avoid using garden soil, as it can become compacted in containers.
* Don’t Overcrowd: Give your cabbage plants enough space to grow. One cabbage plant per 2-liter bottle is ideal.
* Monitor Regularly: Check your plants regularly for signs of pests, diseases, or nutrient deficiencies. Early detection is key to preventing problems.
* Have Fun! Gardening should be enjoyable. Don’t be afraid to experiment and learn from your mistakes.
Growing cabbage in plastic bottles is a rewarding and sustainable way to enjoy fresh, homegrown produce. With a little bit of effort and care, you can harvest delicious cabbage right from your own
Conclusion
So, there you have it! Transforming a humble plastic bottle into a mini-greenhouse for nurturing your cabbage seedlings is not just a clever recycling hack; it’s a game-changer for any gardener, regardless of experience level. We’ve walked through the simple steps, highlighting how this method protects your delicate plants from harsh weather, pesky critters, and the general unpredictability of early spring. But why is this DIY trick a must-try?
Firstly, it’s incredibly cost-effective. Instead of purchasing expensive seed starting trays or mini-greenhouses, you’re repurposing something that would otherwise end up in the landfill. This makes gardening more accessible and sustainable. Secondly, the plastic bottle creates a controlled environment, trapping warmth and humidity, which are crucial for successful germination and early growth. This leads to stronger, healthier seedlings that are better equipped to thrive once transplanted into your garden. Thirdly, it’s a fantastic way to extend your growing season. By starting your cabbage indoors earlier, you can enjoy a bountiful harvest sooner.
But the beauty of this method lies in its adaptability. Feel free to experiment with different types of plastic bottles. Larger bottles can accommodate multiple seedlings or even be used to protect larger plants for a short period. You can also adjust the ventilation by creating more or fewer holes in the bottle, depending on the weather conditions. Consider using colored bottles to filter sunlight or adding a layer of mulch around the base of the bottle to retain moisture.
For those in colder climates, you might want to consider placing your bottle greenhouses in a sunny windowsill or under grow lights for optimal growth. In warmer climates, be mindful of overheating and ensure adequate ventilation. You can even use this technique for other vegetables besides cabbage, such as broccoli, cauliflower, or even herbs. The possibilities are endless!
Ultimately, this plastic bottle cabbage growing method is a testament to the power of resourcefulness and ingenuity in the garden. It’s a simple, effective, and sustainable way to give your cabbage seedlings the best possible start in life.
We wholeheartedly encourage you to give this DIY trick a try. It’s a rewarding experience to watch your seedlings flourish under your care, knowing that you’ve contributed to a more sustainable and productive garden. And most importantly, we want to hear about your experiences! Share your photos, tips, and variations in the comments below. Let’s build a community of resourceful gardeners who are passionate about growing their own food and making a positive impact on the environment. Happy gardening!
Frequently Asked Questions (FAQ)
What type of plastic bottle is best for growing cabbage seedlings?
The ideal plastic bottle is a clear, two-liter soda bottle. Clear bottles allow maximum sunlight penetration, which is essential for seedling growth. However, you can also use larger water bottles or juice bottles, depending on the size of your seedlings and the space you have available. Avoid using bottles that have contained harsh chemicals or cleaning products, as these could contaminate your soil and harm your plants. Thoroughly wash and rinse any bottle before using it for gardening.
How many drainage holes should I make in the bottle?
A good rule of thumb is to create at least four to six drainage holes in the bottom of the bottle. These holes are crucial for preventing waterlogging, which can lead to root rot and other problems. The size of the holes should be about 1/4 inch in diameter. You can use a drill, a nail, or even a sharp knife to create the holes. Make sure the holes are evenly spaced around the bottom of the bottle.
What type of soil should I use for growing cabbage seedlings in plastic bottles?
Use a high-quality seed starting mix. These mixes are specifically formulated to provide the ideal balance of drainage, aeration, and nutrients for young seedlings. Avoid using garden soil, as it can be too heavy and compacted, which can hinder root growth. You can also make your own seed starting mix by combining equal parts peat moss, perlite, and vermiculite.
How often should I water my cabbage seedlings in plastic bottles?
Water your seedlings regularly, keeping the soil consistently moist but not waterlogged. The frequency of watering will depend on the weather conditions and the type of soil you’re using. Check the soil moisture level daily by sticking your finger into the soil. If the top inch of soil feels dry, it’s time to water. When watering, be sure to water gently to avoid disturbing the seedlings.
How much sunlight do cabbage seedlings need?
Cabbage seedlings need at least six hours of sunlight per day. If you’re growing your seedlings indoors, place them in a sunny windowsill or under grow lights. If you’re growing them outdoors, choose a location that receives full sun. Be mindful of the intensity of the sunlight, especially during the hottest part of the day. If the seedlings are getting too much sun, they may wilt or scorch. You can provide shade by covering the bottles with a light-colored cloth or moving them to a shadier location.
When should I transplant my cabbage seedlings from the plastic bottles to the garden?
Transplant your cabbage seedlings to the garden when they have developed several sets of true leaves and are about 4-6 inches tall. This typically takes about 4-6 weeks after sowing the seeds. Before transplanting, harden off the seedlings by gradually exposing them to outdoor conditions for a week or two. This will help them acclimate to the change in environment and reduce the risk of transplant shock.
How do I harden off my cabbage seedlings?
Hardening off is the process of gradually acclimating your seedlings to outdoor conditions. Start by placing the seedlings outdoors in a sheltered location for a few hours each day, gradually increasing the amount of time they spend outdoors. Protect them from direct sunlight, wind, and frost. After a week or two, they should be ready to be transplanted into the garden.
Can I reuse the plastic bottles for other plants?
Yes, you can reuse the plastic bottles for other plants. Just be sure to thoroughly wash and disinfect them before using them again. You can use a solution of bleach and water to disinfect the bottles. Rinse them thoroughly with clean water before using them for gardening.
What if my seedlings get leggy?
Leggy seedlings are tall and spindly, with weak stems. This is usually caused by insufficient light. If your seedlings are getting leggy, move them to a sunnier location or provide them with grow lights. You can also try pinching off the top of the seedlings to encourage them to grow bushier.
How can I prevent pests from attacking my cabbage seedlings in plastic bottles?
While the plastic bottle offers some protection, pests can still be a problem. Regularly inspect your seedlings for signs of pests, such as aphids, cabbage worms, or slugs. If you find any pests, you can remove them by hand or spray the seedlings with an organic insecticide, such as neem oil or insecticidal soap. You can also try placing copper tape around the base of the bottles to deter slugs and snails.
Can I use this method for other vegetables besides cabbage?
Absolutely! This method is suitable for starting a wide variety of vegetables, including broccoli, cauliflower, kale, lettuce, and herbs. The key is to adjust the timing of sowing and transplanting based on the specific needs of each vegetable. Research the optimal growing conditions for each plant to ensure the best results. The plastic bottle cabbage growing technique is easily adaptable to other plants.

Leave a Comment