

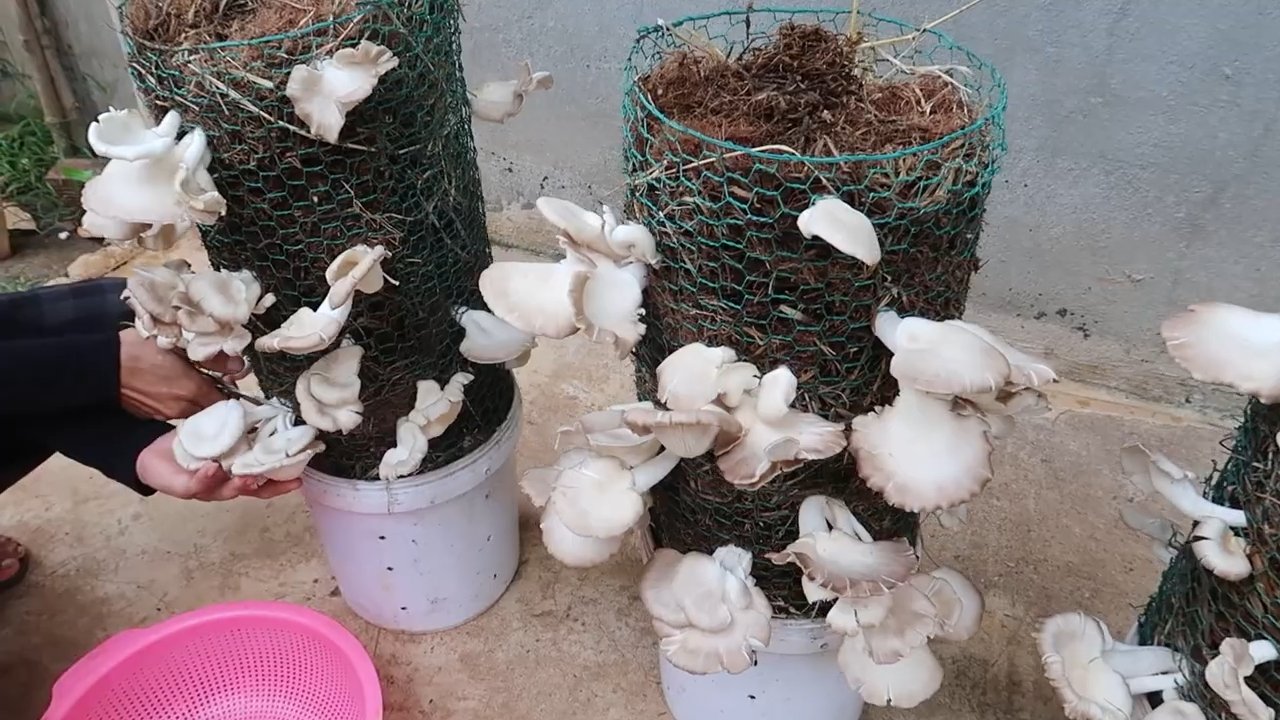
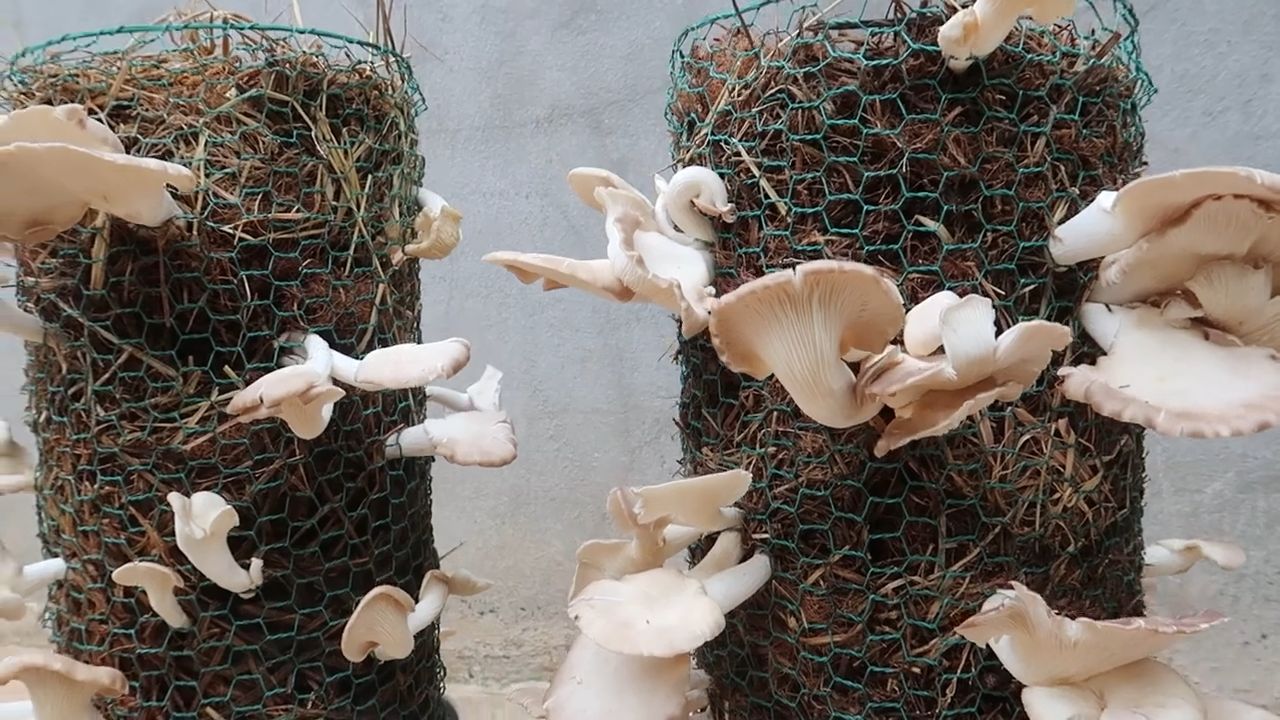
Mushroom Harvesting Stress Free System: Imagine strolling through your backyard, not just to admire your garden, but to gather a bounty of delicious, homegrown mushrooms! For centuries, foraging for mushrooms has been a cherished tradition in many cultures, connecting people to the earth and providing sustenance. From ancient Roman feasts to rural European villages, mushrooms have held a special place in culinary history. But let’s be honest, the thought of mushroom harvesting can be a little daunting, right?
I know I used to feel that way! The fear of misidentification, the uncertainty of where to look, and the general “ick” factor of dealing with fungi can be a real turn-off. But what if I told you there’s a way to eliminate all that stress and enjoy the rewarding experience of harvesting your own mushrooms?
That’s exactly what this DIY guide is all about! We’re going to dive into a mushroom harvesting stress free system that will empower you to grow and harvest your own edible mushrooms with confidence. Whether you’re a seasoned gardener or a complete beginner, these tips and tricks will transform your backyard into a fungal paradise. Get ready to unlock the secrets of successful mushroom cultivation and enjoy the incredible flavor and health benefits of homegrown fungi, all while keeping the process simple, safe, and, yes, stress-free!
Pilzernte Stressfrei: Dein DIY-System für eine reiche Ausbeute
Hallo Pilzfreunde! Ich liebe es, Pilze zu sammeln, aber ich weiß auch, dass es manchmal ganz schön stressig sein kann. Man läuft stundenlang durch den Wald, findet vielleicht nur wenige Pilze und schleppt dann noch schwere Körbe nach Hause. Deshalb habe ich mir ein DIY-System überlegt, das die Pilzernte deutlich entspannter und effizienter macht. Und das Beste daran: Du kannst es ganz einfach selbst nachbauen!
Was du für dein Pilzernte-System brauchst:
* Ein stabiler Wanderrucksack: Achte darauf, dass er bequem sitzt und genügend Stauraum bietet. Ein Hüftgurt ist Gold wert, um das Gewicht besser zu verteilen.
* Mehrere atmungsaktive Körbe oder Netze: Pilze brauchen Luft, damit sie nicht faulen. Vermeide Plastiktüten! Unterschiedliche Größen sind praktisch, um verschiedene Pilzarten getrennt zu transportieren.
* Ein Pilzmesser mit Bürste: Unverzichtbar zum schonenden Ernten und Reinigen der Pilze direkt vor Ort.
* Eine Lupe: Hilfreich, um kleine Details zu erkennen und Pilze besser zu bestimmen.
* Ein Bestimmungsbuch oder eine App: Sicherheit geht vor! Vergewissere dich immer, dass du den Pilz richtig identifiziert hast, bevor du ihn mitnimmst.
* GPS-Gerät oder Smartphone mit Karten-App: Um deine Fundorte zu markieren und dich nicht zu verirren.
* Erste-Hilfe-Set: Für den Fall der Fälle.
* Wasser und Proviant: Eine lange Pilzwanderung macht hungrig und durstig.
* Eine kleine Schaufel oder ein Spaten: Manchmal muss man etwas Erde entfernen, um den Pilz richtig zu ernten.
* Notizblock und Stift: Um Fundorte, Pilzarten und andere Beobachtungen festzuhalten.
* Optional: Eine kleine Waage: Wenn du deine Ernte dokumentieren möchtest.
* Optional: Ein Stativ und eine Kamera: Für schöne Fotos deiner Funde.
Die Vorbereitung: So startest du stressfrei in die Pilzsaison
Bevor es losgeht, ist eine gute Vorbereitung das A und O. Ich mache das immer so:
1. Rucksack packen: Überprüfe, ob du alles hast und packe den Rucksack so, dass schwere Gegenstände nah am Rücken liegen. Das sorgt für eine bessere Gewichtsverteilung.
2. Karten studieren: Schau dir die Karten der Gegend an, in der du pilgern möchtest. Gibt es bestimmte Waldtypen, die für bestimmte Pilzarten bekannt sind?
3. Wetterbericht checken: Das Wetter spielt eine große Rolle für das Pilzwachstum. Nach Regenperioden ist die Chance auf eine reiche Ernte besonders hoch.
4. Bestimmungsbuch auffrischen: Gehe noch einmal die wichtigsten Pilzarten durch, die in deiner Region vorkommen.
5. Akkus laden: Stelle sicher, dass dein GPS-Gerät oder Smartphone voll aufgeladen ist.
6. Kleidung wählen: Trage wetterfeste und bequeme Kleidung. Lange Hosen und festes Schuhwerk sind Pflicht, um dich vor Zecken und Dornen zu schützen.
Die Ernte: So sammelst du Pilze schonend und effizient
Jetzt geht es endlich los! Im Wald angekommen, solltest du folgende Punkte beachten:
1. Schonend vorgehen: Betrete den Wald respektvoll und vermeide unnötigen Lärm.
2. Augen offenhalten: Konzentriere dich auf den Waldboden und achte auf verdächtige Wölbungen oder Verfärbungen.
3. Pilze richtig ernten: Schneide den Pilz mit dem Pilzmesser knapp über dem Boden ab oder drehe ihn vorsichtig heraus. Achte darauf, das Myzel (das Pilzgeflecht im Boden) nicht zu beschädigen.
4. Pilze reinigen: Entferne groben Schmutz mit der Bürste direkt vor Ort.
5. Pilze bestimmen: Vergleiche den Pilz mit den Abbildungen und Beschreibungen im Bestimmungsbuch oder in der App. Wenn du dir unsicher bist, lass den Pilz lieber stehen!
6. Pilze transportieren: Lege die Pilze vorsichtig in die Körbe oder Netze. Achte darauf, dass sie nicht gequetscht werden.
7. Fundorte markieren: Markiere interessante Fundorte mit deinem GPS-Gerät oder Smartphone. So findest du sie beim nächsten Mal wieder.
8. Notizen machen: Notiere dir, welche Pilzarten du gefunden hast, wo du sie gefunden hast und welche Beobachtungen du gemacht hast. Das hilft dir, deine Pilzkenntnisse zu erweitern.
9. Müll mitnehmen: Hinterlasse den Wald so, wie du ihn vorgefunden hast. Nimm deinen Müll wieder mit.
Spezielle Techniken für verschiedene Pilzarten
Manche Pilzarten erfordern besondere Techniken beim Sammeln. Hier ein paar Beispiele:
* Steinpilze: Steinpilze wachsen oft unter Moos oder Laub versteckt. Taste den Boden vorsichtig ab und entferne gegebenenfalls etwas Moos oder Laub, um den Pilz freizulegen.
* Pfifferlinge: Pfifferlinge wachsen oft in Gruppen. Suche in der Nähe von bereits gefundenen Pfifferlingen nach weiteren Exemplaren.
* Parasolpilze: Parasolpilze sind sehr empfindlich. Schneide sie vorsichtig ab und transportiere sie in einem separaten Korb, damit sie nicht zerbrechen.
* Morcheln: Morcheln sind Meister der Tarnung. Suche in der Nähe von Eschen, Obstbäumen oder an Waldrändern.
Die Nachbereitung: So verarbeitest du deine Pilze richtig
Nach der Ernte ist es wichtig, die Pilze richtig zu verarbeiten, um ihren Geschmack und ihre Haltbarkeit zu erhalten.
1. Pilze putzen: Entferne restlichen Schmutz mit einem Pinsel oder einem feuchten Tuch. Vermeide es, die Pilze zu waschen, da sie sich sonst mit Wasser vollsaugen.
2. Pilze schneiden: Schneide die Pilze in mundgerechte Stücke.
3. Pilze zubereiten: Es gibt unzählige Möglichkeiten, Pilze zuzubereiten. Du kannst sie braten, grillen, kochen, dünsten oder im Ofen backen.
4. Pilze konservieren: Wenn du zu viele Pilze hast, um sie sofort zu essen, kannst du sie konservieren. Du kannst sie trocknen, einfrieren oder in Öl einlegen.
Sicherheit geht vor: Wichtige Hinweise für Pilzsammler
Pilze sammeln kann gefährlich sein, wenn man nicht vorsichtig ist. Beachte daher folgende Hinweise:
* Sammle nur Pilze, die du sicher kennst: Wenn du dir unsicher bist, lass den Pilz lieber stehen.
* Verlasse dich nicht nur auf Apps oder Bücher: Die Bestimmung von Pilzen erfordert Erfahrung und Übung.
* Sammle keine Pilze in Naturschutzgebieten oder auf Privatgrundstücken: Informiere dich vorher über die geltenden Bestimmungen.
* Sammle keine Pilze in der Nähe von Straßen oder Industriegebieten: Diese Pilze können mit Schadstoffen belastet sein.
* Iss keine rohen Pilze: Die meisten Pilzarten sind roh giftig oder schwer verdaulich.
* Bewahre Pilze kühl und trocken auf: Pilze verderben schnell.
* Bei Verdacht auf eine Pilzvergiftung: Suche sofort einen Arzt auf.
Zusätzliche Tipps für eine erfolgreiche Pilzernte
Hier noch ein paar zusätzliche Tipps, die dir bei der Pilzernte helfen können:
* Gehe früh los: Am frühen Morgen sind die Pilze oft noch frisch und unverdorben.
* Suche in verschiedenen Waldtypen: Verschiedene Pilzarten bevorzugen unterschiedliche Waldtypen.
* Achte auf die Jahreszeit: Die Pilzsaison variiert je nach Region und Wetterlage.
* Tausche dich mit anderen Pilzsammlern aus: Lerne von den Erfahrungen anderer.
* Besuche Pilzseminare oder -wanderungen: Erweitere dein Wissen über Pilze.
* Sei geduldig: Manchmal dauert es etwas, bis man Pilze findet.
*
Conclusion
So, there you have it! A stress-free system for mushroom harvesting that will revolutionize your foraging experience. We’ve walked you through the steps, highlighted the benefits, and hopefully, inspired you to ditch the old, anxiety-inducing methods. This isn’t just about collecting mushrooms; it’s about connecting with nature in a more mindful and sustainable way. It’s about reducing the stress associated with identifying, collecting, and preserving your precious fungal finds.
Why is this DIY trick a must-try? Because it simplifies the entire process. No more second-guessing your identification skills in the field, no more frantic searches for the perfect container, and no more worrying about damaging the delicate mycelial network. This system promotes responsible harvesting, ensuring that mushroom patches thrive for years to come. It’s about respecting the environment and enjoying the bounty it provides.
But don’t just take our word for it. The beauty of this system lies in its adaptability. Feel free to experiment with variations to suit your specific needs and preferences. For example, if you’re harvesting in a particularly damp environment, consider using breathable mesh bags instead of paper bags to prevent your mushrooms from becoming soggy. Or, if you’re dealing with a large flush of mushrooms, you might want to invest in a small dehydrator to preserve them quickly and efficiently. You could even create a color-coded system for your identification tags, making it even easier to sort and organize your harvest.
Consider adding a small notebook to your harvesting kit to jot down notes about each location. This can include details about the surrounding vegetation, soil type, and weather conditions. Over time, you’ll build up a valuable database of information that will help you become a more skilled and successful mushroom forager.
Remember, the key to successful mushroom harvesting is knowledge and respect. Always be 100% certain of your identification before consuming any wild mushrooms. If you’re unsure, consult with an expert or use a reliable field guide. And always harvest responsibly, leaving plenty of mushrooms behind to ensure the continued health of the population.
We are confident that this stress-free system will transform your mushroom harvesting adventures. It’s a game-changer for both beginners and experienced foragers alike. It’s about making the process more enjoyable, more sustainable, and ultimately, more rewarding.
Now, it’s your turn! We encourage you to try this DIY trick and share your experience with us. Let us know what works for you, what challenges you encounter, and any variations you come up with. We’re eager to hear your stories and learn from your insights. Share your photos and tips on social media using the hashtag #StressFreeMushroomHarvesting. Together, we can build a community of responsible and enthusiastic mushroom foragers. Happy harvesting!
Frequently Asked Questions (FAQ)
What if I’m not confident in my mushroom identification skills?
This is a crucial question! Never consume a wild mushroom unless you are 100% certain of its identification. If you are a beginner, start with easily identifiable species like morels, chanterelles, or oyster mushrooms. Invest in a good field guide specific to your region and compare your finds carefully. Attend a mushroom identification workshop or join a local mycological society. Take clear photos of the mushroom from multiple angles, including the cap, gills (or pores), stem, and base. Compare your photos to images in your field guide and online resources. If you’re still unsure, consult with an experienced mushroom forager or mycologist before consuming the mushroom. Remember, when in doubt, throw it out! There’s no shame in being cautious when it comes to wild mushrooms. Your safety is paramount.
How do I ensure I’m harvesting mushrooms sustainably?
Sustainable harvesting is essential for preserving mushroom populations for future generations. Here are a few key practices to follow:
* **Leave some behind:** Never harvest all the mushrooms in a given area. Leave at least half of the mushrooms undisturbed to allow them to release spores and reproduce.
* **Avoid disturbing the mycelium:** The mycelium is the underground network of fungal threads that produces mushrooms. Be careful not to damage it when harvesting. Use a sharp knife to cut the mushroom stem near the base, rather than pulling it out of the ground.
* **Spread the spores:** After harvesting, gently brush the mushroom caps over the surrounding area to help disperse spores. This will encourage new mushrooms to grow in the future.
* **Respect private property:** Always obtain permission before harvesting mushrooms on private land.
* **Avoid over-harvesting:** Be mindful of the overall impact of your harvesting activities. If you notice that a particular mushroom species is becoming scarce in your area, reduce your harvesting efforts or avoid harvesting it altogether.
* **Educate others:** Share your knowledge of sustainable harvesting practices with other foragers.
What’s the best way to clean mushrooms after harvesting?
Cleaning mushrooms properly is important for removing dirt, debris, and insects. Here’s a gentle and effective method:
* **Avoid soaking:** Soaking mushrooms in water can make them waterlogged and affect their flavor and texture.
* **Use a soft brush:** Gently brush off any dirt or debris with a soft brush, such as a mushroom brush or a toothbrush.
* **Wipe with a damp cloth:** If necessary, wipe the mushrooms with a damp cloth to remove any remaining dirt.
* **Trim the stems:** Trim off any tough or dirty parts of the stems.
* **Dry thoroughly:** Spread the cleaned mushrooms on a clean towel or paper towel and allow them to air dry completely before storing or cooking.
How should I store my harvested mushrooms?
Proper storage is crucial for preserving the quality and freshness of your harvested mushrooms. Here are a few tips:
* **Store in a breathable container:** Avoid storing mushrooms in airtight containers, as this can cause them to become slimy and spoil quickly. Instead, store them in a paper bag or a container lined with paper towels.
* **Refrigerate immediately:** Refrigerate your harvested mushrooms as soon as possible after cleaning them.
* **Use within a few days:** Freshly harvested mushrooms are best used within a few days.
* **Consider drying or freezing:** If you have a large harvest, consider drying or freezing some of the mushrooms for later use. Drying is a great way to preserve mushrooms for long-term storage. Freezing is also an option, but it can affect the texture of the mushrooms.
Can I use this system for all types of mushrooms?
While this system is adaptable, it’s most effective for mushrooms that are relatively easy to identify and handle. For very delicate or fragile mushrooms, you may need to adjust your approach. For example, you might want to use a more rigid container to protect them from damage. For mushrooms that require specific drying conditions, you may need to modify your drying setup. The key is to adapt the system to the specific needs of the mushrooms you are harvesting.
What are some good resources for learning more about mushroom identification?
There are many excellent resources available for learning about mushroom identification. Here are a few suggestions:
* **Field guides:** Invest in a good field guide specific to your region. Look for guides that include detailed descriptions, photographs, and illustrations of common mushroom species.
* **Mycological societies:** Join a local mycological society. These organizations offer workshops, field trips, and other educational opportunities.
* **Online resources:** There are many reputable websites and online forums dedicated to mushroom identification. Be sure to verify the information you find online with other sources.
* **Experts:** Consult with experienced mushroom foragers or mycologists. They can provide valuable insights and guidance.
* **Books:** Look for books on mushroom identification and foraging. These books can provide in-depth information about mushroom biology, ecology, and identification.
What if I find a mushroom that I can’t identify?
If you find a mushroom that you can’t identify, the best course of action is to leave it alone. Do not consume it or attempt to identify it based on unreliable sources. Take clear photos of the mushroom and consult with an expert or use a reliable field guide. Remember, it’s always better to be safe than sorry when it comes to wild mushrooms.
Leave a Comment