

Lemon Harvest Routine: Are you dreaming of a bountiful lemon harvest, picturing yourself whipping up homemade lemonade and zesty lemon bars with fruit straight from your own backyard? I know I am! But knowing *when* and *how* to harvest your lemons is crucial for maximizing your yield and ensuring the best flavor. This isn’t just about picking fruit; it’s about understanding the rhythm of your lemon tree and working *with* nature.
Lemons have a rich history, dating back centuries and playing a vital role in various cultures. From ancient medicinal uses to culinary staples, lemons have always been prized. Think about the Sicilian lemon groves, passed down through generations, each family holding secrets to the perfect harvest. While we might not have a sprawling grove, we *can* learn from these traditions and apply them to our own home gardens.
Many gardeners struggle with knowing the optimal time to pick their lemons, often resulting in sour, underdeveloped fruit, or lemons that have lost their zest. That’s where this DIY guide comes in! I’m going to share my tried-and-true lemon harvest routine, a simple yet effective method that will help you determine the perfect moment to pluck those golden gems. By following these easy steps, you’ll not only enjoy a more abundant harvest but also unlock the full potential of your homegrown lemons. Let’s get started and transform your lemon tree into a citrus treasure trove!
DIY Lemon Harvest Basket: From Tree to Table with Style
Okay, lemon lovers, let’s talk about harvesting those beautiful, sunshine-yellow fruits! If you’re anything like me, you’ve probably got a lemon tree overflowing with goodness, and you’re wondering how to gather them all without ending up with a bruised, scratched, and generally sad-looking pile. That’s where this DIY lemon harvest basket comes in! It’s not just practical; it’s also a super cute way to bring your harvest indoors. I promise, you’ll feel like a citrus-picking pro.
Materials You’ll Need
Before we dive in, let’s gather our supplies. Don’t worry, you probably have most of this stuff lying around already!
* A sturdy basket (wicker, metal, or even a plastic crate will work – just make sure it’s clean!)
* Soft fabric (old towels, burlap, felt, or even an old t-shirt – anything to cushion those lemons!)
* Scissors or a rotary cutter
* Measuring tape or ruler
* Hot glue gun and glue sticks (or strong fabric glue)
* Optional: Decorative elements like ribbon, lace, paint, stencils, or wooden beads.
* Optional: A long handle (broom handle, sturdy stick, or even a repurposed garden tool handle) and hardware to attach it.
* Optional: Pruning shears or lemon harvesting tool
Designing Your Basket: Functionality and Flair
Before we start gluing and cutting, let’s think about what we want our basket to look like and how we want it to function. This is where you can really get creative!
* Size Matters: Consider the size of your lemon harvest. A small basket is great for a few lemons, but if you’re planning a major harvest, you’ll need something bigger.
* Cushioning is Key: The most important part is the cushioning. We want to protect those delicate lemons from bruising.
* Handle or No Handle?: A handle makes it easier to carry a full basket, especially if you’re harvesting from a tall tree.
* Drainage (If Needed): If you live in a humid climate or anticipate wet lemons, consider adding drainage holes to the bottom of your basket.
* Aesthetic Appeal: This is where your personal style comes in! Do you want a rustic, farmhouse look? Or something more modern and chic?
Step-by-Step Instructions: Building Your Lemon Harvest Basket
Alright, let’s get our hands dirty!
1. Prepare Your Basket: Start by cleaning your basket thoroughly. Remove any dirt, dust, or debris. If you’re using a plastic crate, make sure it’s food-safe.
2. Measure and Cut Your Fabric:
* Measure the inside bottom of your basket. Add a few inches to each side for overlap.
* Cut a piece of fabric to this size. This will be the base cushion.
* Measure the inside height of your basket. Add a few inches to the top for folding over.
* Measure the inside circumference of your basket. Add a few inches for overlap.
* Cut a long strip of fabric to these dimensions. This will be the side cushion.
* If you want to add extra cushioning, cut additional pieces of fabric to layer on top of the base and sides.
3. Attach the Base Cushion:
* Place the base fabric piece inside the basket.
* Fold the edges of the fabric over the sides of the basket.
* Using your hot glue gun (or fabric glue), carefully glue the folded edges to the inside of the basket. Make sure the fabric is taut and smooth.
* If you’re using multiple layers of fabric, glue them together before attaching them to the basket.
4. Attach the Side Cushion:
* Starting at one point, carefully glue the bottom edge of the side fabric strip to the inside bottom of the basket, overlapping the base cushion.
* Work your way around the entire circumference of the basket, ensuring the fabric is smooth and even.
* Fold the top edge of the fabric over the top edge of the basket.
* Glue the folded edge to the inside of the basket, creating a clean and finished look.
* Overlap the ends of the fabric strip and glue them together securely.
5. Reinforce and Add Extra Cushioning (Optional):
* If you want to add extra cushioning, cut additional pieces of fabric and glue them to the inside of the basket, layering them on top of the base and side cushions.
* Pay special attention to the corners and edges, as these are the areas most likely to come into contact with the lemons.
* For extra reinforcement, you can add a layer of batting or foam padding underneath the fabric.
6. Adding a Handle (Optional):
* Decide where you want to position the handle on your basket.
* If you’re using a broom handle or sturdy stick, you may need to drill holes in the basket to attach it.
* Use screws, bolts, or strong zip ties to secure the handle to the basket. Make sure the handle is sturdy and can support the weight of a full basket of lemons.
* If you’re using a repurposed garden tool handle, you may need to modify it to fit your basket.
* Consider wrapping the handle with rope or fabric for a more comfortable grip.
7. Decorate Your Basket (Optional):
* This is where you can let your creativity shine!
* Use ribbon, lace, or paint to add decorative accents to your basket.
* Stencils can be used to create intricate designs.
* Wooden beads can be glued around the edges of the basket for a rustic look.
* Consider adding a personalized touch, such as your initials or a lemon-themed design.
Harvesting Your Lemons: Tips and Tricks
Now that your basket is ready, let’s talk about harvesting those lemons!
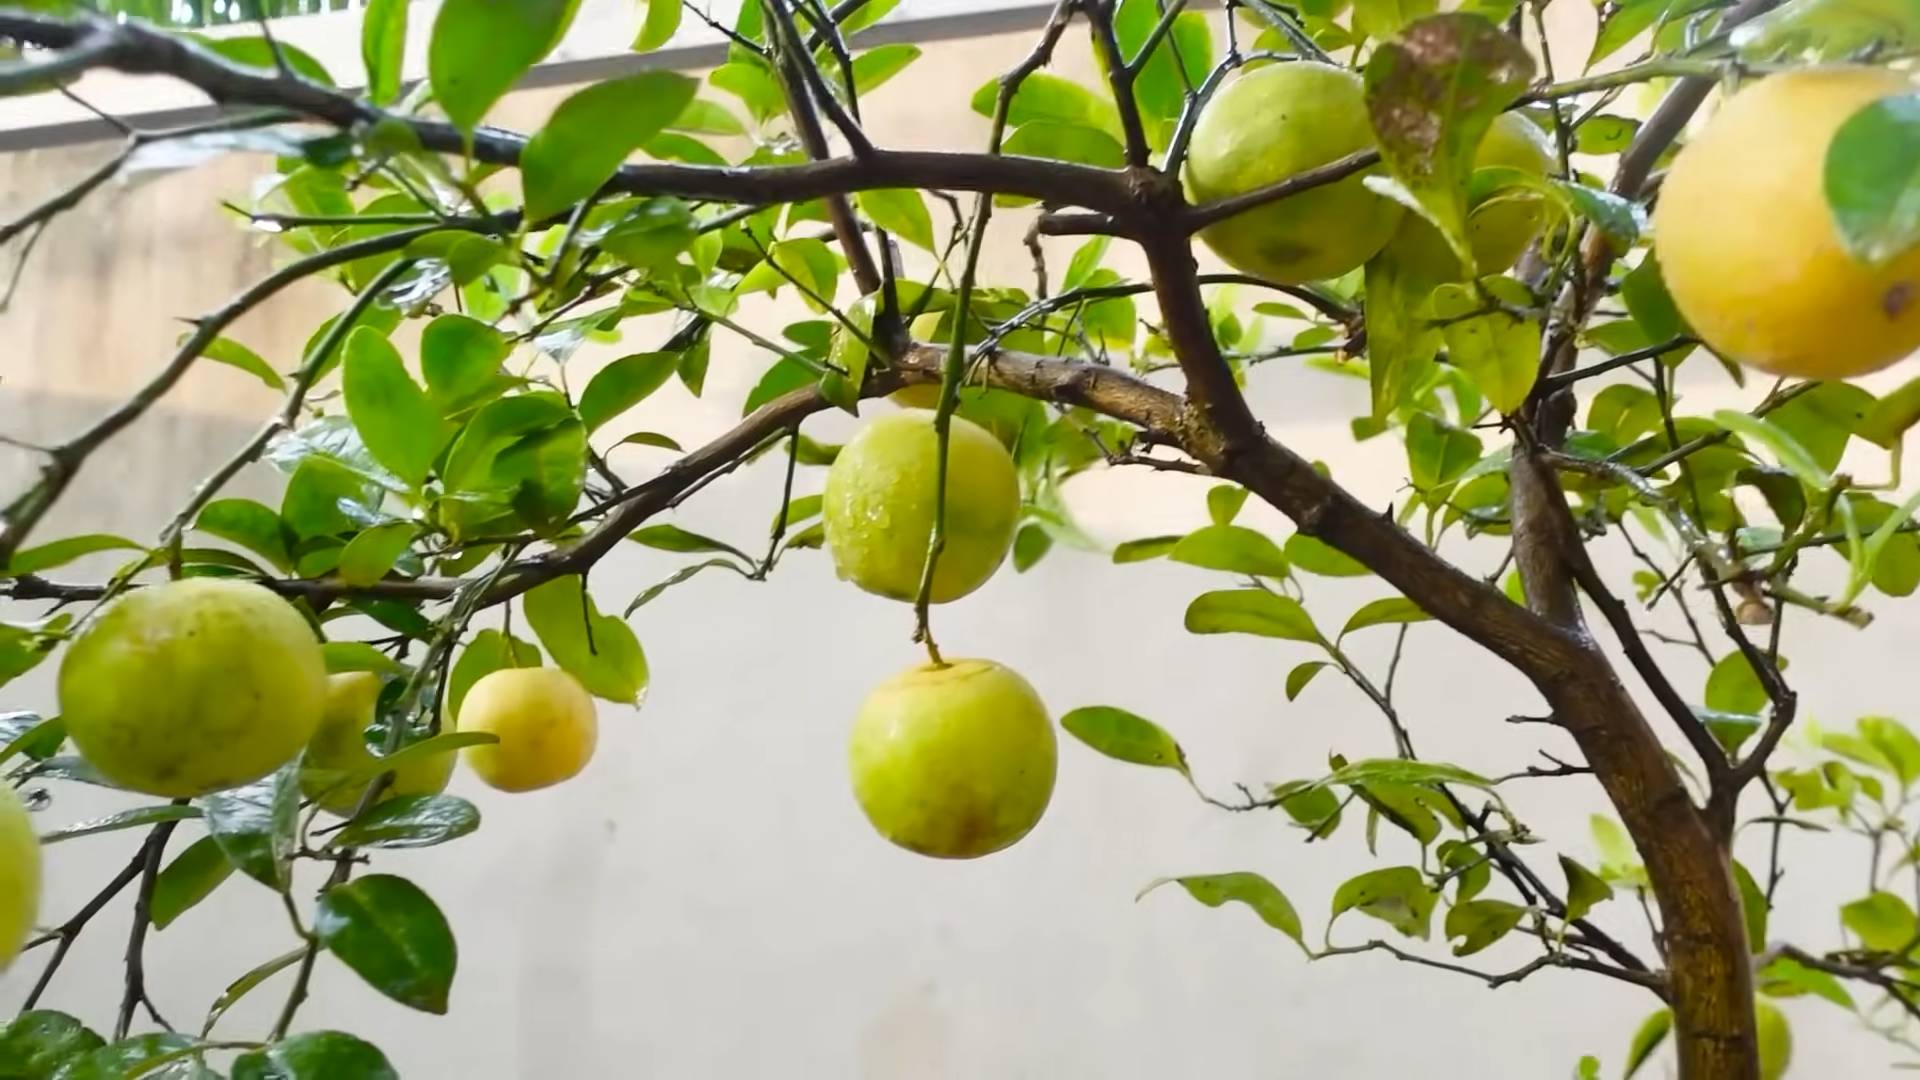
1. Choose the Right Lemons: Look for lemons that are fully yellow and slightly soft to the touch. They should also be fragrant. Avoid lemons that are green, hard, or have blemishes.
2. Use the Right Tools: Pruning shears or a lemon harvesting tool are ideal for cutting the lemons from the tree. This will prevent damage to the tree and ensure a clean cut. If you don’t have these tools, you can carefully twist the lemons off the tree, but be gentle to avoid tearing the branches.
3. Handle with Care: Gently place the lemons in your harvest basket, being careful not to bruise them. Avoid dropping them or piling them too high.
4. Harvest Regularly: Lemons can stay on the tree for a long time, but they will eventually start to deteriorate. Harvest your lemons regularly to ensure the best quality.
5. Storage Tips: Store your harvested lemons in a cool, dry place. They can last for several weeks in the refrigerator. You can also freeze lemon juice or zest for later use.
Maintaining Your Lemon Harvest Basket
To keep your lemon harvest basket in good condition, follow these simple tips:
* Clean Regularly: Wipe down the basket with a damp cloth after each use.
* Air Dry: Allow the basket to air dry completely before storing it.
* Store Properly: Store the basket in a dry place to prevent mold and mildew.
* Repair as Needed: If the fabric becomes loose or damaged, repair it promptly to prevent further deterioration.
Troubleshooting
* Fabric Slipping: If the fabric is slipping, use more glue or try a different type of glue. You can also use pins to hold the fabric in place while the glue dries.
* Handle Not Secure: If the handle is not secure, use stronger hardware or reinforce the attachment points.
* Basket Too Small: If your basket is too small, consider using a larger basket or making multiple trips to the tree.
* Lemons Bruising: If your lemons are bruising, add more cushioning to the basket or handle them more gently.
Enjoy Your Harvest!
And there you have it! Your very own DIY lemon harvest basket. Now you can gather those sunny citrus fruits in style and enjoy the fruits (literally!) of your labor. Happy harvesting! I hope you found this guide helpful and that your lemon harvest is bountiful! Remember to share your creations with me – I’d love to see your personalized lemon harvest baskets!
Conclusion
So, there you have it! Mastering this simple yet effective lemon harvest routine is more than just picking fruit; it’s about maximizing your yield, ensuring the longevity of your lemon tree, and enjoying the freshest, most flavorful lemons imaginable. We’ve walked through the key indicators of ripeness, the gentle harvesting techniques, and the crucial post-harvest care that will keep your tree thriving for years to come.
Why is this DIY trick a must-try? Because it empowers you to take control of your lemon harvest, moving beyond guesswork and embracing a method that guarantees optimal results. No more sour surprises or prematurely picked fruit! This routine ensures you’re harvesting lemons at their peak of flavor and juiciness, unlocking their full potential in your culinary creations, refreshing beverages, and even your cleaning solutions.
But the beauty of this lemon harvest routine lies in its adaptability. Feel free to experiment with variations to suit your specific needs and preferences. For instance, if you live in a particularly humid climate, consider increasing the frequency of your tree inspections to catch any signs of fungal diseases early on. Or, if you’re aiming for a specific flavor profile, research the optimal harvest time for different lemon varieties. Some lemons develop a sweeter taste if left on the tree a bit longer, while others are best picked when their skin is still slightly green.
Consider these variations to enhance your lemon harvest routine:
* Early Harvest for Zest: If you’re primarily interested in lemon zest, harvest the lemons slightly before they reach full ripeness. The zest tends to be more fragrant and flavorful at this stage.
* Late Harvest for Juice: For maximum juice yield, allow the lemons to ripen fully on the tree. They will be heavier and more succulent.
* Staggered Harvest: If you have a large lemon tree, consider staggering your harvest over several weeks. This will allow you to enjoy fresh lemons for an extended period.
* Preserving Your Harvest: Explore different preservation methods to extend the shelf life of your lemons. You can freeze the juice, zest the lemons and freeze the zest, or make lemon curd or marmalade.
Ultimately, the best lemon harvest routine is the one that works best for you and your lemon tree. Don’t be afraid to tweak and adjust the steps to fit your unique circumstances.
We wholeheartedly encourage you to try this lemon harvest routine and experience the difference it makes. Imagine the satisfaction of harvesting perfectly ripe lemons, knowing that you’ve nurtured your tree and reaped the rewards of your efforts. Share your experiences with us! We’d love to hear about your successes, challenges, and any variations you’ve discovered. Let’s build a community of lemon-loving gardeners who are passionate about harvesting the best possible fruit. So, grab your gloves, head out to your lemon tree, and get ready to embark on a rewarding and flavorful journey!
FAQ
What are the key indicators that my lemons are ready to be harvested?
The most reliable indicators of lemon ripeness are color, size, and texture. Ripe lemons will have a vibrant yellow color, although some varieties may retain a slight green tinge even when fully ripe. They should also be relatively large and feel heavy for their size, indicating a high juice content. The skin should be smooth and slightly yielding to gentle pressure. Avoid harvesting lemons that are still completely green or feel hard and unripe.
How do I harvest lemons without damaging the tree?
The best way to harvest lemons is to use pruning shears or sharp scissors to cut the fruit from the branch. Cut the stem close to the fruit, leaving a small stub attached. Avoid pulling or twisting the lemons, as this can damage the branches and potentially introduce diseases. Always wear gloves to protect your hands from thorns and any potential irritants in the lemon peel.
How often should I inspect my lemon tree for ripe fruit?
During the peak harvest season, it’s recommended to inspect your lemon tree at least once a week. This will allow you to catch the lemons at their optimal ripeness and prevent them from becoming overripe or falling off the tree. Regular inspections also give you the opportunity to identify any potential problems, such as pests or diseases, early on.
What should I do with my lemons after harvesting them?
After harvesting your lemons, gently wash them with cool water to remove any dirt or debris. Pat them dry and store them in a cool, dry place, such as the refrigerator. Lemons can typically last for several weeks when stored properly. If you have a large harvest, consider preserving some of the lemons by freezing the juice, zesting the lemons, or making lemon curd or marmalade.
Can I harvest all the lemons from my tree at once, or should I harvest them gradually?
It’s generally best to harvest lemons gradually as they ripen. This allows you to enjoy fresh lemons over an extended period and prevents you from having to deal with a large quantity of lemons all at once. However, if you need to harvest all the lemons at once for a specific reason, such as an impending frost, that is perfectly acceptable. Just be sure to store the lemons properly to prevent them from spoiling.
What if my lemons are still green but starting to fall off the tree?
If your lemons are falling off the tree while still green, it could be a sign of several issues, including insufficient watering, nutrient deficiencies, or pest infestations. Check the soil moisture and water the tree deeply if the soil is dry. Consider fertilizing the tree with a citrus-specific fertilizer to provide it with the necessary nutrients. Inspect the tree for any signs of pests, such as aphids or scale, and take appropriate action to control them. If the problem persists, consult with a local arborist or citrus expert for further assistance.
How do I store lemons to keep them fresh for longer?
To maximize the shelf life of your lemons, store them in the refrigerator in a plastic bag or airtight container. This will help to prevent them from drying out and losing their moisture. You can also store lemons at room temperature, but they will not last as long. Avoid storing lemons near ethylene-producing fruits, such as apples and bananas, as this can accelerate their ripening and spoilage.
What are some creative ways to use my harvested lemons?
The possibilities for using your harvested lemons are endless! Of course, you can use them to make lemonade, lemon bars, lemon meringue pie, and other classic lemon desserts. But you can also use them in savory dishes, such as lemon chicken, lemon pasta, and lemon vinaigrette. Lemon juice can also be used as a natural cleaning agent and deodorizer. And don’t forget about the zest! Lemon zest adds a bright, citrusy flavor to baked goods, sauces, and marinades.
How can I tell if my lemon tree is healthy and producing good-quality fruit?
A healthy lemon tree will have lush, green foliage and produce an abundance of fragrant blossoms. The lemons should be smooth, firm, and free from blemishes or deformities. If your lemon tree is showing signs of stress, such as yellowing leaves, stunted growth, or sparse fruit production, it could be a sign of underlying problems. Regular watering, fertilization, and pest control are essential for maintaining the health of your lemon tree and ensuring a bountiful harvest.


Leave a Comment