

Jackfruit Grafting at Home: Unlock the Secrets to Bountiful Harvests!
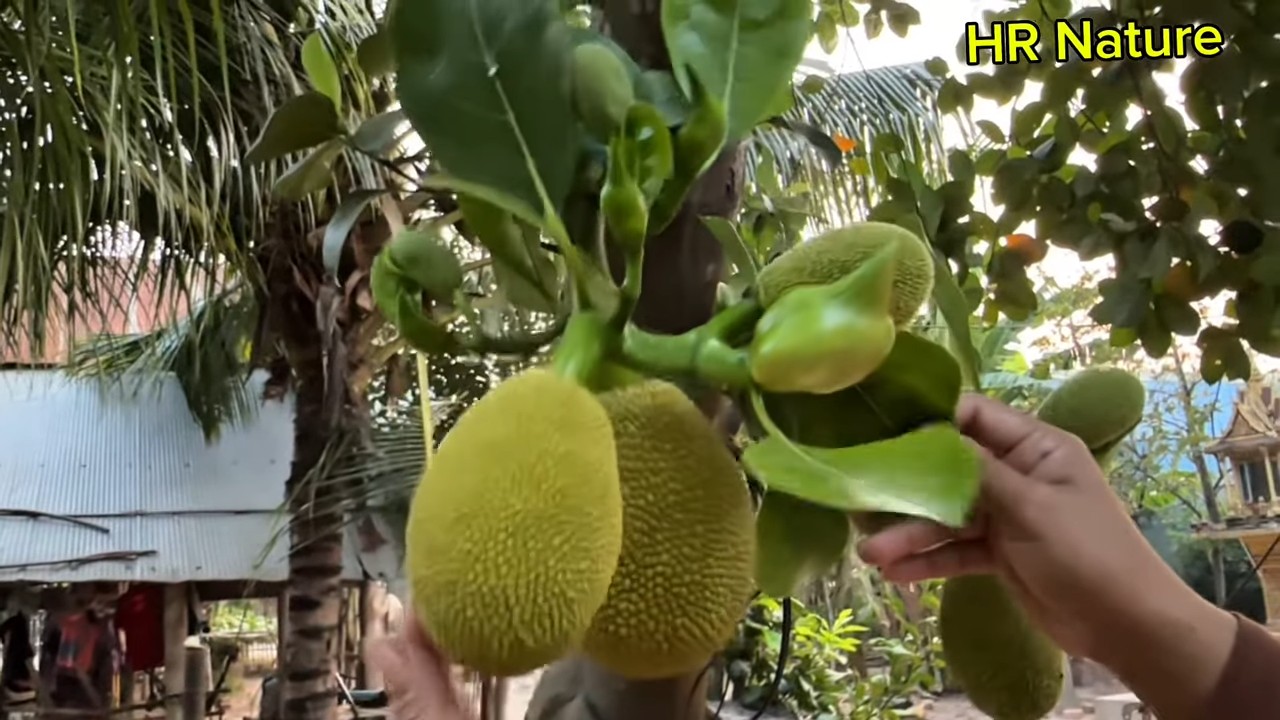
Have you ever dreamed of biting into a perfectly ripe, homegrown jackfruit, bursting with tropical sweetness? I know I have! But the thought of waiting years for a seedling to mature can be discouraging. That’s where the magic of grafting comes in! This DIY guide will empower you to take control of your jackfruit destiny and enjoy delicious fruit much sooner than you thought possible.
Grafting, the ancient art of joining two plants together to grow as one, has been practiced for centuries across various cultures. From ancient China to the Roman Empire, civilizations have harnessed this technique to propagate desirable traits and improve crop yields. Think of it as a botanical shortcut, allowing you to combine the robust root system of one plant with the superior fruiting qualities of another.
Why is jackfruit grafting at home so essential? Well, for starters, it significantly reduces the time it takes for your jackfruit tree to bear fruit. Seedlings can take 5-7 years, while grafted trees often produce within 2-3 years! Plus, grafting allows you to propagate specific varieties with desirable characteristics like sweetness, size, and disease resistance. Imagine consistently enjoying the best jackfruit your garden can offer, year after year. This DIY guide will break down the process into easy-to-follow steps, ensuring even beginners can successfully graft their own jackfruit trees. Let’s get started and transform your backyard into a tropical paradise!
Jackfrucht-Veredelung zu Hause: Eine Schritt-für-Schritt-Anleitung
Hallo liebe Gartenfreunde! Habt ihr euch jemals gefragt, wie man mehr Jackfruchtbäume bekommt, ohne ewig auf die Samenkeimung zu warten? Oder vielleicht habt ihr einen Jackfruchtbaum, der nicht die gewünschten Früchte trägt, und ihr wollt ihn mit einer besseren Sorte veredeln? Dann seid ihr hier genau richtig! Ich zeige euch, wie ihr Jackfrucht-Veredelung zu Hause ganz einfach selbst durchführen könnt. Es ist gar nicht so schwer, wie es klingt, versprochen!
Was ist Veredelung und warum ist sie nützlich?
Veredelung ist im Grunde genommen eine Art “Pflanzen-Chirurgie”, bei der man zwei verschiedene Pflanzen miteinander verbindet, sodass sie zusammenwachsen und als eine einzige Pflanze weiterleben. Der Vorteil? Man kann die positiven Eigenschaften beider Pflanzen kombinieren! Bei Jackfrüchten bedeutet das:
* Schnellere Ernte: Veredelte Bäume tragen oft viel früher Früchte als aus Samen gezogene Bäume.
* Bessere Fruchtqualität: Man kann eine Sorte mit besonders schmackhaften oder großen Früchten auf einen robusten Unterstamm veredeln.
* Krankheitsresistenz: Der Unterstamm kann resistent gegen bestimmte Krankheiten sein, was den gesamten Baum widerstandsfähiger macht.
* Erhaltung seltener Sorten: Veredelung ist eine tolle Möglichkeit, seltene oder gefährdete Jackfruchtsorten zu erhalten.
Die richtige Vorbereitung ist das A und O
Bevor wir loslegen, brauchen wir natürlich das richtige Werkzeug und Material. Hier ist eine Liste von Dingen, die ihr bereithalten solltet:
* Ein gesunder Unterstamm: Das ist der Baum, auf den wir die Edelsorte veredeln. Er sollte kräftig und gesund sein, idealerweise 1-2 Jahre alt. Achtet darauf, dass er gut bewurzelt ist.
* Ein Edelreis: Das ist der Trieb der Jackfruchtsorte, die ihr vermehren wollt. Wählt einen gesunden, kräftigen Trieb mit gut entwickelten Knospen. Er sollte etwa bleistiftdick sein.
* Ein scharfes Veredelungsmesser: Ein wirklich scharfes Messer ist unerlässlich für saubere Schnitte.
* Veredelungsband oder -folie: Damit fixieren wir die Veredelungsstelle und schützen sie vor dem Austrocknen.
* Baumwachs oder Wundverschlussmittel: Damit versiegeln wir die Schnittstellen und verhindern das Eindringen von Krankheitserregern.
* Alkohol oder Desinfektionsmittel: Um das Messer und die Schnittstellen zu desinfizieren und das Risiko von Infektionen zu minimieren.
* Eine Sprühflasche mit Wasser: Um das Edelreis feucht zu halten.
* Handschuhe: Zum Schutz eurer Hände.
Wichtiger Hinweis: Sauberkeit ist bei der Veredelung extrem wichtig! Desinfiziert euer Messer vor jedem Schnitt, um die Übertragung von Krankheiten zu vermeiden.
Die Wahl der richtigen Veredelungsmethode
Es gibt verschiedene Veredelungsmethoden, aber für Jackfrüchte ist die Geißfußveredelung (auch Spaltveredelung genannt) eine sehr beliebte und erfolgreiche Methode. Sie ist relativ einfach durchzuführen und bietet gute Erfolgschancen.
Schritt-für-Schritt-Anleitung zur Geißfußveredelung
Jetzt geht’s ans Eingemachte! Hier ist eine detaillierte Anleitung, wie ihr die Geißfußveredelung bei Jackfrüchten durchführt:
1. Vorbereitung des Unterstamms
1. Wählt den richtigen Zeitpunkt: Die beste Zeit für die Veredelung von Jackfrüchten ist in der Regel im Frühjahr oder Frühsommer, wenn die Bäume aktiv wachsen.
2. Schneidet den Unterstamm: Schneidet den Unterstamm in einer Höhe von etwa 15-20 cm über dem Boden ab. Achtet darauf, dass der Schnitt sauber und glatt ist.
3. Spaltet den Unterstamm: Mit eurem Veredelungsmesser spaltet ihr den Unterstamm in der Mitte etwa 5-7 cm tief. Achtet darauf, dass der Spalt gerade ist.
2. Vorbereitung des Edelreises
1. Wählt das richtige Edelreis: Wählt einen gesunden, kräftigen Trieb der gewünschten Jackfruchtsorte. Er sollte etwa bleistiftdick sein und gut entwickelte Knospen haben.
2. Schneidet das Edelreis: Schneidet das Edelreis auf eine Länge von etwa 8-10 cm zu. Entfernt alle Blätter, die sich am Edelreis befinden.
3. Schneidet das Edelreis keilförmig zu: Schneidet das untere Ende des Edelreises auf beiden Seiten keilförmig zu, sodass es in den Spalt des Unterstamms passt. Die Keile sollten etwa 5-7 cm lang sein.
3. Zusammenfügen von Unterstamm und Edelreis
1. Fügt das Edelreis in den Spalt ein: Schiebt das keilförmige Ende des Edelreises vorsichtig in den Spalt des Unterstamms. Achtet darauf, dass die Kambiumschichten (die grüne Schicht direkt unter der Rinde) von Unterstamm und Edelreis so gut wie möglich aufeinander liegen. Das ist entscheidend für das Zusammenwachsen!
2. Fixiert die Veredelungsstelle: Wickelt die Veredelungsstelle fest mit Veredelungsband oder -folie ein. Beginnt unterhalb des Spalts und arbeitet euch nach oben. Achtet darauf, dass die Veredelungsstelle gut abgedichtet ist, damit keine Feuchtigkeit eindringen kann.
4. Versiegeln der Schnittstellen
1. Versiegelt die Schnittstellen: Tragt Baumwachs oder Wundverschlussmittel auf alle Schnittstellen auf, um sie vor dem Austrocknen und vor Krankheitserregern zu schützen. Besonders wichtig ist es, die Spitze des Edelreises zu versiegeln.
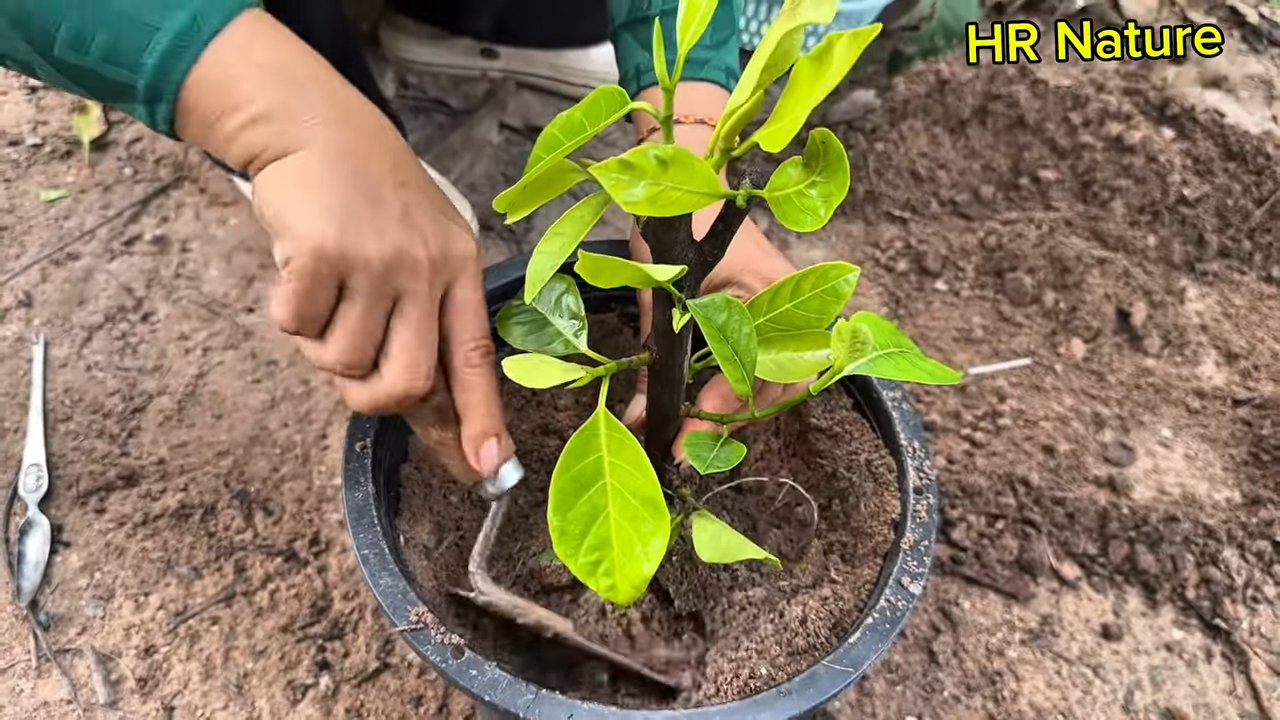
5. Nachsorge und Pflege
1. Schützt die Veredelungsstelle: Schützt die Veredelungsstelle vor direkter Sonneneinstrahlung und starkem Wind. Ihr könnt den Baum beispielsweise mit einem Schattiernetz abdecken.
2. Haltet den Boden feucht: Gießt den Baum regelmäßig, aber vermeidet Staunässe.
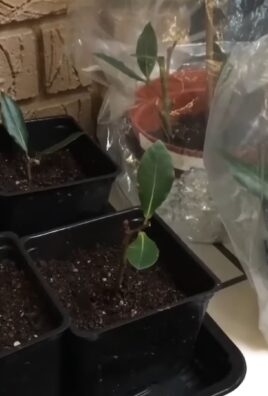
3. Beobachtet die Veredelungsstelle: Kontrolliert die Veredelungsstelle regelmäßig auf Anzeichen von Wachstum. Nach einigen Wochen sollten die Knospen am Edelreis anfangen, auszutreiben.
4. Entfernt das Veredelungsband: Sobald das Edelreis gut angewachsen ist und neue Triebe bildet, könnt ihr das Veredelungsband vorsichtig entfernen.
5. Entfernt Wildtriebe: Entfernt alle Triebe, die unterhalb der Veredelungsstelle am Unterstamm wachsen. Diese würden dem Edelreis Nährstoffe wegnehmen.
Häufige Fehler und wie man sie vermeidet
* Unsaubere Schnitte: Verwendet immer ein scharfes Messer und desinfiziert es regelmäßig.
* Schlechter Kontakt der Kambiumschichten: Achtet darauf, dass die Kambiumschichten von Unterstamm und Edelreis so gut wie möglich aufeinander liegen.
* Austrocknung der Veredelungsstelle: Versiegelt die Schnittstellen gut mit Baumwachs und schützt die Veredelungsstelle vor direkter Sonneneinstrahlung.
* Infektionen: Desinfiziert euer Werkzeug und achtet auf Sauberkeit.
* Ungeduld: Veredelung braucht Zeit! Habt Geduld und gebt dem Baum Zeit, zusammenzuwachsen.
Geduld zahlt sich aus!
Die Veredelung von Jackfrüchten ist zwar etwas aufwendig, aber es lohnt sich auf jeden Fall! Mit etwas Übung und Geduld könnt ihr eure eigenen Jackfruchtbäume vermehren und euch schon bald über eine reiche Ernte freuen. Ich hoffe, diese Anleitung hat euch geholfen und inspiriert, es selbst auszuprobieren. Viel Erfolg beim Veredeln!
Conclusion
So, there you have it! Mastering jackfruit grafting at home might seem daunting at first, but with a little patience, the right techniques, and our detailed guide, you’ll be well on your way to enjoying the fruits (literally!) of your labor. This DIY approach isn’t just about saving money; it’s about connecting with nature, understanding the life cycle of your plants, and experiencing the immense satisfaction of nurturing a tree from a simple graft.
Why is this a must-try? Because grafting allows you to propagate desirable jackfruit varieties with guaranteed traits. Forget the uncertainty of growing from seed where the resulting fruit might not match the parent tree. Grafting ensures you get the delicious, high-yielding jackfruit you’re after. Plus, it’s a fantastic way to preserve heirloom varieties or propagate rare and unique jackfruit types that might be difficult to find otherwise.
But the benefits extend beyond just the fruit itself. Grafting can also improve the overall health and vigor of your jackfruit tree. By selecting a strong, disease-resistant rootstock, you can create a tree that is better equipped to withstand environmental stresses and produce abundant harvests for years to come.
Ready to take your jackfruit cultivation to the next level?
Don’t be afraid to experiment with different grafting techniques. While we’ve focused on cleft grafting, you might also explore side veneer grafting or approach grafting, depending on your skill level and the specific circumstances of your trees. Consider using different rootstocks to see which performs best in your local climate and soil conditions.
And speaking of variations, think about the possibilities! You could graft multiple jackfruit varieties onto a single tree, creating a “fruit salad” tree that offers a diverse range of flavors and textures. Or, you could graft a dwarf jackfruit variety onto a standard rootstock to create a more manageable tree for smaller gardens.
The key is to be observant, patient, and willing to learn from your mistakes. Grafting is a skill that improves with practice, so don’t get discouraged if your first attempt isn’t perfect. Keep experimenting, keep learning, and keep sharing your experiences with others.
We wholeheartedly encourage you to embark on this rewarding journey of jackfruit grafting at home. It’s a fantastic way to enhance your gardening skills, connect with nature, and enjoy the delicious rewards of your hard work.
Once you’ve tried your hand at jackfruit grafting, we’d love to hear about your experience! Share your successes, your challenges, and any tips or tricks you’ve learned along the way in the comments section below. Let’s build a community of jackfruit grafting enthusiasts and help each other grow! Share your photos and videos on social media using #JackfruitGraftingAtHome. We can’t wait to see what you create!
Frequently Asked Questions (FAQ)
What is the best time of year to graft jackfruit?
The ideal time for jackfruit grafting is typically during the late winter or early spring, just before the tree begins its active growth phase. This is when the sap flow is increasing, which promotes successful union between the scion and rootstock. Avoid grafting during periods of extreme heat, cold, or heavy rainfall, as these conditions can hinder the healing process and increase the risk of failure. In tropical climates with consistent temperatures, grafting can be attempted year-round, but monitoring weather conditions is still crucial.
How long does it take for a jackfruit graft to take?
The time it takes for a jackfruit graft to successfully take can vary depending on several factors, including the grafting technique used, the health of the scion and rootstock, and the environmental conditions. Generally, you can expect to see signs of successful union within 3 to 8 weeks. Look for new growth emerging from the scion, indicating that it has successfully connected to the rootstock and is receiving nutrients. It’s important to be patient and avoid disturbing the graft during this critical period.
What type of rootstock is best for jackfruit grafting?
The best type of rootstock for jackfruit grafting depends on your specific goals and the environmental conditions in your area. Seedlings of common jackfruit varieties are often used as rootstock. However, selecting a rootstock that is known for its disease resistance, vigor, and adaptability to your local soil and climate is crucial. Consider using rootstocks from varieties that are known to be tolerant of root rot or other common jackfruit diseases. Local agricultural extension offices or experienced jackfruit growers in your area can provide valuable recommendations on the best rootstock options for your region.
Can I graft different varieties of jackfruit onto the same tree?
Yes, you can graft different varieties of jackfruit onto the same tree, creating what is sometimes referred to as a “fruit salad” tree. This can be a great way to enjoy a diverse range of jackfruit flavors and textures from a single tree. However, it’s important to choose varieties that are compatible with each other and have similar growth habits. Also, ensure that each graft receives adequate sunlight and space to develop properly.
What are the common reasons for jackfruit grafting failure?
Several factors can contribute to jackfruit grafting failure. These include:
* Incompatibility between the scion and rootstock: Ensure that the varieties you are grafting are compatible with each other.
* Poor grafting technique: Proper alignment of the cambium layers is essential for successful union.
* Contamination: Use sterile tools and maintain a clean grafting environment to prevent infection.
* Desiccation: Protect the graft from drying out by wrapping it securely with grafting tape or wax.
* Pest and disease: Monitor the graft for signs of pests or diseases and take appropriate action.
* Unfavorable weather conditions: Avoid grafting during periods of extreme heat, cold, or heavy rainfall.
How do I care for a newly grafted jackfruit tree?
Caring for a newly grafted jackfruit tree is crucial for its survival and successful development. Here are some key tips:
* Protection: Protect the graft from direct sunlight, strong winds, and heavy rain. You can use shade cloth or a temporary shelter to provide protection.
* Watering: Water the tree regularly, but avoid overwatering, which can lead to root rot.
* Fertilizing: Apply a balanced fertilizer to promote healthy growth. Follow the instructions on the fertilizer label.
* Pest and disease control: Monitor the tree for signs of pests or diseases and take appropriate action.
* Pruning: Prune any suckers or shoots that emerge from the rootstock below the graft union.
* Support: Provide support for the newly grafted branch to prevent it from breaking under its own weight.
Can I use jackfruit grafting to propagate dwarf varieties?
Yes, jackfruit grafting is an excellent way to propagate dwarf varieties. Grafting a dwarf scion onto a standard rootstock allows you to maintain the desirable characteristics of the dwarf variety while benefiting from the vigor and disease resistance of the rootstock. This can be particularly useful for growing jackfruit in smaller gardens or containers.
Where can I find scion wood for jackfruit grafting?
Finding high-quality scion wood is essential for successful jackfruit grafting. You can obtain scion wood from several sources, including:
* Established jackfruit trees in your area: Ask permission from the owner before collecting scion wood.
* Nurseries: Some nurseries specialize in jackfruit and may offer scion wood for sale.
* Agricultural extension offices: These offices may have access to scion wood from reputable sources.
* Online forums and communities: Connect with other jackfruit growers and exchange scion wood.
When selecting scion wood, choose healthy, disease-free branches that are actively growing and have well-developed buds.
What tools do I need for jackfruit grafting?
To successfully perform jackfruit grafting, you will need the following tools:
* Grafting knife: A sharp, specialized knife designed for making clean cuts.
* Pruning shears: For trimming branches and preparing the rootstock.
* Grafting tape or wax: To seal the graft union and prevent desiccation.
* Rubbing alcohol or bleach solution: For sterilizing your tools.
* Protective gloves: To protect your hands from cuts and contamination.
* Optional: Budding strips, raffia, or twine for additional support.
Ensure that all your tools are clean and sharp to minimize the risk of infection and promote successful grafting.
Leave a Comment