

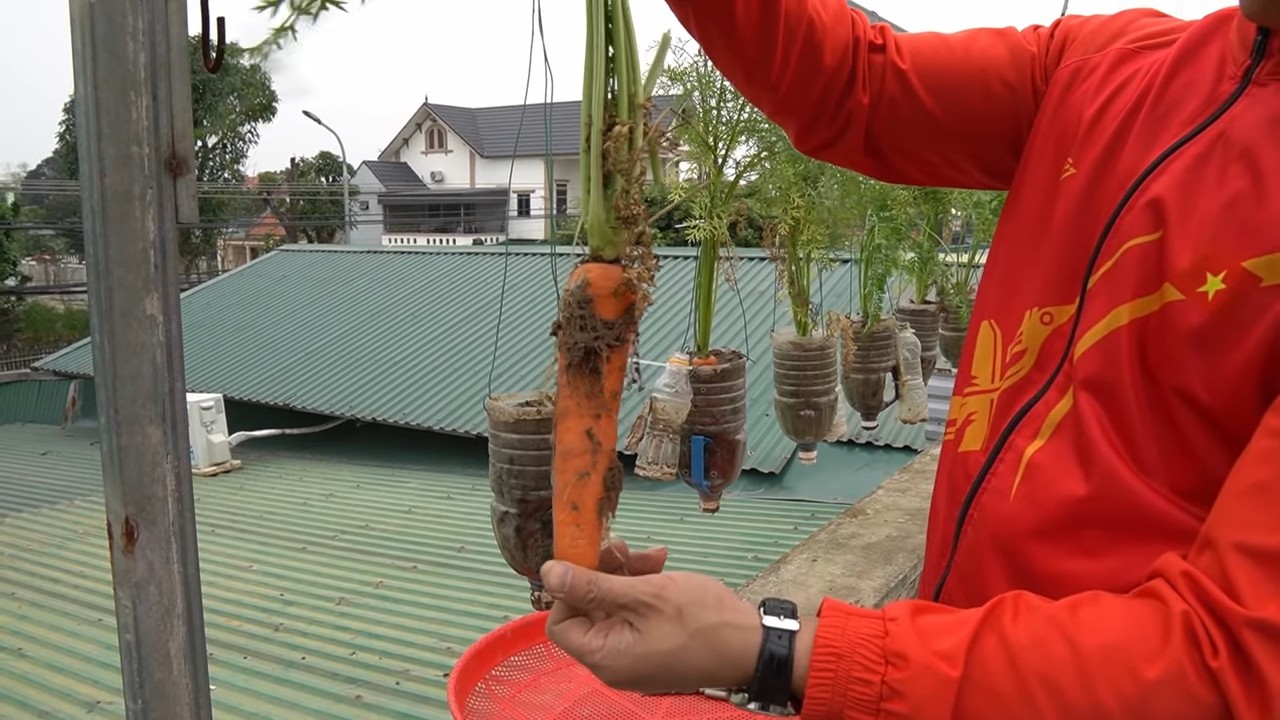
Hanging carrot bottle planter: Ever dreamt of a whimsical garden cascading with vibrant greenery, even if you’re short on space? I know I have! Forget sprawling acres; we’re bringing the charm of a countryside garden right to your balcony, patio, or even a sunny window with this incredibly fun and easy DIY project.
The concept of repurposing materials for gardening isn’t new. Throughout history, resourceful gardeners have found creative ways to cultivate plants using what’s available. Think of the ancient Egyptians using broken pottery to grow herbs or the ingenious vertical gardens of Babylon. We’re tapping into that same spirit of innovation and sustainability with this project.
Why a hanging carrot bottle planter, you ask? Well, imagine the delight of watching carrot tops sprout and flourish from a recycled plastic bottle, adding a touch of quirky elegance to your space. Plus, it’s a fantastic way to reduce waste and teach kids about recycling and gardening. This DIY trick is perfect for anyone who wants to add a touch of green to their lives without breaking the bank or needing a large garden. It’s also a great solution for small spaces, allowing you to maximize your growing potential vertically. So, grab your empty plastic bottles, and let’s get started on creating your own unique hanging garden!
DIY Hängender Karotten-Flaschen-Pflanzer: Ein farbenfroher Hingucker für deinen Garten
Hallo liebe Gartenfreunde! Heute zeige ich euch, wie ihr aus einfachen Plastikflaschen und ein bisschen Farbe einen super süßen und praktischen hängenden Karotten-Pflanzer basteln könnt. Das ist nicht nur ein tolles Upcycling-Projekt, sondern auch eine super Möglichkeit, eure Lieblingskräuter oder kleine Blumen auf dem Balkon, der Terrasse oder im Garten aufzuhängen. Lasst uns loslegen!
Benötigte Materialien
Bevor wir anfangen, hier eine Liste der Dinge, die ihr braucht:
* Leere Plastikflaschen (am besten 1,5 oder 2 Liter)
* Acrylfarben (Orange, Grün, Schwarz)
* Pinsel in verschiedenen Größen
* Schere oder Cuttermesser
* Heißklebepistole (optional, aber sehr hilfreich)
* Dicke Schnur oder Seil
* Erde
* Pflanzen (Kräuter, kleine Blumen, Erdbeeren – was immer ihr mögt!)
* Bleistift
* Schleifpapier (fein)
* Klarlack (optional, zum Versiegeln der Farbe)
* Bohrmaschine oder Ahle (zum Bohren von Löchern)
Schritt-für-Schritt-Anleitung
Hier ist eine detaillierte Anleitung, wie ihr euren eigenen Karotten-Flaschen-Pflanzer bastelt:
1. Vorbereitung der Flaschen
1. Reinigung: Zuerst müsst ihr die Plastikflaschen gründlich reinigen. Entfernt alle Etiketten und Klebereste. Warmes Wasser und Spülmittel helfen dabei. Lasst die Flaschen anschließend gut trocknen.
2. Zuschneiden: Jetzt kommt der spannende Teil! Mit einem Bleistift markiert ihr, wo ihr die Flasche zuschneiden wollt. Stellt euch vor, ihr wollt eine Karottenform erzeugen. Schneidet die Flasche mit einer Schere oder einem Cuttermesser so zu, dass sie nach unten hin spitz zuläuft. Achtet darauf, dass die Kanten sauber sind.
3. Abschleifen: Um scharfe Kanten zu vermeiden, schleift ihr die Schnittkanten mit feinem Schleifpapier ab. Das ist besonders wichtig, wenn Kinder mithelfen.
2. Bemalen der Karotten
1. Grundierung (optional): Wenn ihr möchtet, könnt ihr die Flaschen zuerst mit einer weißen oder grauen Grundierung besprühen. Das sorgt dafür, dass die Farbe besser haftet und leuchtender wirkt. Lasst die Grundierung gut trocknen.
2. Orange Farbe: Jetzt kommt die orange Farbe ins Spiel! Bemalt die gesamte Außenseite der Flasche mit Acrylfarbe. Tragt am besten zwei Schichten auf, damit die Farbe deckend ist. Lasst jede Schicht gut trocknen, bevor ihr die nächste auftragt.
3. Details: Mit einem feinen Pinsel könnt ihr kleine Details hinzufügen, wie z.B. leichte Schattierungen, um die Karotte realistischer wirken zu lassen.
3. Gestaltung des Grüns
1. Zuschnitt des Grüns: Aus den abgeschnittenen Flaschenresten oder aus einer weiteren Flasche schneidet ihr lange, dünne Streifen. Diese werden das Karottengrün darstellen. Ihr könnt die Streifen auch leicht einrollen, um ihnen mehr Volumen zu geben.
2. Bemalen des Grüns: Bemalt die Streifen mit grüner Acrylfarbe. Auch hier sind zwei Schichten empfehlenswert. Lasst die Farbe gut trocknen.
3. Anbringen des Grüns: Mit einer Heißklebepistole (oder starkem Kleber) klebt ihr die grünen Streifen am oberen, offenen Ende der Karotte fest. Achtet darauf, dass sie gut halten. Ihr könnt die Streifen auch leicht nach außen biegen, um einen buschigeren Effekt zu erzielen.
4. Anbringen der Aufhängung
1. Löcher bohren: Bohrt mit einer Bohrmaschine oder einer Ahle zwei Löcher an den Seiten der Karotte, knapp unterhalb des grünen “Laubs”. Die Löcher sollten sich gegenüberliegen.
2. Schnur befestigen: Fädelt die Schnur oder das Seil durch die Löcher und verknotet sie fest. Achtet darauf, dass die Schnur lang genug ist, um den Pflanzer bequem aufhängen zu können.
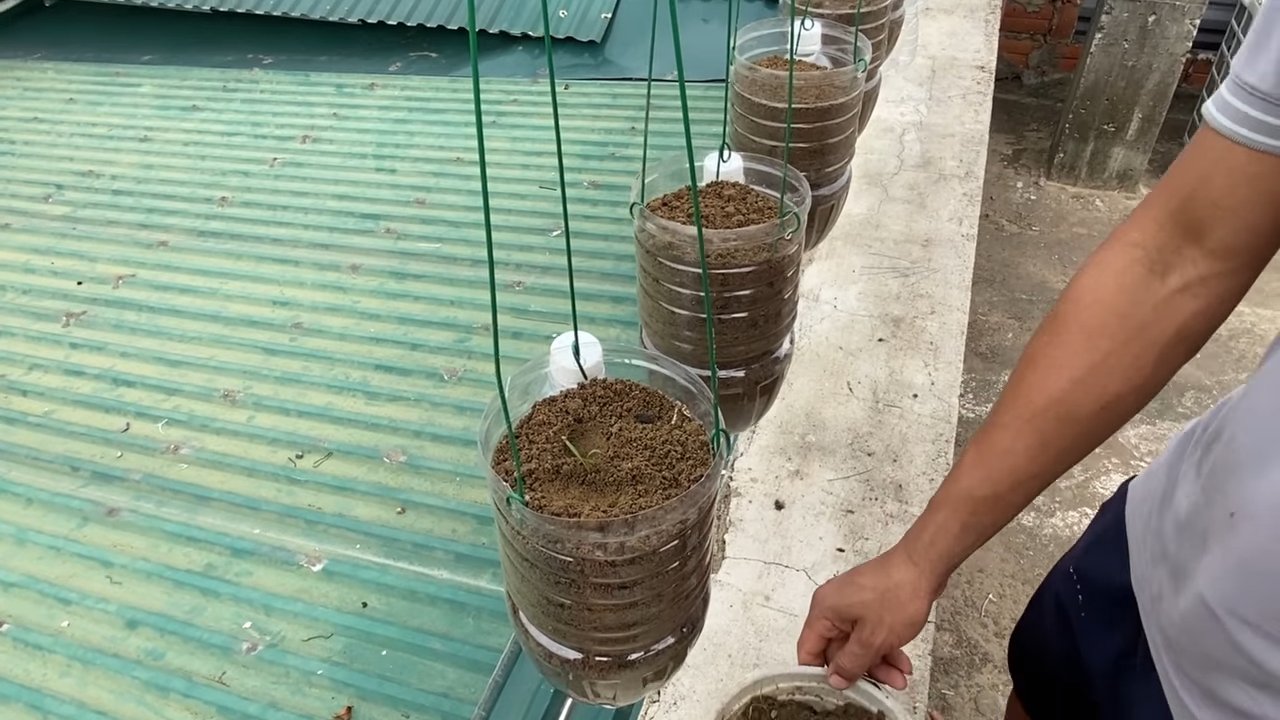
5. Bepflanzen der Karotte
1. Erde einfüllen: Füllt die Karotte mit Erde. Achtet darauf, dass ihr hochwertige Pflanzerde verwendet, die gut Wasser speichert.
2. Pflanzen einsetzen: Setzt eure Pflanzen in die Erde. Kräuter wie Basilikum, Petersilie oder Schnittlauch eignen sich hervorragend. Kleine Blumen wie Petunien oder Stiefmütterchen sehen auch sehr hübsch aus. Ihr könnt auch Erdbeeren pflanzen – das ist besonders dekorativ!
3. Angießen: Gießt die Pflanzen vorsichtig an. Achtet darauf, dass das Wasser gut abfließen kann.
6. Feinschliff (Optional)
1. Gesicht aufmalen: Mit schwarzer Acrylfarbe könnt ihr der Karotte ein lustiges Gesicht aufmalen. Das macht den Pflanzer noch individueller und verspielter.
2. Versiegeln: Um die Farbe vor Witterungseinflüssen zu schützen, könnt ihr den Pflanzer mit Klarlack versiegeln. Das verlängert die Lebensdauer eures DIY-Projekts.
Zusätzliche Tipps und Tricks
* Drainage: Um Staunässe zu vermeiden, könnt ihr vor dem Einfüllen der Erde eine Schicht Kieselsteine oder Tonscherben auf den Boden der Flasche legen.
* Farbvariationen: Seid kreativ mit den Farben! Ihr könnt die Karotten auch in anderen Farben bemalen, z.B. in Gelb oder Lila.
* Muster: Verziert die Karotten mit Mustern, z.B. mit Punkten, Streifen oder Blumen.
* Mehrere Pflanzer: Bastelt mehrere Karotten-Pflanzer und hängt sie nebeneinander auf. Das sieht besonders schön aus!
* Geschenkidee: Der Karotten-Flaschen-Pflanzer ist auch eine tolle Geschenkidee für Gartenfreunde.
Sicherheitshinweise
* Seid vorsichtig beim Zuschneiden der Flaschen mit Schere oder Cuttermesser.
* Lasst Kinder nur unter Aufsicht mithelfen.
* Verwendet eine Heißklebepistole nur mit Vorsicht und achtet darauf, euch nicht zu verbrennen.
* Bohrt Löcher nur mit der entsprechenden Schutzausrüstung (z.B. Schutzbrille).
Pflegehinweise
* Gießt die Pflanzen regelmäßig, aber vermeidet Staunässe.
* Düngt die Pflanzen bei Bedarf.
* Entfernt regelmäßig verwelkte Blätter und Blüten.
* Stellt den Pflanzer an einen sonnigen Standort, aber schützt ihn vor direkter Mittagssonne.
* Im Winter solltet ihr die Pflanzen vor Frost schützen.
Ich hoffe, diese Anleitung hat euch gefallen und ihr habt viel Spaß beim Basteln eures eigenen Karotten-Flaschen-Pflanzers! Zeigt mir eure Ergebnisse – ich bin gespannt, wie eure kreativen Karotten aussehen werden! Viel Erfolg und fröhliches Gärtnern!
Conclusion
So, there you have it! Transforming a humble plastic bottle and a carrot into a self-watering planter is not just a fun project; it’s a game-changer for your indoor gardening. This hanging carrot bottle planter offers a sustainable, cost-effective, and visually appealing way to nurture your favorite herbs, succulents, or even small flowering plants. Forget about constantly worrying about overwatering or underwatering – the carrot acts as a natural regulator, drawing moisture from the water reservoir as needed.
But why is this DIY trick a must-try? Beyond its practicality, it’s about embracing a more eco-conscious lifestyle. We’re all becoming increasingly aware of the impact of plastic waste, and this project offers a creative way to repurpose those bottles that would otherwise end up in landfills. Plus, it’s incredibly satisfying to create something beautiful and functional with your own hands.
The beauty of this project lies in its adaptability. Feel free to experiment with different types of bottles – larger bottles can accommodate bigger plants, while smaller ones are perfect for seedlings or herbs. You can also get creative with the design. Paint the bottle with vibrant colors, add decorative twine or beads, or even create a macrame hanger for a bohemian touch. Consider using different types of carrots too! While standard orange carrots work perfectly, you could try purple or yellow varieties for a unique aesthetic.
For those who want to take it a step further, consider adding a small amount of liquid fertilizer to the water reservoir. This will provide your plants with an extra boost of nutrients. Just be sure to dilute the fertilizer properly to avoid burning the roots. Another variation is to use a small piece of cloth or felt instead of a carrot, although the carrot’s natural properties make it a superior choice for water regulation.
Don’t be intimidated if you’re not a seasoned DIYer. This project is incredibly simple and requires minimal tools and materials. The most important thing is to have fun and experiment! The satisfaction of watching your plants thrive in a planter you created yourself is truly rewarding.
We wholeheartedly encourage you to give this hanging carrot bottle planter a try. It’s a fantastic way to add a touch of green to your home, reduce plastic waste, and learn a new skill. Once you’ve created your own, we’d love to see your creations! Share your photos and experiences with us on social media using #CarrotBottlePlanterDIY. Let’s inspire others to embrace sustainable gardening practices and create a greener world, one planter at a time. We can’t wait to see what you come up with! Let us know if you have any questions, and happy planting!
Frequently Asked Questions (FAQ)
What kind of plants are best suited for a hanging carrot bottle planter?
The hanging carrot bottle planter is ideal for plants that prefer consistent moisture and don’t require a lot of space. Herbs like basil, mint, and oregano thrive in these planters. Succulents, with their low water requirements, are also a great option. Smaller flowering plants like pansies or petunias can also be grown successfully. Avoid plants with extensive root systems or those that need well-draining soil, as the constant moisture could lead to root rot.
How often do I need to refill the water reservoir?
The frequency of refilling depends on several factors, including the type of plant, the size of the bottle, and the ambient temperature. Generally, you’ll need to check the water level every few days. If the plant is actively growing or the weather is hot and dry, you may need to refill it more frequently. A good rule of thumb is to refill the reservoir when it’s about one-third empty. The carrot will help regulate the water uptake, preventing overwatering.
Will the carrot rot inside the bottle?
Yes, the carrot will eventually decompose, but it will take several weeks or even months depending on the environment. The decomposition process is slow enough that it won’t harm the plant. In fact, as the carrot breaks down, it releases nutrients into the water, providing a natural fertilizer for your plant. When the carrot becomes too soft or starts to disintegrate significantly, simply replace it with a fresh one.
Can I use any type of plastic bottle?
While you can technically use any type of plastic bottle, it’s best to opt for bottles made from thicker, more durable plastic. Soda bottles or water bottles work well. Avoid using bottles that are too thin or flimsy, as they may collapse under the weight of the soil and plant. Also, make sure the bottle is clean and free of any residue before using it. Thoroughly rinse the bottle with soap and water to remove any lingering odors or chemicals.
How do I prevent algae growth in the water reservoir?
Algae growth is a common issue in self-watering planters. To minimize algae growth, keep the planter out of direct sunlight. Algae thrive in sunlight, so placing the planter in a shaded area will help prevent its growth. You can also add a small amount of hydrogen peroxide to the water reservoir. Hydrogen peroxide is a natural algaecide that won’t harm your plants. Alternatively, you can wrap the bottle with dark-colored tape or paint to block out light.
What if my plant starts to wilt or show signs of overwatering?
If your plant starts to wilt, it could be a sign of either underwatering or overwatering. Check the soil moisture level. If the soil is dry, refill the water reservoir. If the soil is soggy, it could be a sign of overwatering. In this case, allow the soil to dry out slightly before refilling the reservoir. You can also improve drainage by adding a layer of gravel or pebbles to the bottom of the bottle. If the problem persists, consider transplanting the plant to a pot with better drainage.
Can I use this planter outdoors?
Yes, you can use the hanging carrot bottle planter outdoors, but keep in mind that it will be exposed to the elements. The plastic bottle may degrade more quickly in direct sunlight, and the water reservoir may evaporate more rapidly in hot weather. If you live in an area with strong winds, make sure the planter is securely hung to prevent it from falling. Also, be aware that outdoor plants may require more frequent watering and fertilization.
How do I hang the planter securely?
The best way to hang the planter securely is to use a strong, durable cord or rope. You can create a macrame hanger or simply tie the cord around the neck of the bottle. Make sure the cord is long enough to accommodate the weight of the planter and the plant. Choose a hanging location that can support the weight of the planter, such as a sturdy hook or a strong branch. Regularly check the cord for wear and tear and replace it if necessary.
Is this planter suitable for all climates?
The hanging carrot bottle planter is generally suitable for most climates, but you may need to make adjustments depending on your specific climate. In hot, dry climates, you may need to refill the water reservoir more frequently. In cold climates, you may need to bring the planter indoors during the winter months to protect the plant from frost. Pay attention to the specific needs of your plant and adjust your care accordingly.
How do I clean the planter?
To clean the planter, remove the plant and the carrot. Rinse the bottle with soap and water to remove any dirt or debris. You can use a bottle brush to scrub the inside of the bottle. If there is algae growth, soak the bottle in a solution of water and bleach for a few minutes. Rinse the bottle thoroughly with water before replanting. Replace the carrot with a fresh one. Regular cleaning will help prevent the buildup of bacteria and algae and keep your plant healthy.
Leave a Comment