

Growing Tomatoes at Home can feel like a daunting task, but trust me, it’s more rewarding than you might think! Imagine biting into a juicy, sun-ripened tomato, bursting with flavor, that you nurtured from a tiny seed right in your own backyard. Forget those bland, store-bought imposters – we’re talking about the real deal here!
For centuries, tomatoes have held a special place in cultures around the world. Originating in South America, they were initially met with suspicion in Europe, but eventually, their vibrant color and delicious taste won everyone over. Now, they’re a staple in countless cuisines, from Italian pasta sauces to refreshing summer salads.
But why should you bother with the effort of growing tomatoes at home? Well, for starters, you get complete control over what goes into your food. No pesticides, no artificial fertilizers – just pure, natural goodness. Plus, it’s incredibly satisfying to watch your plants thrive and produce a bountiful harvest. And let’s be honest, who doesn’t love bragging about their homegrown tomatoes? In this article, I’m going to share some simple DIY tricks and hacks that will help you cultivate the most delicious tomatoes you’ve ever tasted, even if you’re a complete beginner. Get ready to get your hands dirty and enjoy the fruits (or should I say, vegetables?) of your labor!

Growing Tomatoes at Home: A Beginner’s Guide
Okay, tomato lovers, let’s get our hands dirty! I’m going to walk you through everything you need to know to grow delicious, juicy tomatoes right in your own backyard (or even on your balcony!). Trust me, there’s nothing quite like the taste of a homegrown tomato. It’s a rewarding experience, and with a little patience and effort, you’ll be enjoying fresh tomatoes all season long.
Choosing Your Tomato Varieties
Before we even think about planting, we need to decide what kind of tomatoes we want to grow. There are literally hundreds of varieties, so it can be a little overwhelming! Here’s a breakdown to help you choose:
* **Determinate vs. Indeterminate:** This is the big one!
* **Determinate tomatoes** grow to a certain size and then produce all their fruit at once, usually over a period of a few weeks. They’re great for canning or making sauce because you’ll have a big harvest all at once. They also tend to be more compact, making them suitable for smaller spaces.
* **Indeterminate tomatoes** keep growing and producing fruit throughout the entire season until frost kills them. They need staking or caging to support their growth. These are perfect if you want a continuous supply of tomatoes for salads and snacking.
* **Tomato Size:**
* **Cherry tomatoes:** Small, bite-sized, and super sweet. Great for snacking and salads.
* **Grape tomatoes:** Similar to cherry tomatoes but slightly oblong.
* **Plum tomatoes:** Oval-shaped, meaty, and ideal for sauces and canning. Roma tomatoes are a popular plum variety.
* **Beefsteak tomatoes:** Large, juicy, and perfect for slicing on sandwiches.
* **Heirloom tomatoes:** These are older varieties that have been passed down through generations. They often have unique colors, shapes, and flavors. They can be a bit more challenging to grow, but the taste is worth it!
My personal favorites are Roma for sauce, cherry tomatoes for snacking, and a big beefsteak for sandwiches.
Starting from Seed vs. Buying Transplants
You have two main options for getting your tomato plants: starting them from seed indoors or buying transplants from a nursery.
* **Starting from Seed:** This gives you more control over the varieties you grow and can be more cost-effective. However, it requires more time and effort. You’ll need to start your seeds indoors about 6-8 weeks before the last expected frost in your area.
* **Buying Transplants:** This is the easier option, especially for beginners. You can find a wide variety of tomato plants at most nurseries and garden centers. Just make sure to choose healthy-looking plants with sturdy stems and no signs of disease.
I usually start a few of my favorite varieties from seed and then buy a few transplants to get a head start on the season.
Preparing the Soil
Tomatoes need well-drained soil that is rich in organic matter. Here’s how to prepare your soil:
* **Choose a sunny location:** Tomatoes need at least 6-8 hours of sunlight per day.
* **Test your soil:** A soil test will tell you the pH level and nutrient content of your soil. Tomatoes prefer a slightly acidic soil with a pH between 6.0 and 6.8. You can buy a soil testing kit at most garden centers.
* **Amend the soil:** If your soil is heavy clay or sandy, you’ll need to amend it with organic matter such as compost, aged manure, or peat moss. This will improve drainage, aeration, and nutrient content.
* **Add fertilizer:** Tomatoes are heavy feeders, so you’ll need to add a fertilizer that is high in phosphorus. Phosphorus promotes root growth and fruit development. You can use a granular fertilizer or a liquid fertilizer. Follow the instructions on the fertilizer package.
I always add a generous amount of compost to my tomato beds before planting. It really makes a difference!
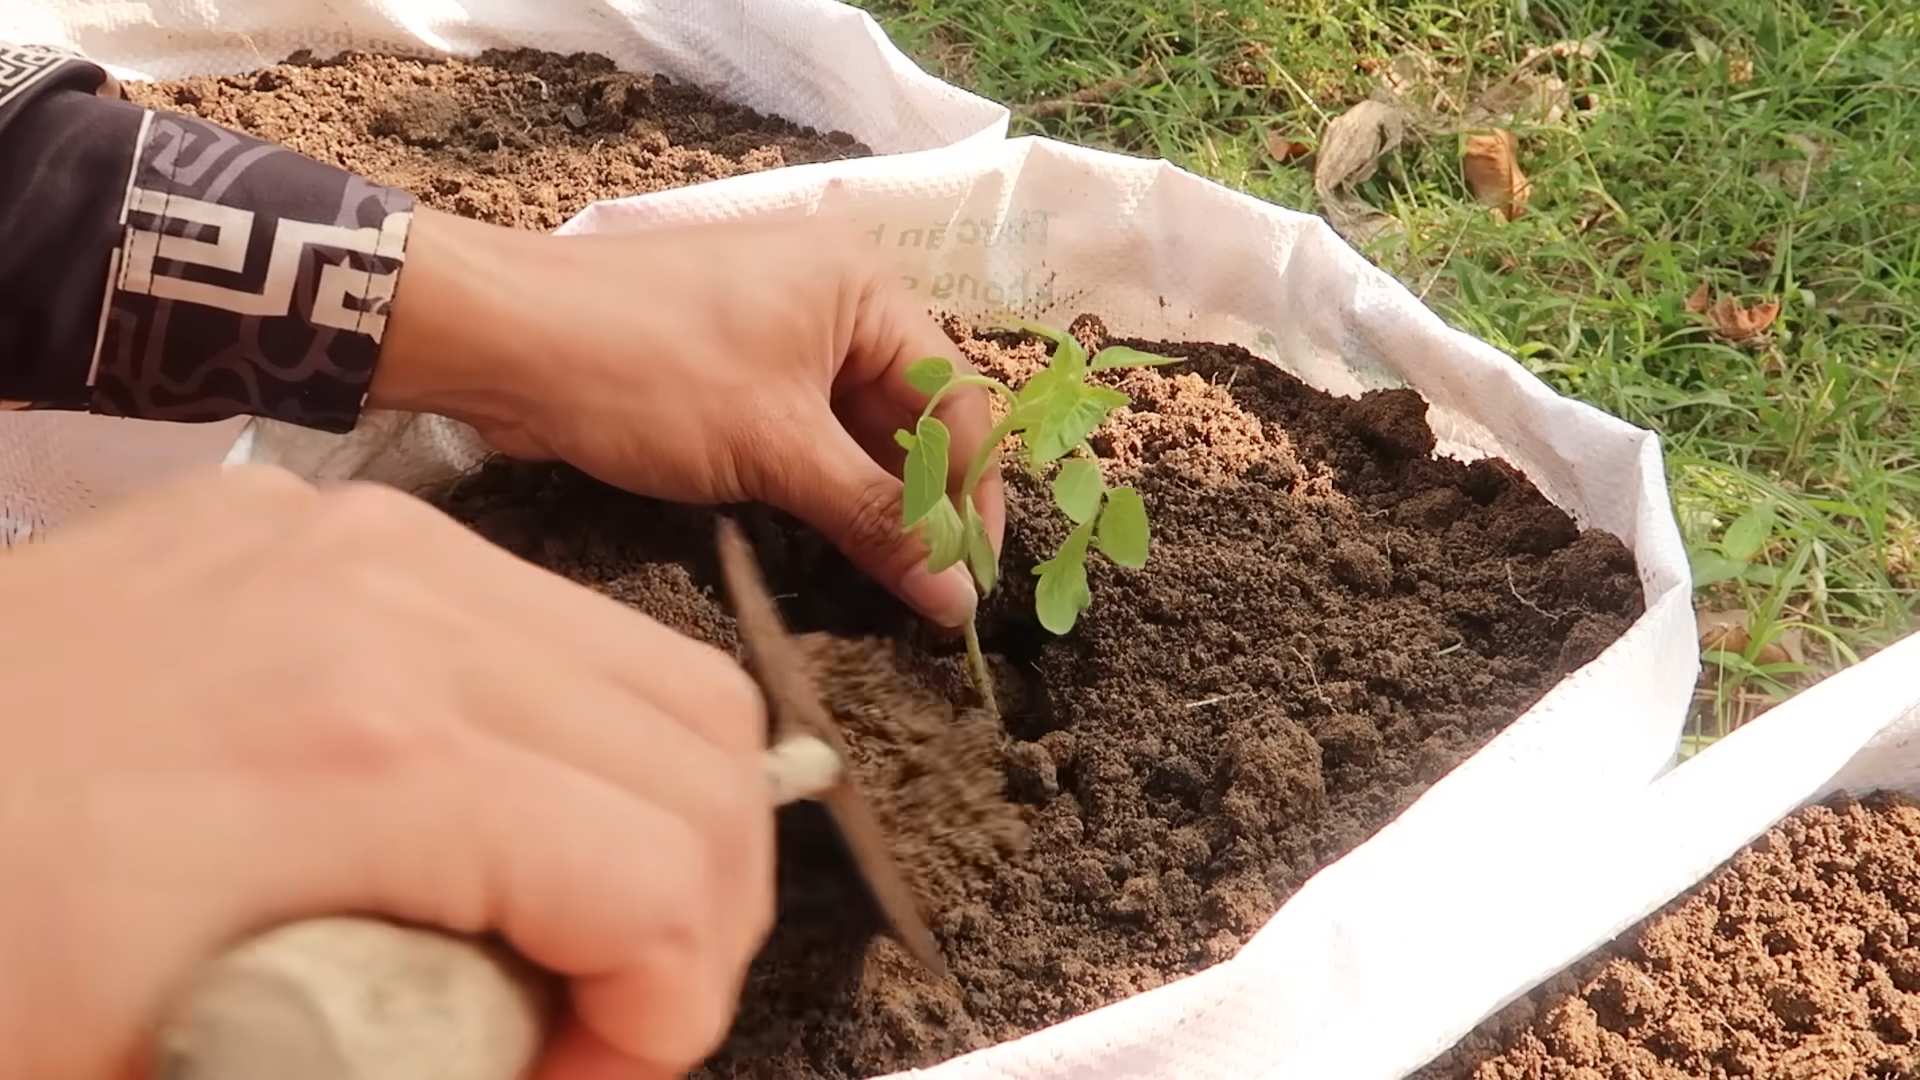
Planting Your Tomato Plants
Now for the fun part! Here’s how to plant your tomato plants:
1. **Harden off your transplants:** If you bought transplants, you’ll need to harden them off before planting them in the ground. This means gradually exposing them to outdoor conditions over a period of a week or two. Start by placing them in a sheltered location for a few hours each day, gradually increasing the amount of time they spend outdoors.
2. **Dig a hole:** Dig a hole that is deep enough to bury the bottom third of the tomato plant’s stem. This will encourage the plant to develop more roots along the buried stem, making it stronger and more productive.
3. **Remove the lower leaves:** Remove any leaves that will be buried below the soil line.
4. **Plant the tomato plant:** Gently remove the tomato plant from its container and place it in the hole.
5. **Backfill the hole:** Backfill the hole with soil, gently firming it around the plant.
6. **Water thoroughly:** Water the tomato plant thoroughly after planting.
7. **Add support:** Install stakes or cages to support the tomato plants as they grow. This will prevent the plants from falling over and keep the fruit off the ground.
Don’t be afraid to bury a good portion of the stem! It really does help the plant develop a stronger root system.
Caring for Your Tomato Plants
Once your tomato plants are in the ground, you’ll need to provide them with regular care to ensure a bountiful harvest.
* **Watering:** Water your tomato plants deeply and regularly, especially during hot, dry weather. Aim to water at the base of the plant to avoid wetting the leaves, which can lead to disease.
* **Fertilizing:** Fertilize your tomato plants every 2-3 weeks with a fertilizer that is high in potassium. Potassium promotes fruit development and ripening.
* **Pruning:** Prune your tomato plants to remove suckers, which are small shoots that grow in the crotch between the main stem and the branches. Removing suckers will encourage the plant to focus its energy on producing fruit. For determinate varieties, pruning is less critical.
* **Mulching:** Mulch around your tomato plants with straw, hay, or wood chips. Mulch will help to retain moisture in the soil, suppress weeds, and regulate soil temperature.
* **Pest and Disease Control:** Keep an eye out for pests and diseases. Common tomato pests include aphids, tomato hornworms, and whiteflies. Common tomato diseases include early blight, late blight, and blossom end rot. There are many organic and chemical control options available.
I like to use a soaker hose to water my tomato plants. It delivers water directly to the roots, which helps to prevent disease.
Dealing with Common Tomato Problems
Even with the best care, you may encounter some problems when growing tomatoes. Here are a few common issues and how to address them:
* **Blossom End Rot:** This is caused by a calcium deficiency in the fruit. The bottom of the tomato will develop a dark, leathery spot. To prevent blossom end rot, make sure your soil is well-drained and that you are watering your plants regularly. You can also add calcium to the soil by adding crushed eggshells or bone meal.
* **Early Blight:** This is a fungal disease that causes dark spots to appear on the leaves. To prevent early blight, avoid wetting the leaves when watering and prune off any infected leaves. You can also spray your plants with a fungicide.
* **Tomato Hornworms:** These are large green caterpillars that can quickly defoliate your tomato plants. Handpick them off the plants and drop them into a bucket of soapy water.
* **Aphids:** These are small, sap-sucking insects that can weaken your tomato plants. Spray them off with a strong stream of water or use insecticidal soap.
Prevention is key when it comes to tomato diseases. Make sure to provide your plants with good air circulation and avoid wetting the leaves.
Harvesting Your Tomatoes
The moment we’ve all been waiting for! Here’s how to harvest your tomatoes:
* **Wait for the right color:** Tomatoes are ready to harvest when they are fully colored and slightly soft to the touch.
* **Gently twist the tomato:** Gently twist the tomato off the vine.
* **Store your tomatoes properly:** Store your tomatoes at room temperature, away from direct sunlight. Do not refrigerate them, as this will affect their flavor and texture.
There’s nothing quite like the taste of a freshly picked, sun-ripened tomato!
Extending the Tomato Season
Want to keep enjoying fresh tomatoes even after the first frost? Here are a few tips for extending the tomato season:
* **Choose early-maturing varieties:** These varieties will produce fruit earlier in the season, giving you a longer harvest window.
* **Use row covers:** Row covers can protect your tomato plants from frost and extend the growing season.
* **Pick green tomatoes:** You can pick green tomatoes before the first frost and ripen them indoors. Place them in a paper bag with an apple or banana, which will release ethylene gas and speed
Conclusion
So, there you have it! Growing tomatoes at home isn’t just a rewarding hobby; it’s a gateway to experiencing the freshest, most flavorful tomatoes you’ve ever tasted. Ditching the store-bought varieties and embracing the DIY approach allows you to control every aspect of the growing process, from soil composition to sunlight exposure, resulting in a superior product bursting with unmatched taste.
This isn’t just about saving money (though that’s certainly a perk!). It’s about connecting with nature, understanding where your food comes from, and enjoying the unparalleled satisfaction of nurturing a plant from seed to succulent fruit. Imagine the pride you’ll feel serving a Caprese salad made with tomatoes you grew yourself, or the delight of sharing your homegrown bounty with friends and family.
But the benefits extend beyond the immediate gratification of delicious tomatoes. Gardening is a fantastic stress reliever, a great way to get some exercise, and a wonderful opportunity to learn new skills. Plus, you’ll be contributing to a more sustainable lifestyle by reducing your reliance on commercially grown produce, which often involves long-distance transportation and potentially harmful pesticides.
Don’t be afraid to experiment! Try different varieties of tomatoes to find your favorites. Cherry tomatoes are perfect for snacking, while Roma tomatoes are ideal for sauces. Beefsteak tomatoes are a classic choice for sandwiches, and heirloom varieties offer unique flavors and colors. Consider companion planting with basil, marigolds, or other herbs to deter pests and enhance the flavor of your tomatoes. You can also explore different growing methods, such as container gardening, raised beds, or even hydroponics.
For those with limited space, container gardening is an excellent option. Choose a large pot (at least 20 gallons) with good drainage and use a high-quality potting mix. Place your container in a sunny location and water regularly. You can even grow tomatoes indoors with the help of grow lights.
And if you’re feeling adventurous, try saving seeds from your best tomatoes to plant next year. This is a great way to preserve your favorite varieties and adapt them to your local climate.
Growing tomatoes at home is an investment in your health, your well-being, and your taste buds. It’s a journey of discovery, a celebration of nature, and a source of endless enjoyment.
We encourage you to take the plunge and start growing your own tomatoes today. Don’t be intimidated if you’re a beginner. There are plenty of resources available online and at your local garden center to help you succeed. And remember, even experienced gardeners encounter challenges along the way. The key is to learn from your mistakes and keep experimenting.
Once you’ve harvested your first crop of homegrown tomatoes, we’d love to hear about your experience. Share your tips, your triumphs, and your challenges in the comments below. Let’s create a community of tomato-growing enthusiasts and inspire others to discover the joys of growing their own food. So, get your hands dirty, soak up the sun, and prepare to be amazed by the incredible flavor of homegrown tomatoes!
Frequently Asked Questions (FAQ)
What is the best time to start growing tomatoes?
The best time to start growing tomatoes depends on your climate. In general, you should start seeds indoors 6-8 weeks before the last expected frost. If you live in a warmer climate, you can start seeds directly in the ground after the last frost. A good rule of thumb is to wait until the soil temperature reaches at least 60 degrees Fahrenheit. You can purchase a soil thermometer to monitor the temperature. Starting too early can lead to leggy seedlings that are susceptible to disease. Starting too late can shorten your growing season and reduce your yield.
What kind of soil is best for growing tomatoes?
Tomatoes thrive in well-drained, fertile soil with a slightly acidic pH (between 6.0 and 6.8). Amend your soil with compost or other organic matter to improve drainage and fertility. Avoid heavy clay soils, as they can become waterlogged and suffocate the roots. If you’re growing tomatoes in containers, use a high-quality potting mix specifically formulated for vegetables. You can also add slow-release fertilizer to the soil to provide your plants with a steady supply of nutrients. Regularly testing your soil pH is recommended to ensure optimal growing conditions.
How much sunlight do tomatoes need?
Tomatoes need at least 6-8 hours of direct sunlight per day to produce a good crop. Choose a sunny location for your tomato plants, preferably one that receives morning sun. If you live in a hot climate, some afternoon shade can be beneficial to prevent the plants from overheating. Insufficient sunlight can lead to weak, leggy plants with poor fruit production. If you don’t have a sunny spot in your garden, consider using grow lights to supplement the natural sunlight.
How often should I water my tomato plants?
Water your tomato plants deeply and regularly, especially during hot, dry weather. Aim to water at the base of the plant to avoid wetting the foliage, which can increase the risk of disease. The frequency of watering will depend on the weather, the type of soil, and the size of the plant. A good rule of thumb is to water when the top inch of soil feels dry to the touch. Overwatering can lead to root rot, while underwatering can stress the plants and reduce fruit production. Mulching around the base of the plants can help retain moisture in the soil.
What are some common tomato pests and diseases?
Tomatoes are susceptible to a variety of pests and diseases, including aphids, whiteflies, tomato hornworms, blossom end rot, early blight, and late blight. Regularly inspect your plants for signs of pests or diseases and take action promptly. Use organic pest control methods, such as insecticidal soap or neem oil, to control pests. Prune away any diseased leaves or stems to prevent the spread of disease. Ensure good air circulation around the plants to reduce humidity and prevent fungal diseases. Consider using disease-resistant tomato varieties to minimize the risk of disease.
How do I prevent blossom end rot?
Blossom end rot is a common problem in tomatoes caused by a calcium deficiency. It appears as a dark, leathery spot on the bottom of the fruit. To prevent blossom end rot, ensure that your soil is rich in calcium and that your plants are receiving consistent watering. Avoid over-fertilizing with nitrogen, as this can interfere with calcium uptake. You can also add calcium to the soil by incorporating bone meal or crushed eggshells. Foliar sprays containing calcium can also be helpful.
When should I harvest my tomatoes?
Tomatoes are typically ready to harvest when they are fully colored and slightly soft to the touch. The exact color will depend on the variety of tomato. Gently twist the tomato from the vine, leaving the stem attached. Avoid pulling the tomato, as this can damage the plant. Tomatoes will continue to ripen after they are harvested, so you can pick them slightly underripe if you need to. Store ripe tomatoes at room temperature for the best flavor.
Can I grow tomatoes in containers?
Yes, you can definitely grow tomatoes in containers! Choose a large container (at least 20 gallons) with good drainage. Use a high-quality potting mix specifically formulated for vegetables. Select determinate tomato varieties, which are more compact and better suited for container gardening. Place your container in a sunny location and water regularly. Fertilize your plants regularly with a balanced fertilizer. Provide support for the plants with stakes or cages.
What are some good companion plants for tomatoes?
Companion planting can help deter pests, attract beneficial insects, and improve the flavor of your tomatoes. Some good companion plants for tomatoes include basil, marigolds, onions, garlic, carrots, and beans. Avoid planting tomatoes near brassicas (such as cabbage and broccoli), as they can compete for nutrients.
How do I save tomato seeds?
Saving tomato seeds is a great way to preserve your favorite varieties and adapt them to your local climate. Choose ripe, healthy tomatoes from your best plants. Squeeze the seeds and pulp into a jar and add a little water. Let the mixture ferment for 3-4 days, stirring occasionally. This process will help remove the gelatinous coating from the seeds. Rinse the seeds thoroughly and spread them out on a paper towel to dry. Once the seeds are completely dry, store them in an airtight container in a cool, dark place.
Leave a Comment