

Growing Sage at Home doesn’t have to be a daunting task reserved for seasoned gardeners! Have you ever dreamt of stepping outside your kitchen door and snipping fresh, fragrant sage to elevate your culinary creations? Imagine the burst of flavor in your roasted chicken, the comforting aroma in your homemade stuffing, all thanks to your own homegrown herb. This DIY guide will unlock the secrets to successfully cultivating this versatile herb, even if you’re a complete beginner.
Sage, with its silvery-green leaves and earthy aroma, boasts a rich history. For centuries, it has been revered not only for its culinary uses but also for its medicinal properties. Ancient Romans considered sage a sacred herb, believing it could grant immortality. In medieval times, it was a common ingredient in remedies for everything from snakebites to memory loss. Today, while we may not rely on it for immortality, its culinary and aromatic appeal remains strong.
Why should you embark on this growing sage at home adventure? Well, store-bought herbs can be expensive and often lack the vibrant flavor of freshly picked ones. Plus, there’s an undeniable satisfaction in nurturing a plant from seed or cutting to a thriving herb that enhances your meals and your garden’s beauty. This DIY guide provides simple, effective tricks and hacks to ensure your sage plant flourishes, providing you with a continuous supply of this wonderful herb. Let’s get started!
Growing Sage at Home: Your DIY Guide for a Green Thumb
Hello, dear garden friends! I’m so excited to show you today how you can easily grow sage at home. Sage is not only a wonderful addition to your kitchen but also a medicinal herb with many positive properties. And the best part? It’s not as hard as you might think! So, let’s roll up our sleeves and get started!
What You Need: The Right Equipment
Before we start planting, we should make sure we have everything we need. Here is a list of the things you’ll need:
- Sage seeds or sage cuttings: You can either buy seeds or take cuttings from an existing sage plant. I personally find cuttings easier because they grow faster.
- Starter pots or trays: These are ideal for the start, before you transplant the plants into larger pots or outdoors.
- Seed-starting mix: This soil is specially formulated for young plants and contains the right nutrients.
- Pots (for later): Choose pots with good drainage that are large enough for the sage plants to grow.
- Garden soil: A mixture of garden soil, compost, and sand is ideal for sage.
- Watering can or spray bottle: For watering the plants.
- Garden shears or a knife: For taking cuttings.
- Rooting hormone (optional): Can help speed up root formation on cuttings.
- Labels and a pen: To identify the different sage varieties if you have several.
- A sunny location: Sage loves the sun!
Growing Sage from Seed: Step by Step
If you’ve decided to grow from seed, here is a detailed guide:
- Prepare the starter pots: Fill the starter pots or trays with seed-starting mix. Press the soil down lightly, but not too firmly.
- Sow the seeds: Distribute the sage seeds evenly over the soil. Since sage is a light germinator, cover the seeds only lightly with soil. A thin layer is perfectly sufficient.
- Water: Gently moisten the soil with a spray bottle. Make sure the soil is damp, but not wet.
- Location: Place the starter pots in a warm and bright location. A windowsill with plenty of sunlight is ideal.
- Germination: The seeds should germinate within 10-21 days. Keep the soil moist during this time.
- Pricking Out: Once the seedlings are large enough to handle (about 5-7 cm / 2-3 inches high), you can transplant them into larger pots. Be careful not to damage the roots.
Growing Sage from Cuttings: A Simple Method
Growing sage from cuttings is, in my opinion, the easiest method. Here’s how:
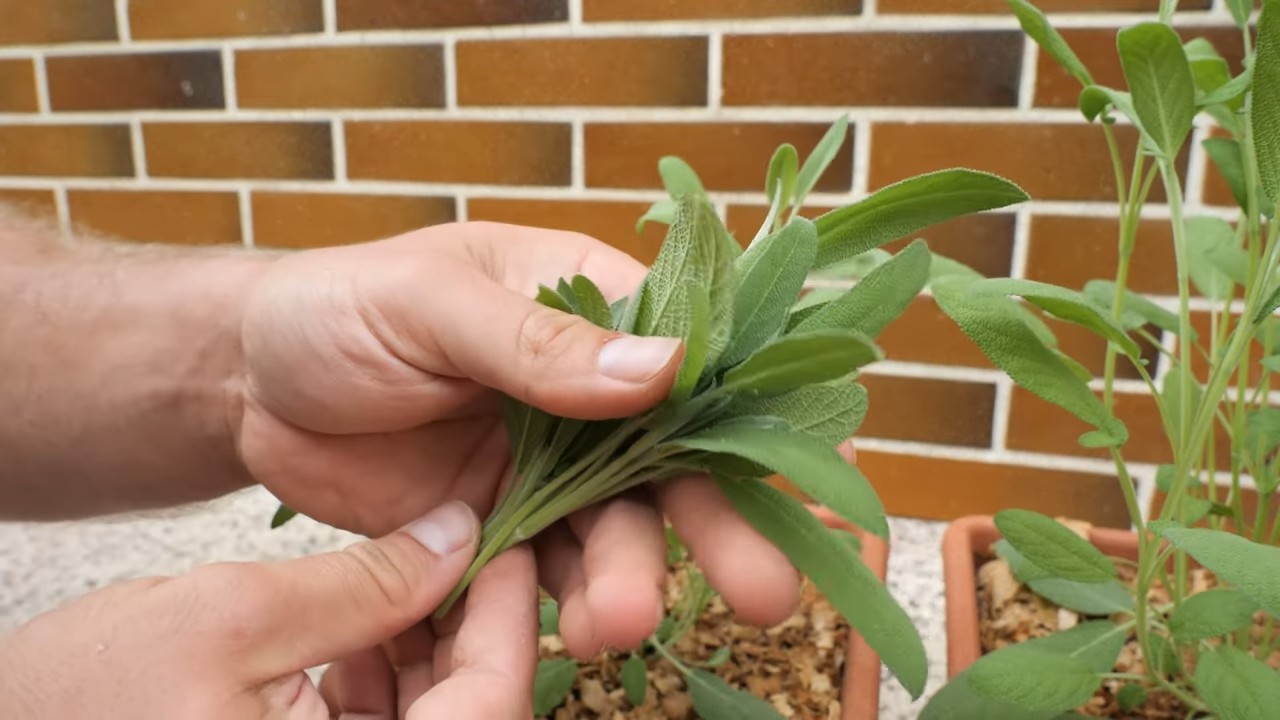
- Select the cuttings: Choose healthy, strong shoots from an existing sage plant. The shoots should be about 10-15 cm (4-6 inches) long.
- Cut the cuttings: Cut the shoots with clean garden shears or a knife, directly below a leaf node.
- Remove the lower leaves: Remove the lower leaves of the cutting, leaving only the top leaves. This prevents the leaves from rotting in the soil.
- Rooting hormone (optional): Dip the lower end of the cutting in rooting hormone to encourage root formation. This is not strictly necessary, however.
- Plant the cuttings: Fill starter pots with seed-starting mix and stick the cuttings about 5 cm (2 inches) deep into the soil.
- Water: Gently moisten the soil with a spray bottle.
- Location: Place the starter pots in a warm and bright location, but avoid direct sunlight.
- Cover (optional): You can cover the starter pots with a plastic bag or a mini-greenhouse to increase humidity. Be sure to ventilate the cover regularly to prevent mold.
- Root formation: The cuttings should form roots within 2-4 weeks. You can gently tug on the cuttings to check if they have rooted. If they offer resistance, they have taken root.
Transplanting: A New Home for Your Sage
Once your sage seedlings or cuttings are strong enough, it’s time to transplant them into larger pots or outdoors.
- Prepare the pots or bed: Choose pots with good drainage that are large enough for the sage plants to grow. If you are transplanting into the garden, choose a sunny location with well-draining soil.
- Soil mix: Mix garden soil with compost and sand to create a well-draining and nutrient-rich soil mix.
- Transplanting: Dig a hole large enough to accommodate the root ball of the sage plant. Carefully place the plant in the hole and fill it with the soil mix. Press the soil down lightly.
- Watering: Water the plants thoroughly to moisten the soil.
Care: How to Keep Your Sage Happy and Healthy
Proper care is crucial for your sage to thrive. Here are some tips:
- Watering: Sage likes it dry. Only water the plants when the soil is dry. Avoid waterlogging, as this can lead to root rot.
- Fertilizing: Fertilize the plants in the spring with an organic fertilizer. Avoid excessive fertilization, as this can lead to excessive leaf growth and a loss of aroma.
- Pruning: Prune the plants regularly to encourage bushy growth. Remove withered flowers and dead leaves. A spring pruning encourages the growth of new shoots.
- Overwintering: Sage is hardy, but in cold regions, it can be beneficial to cover the plants with brushwood or leaves to protect them from frost. Potted plants can be moved to a cool, bright location.
- Pests and diseases: Sage is relatively resistant to pests and diseases. Occasionally, aphids may appear. These can be controlled with a jet of water or a mild soap solution.
Harvest: The Reward for Your Work
You can harvest the sage leaves as soon as the plants are large enough. It’s best to harvest the leaves in the morning after the dew has dried. Cut the leaves with scissors or a knife. You can use the leaves fresh or dry them for later use.
Drying Sage: How to Preserve the Aroma
There are several ways to dry sage:
Drying in the oven: Place the sage leaves on a baking sheet and dry them at a low temperature (approx. 50°C / 120°F) in the oven. Be sure to leave the oven door slightly ajar so moisture can escape.
Air-drying: Tie the sage sprigs into small bundles and hang them in a dry, airy place. The leaves should be dry within 1-2 weeks.

Conclusion
So, there you have it! Growing sage at home is not only achievable, but it’s also incredibly rewarding. From the vibrant aroma that fills your kitchen to the fresh, flavorful leaves that elevate your culinary creations, the benefits are undeniable. We’ve walked you through the simple steps, debunked common myths, and armed you with the knowledge to cultivate your own thriving sage plant, regardless of your gardening experience.
Why is this DIY trick a must-try? Because it puts you in control. You know exactly where your sage comes from, how it’s grown, and what (if anything) has been used on it. Store-bought herbs, while convenient, often lack the robust flavor and freshness of homegrown varieties. Plus, think of the satisfaction of snipping off a few sprigs of sage that you nurtured from a tiny seed or cutting! It’s a connection to nature, a sustainable practice, and a delicious addition to your life all rolled into one.
But the adventure doesn’t stop here! Feel free to experiment with different varieties of sage. Common sage is a classic, but consider exploring purple sage for its ornamental value and slightly different flavor profile, or golden sage for its striking foliage. You can also try growing sage in different containers, from terracotta pots to raised garden beds, to see what works best for your space and climate.
Don’t be afraid to get creative with how you use your homegrown sage. Beyond traditional uses like stuffing and sauces, try adding it to teas, infused oils, or even homemade soaps. The possibilities are endless!
We wholeheartedly encourage you to embark on this journey of growing sage at home. It’s a simple, satisfying, and sustainable way to enhance your cooking and connect with the natural world. And most importantly, we want to hear about your experiences! Share your successes, your challenges, and your tips in the comments below. Let’s create a community of sage-loving gardeners and learn from each other. What are you waiting for? Get your hands dirty and start growing your own sage today! You’ll be amazed at the difference fresh, homegrown herbs can make.
Frequently Asked Questions (FAQ)
Q: What is the best time of year to start growing sage?
A: The best time to start growing sage depends on how you’re starting it. If you’re starting from seeds indoors, begin 6-8 weeks before the last expected frost. This allows the seedlings to develop a strong root system before being transplanted outdoors. If you’re starting from cuttings, spring or early summer is the ideal time, as the plant is actively growing and will root more easily. For transplanting established sage plants, spring or fall are the best times, avoiding the heat of summer or the cold of winter.
Q: How much sunlight does sage need?
A: Sage thrives in full sun, meaning it needs at least 6-8 hours of direct sunlight per day. Insufficient sunlight can lead to leggy growth, reduced flavor, and increased susceptibility to diseases. If you’re growing sage indoors, place it near a sunny window or supplement with grow lights.
Q: What kind of soil is best for growing sage?
A: Sage prefers well-draining soil with a slightly alkaline pH (around 6.0 to 7.0). Heavy clay soil can retain too much moisture, leading to root rot. Amend heavy soil with compost, perlite, or sand to improve drainage. A good potting mix for containers should also be well-draining and contain organic matter.
Q: How often should I water my sage plant?
A: Water sage deeply but infrequently, allowing the soil to dry out slightly between waterings. Overwatering is a common mistake that can lead to root rot. Check the soil moisture by sticking your finger about an inch deep. If the soil feels dry, it’s time to water. During hot, dry weather, you may need to water more frequently.
Q: How do I prune my sage plant?
A: Pruning is essential for maintaining a healthy and productive sage plant. Prune in the spring after the last frost, removing any dead, damaged, or woody stems. You can also prune lightly throughout the growing season to encourage bushier growth and prevent the plant from becoming too leggy. Avoid pruning too heavily at once, as this can stress the plant.
Q: How do I harvest sage leaves?
A: You can start harvesting sage leaves once the plant is established, usually after a few months. Simply snip off the leaves or stems as needed, using sharp scissors or pruning shears. Harvest in the morning, after the dew has dried, for the best flavor. Avoid harvesting more than one-third of the plant at a time.
Q: Can I grow sage indoors?
A: Yes, you can successfully grow sage indoors, provided you meet its basic needs. Choose a pot with drainage holes and use a well-draining potting mix. Place the plant near a sunny window or supplement with grow lights. Water regularly, allowing the soil to dry out slightly between waterings. Prune regularly to maintain its shape and encourage bushier growth.
Q: How do I propagate sage?
A: Sage can be easily propagated from cuttings. Take a 4-6 inch cutting from a healthy stem, removing the lower leaves. Dip the cut end in rooting hormone (optional) and plant it in a pot filled with moist potting mix. Cover the pot with a plastic bag or humidity dome to create a humid environment. Keep the soil moist but not soggy. Roots should develop in a few weeks.
Q: What are some common pests and diseases that affect sage?
A: Sage is generally resistant to pests and diseases, but it can be susceptible to aphids, spider mites, and powdery mildew. Inspect your plants regularly for signs of infestation or disease. Treat aphids and spider mites with insecticidal soap or neem oil. Prevent powdery mildew by ensuring good air circulation and avoiding overhead watering.
Q: How do I overwinter my sage plant?
A: In colder climates, sage can be overwintered indoors. Before the first frost, dig up the plant and pot it in a container. Cut back the stems to about 6 inches. Place the plant in a cool, bright location and water sparingly. In milder climates, sage can be left outdoors, but protect it from frost by covering it with mulch or burlap.
Q: Can I dry sage leaves for later use?
A: Yes, drying sage leaves is a great way to preserve their flavor. Harvest the leaves as described above and tie them into small bundles. Hang the bundles upside down in a cool, dry, and well-ventilated place. Alternatively, you can dry the leaves in a dehydrator or oven at a low temperature. Once the leaves are completely dry, store them in an airtight container in a cool, dark place.
Q: Is growing sage at home worth the effort?
A: Absolutely! The fresh, intense flavor of homegrown sage is far superior to store-bought dried sage. Plus, growing your own herbs is a rewarding and sustainable practice. You’ll have a constant supply of fresh sage for your culinary creations, and you’ll know exactly where it came from. Give it a try – you won’t be disappointed!

Leave a Comment