

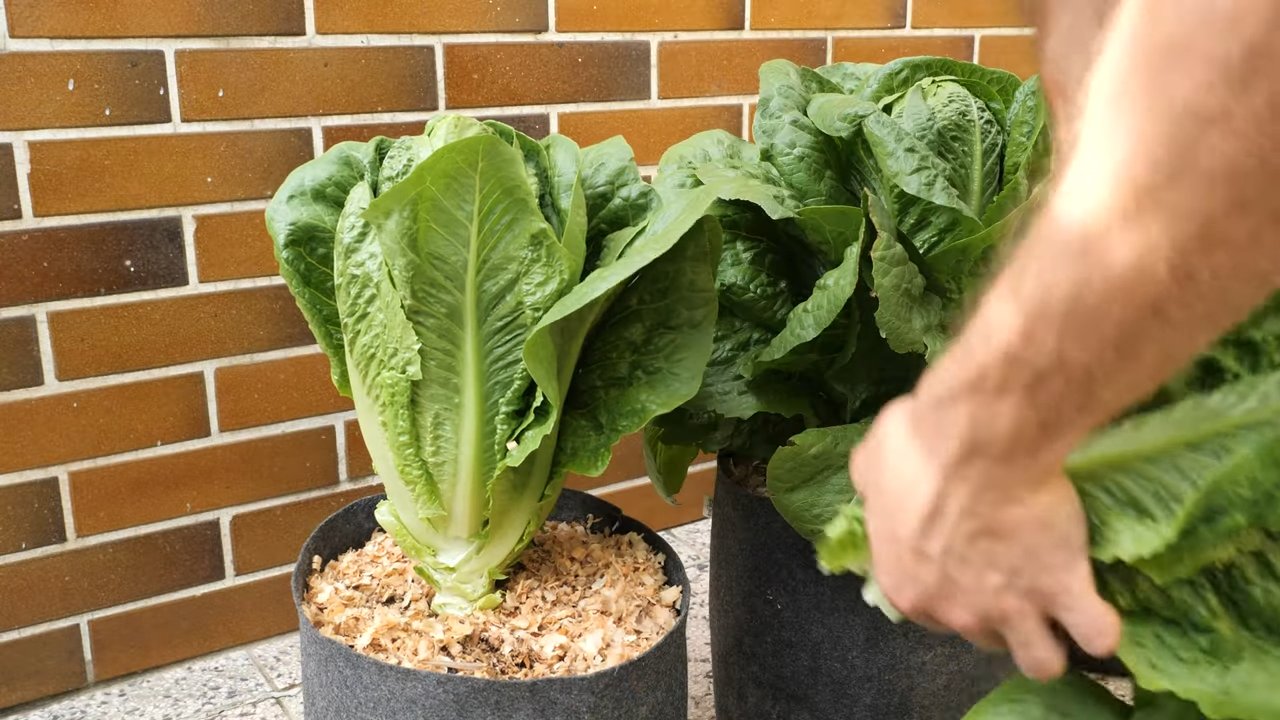
Growing Romaine Lettuce Hydroponically might sound like something out of a sci-fi movie, but trust me, it’s easier than you think! Forget battling garden pests and unpredictable weather; with hydroponics, you can have fresh, crisp romaine lettuce right in your kitchen, all year round.
Hydroponics, the art of growing plants without soil, has been around for centuries. From the Hanging Gardens of Babylon (though debated if truly hydroponic) to ancient Aztec chinampas, people have been finding innovative ways to cultivate plants using water and nutrients. But it’s really taken off in recent years as we look for more sustainable and efficient ways to produce food.
Why should you try growing romaine lettuce hydroponically? Well, for starters, it’s incredibly space-saving, perfect for apartment dwellers or anyone with limited outdoor space. Plus, you’ll have complete control over the growing environment, resulting in faster growth, higher yields, and fewer pest problems. Imagine the satisfaction of harvesting your own delicious, pesticide-free lettuce for salads, sandwiches, and wraps. In this article, I’m going to share some simple DIY tricks and hacks to get you started on your hydroponic lettuce journey. Get ready to ditch the dirt and embrace the future of gardening!
Growing Romaine Lettuce Hydroponically: A Beginner’s Guide
Hey there, fellow plant enthusiasts! Ever dreamt of having fresh, crisp romaine lettuce right at your fingertips, year-round, without the hassle of soil? Well, you’re in the right place! I’m going to walk you through how to grow romaine lettuce hydroponically. It’s easier than you think, and the rewards are incredibly delicious.
Why Hydroponics for Romaine?
Before we dive in, let’s quickly touch on why hydroponics is a fantastic choice for growing romaine lettuce:
* Faster Growth: Hydroponically grown lettuce matures much faster than soil-grown lettuce. We’re talking weeks, not months!
* Less Space: Perfect for apartment dwellers or anyone with limited outdoor space. You can grow a surprising amount of lettuce in a small area.
* Fewer Pests and Diseases: Soilborne pests and diseases are significantly reduced, meaning less need for pesticides.
* Consistent Results: You have more control over the growing environment, leading to more consistent and predictable harvests.
* Year-Round Growing: With the right setup, you can grow romaine lettuce indoors, regardless of the weather outside.
Choosing Your Hydroponic System
There are several types of hydroponic systems you can use for romaine lettuce. Here are a few popular options:
* Deep Water Culture (DWC): This is the simplest and most beginner-friendly system. The lettuce roots are suspended in a nutrient-rich solution, with an air stone providing oxygen.
* Nutrient Film Technique (NFT): A thin film of nutrient solution flows continuously over the roots. This requires a pump and a slightly more complex setup.
* Kratky Method: A passive hydroponic system where the plant sits in a reservoir of nutrient solution, and the roots self-adjust as the water level drops. It’s super low-maintenance.
* Ebb and Flow (Flood and Drain): The growing tray is periodically flooded with nutrient solution and then drained. This requires a timer and a pump.
For this guide, I’m going to focus on the Deep Water Culture (DWC) method because it’s the easiest to set up and maintain, especially for beginners.
Materials You’ll Need
Alright, let’s gather our supplies! Here’s what you’ll need to get started with your DWC romaine lettuce garden:
* Romaine Lettuce Seeds: Choose your favorite variety! I personally love ‘Paris Island Cos’ for its classic flavor and texture.
* Net Pots: These will hold your lettuce plants and allow the roots to grow into the nutrient solution. 2-inch net pots are a good size.
* Growing Medium: Rockwool cubes, coco coir, or rapid rooters are all excellent choices for starting your seeds.
* Hydroponic Nutrients: Specifically formulated for leafy greens. Look for a balanced nutrient solution with the correct NPK ratio (Nitrogen, Phosphorus, Potassium).
* Airtight Container: A dark-colored plastic tub or bucket (5-gallon size is ideal) to hold the nutrient solution. The darkness prevents algae growth.
* Air Pump and Air Stone: To oxygenate the nutrient solution. This is crucial for healthy root development.
* pH Meter or pH Test Kit: To monitor and adjust the pH of the nutrient solution. Romaine lettuce prefers a pH between 5.5 and 6.5.
* pH Up and pH Down Solutions: To adjust the pH of the nutrient solution as needed.
* Grow Lights (Optional): If you’re growing indoors and don’t have access to sufficient natural light, you’ll need grow lights. LED grow lights are energy-efficient and work well.
* Timer (Optional): If you’re using grow lights, you’ll need a timer to control the light cycle.
* Measuring Cups and Spoons: For accurately measuring nutrients.
* Water: Tap water is usually fine, but let it sit for 24 hours to allow chlorine to evaporate.
Step-by-Step Instructions: Growing Romaine Lettuce in DWC
Okay, let’s get our hands dirty (well, not really, since it’s hydroponics!). Here’s a step-by-step guide to growing romaine lettuce using the DWC method:
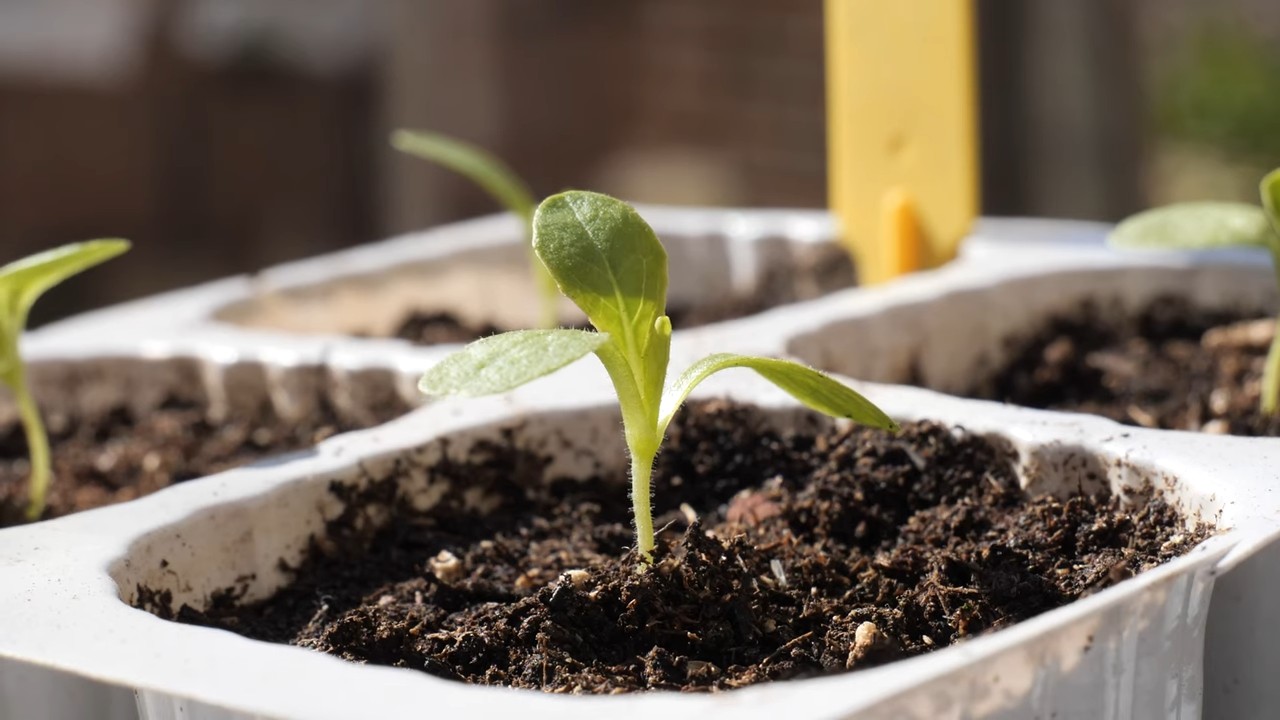
1. Germinating Your Seeds
* Soak the Growing Medium: Soak your rockwool cubes, coco coir, or rapid rooters in water for a few minutes until they are fully saturated.
* Sow the Seeds: Place 2-3 romaine lettuce seeds in the center of each cube or plug.
* Provide Humidity: Place the cubes or plugs in a humidity dome or a plastic container with a lid to maintain high humidity.
* Keep Them Warm: Keep the seeds in a warm location (around 70-75°F or 21-24°C).
* Wait for Germination: Germination usually takes 3-7 days. Once the seeds have sprouted, remove the humidity dome and provide light.
2. Preparing the DWC System
* Clean the Container: Thoroughly clean your plastic tub or bucket with soap and water. Rinse it well to remove any soap residue.
* Drill Holes (If Necessary): If your container doesn’t have pre-made holes, drill holes in the lid that are slightly smaller than the diameter of your net pots. The net pots should fit snugly in the holes.
* Prepare the Nutrient Solution: Fill the container with water. Add the hydroponic nutrients according to the manufacturer’s instructions. Be precise! Too much or too little can harm your plants.
* Check and Adjust pH: Use your pH meter or test kit to check the pH of the nutrient solution. Adjust the pH to between 5.5 and 6.5 using pH Up or pH Down solutions.
* Add the Air Stone: Place the air stone at the bottom of the container. Connect the air stone to the air pump with the tubing. Plug in the air pump. You should see bubbles rising in the nutrient solution.
3. Transplanting the Seedlings
* Wait for True Leaves: Allow your seedlings to develop a few sets of true leaves (the leaves that look like miniature lettuce leaves). This usually takes 2-3 weeks.
* Gently Remove Seedlings: Carefully remove the seedlings from the rockwool cubes or coco coir plugs. Be gentle to avoid damaging the roots.
* Place in Net Pots: Place each seedling in a net pot. You can use a small amount of additional growing medium (like hydroton clay pebbles) to help stabilize the seedling in the net pot.
* Position in the DWC System: Place the net pots into the holes in the lid of the container. The bottom of the net pots should be submerged in the nutrient solution. The roots will grow down into the solution.
4. Providing Light and Air
* Light Cycle: If you’re using grow lights, set them on a timer to provide 14-16 hours of light per day. Romaine lettuce needs plenty of light to grow well.
* Air Circulation: Ensure good air circulation around your plants. A small fan can help prevent mold and mildew.
* Monitor Temperature: Maintain a temperature between 65-75°F (18-24°C).
5. Maintaining the System
* Check pH Regularly: Check the pH of the nutrient solution every 1-2 days and adjust as needed.
* Change Nutrient Solution: Change the nutrient solution every 1-2 weeks. This prevents nutrient imbalances and the buildup of harmful bacteria.
* Top Off Water: As the plants grow, they will absorb water from the nutrient solution. Top off the water level with fresh water as needed.
* Monitor for Pests and Diseases: Keep an eye out for any signs of pests or diseases. Treat promptly if necessary.
6. Harvesting Your Romaine Lettuce
* Harvest When Mature: Romaine lettuce is typically ready to harvest in 4-6 weeks after transplanting.
* Cut Outer Leaves: You can harvest the outer leaves as needed, allowing the inner leaves to continue growing. This is known as a “cut-and-come-again” harvest.
* Harvest the Whole Head: Alternatively, you can harvest the entire head of lettuce at once. Simply cut the stem at the base of the plant.
Troubleshooting Tips
Even with the best planning, you might encounter a few hiccups along the way. Here are some common problems and how to address them:
* Yellowing Leaves: This could be a sign of nutrient deficiency. Check the nutrient solution and adjust as needed. Make sure you’re using a nutrient solution specifically formulated for leafy greens.
* Slow Growth: This could be due to insufficient light, incorrect pH, or nutrient
Conclusion
So, there you have it! Growing Romaine Lettuce Hydroponically is not just a trendy gardening experiment; it’s a game-changer for fresh, readily available greens. We’ve walked through the simple steps, highlighted the benefits, and hopefully, demystified the process. The beauty of this method lies in its efficiency, space-saving nature, and the sheer joy of watching your lettuce thrive without soil.
Why is this a must-try? Because it puts you in control of your food source. You know exactly what’s going into your lettuce – no pesticides, no hidden chemicals, just pure, unadulterated goodness. Imagine stepping into your kitchen and harvesting crisp, vibrant Romaine leaves for your salad, sandwich, or wrap, all grown by your own hand. That’s the power of hydroponics.
But the fun doesn’t stop there! Feel free to experiment with different nutrient solutions to see what works best for your setup. You can also try different varieties of Romaine lettuce, from the classic green to the more colorful red varieties. Consider adding companion plants like basil or chives to your hydroponic system to enhance the flavor and deter pests.
Don’t be afraid to get creative! You can adapt this method to fit your space and resources. Use recycled materials for your containers, experiment with different lighting options, and adjust the nutrient solution based on your lettuce’s needs. The possibilities are endless.
We truly believe that anyone can successfully grow Romaine Lettuce Hydroponically with a little patience and attention. It’s a rewarding experience that connects you to nature, promotes healthy eating, and adds a touch of green to your living space.
Now, it’s your turn! We encourage you to take the plunge and give this DIY trick a try. Share your experiences with us in the comments below. We’d love to hear about your successes, challenges, and any tips you discover along the way. Let’s build a community of hydroponic gardeners and inspire others to grow their own food. Happy growing!
Frequently Asked Questions (FAQ)
What exactly is hydroponics, and why is it good for growing Romaine lettuce?
Hydroponics is a method of growing plants without soil, using mineral nutrient solutions in water. It’s particularly well-suited for Romaine lettuce because lettuce has relatively shallow roots and a fast growth cycle. Hydroponics provides a controlled environment where you can optimize nutrient delivery, light exposure, and temperature, leading to faster growth, higher yields, and reduced risk of soilborne diseases. Plus, it’s incredibly space-efficient, making it ideal for urban gardeners or anyone with limited outdoor space.
What kind of hydroponic system is best for beginners growing Romaine lettuce?
For beginners, a simple Deep Water Culture (DWC) system is often recommended. It’s easy to set up and maintain. All you need is a container, a net pot, an air pump, an air stone, and a nutrient solution. The lettuce roots are suspended in the nutrient solution, and the air stone provides oxygen to the roots. Other options include Kratky method (a passive DWC system that doesn’t require an air pump) and Nutrient Film Technique (NFT), but these might be slightly more complex for first-timers.
What kind of nutrient solution should I use for hydroponic Romaine lettuce?
You’ll need a balanced hydroponic nutrient solution specifically formulated for leafy greens. Look for a solution that contains essential macronutrients like nitrogen (N), phosphorus (P), and potassium (K), as well as micronutrients like iron (Fe), manganese (Mn), and zinc (Zn). Follow the manufacturer’s instructions carefully when mixing the solution, and monitor the pH level regularly. The ideal pH range for Romaine lettuce is between 5.5 and 6.5. You can purchase pre-mixed nutrient solutions or mix your own using individual nutrient salts.
How much light does hydroponic Romaine lettuce need?
Romaine lettuce needs plenty of light to thrive. Ideally, it should receive 14-16 hours of light per day. If you’re growing indoors, you’ll need to supplement natural light with artificial grow lights. LED grow lights are a popular choice because they’re energy-efficient and produce very little heat. Fluorescent lights can also be used, but they may not be as effective as LEDs. Position the lights close enough to the lettuce to provide adequate illumination, but not so close that they burn the leaves.
How often should I change the nutrient solution in my hydroponic system?
The frequency of nutrient solution changes depends on the size of your system and the growth rate of your lettuce. As a general rule, you should change the nutrient solution every 1-2 weeks. This helps to prevent nutrient imbalances, the buildup of harmful bacteria, and the depletion of essential nutrients. When changing the solution, thoroughly clean the container and net pots to remove any algae or debris.
What are some common problems I might encounter when growing hydroponic Romaine lettuce, and how can I fix them?
Some common problems include nutrient deficiencies, algae growth, root rot, and pests. Nutrient deficiencies can be identified by discoloration or stunted growth. Adjust the nutrient solution accordingly. Algae growth can be prevented by keeping the container clean and opaque and by using an algaecide if necessary. Root rot is caused by poor oxygenation and can be prevented by ensuring adequate aeration with an air pump and air stone. Pests can be controlled with organic insecticides or by introducing beneficial insects.
How long does it take to grow hydroponic Romaine lettuce from seed to harvest?
Hydroponic Romaine lettuce typically takes 4-6 weeks to mature from seed to harvest. The exact time will depend on the variety of lettuce, the growing conditions, and the nutrient solution used. You can start harvesting individual leaves as soon as they’re large enough, or you can harvest the entire head of lettuce at once.
Can I grow other types of lettuce hydroponically?
Absolutely! Hydroponics is well-suited for growing various types of lettuce, including butterhead, loose-leaf, and crisphead varieties. The growing conditions and nutrient requirements are generally similar for all types of lettuce. Experiment with different varieties to find your favorites.
Is hydroponics expensive to set up?
The initial cost of setting up a hydroponic system can vary depending on the size and complexity of the system. However, you can start with a very basic and inexpensive setup using recycled materials and readily available supplies. Over time, hydroponics can actually save you money because you’ll be growing your own food and reducing your reliance on store-bought produce.
How do I know when my hydroponic Romaine lettuce is ready to harvest?
Your hydroponic Romaine lettuce is ready to harvest when the leaves are firm, crisp, and have reached the desired size. You can harvest individual leaves as needed, or you can harvest the entire head of lettuce at once. To harvest the entire head, simply cut it off at the base of the plant. Enjoy your fresh, homegrown Romaine lettuce!

Leave a Comment