

Growing Radicchio in Small Spaces might seem like a challenge, but trust me, it’s totally achievable, even if you’re working with a tiny balcony or just a sunny windowsill! Have you ever admired those vibrant, burgundy leaves in the grocery store and thought, “I wish I could grow that?” Well, now you can! For centuries, radicchio has been a staple in Italian cuisine, adding a delightful bitter note to salads and grilled dishes. Its beautiful color also makes it a visually appealing addition to any garden, no matter how small.
But why bother with growing your own radicchio? Well, store-bought radicchio can be expensive and often lacks the freshness and flavor of homegrown varieties. Plus, there’s something incredibly satisfying about harvesting your own food, even if it’s just a small head of radicchio. In this article, I’m going to share some simple, yet effective, DIY tricks and hacks that will allow you to successfully cultivate this delicious vegetable, even if you’re short on space. We’ll cover everything from choosing the right container to optimizing sunlight and watering techniques. So, get ready to transform your small space into a thriving radicchio garden! You’ll be amazed at how easy it is to start growing radicchio in small spaces and enjoy fresh, flavorful leaves right from your own home.
Growing Radicchio in Small Spaces: A DIY Guide
Okay, so you’re itching to grow some vibrant, slightly bitter, and oh-so-chic radicchio, but you’re short on space? No problem! I’m here to tell you that you absolutely can cultivate this Italian delight even if you only have a balcony, patio, or a sunny windowsill. Radicchio is surprisingly adaptable, and with a few clever tricks, you’ll be enjoying fresh, homegrown radicchio in no time. Let’s dive in!
Choosing the Right Radicchio Variety
First things first, not all radicchio is created equal. Some varieties are better suited for container gardening than others. Here’s a quick rundown of some of my favorites for small spaces:
* Chioggia: This is probably the most common type. It forms a tight, round head, similar to a small cabbage. It’s relatively compact and matures quickly, making it ideal for containers.
* Treviso: Treviso comes in two main types: early and late. Early Treviso forms a loose head, while late Treviso is more elongated. While late Treviso can get a bit larger, early Treviso is a great option for containers.
* Castelfranco: This variety is known for its beautiful, speckled leaves. It’s a bit more delicate than Chioggia, but it’s still manageable in a container.
* Verona Red: This is another classic round-headed variety that does well in containers.
When selecting your seeds or seedlings, consider the size of your container and the expected mature size of the radicchio variety. Smaller varieties will obviously thrive better in limited spaces.
Setting Up Your Radicchio Container Garden
Now, let’s get our hands dirty and set up the perfect home for your radicchio!
* Container Selection: Choose a container that is at least 8-12 inches deep and wide. This will give the radicchio roots enough room to grow. Make sure the container has drainage holes! Radicchio hates soggy feet. Terracotta pots are great because they allow the soil to breathe, but plastic pots work just fine too.
* Potting Mix: Don’t use garden soil in your containers! It’s too heavy and doesn’t drain well. Instead, opt for a high-quality potting mix. I like to use a mix that’s specifically formulated for vegetables. You can also amend your potting mix with compost for added nutrients.
* Location, Location, Location: Radicchio needs at least 6 hours of sunlight per day. A sunny balcony, patio, or windowsill is ideal. If you don’t have enough natural light, you can supplement with grow lights.
* Spacing: If you’re planting multiple radicchio plants in the same container, space them about 6-8 inches apart. This will give them enough room to grow without overcrowding each other.
Planting Your Radicchio
Alright, time to get those radicchio babies in the ground (or, well, in the container)!
1. Starting from Seed: You can start radicchio seeds indoors about 4-6 weeks before the last expected frost. Sow the seeds about ¼ inch deep in seed-starting trays or small pots. Keep the soil moist but not soggy. Once the seedlings have a few true leaves, you can transplant them into your container.
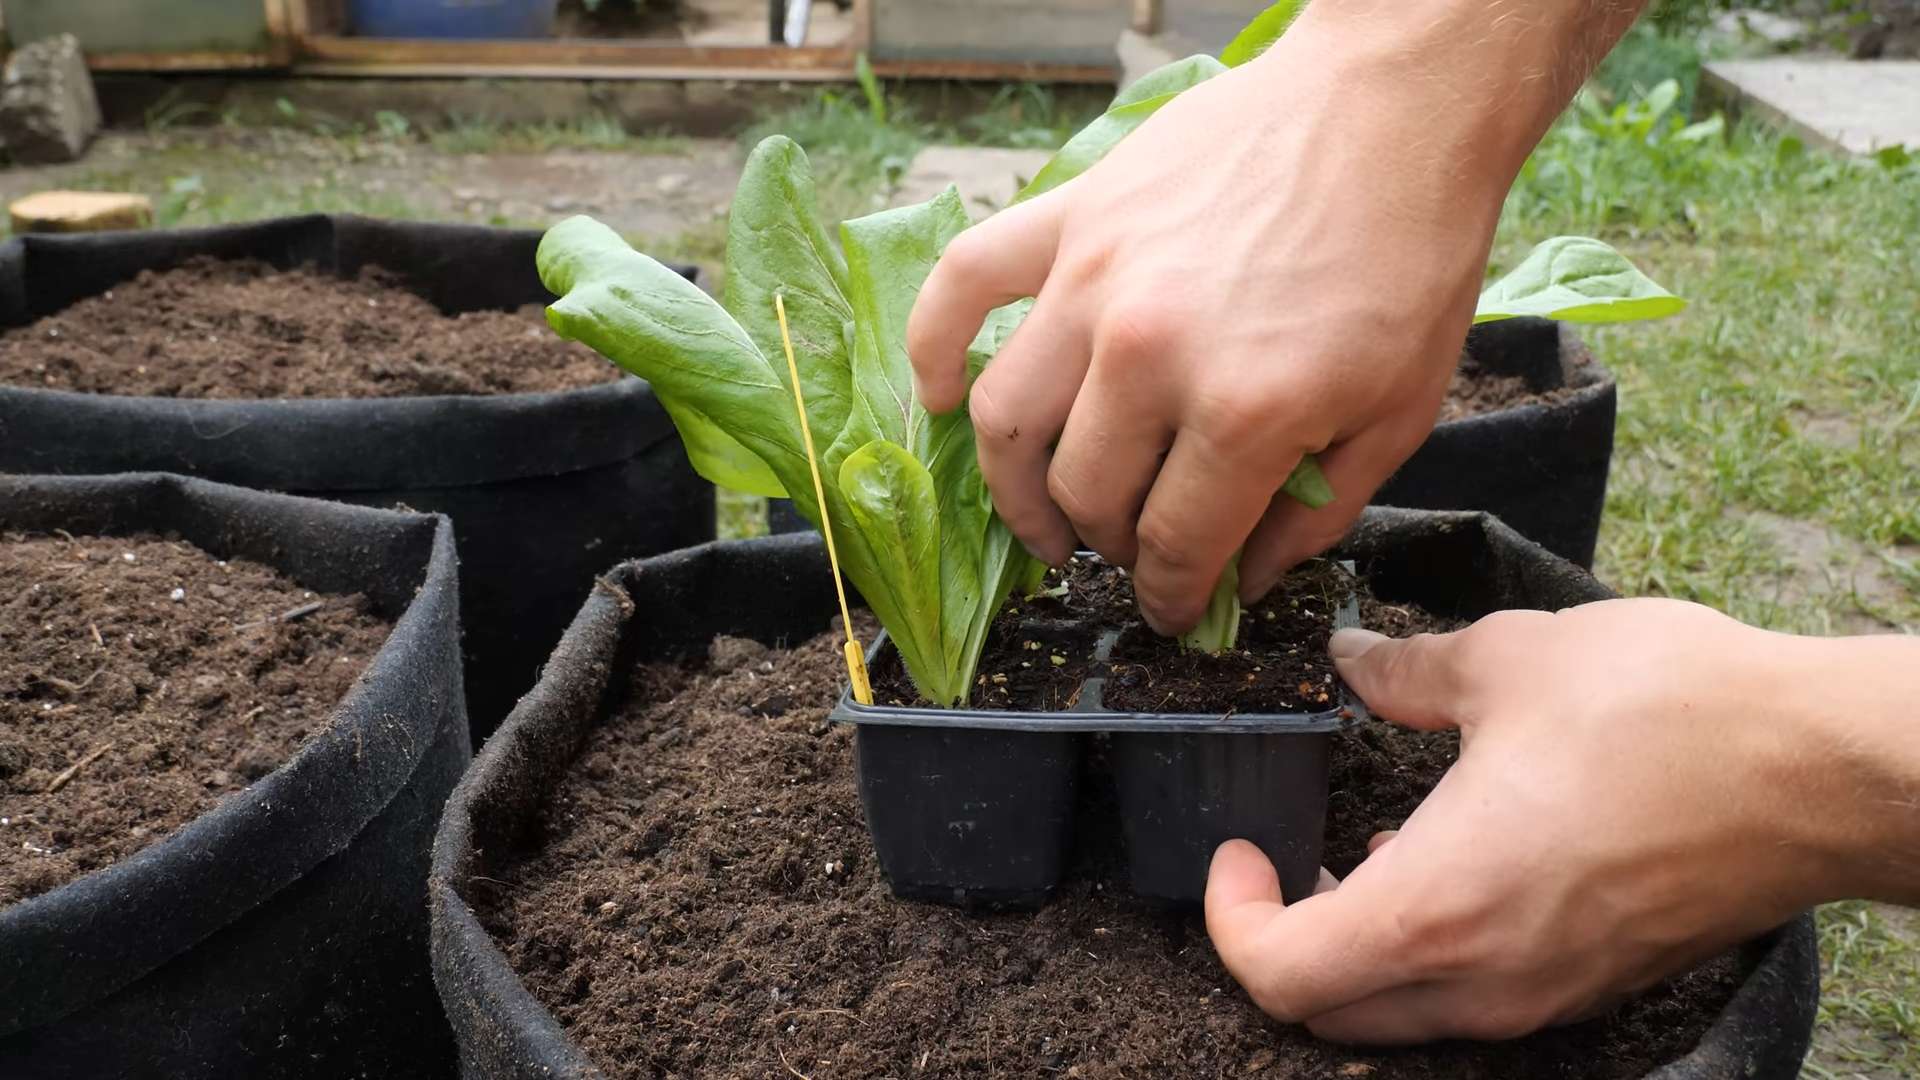
2. Transplanting Seedlings: If you’re buying seedlings from a nursery, gently remove them from their pots and loosen the roots a bit. Dig a hole in the potting mix that’s large enough to accommodate the root ball. Place the seedling in the hole and backfill with potting mix. Gently firm the soil around the base of the plant.
3. Watering: Water your radicchio plants thoroughly after planting. Keep the soil consistently moist, but avoid overwatering. Let the top inch of soil dry out between waterings.
4. Mulching (Optional): Adding a layer of mulch around your radicchio plants can help retain moisture, suppress weeds, and regulate soil temperature. I like to use straw or shredded leaves.
Caring for Your Radicchio Plants
Now that your radicchio is planted, it’s time to give it some TLC!
* Fertilizing: Radicchio is a relatively light feeder, but it will benefit from regular fertilization. Use a balanced liquid fertilizer every 2-3 weeks. Follow the instructions on the fertilizer label.
* Watering: As I mentioned before, keep the soil consistently moist, but avoid overwatering. Check the soil moisture regularly and water when the top inch of soil is dry.
* Weeding: Keep your container free of weeds. Weeds compete with your radicchio plants for nutrients and water.
* Pest Control: Radicchio can be susceptible to pests like aphids and slugs. Inspect your plants regularly for signs of infestation. If you find pests, you can try spraying them with insecticidal soap or neem oil. For slugs, you can use slug bait or handpick them off the plants.
* Bolting: Bolting is when a plant prematurely flowers, usually due to stress from heat or lack of water. Bolting can make the leaves bitter. To prevent bolting, keep your radicchio plants well-watered and provide them with some shade during the hottest part of the day. If your radicchio does bolt, you can still harvest the leaves, but they may be more bitter than usual.
Harvesting Your Radicchio
The moment we’ve all been waiting for – harvest time!
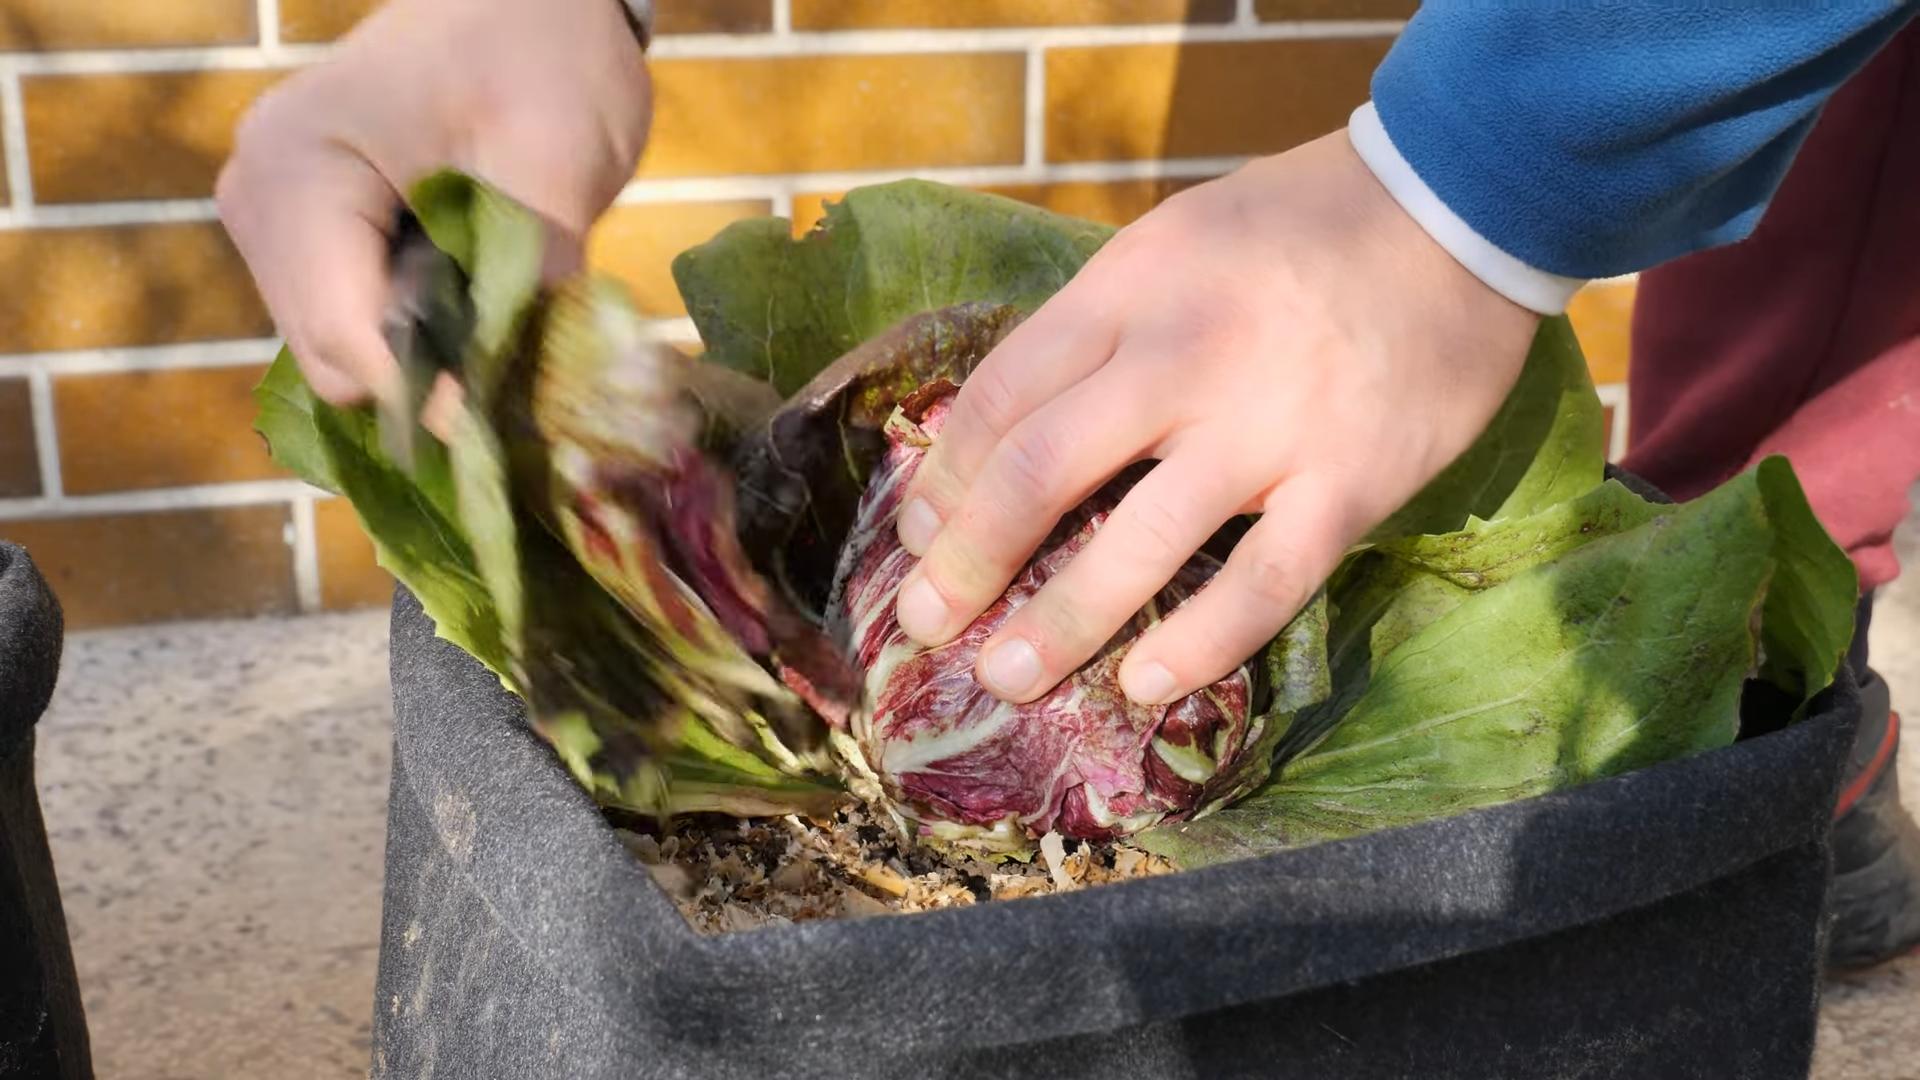
* When to Harvest: Radicchio is typically ready to harvest in 50-60 days from planting. You can harvest the entire head at once, or you can harvest individual leaves as needed.
* How to Harvest: To harvest the entire head, use a sharp knife to cut the radicchio at the base of the plant. To harvest individual leaves, simply pluck them off the plant.
* Storage: Radicchio can be stored in the refrigerator for up to a week. Wrap it in a damp paper towel and place it in a plastic bag.
Troubleshooting
Even with the best care, you might encounter a few challenges along the way. Here are some common problems and how to fix them:
* Yellowing Leaves: Yellowing leaves can be a sign of overwatering, underwatering, or nutrient deficiency. Check the soil moisture and adjust your watering accordingly. If you suspect a nutrient deficiency, fertilize your plants with a balanced liquid fertilizer.
* Bitter Leaves: Bitter leaves can be caused by bolting, heat stress, or lack of water. Keep your plants well-watered and provide them with some shade during the hottest part of the day.
* Slow Growth: Slow growth can be caused by lack of sunlight, poor soil, or nutrient deficiency. Make sure your plants are getting enough sunlight and fertilize them regularly.
* Pest Infestation: As mentioned before, inspect your plants regularly for signs of pest infestation. Treat any infestations promptly with insecticidal soap or neem oil.
Radicchio Recipes to Try
Now that you’ve harvested your beautiful, homegrown radicchio, it’s time to get cooking! Here are a few of my favorite radicchio recipes:
* Grilled Radicchio Salad: Grill wedges of radicchio and toss them with a vinaigrette dressing, toasted nuts, and crumbled cheese.
* Radicchio Risotto: Add chopped radicchio to your favorite risotto recipe for a slightly bitter and colorful twist.
* Radicchio and Gorgonzola Pizza: Top your pizza with radicchio, gorgonzola cheese, and balsamic glaze.
* Radicchio and Orange Salad: Combine radicchio with orange segments, fennel, and a citrus vinaigrette.
* Sautéed Radicchio: Sauté radicchio with garlic, olive oil, and a pinch of red pepper flakes.
Final Thoughts
Growing radicchio in small spaces is totally achievable, and it’s a rewarding experience. With a little bit of planning and care, you can enjoy fresh, homegrown radicchio all season long. So, grab your seeds, your containers, and your gardening gloves, and get ready to grow some deliciousness! Happy gardening!
Conclusion
So, there you have it! Growing your own radicchio, even in the smallest of spaces, is not only achievable but also incredibly rewarding. We’ve explored the simple yet effective DIY trick of utilizing container gardening to bring the slightly bitter, beautifully colored leaves of radicchio right to your doorstep (or balcony!).
Why is this a must-try? Because fresh, homegrown radicchio offers a flavor and vibrancy that you simply can’t replicate with store-bought varieties. Imagine adding a handful of freshly harvested radicchio to your salads, pizzas, or grilled dishes. The subtle bitterness provides a delightful counterpoint to sweeter flavors, elevating your culinary creations to a whole new level. Plus, you’ll have the satisfaction of knowing exactly where your food comes from and that it’s free from harmful pesticides.
But the benefits extend beyond just taste. Growing your own radicchio is a fantastic way to connect with nature, even in an urban environment. It’s a therapeutic activity that can reduce stress and improve your overall well-being. And let’s not forget the aesthetic appeal! The deep red and purple hues of radicchio leaves add a touch of elegance and visual interest to any garden or balcony.
Don’t be afraid to experiment with different varieties of radicchio. ‘Chioggia’ is a classic choice with its round, tightly packed heads, while ‘Treviso’ offers elongated leaves with a more pronounced bitterness. You can also try ‘Castelfranco’, known for its beautiful variegated leaves. Consider companion planting too! Radicchio pairs well with herbs like rosemary and thyme, as well as vegetables like carrots and onions. These companions can help deter pests and improve the overall health of your radicchio plants.
For those looking to maximize their yield, consider succession planting. Sow new seeds every few weeks to ensure a continuous harvest throughout the growing season. And don’t forget to provide your radicchio plants with adequate sunlight and well-drained soil. Regular watering is also essential, especially during hot weather.
The DIY trick we’ve discussed is adaptable to various container sizes and shapes. You can use traditional pots, raised beds, or even repurposed containers like old buckets or tires. Just make sure your chosen container has adequate drainage holes to prevent waterlogging.
We are confident that with a little effort and the right guidance, you can successfully grow your own radicchio in small spaces. It’s a fun, rewarding, and delicious experience that we highly recommend.
So, what are you waiting for? Grab some seeds, find a suitable container, and get started on your radicchio-growing adventure today! We’re eager to hear about your experiences. Share your tips, tricks, and photos with us in the comments below. Let’s build a community of radicchio enthusiasts and inspire others to embrace the joys of homegrown produce. Let us know what challenges you face, and what successes you celebrate. Your feedback will help us refine our advice and provide even better guidance to future growers. Happy gardening!
FAQ
What exactly is radicchio, and what does it taste like?
Radicchio (pronounced ra-DEE-kee-oh) is a leafy vegetable belonging to the chicory family. It’s known for its distinctive slightly bitter and sometimes peppery flavor. The bitterness can vary depending on the variety and how it’s prepared. Some varieties are milder than others, and grilling or roasting radicchio can help to mellow out the bitterness. It’s often used in salads, risottos, and grilled dishes to add a unique flavor dimension.
What are the best radicchio varieties to grow in containers?
While most radicchio varieties can be grown in containers, some are better suited than others due to their size and growth habits. Here are a few recommendations:
* **Chioggia:** This is a classic variety with round, tightly packed heads. It’s relatively compact and well-suited for container gardening.
* **Treviso:** This variety has elongated leaves and a slightly more pronounced bitterness. It can be grown in containers, but you may need a larger pot to accommodate its growth.
* **Castelfranco:** This variety is known for its beautiful variegated leaves, which add visual interest to your garden. It’s relatively easy to grow in containers.
* **Verona:** Similar to Chioggia, Verona is a round-headed variety that matures quickly, making it a good choice for smaller containers and shorter growing seasons.
When choosing a variety, consider your personal taste preferences and the size of your available container space.
How much sunlight does radicchio need?
Radicchio thrives in full sun, which means at least 6 hours of direct sunlight per day. However, it can tolerate partial shade, especially in hot climates. If you’re growing radicchio in a container, make sure to place it in a location that receives ample sunlight. If you don’t have a sunny spot, you can supplement with grow lights.
What type of soil is best for growing radicchio in containers?
Radicchio prefers well-drained soil that is rich in organic matter. A good potting mix for containers should contain a blend of peat moss, perlite, and vermiculite. You can also add compost or other organic amendments to improve the soil’s fertility and drainage. Avoid using heavy clay soil, as it can become waterlogged and inhibit root growth.
How often should I water my radicchio plants?
Water your radicchio plants regularly, especially during hot and dry weather. The soil should be kept consistently moist but not waterlogged. Check the soil moisture level by sticking your finger into the soil. If the top inch of soil feels dry, it’s time to water. Avoid overhead watering, as it can promote fungal diseases. Instead, water at the base of the plant.
How do I prevent pests and diseases from affecting my radicchio plants?
Radicchio is generally resistant to pests and diseases, but it can be susceptible to certain problems, such as aphids, slugs, and fungal diseases. To prevent these problems, follow these tips:
* Inspect your plants regularly for signs of pests or diseases.
* Remove any infected leaves or plants immediately.
* Use organic pest control methods, such as insecticidal soap or neem oil, to control aphids and other pests.
* Provide good air circulation around your plants to prevent fungal diseases.
* Avoid overwatering, as it can create a favorable environment for fungal growth.
* Consider companion planting with herbs like rosemary or thyme, which can help deter pests.
When is the best time to harvest radicchio?
Radicchio is typically ready to harvest in 60-90 days from sowing, depending on the variety. You can harvest the entire head at once or harvest individual leaves as needed. To harvest the entire head, cut it off at the base of the plant. To harvest individual leaves, simply pluck them off the plant. The leaves are best harvested when they are young and tender. Older leaves can become bitter.
Can I grow radicchio indoors?
Yes, you can grow radicchio indoors, but it requires a bit more effort. You’ll need to provide adequate light, either through a sunny window or with grow lights. You’ll also need to maintain a consistent temperature and humidity level. Indoor-grown radicchio may not be as productive as outdoor-grown radicchio, but it’s still possible to harvest a decent crop.
My radicchio is very bitter. Is there anything I can do to reduce the bitterness?
Yes, there are several ways to reduce the bitterness of radicchio:
* **Soaking:** Soak the leaves in cold water for 30 minutes before using them. This can help to draw out some of the bitter compounds.
* **Grilling or Roasting:** Grilling or roasting radicchio can mellow out the bitterness and bring out its sweetness.
* **Pairing with Sweet Flavors:** Combine radicchio with sweet flavors, such as fruits, honey, or balsamic vinegar, to balance out the bitterness.
* **Choosing Milder Varieties:** Opt for milder varieties of radicchio, such as ‘Castelfranco’, which are less bitter than other varieties.
* **Harvesting Young Leaves:** Harvest the leaves when they are young and tender, as older leaves tend to be more bitter.
Can I save seeds from my radicchio plants?
Yes, you can save seeds from your radicchio plants, but it requires allowing the plants to bolt (flower and produce seeds). This typically happens in the second year of growth. However, if you’re growing hybrid varieties, the seeds may not produce plants that are true to type. Open-pollinated varieties are more likely to produce plants that are similar to the parent plant. To save seeds, allow the seed heads to dry completely on the plant. Then, harvest the seeds and store them in a cool, dry place.


Leave a Comment