

Growing Potatoes Indoors might sound like a quirky experiment relegated to science classrooms, but trust me, it’s a surprisingly rewarding and practical way to enjoy fresh, homegrown potatoes year-round! Forget battling unpredictable weather and limited garden space; with a few simple tricks, you can cultivate a thriving potato patch right inside your home.
The history of potato cultivation is deeply intertwined with human civilization, dating back thousands of years to the Andes Mountains. While traditionally grown outdoors, the ingenuity of gardeners has led to innovative methods like indoor cultivation, allowing us to connect with this ancient food source in a modern context. Imagine harvesting your own creamy Yukon Golds or flavorful Russets just steps from your kitchen – it’s a truly satisfying experience!
Why should you consider growing potatoes indoors? Well, for starters, it offers unparalleled control over the growing environment. You can regulate temperature, light, and moisture, ensuring optimal conditions for potato development. This is especially beneficial for those living in urban areas with limited outdoor space or regions with harsh climates. Plus, it’s a fantastic way to extend the growing season and enjoy fresh potatoes even in the dead of winter. I’m excited to share some easy-to-follow DIY tricks and hacks that will empower you to successfully grow potatoes indoors, regardless of your gardening experience. Let’s get started!
Growing Potatoes Indoors: A Spud-tacular DIY Guide!
Hey there, fellow gardening enthusiasts! Ever dreamed of harvesting your own potatoes without stepping foot outside? Well, dream no more! I’m going to walk you through the surprisingly simple process of growing potatoes indoors. It’s a fun, rewarding project that can provide you with fresh, homegrown potatoes year-round. Let’s get digging!
What You’ll Need
Before we get our hands dirty, let’s gather our supplies. Here’s a list of everything you’ll need to successfully grow potatoes indoors:
* Seed Potatoes: These are potatoes specifically grown for planting. You can find them at your local garden center or online. Choose certified disease-free varieties for the best results. I personally love Yukon Gold for their creamy texture and delicious flavor, but feel free to experiment!
* Large Container: You’ll need a container that’s at least 10 gallons in size. A plastic storage bin, a large pot, or even a repurposed trash can (cleaned thoroughly, of course!) will work. The key is depth – potatoes need room to grow upwards as well as downwards.
* Well-Draining Potting Mix: Avoid using garden soil, as it can become compacted and doesn’t drain well. A good quality potting mix is essential for healthy potato growth. I like to mix in some compost for added nutrients.
* Grow Lights (Optional but Recommended): While potatoes can technically grow indoors with natural light, grow lights will significantly improve your yield and ensure strong, healthy plants. I use LED grow lights, which are energy-efficient and provide the full spectrum of light that plants need.
* Watering Can or Hose: For keeping your potato plants hydrated.
* Sharp Knife (for cutting seed potatoes): Make sure it’s clean to prevent the spread of disease.
* Spray Bottle (Optional): For misting the foliage to increase humidity.
Preparing Your Seed Potatoes
This is a crucial step! You can’t just throw any old potato in the ground and expect it to grow. We need to encourage those “eyes” (the little buds on the potato) to sprout.
1. Chitting (Sprouting) Your Seed Potatoes: This process encourages the seed potatoes to sprout before planting. Place your seed potatoes in a cool, bright location (but not direct sunlight) for about 2-3 weeks. You can use an egg carton or a shallow tray to hold them. The “eyes” will start to develop into small, green sprouts. This gives your potatoes a head start.
2. Cutting Larger Seed Potatoes: If your seed potatoes are large (bigger than an egg), you can cut them into smaller pieces. Each piece should have at least 2-3 “eyes.” This allows you to get more plants from a single seed potato.
3. Letting the Cut Pieces Cure: After cutting, let the pieces sit for a day or two to allow the cut surfaces to dry and form a callus. This helps prevent rot. I usually leave them on a paper towel in a cool, dry place.
Planting Your Potatoes
Now for the fun part! Let’s get those potatoes in the ground (or, in this case, the container).
1. Prepare Your Container: Fill the bottom of your container with about 4-6 inches of potting mix.
2. Plant the Seed Potatoes: Place the seed potato pieces (or whole small seed potatoes) on top of the soil, with the sprouts facing upwards. Space them about 8-12 inches apart. If you’re using a very large container, you can plant more than one.
3. Cover with Soil: Cover the seed potatoes with another 4-6 inches of potting mix.
4. Water Thoroughly: Water the soil until it’s evenly moist, but not soggy.
Caring for Your Potato Plants
This is where the patience comes in. But trust me, it’s worth it!
1. Light: Place your container in a location that receives at least 6-8 hours of sunlight per day. If you’re using grow lights, position them about 6-12 inches above the plants and keep them on for 14-16 hours per day.
2. Watering: Keep the soil consistently moist, but not waterlogged. Water when the top inch of soil feels dry to the touch. Overwatering can lead to rot, so be careful!
3. Fertilizing: Potatoes are heavy feeders, so you’ll need to fertilize them regularly. Use a balanced liquid fertilizer (like a 10-10-10) diluted to half strength every 2-3 weeks.
4. Hilling: This is a crucial step for maximizing your potato yield. As the potato plants grow, they’ll develop stems. When the stems are about 6-8 inches tall, add more potting mix to the container, covering the stems up to the bottom leaves. This encourages the plants to produce more potatoes along the buried stems. Repeat this process every few weeks until the container is almost full. I usually do this about 3-4 times during the growing season.
5. Pest Control: Keep an eye out for pests like aphids, spider mites, and potato beetles. If you spot any, you can try spraying them with insecticidal soap or neem oil. I prefer to use organic methods whenever possible.
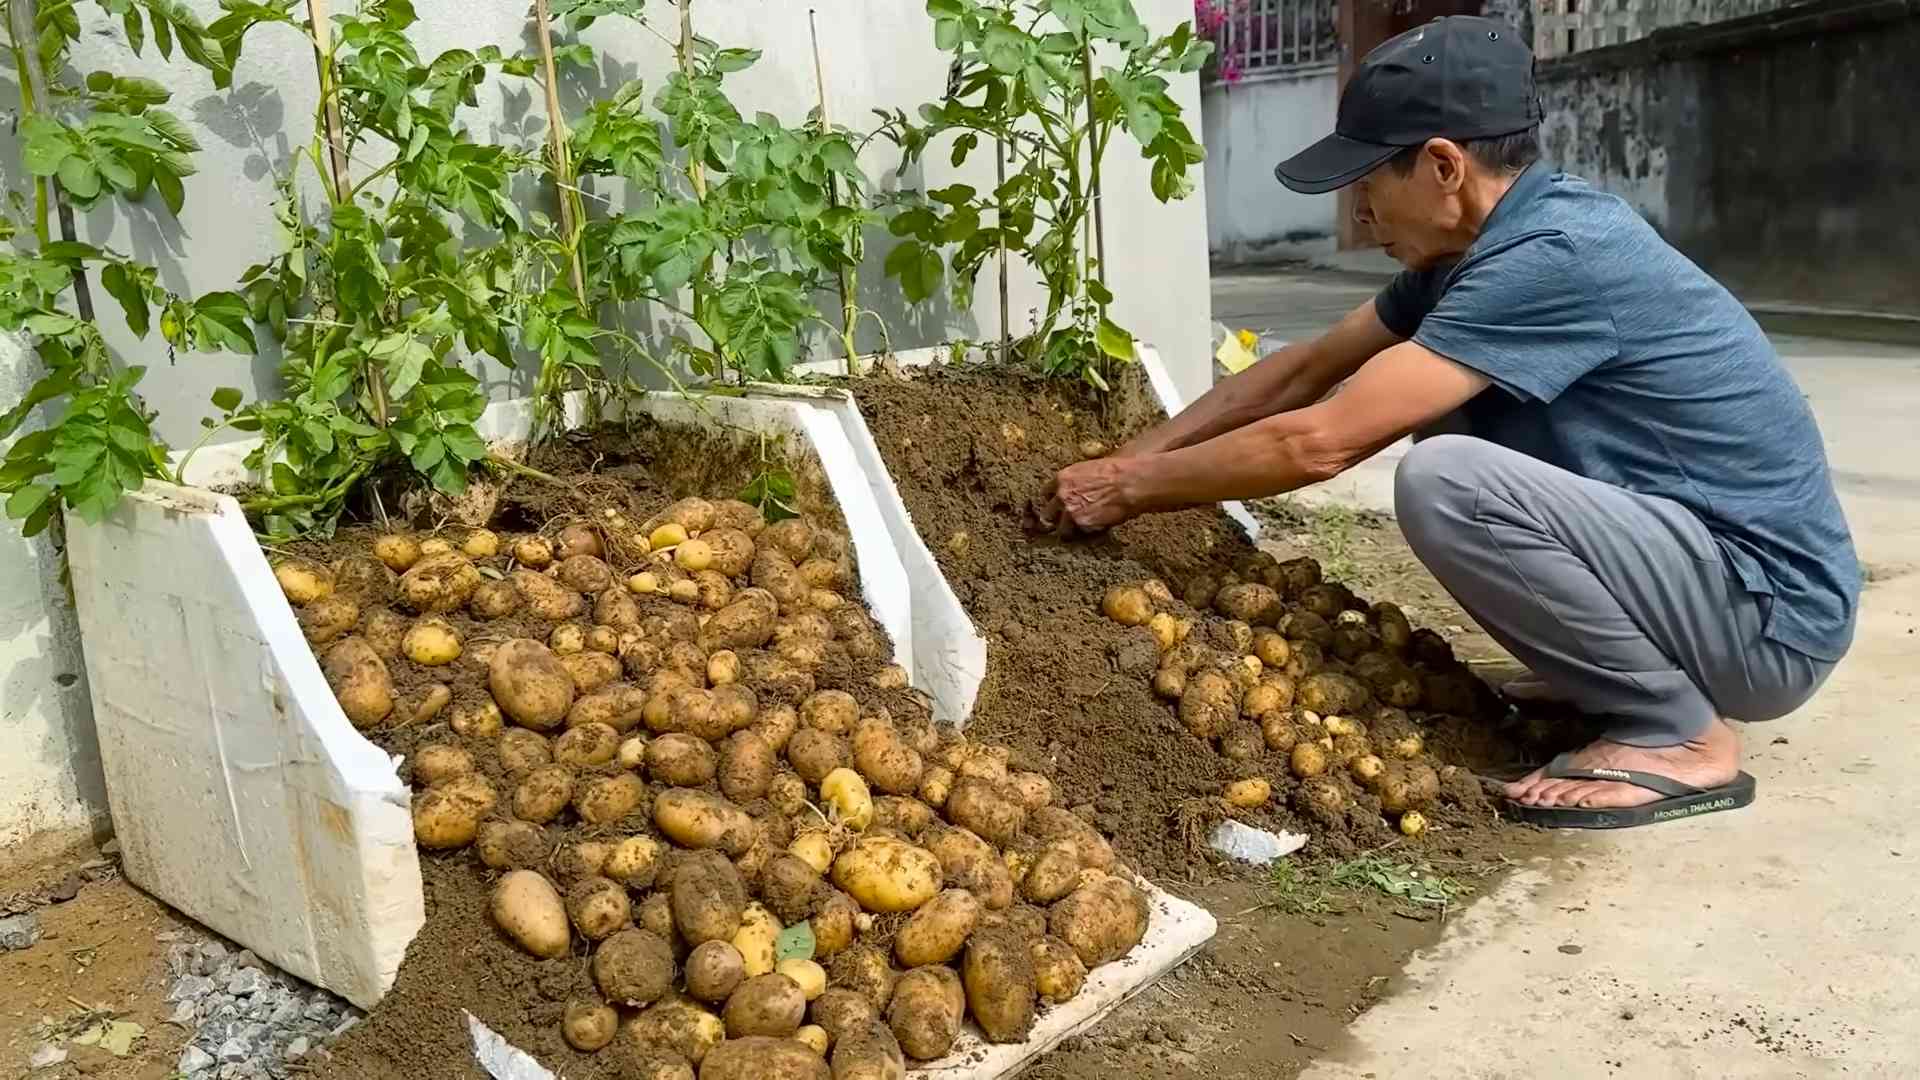
Harvesting Your Potatoes
The moment we’ve all been waiting for!
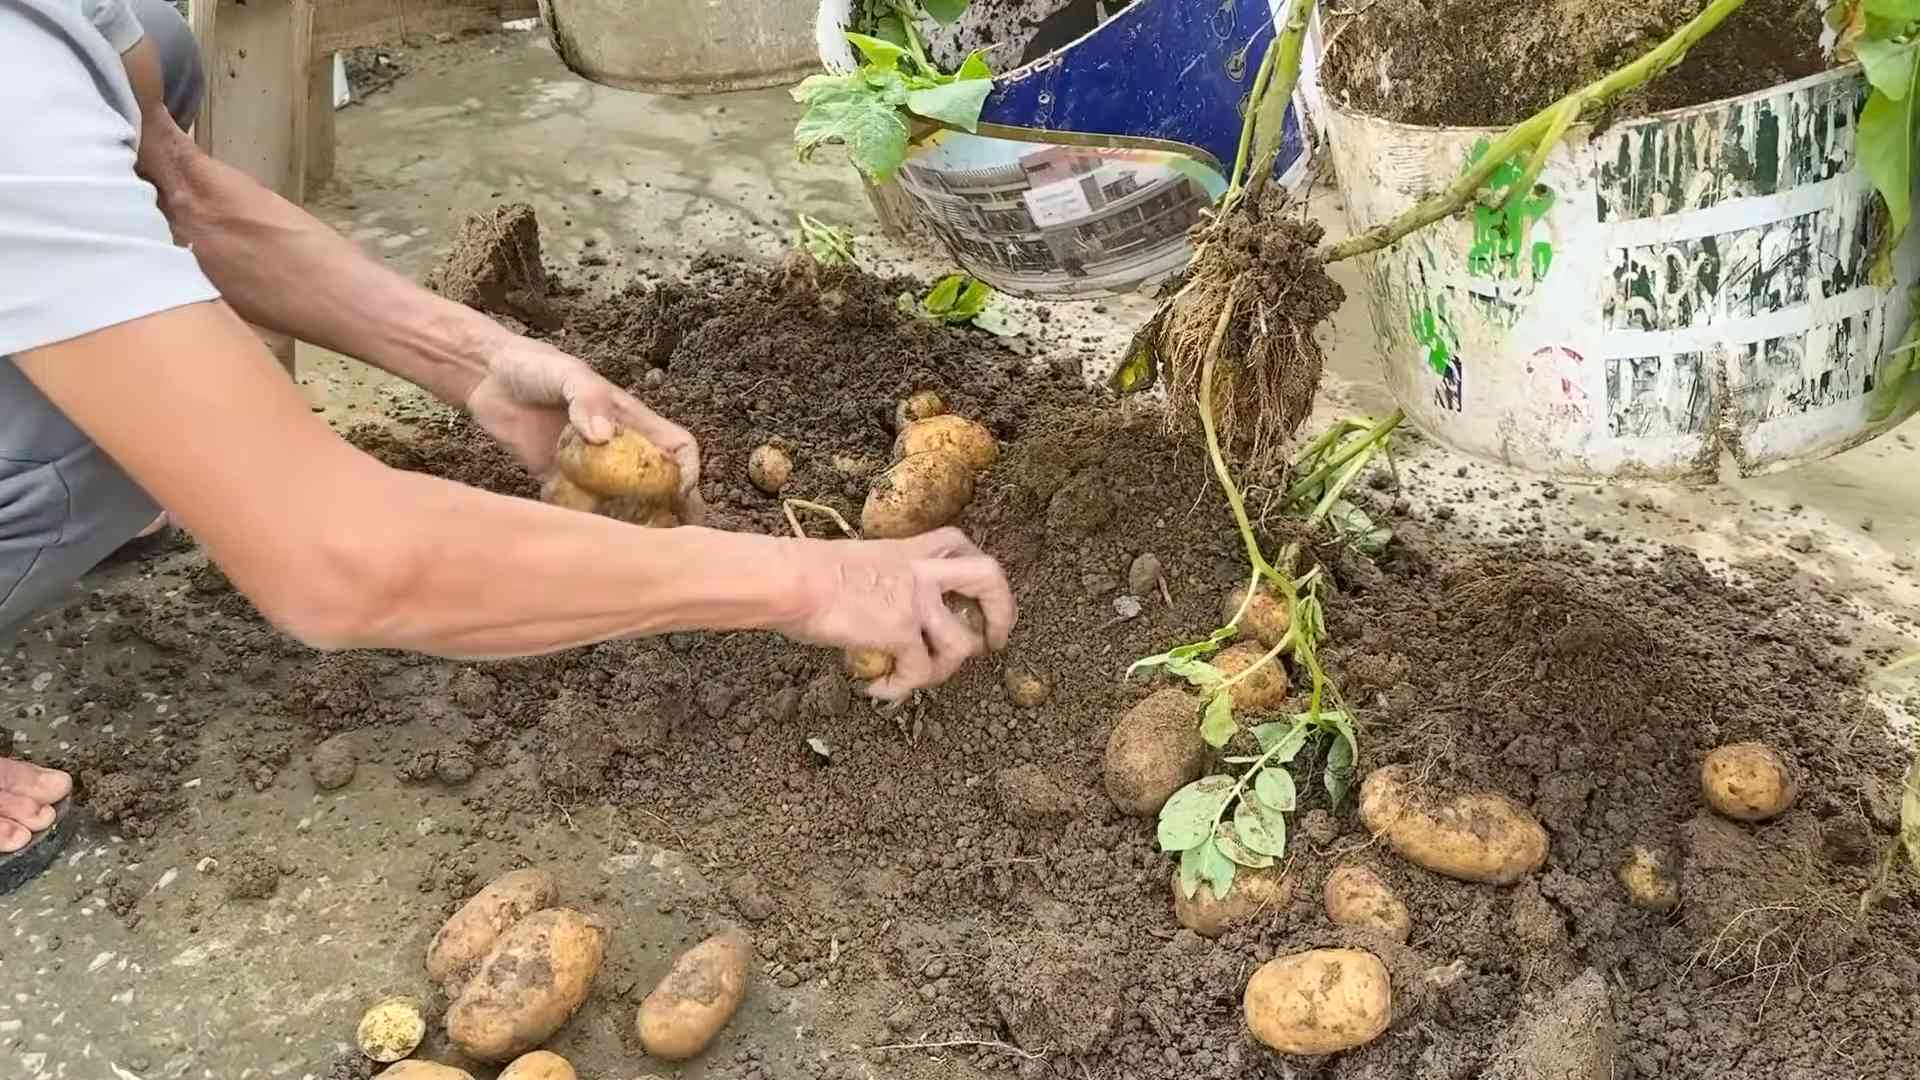
1. When to Harvest: You can start harvesting “new potatoes” (small, tender potatoes) about 2-3 months after planting. To harvest new potatoes, carefully dig around the base of the plant and remove a few potatoes. Be careful not to disturb the rest of the plant. For mature potatoes, wait until the foliage starts to turn yellow and die back. This usually takes about 3-4 months.
2. How to Harvest: Gently tip the container over and carefully remove the potatoes from the soil. You can also use a garden fork to loosen the soil and then pull out the potatoes by hand.
3. Curing Your Potatoes (for mature potatoes): After harvesting, let the potatoes cure in a cool, dark, and well-ventilated place for about a week. This allows the skins to harden and helps prevent rot during storage.
4. Storing Your Potatoes: Store your cured potatoes in a cool, dark, and dry place. A root cellar is ideal, but a basement or garage will also work. Avoid storing potatoes in the refrigerator, as this can cause them to develop a sweet taste.
Troubleshooting
Even with the best intentions, things can sometimes go wrong. Here are a few common problems you might encounter and how to fix them:
* Yellowing Leaves: This could be a sign of overwatering, underwatering, nutrient deficiency, or disease. Check the soil moisture and adjust your watering accordingly. Fertilize regularly and inspect the plants for signs of disease.
* Leggy Growth: This is usually caused by insufficient light. Make sure your plants are getting enough sunlight or grow light.
* No Potatoes: This could be due to a number of factors, including poor soil, insufficient light, lack of fertilization, or improper hilling. Make sure you’re providing your plants with the right conditions and following the steps outlined above.
* Rotting Potatoes: This is usually caused by overwatering or poor drainage. Make sure your container has drainage holes and that you’re not overwatering.
Extra Tips for Success
* Choose the Right Variety: Some potato varieties are better suited for indoor growing than others. Look for varieties that are known for their compact growth habit and early maturity.
* Rotate Your Crops: Avoid planting potatoes in the same container year after year. This can help prevent the buildup of soilborne diseases.
* Have Fun! Growing potatoes indoors is a rewarding experience. Don’t be afraid to experiment and learn from your mistakes.
Growing potatoes indoors is a fantastic way to enjoy fresh, homegrown potatoes year-round. With a little bit of effort and the right supplies, you can have a bountiful harvest right in your own home. So, grab your seed potatoes, get your hands dirty, and get ready to enjoy the fruits (or should I say, vegetables?) of your labor! Happy gardening!
Conclusion
So, there you have it! Growing potatoes indoors is not only possible, but it’s also a surprisingly rewarding experience. Forget the limitations of your outdoor space or the unpredictable weather; with a little planning and effort, you can enjoy freshly harvested, homegrown potatoes right from your own home. This DIY trick offers a unique opportunity to connect with nature, learn about the potato life cycle, and savor the unparalleled taste of potatoes you nurtured from sprout to spud.
Why is this a must-try? Because it’s more than just growing food; it’s about empowerment. It’s about taking control of your food source, reducing your carbon footprint, and experiencing the satisfaction of creating something delicious and nutritious with your own two hands. Plus, it’s a fantastic conversation starter! Imagine the look on your friends’ faces when you tell them you’re growing potatoes in your living room.
But the fun doesn’t stop there. Feel free to experiment with different potato varieties. Russets are great for baking, Yukon Golds are perfect for creamy mashed potatoes, and red potatoes hold their shape well in salads. You can also try different containers – from traditional grow bags to repurposed buckets or even stylish decorative pots. Just ensure they have adequate drainage.
Consider adding companion plants to your potato containers. Marigolds can help deter pests, while basil can improve the flavor of your potatoes. Get creative with your setup! A vertical potato tower can maximize space, while a simple windowsill garden can bring a touch of green to any room.
Don’t be afraid to tweak the process to suit your specific environment and preferences. If you live in a particularly sunny area, you might need to provide some shade to prevent the leaves from scorching. If your home is dry, you might need to water more frequently. The key is to observe your plants, learn from your mistakes, and adapt your approach as needed.
Ultimately, growing potatoes indoors is a journey of discovery. It’s a chance to connect with nature, learn new skills, and enjoy the fruits (or rather, tubers) of your labor. So, what are you waiting for? Grab a few seed potatoes, gather your supplies, and embark on this exciting adventure today.
We are confident that you’ll find this DIY trick to be both enjoyable and rewarding. But more importantly, we want to hear about your experience! Share your photos, tips, and stories with us in the comments below. Let’s create a community of indoor potato growers and inspire others to embrace the joy of homegrown food. Tell us what variety you chose, what challenges you faced, and what delicious dishes you created with your homegrown harvest. Your insights could be invaluable to other aspiring potato farmers. So, get growing, get sharing, and let’s celebrate the magic of indoor potatoes together! This method of growing potatoes indoors is a game changer.
Frequently Asked Questions (FAQ)
What kind of potatoes are best for growing indoors?
While you can technically grow any variety of potato indoors, some are better suited than others. Smaller, earlier-maturing varieties like Yukon Gold, fingerling potatoes, and red potatoes tend to do well in containers. These varieties generally require less space and have a shorter growing season, making them ideal for indoor cultivation. Avoid larger, late-maturing varieties like Russets, as they may not have enough room to fully develop in a container. Seed potatoes are the best starting point, but you can also use potatoes that have sprouted “eyes.” Just make sure they are certified disease-free.
How much sunlight do indoor potatoes need?
Potatoes need at least 6-8 hours of direct sunlight per day to thrive. If you don’t have a sunny windowsill, you’ll need to supplement with artificial lighting. Grow lights, particularly LED grow lights, are an excellent option. Position the lights about 6-12 inches above the plants and keep them on for 14-16 hours per day. Rotate the plants regularly to ensure even light exposure on all sides. Insufficient light can lead to leggy growth and reduced tuber production.
What kind of soil should I use for growing potatoes indoors?
Potatoes need well-draining soil that is rich in organic matter. A good mix would be equal parts potting soil, compost, and perlite or vermiculite. The potting soil provides a base for the plants to grow, the compost adds nutrients, and the perlite or vermiculite improves drainage and aeration. Avoid using garden soil, as it can be too heavy and may contain pests or diseases. The ideal pH for potato growth is between 5.5 and 6.5.
How often should I water my indoor potato plants?
Water your potato plants regularly, keeping the soil consistently moist but not waterlogged. Check the soil moisture by sticking your finger about an inch deep. If the soil feels dry, it’s time to water. Water deeply, allowing the excess water to drain out of the bottom of the container. Avoid overwatering, as this can lead to root rot. The frequency of watering will depend on factors such as the size of the container, the temperature, and the humidity.
How do I “hill” my potato plants indoors?
“Hilling” is the process of adding more soil to the container as the potato plants grow. This encourages the plants to produce more tubers along the buried stem. Start hilling when the plants are about 6 inches tall. Add a few inches of soil around the base of the plants, burying the lower part of the stem. Repeat this process every few weeks as the plants grow, until the container is nearly full.
When are my indoor potatoes ready to harvest?
Indoor potatoes are typically ready to harvest about 70-90 days after planting. The foliage will start to turn yellow and die back when the potatoes are mature. You can harvest “new potatoes” earlier, about 60 days after planting, by carefully digging around the edges of the container and removing a few small tubers. For a full harvest, wait until the foliage has completely died back. Then, carefully dump the container and collect the potatoes.
What are some common problems when growing potatoes indoors and how can I fix them?
Some common problems include pests (like aphids or spider mites), diseases (like early blight or late blight), and nutrient deficiencies. To prevent pests, inspect your plants regularly and treat them with insecticidal soap or neem oil if necessary. Ensure good air circulation to prevent fungal diseases. If you notice yellowing leaves, it could be a sign of nutrient deficiency. Fertilize your plants with a balanced fertilizer according to the package instructions.
Can I grow potatoes indoors year-round?
Yes, you can grow potatoes indoors year-round, provided you have adequate light and temperature control. Potatoes prefer temperatures between 60-70°F (15-21°C). If your home is too cold or too hot, you may need to adjust the temperature with a space heater or air conditioner. You’ll also need to ensure that your plants receive enough light, especially during the winter months.
How do I store my homegrown potatoes?
Store your homegrown potatoes in a cool, dark, and well-ventilated place. The ideal temperature is between 40-50°F (4-10°C). Avoid storing potatoes in the refrigerator, as this can cause them to develop a sweet taste. Store them in a paper bag or cardboard box to prevent them from drying out. Properly stored potatoes can last for several months.
Is growing potatoes indoors worth the effort?
Absolutely! While it requires some effort and attention, growing potatoes indoors is a rewarding experience that offers numerous benefits. You get to enjoy fresh, homegrown potatoes, learn about the potato life cycle, and connect with nature. It’s also a great way to reduce your carbon footprint and take control of your food source. Plus, it’s a fun and educational activity for the whole family. The taste of freshly harvested, homegrown potatoes is simply unbeatable.

Leave a Comment