

Growing Pineapples at Home might sound like an exotic dream reserved for tropical climates, but I’m here to tell you it’s absolutely achievable, even if you’re miles away from Hawaii! Imagine plucking a juicy, sun-ripened pineapple straight from your own backyard (or balcony!). That’s the magic we’re unlocking today with these simple, yet effective, DIY tricks.
The pineapple, a symbol of hospitality and welcome, has a rich history dating back centuries. Originating in South America, it was quickly embraced by explorers and traders, eventually becoming a prized delicacy in Europe. Pineapples were so valuable that they were often rented out as status symbols for parties! While we may not be renting them out, bringing that touch of tropical luxury into our homes is something special.
But why bother with the effort? Well, store-bought pineapples, while delicious, often lack the intense flavor of a truly fresh, homegrown fruit. Plus, growing pineapples at home is incredibly rewarding and surprisingly easy. In this article, I’ll share my favorite DIY hacks to help you cultivate your own pineapple paradise, regardless of your gardening experience. From preparing the pineapple top to nurturing your plant, I’ll guide you through every step. Get ready to impress your friends and family with your green thumb and enjoy the sweet taste of success!
Ananas selber ziehen: Dein tropischer Traum im eigenen Zuhause
Hey Leute! Habt ihr auch schon mal davon geträumt, eure eigenen Ananas zu ernten? Ich zeige euch, wie ihr diesen tropischen Traum ganz einfach zu Hause verwirklichen könnt. Es ist einfacher als ihr denkt und macht super viel Spaß! Lasst uns loslegen!
Was du brauchst:
* Eine reife Ananas (am besten aus dem Bioladen, da diese oft unbehandelt sind)
* Ein scharfes Messer
* Einen Topf (ca. 20 cm Durchmesser)
* Anzuchterde oder Kokosfaser
* Optional: Bewurzelungspulver
* Eine Sprühflasche
* Geduld (Ananas brauchen Zeit!)
Ananas vorbereiten: Der Kopf muss ab!
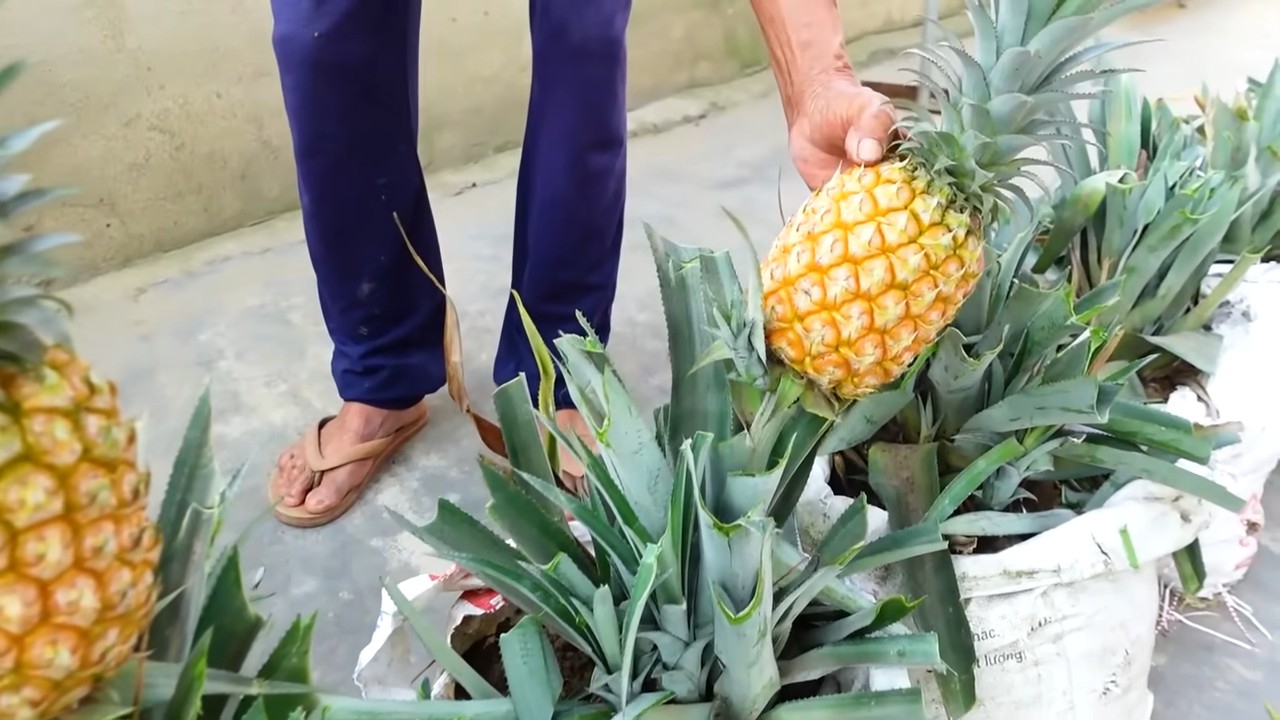
1. Ananas auswählen: Wähle eine reife Ananas aus. Sie sollte eine goldgelbe Farbe haben und einen angenehmen, süßen Duft verströmen. Die Blätter sollten grün und fest sein. Vermeide Ananas mit braunen oder welken Blättern.
2. Blätterkrone abschneiden: Nimm dein scharfes Messer und schneide die Blätterkrone mit etwa 2-3 cm Fruchtfleisch ab. Achte darauf, einen sauberen Schnitt zu machen.
3. Fruchtfleisch entfernen: Entferne vorsichtig das restliche Fruchtfleisch von der Blätterkrone. Das ist wichtig, da das Fruchtfleisch sonst faulen kann und die Wurzelbildung behindert. Du kannst das Fruchtfleisch entweder mit einem Messer abschneiden oder es vorsichtig abziehen.
4. Unterste Blätter entfernen: Entferne die untersten Blätter der Blätterkrone (ca. 2-3 Reihen). Dadurch werden die Stellen freigelegt, an denen die Wurzeln später austreten werden.
5. Optional: Bewurzelungspulver: Tauche die freigelegten Stellen in Bewurzelungspulver. Das fördert die Wurzelbildung und schützt vor Pilzbefall. Das ist aber kein Muss, es funktioniert auch ohne!
Einpflanzen und Bewurzeln: Ab in die Erde!
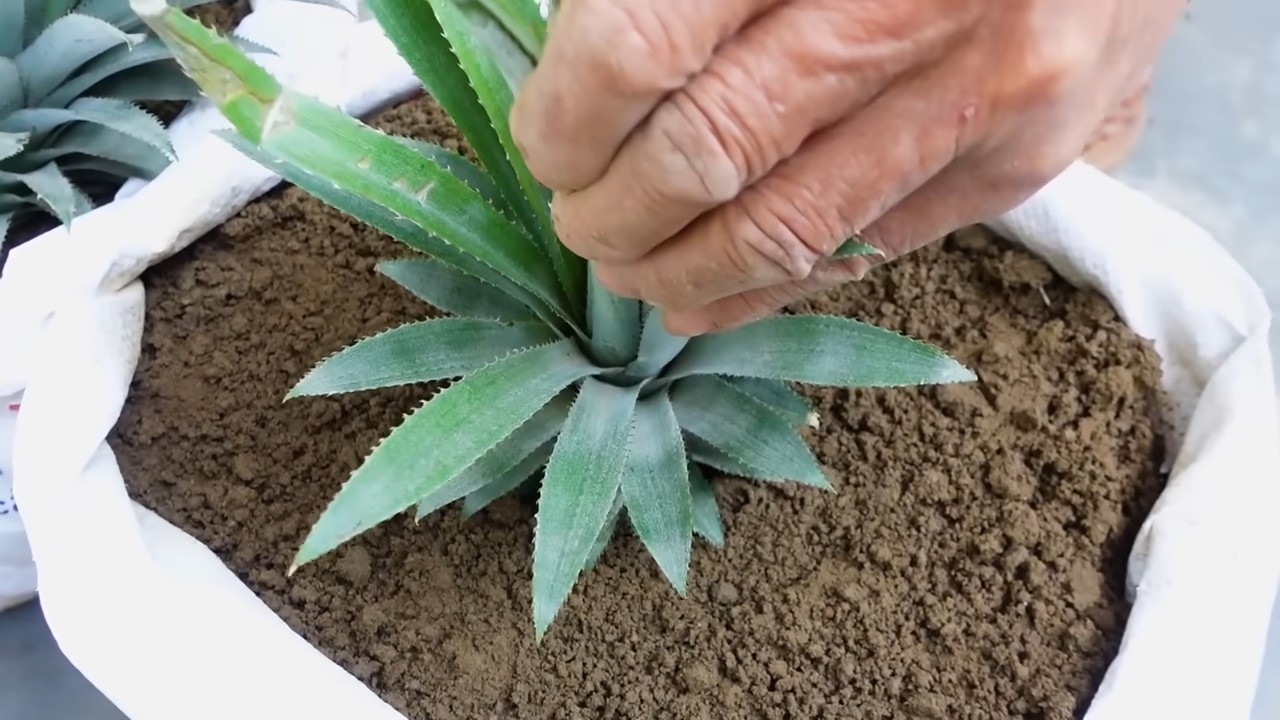
1. Topf vorbereiten: Fülle den Topf mit Anzuchterde oder Kokosfaser. Drücke die Erde leicht an.
2. Ananas einpflanzen: Stecke die vorbereitete Blätterkrone etwa 2-3 cm tief in die Erde. Achte darauf, dass die Blätter nicht die Erde berühren.
3. Angießen: Gieße die Ananas vorsichtig an, sodass die Erde feucht, aber nicht nass ist.
4. Standort wählen: Stelle den Topf an einen warmen und hellen Ort. Ananas lieben Wärme und Licht! Ein Fensterbrett mit Südausrichtung ist ideal.
5. Feuchtigkeit halten: Besprühe die Blätter regelmäßig mit Wasser, um die Luftfeuchtigkeit zu erhöhen. Das hilft der Ananas beim Bewurzeln.
Pflege und Geduld: Warten auf die Wurzeln!
1. Gießen: Gieße die Ananas nur, wenn die Erde trocken ist. Vermeide Staunässe, da dies zu Fäulnis führen kann.
2. Düngen: Nach etwa 2-3 Monaten, wenn die Ananas Wurzeln gebildet hat, kannst du sie mit einem speziellen Ananasdünger oder einem Flüssigdünger für Zimmerpflanzen düngen. Befolge dabei die Anweisungen auf der Verpackung.
3. Umpflanzen: Wenn die Ananas größer wird, kannst du sie in einen größeren Topf umpflanzen.
4. Geduld haben: Es kann bis zu 2-3 Jahre dauern, bis deine Ananas Früchte trägt. Aber keine Sorge, es lohnt sich!
Die richtige Umgebung schaffen: Tropenfeeling für deine Ananas
* Temperatur: Ananas lieben Wärme. Die ideale Temperatur liegt zwischen 20 und 30 Grad Celsius. Vermeide Temperaturen unter 15 Grad Celsius.
* Luftfeuchtigkeit: Ananas benötigen eine hohe Luftfeuchtigkeit. Du kannst die Luftfeuchtigkeit erhöhen, indem du die Blätter regelmäßig mit Wasser besprühst oder den Topf auf einen Untersetzer mit Wasser und Kieselsteinen stellst.
* Licht: Ananas brauchen viel Licht. Stelle sie an einen hellen Ort, aber vermeide direkte Sonneneinstrahlung während der heißesten Stunden des Tages.
* Belüftung: Sorge für eine gute Belüftung, um Pilzbefall vorzubeugen.
Anzeichen für Erfolg: Sie wächst!
* Neue Blätter: Wenn deine Ananas neue Blätter bildet, ist das ein gutes Zeichen! Das bedeutet, dass sie Wurzeln gebildet hat und wächst.
* Fester Stand: Wenn du vorsichtig an der Ananas ziehst und sie fest im Topf sitzt, hat sie Wurzeln gebildet.
Probleme und Lösungen: Was tun, wenn’s nicht klappt?
* Fäulnis: Wenn die Blätter braun werden und faulen, ist das ein Zeichen für Staunässe oder Pilzbefall. Entferne die betroffenen Blätter und reduziere die Wassermenge. Du kannst auch ein Fungizid verwenden.
* Gelbe Blätter: Gelbe Blätter können ein Zeichen für Nährstoffmangel sein. Dünge die Ananas mit einem speziellen Ananasdünger oder einem Flüssigdünger für Zimmerpflanzen.
* Kein Wachstum: Wenn die Ananas nicht wächst, kann das an zu wenig Licht, zu niedriger Temperatur oder Nährstoffmangel liegen. Überprüfe die Bedingungen und passe sie gegebenenfalls an.
Die Blüte und die Frucht: Der Lohn der Geduld!
1. Die Blüte: Nach etwa 2-3 Jahren wird deine Ananas blühen. Die Blüte ist ein wunderschönes Schauspiel aus violetten Blüten, die sich zu einer Frucht entwickeln.
2. Die Frucht: Die Frucht reift langsam heran. Es kann mehrere Monate dauern, bis sie reif ist.
3. Ernte: Wenn die Frucht eine goldgelbe Farbe hat und einen angenehmen, süßen Duft verströmt, ist sie reif für die Ernte. Schneide die Frucht mit einem scharfen Messer ab.
Zusätzliche Tipps und Tricks: Für noch mehr Erfolg!
* Ananas aus dem Supermarkt: Achte beim Kauf der Ananas darauf, dass sie frisch und gesund aussieht. Vermeide Ananas mit braunen oder welken Blättern.
* Bewurzelung im Wasser: Du kannst die Blätterkrone auch zuerst im Wasser bewurzeln, bevor du sie in die Erde pflanzt. Stelle die Blätterkrone in ein Glas Wasser und wechsle das Wasser regelmäßig. Sobald sich Wurzeln gebildet haben, kannst du sie in die Erde pflanzen.
* Winterruhe: Im Winter benötigt die Ananas weniger Wasser und Dünger. Stelle sie an einen kühleren Ort und gieße sie nur, wenn die Erde trocken ist.
* Schädlinge: Ananas können von Schädlingen wie Spinnmilben oder Wollläusen befallen werden. Kontrolliere die Blätter regelmäßig und bekämpfe die Schädlinge bei Bedarf mit einem geeigneten Mittel.
Ananas vermehren: Mehr ist mehr!
* Seitentriebe: Ananas bilden oft Seitentriebe, die du zur Vermehrung verwenden kannst. Schneide die Seitentriebe ab, sobald sie eine Größe von etwa 15-20 cm erreicht haben. Entferne die untersten Blätter und pflanze die Seitentriebe in einen separaten Topf.
* Blätterkrone: Du kannst auch die Blätterkrone der geernteten Ananas zur Vermehrung verwenden. Folge einfach den gleichen Schritten wie oben beschrieben.
Ich hoffe, diese Anleitung hilft euch dabei, eure eigenen Ananas zu ziehen! Es ist ein tolles Gefühl, die Früchte seiner eigenen Arbeit zu ernten. Viel Spaß beim Gärtnern!
Conclusion
So, there you have it! Growing pineapples at home, while it might seem like a tropical dream reserved for expert gardeners, is surprisingly achievable with a little patience and the right approach. We’ve walked you through the process, from selecting the perfect pineapple top to nurturing your plant through its various stages. But why should you even bother?
The answer is multifaceted. First and foremost, the satisfaction of harvesting a pineapple you’ve personally cultivated is unparalleled. It’s a testament to your green thumb and a rewarding experience that connects you to the natural world. Secondly, homegrown pineapples often boast a superior flavor compared to store-bought varieties. They’re allowed to ripen fully on the plant, resulting in a sweeter, more intense taste that will tantalize your taste buds. Finally, you’ll know exactly where your pineapple came from and how it was grown, ensuring it’s free from harmful pesticides and chemicals.
This DIY trick is more than just a gardening project; it’s an investment in fresh, delicious fruit and a sustainable lifestyle. Imagine serving a homegrown pineapple to your friends and family, sharing the story of its journey from a simple pineapple top to a juicy, tropical treat. The conversations and memories created will be as sweet as the fruit itself.
Don’t be afraid to experiment with variations! Try different potting mixes to see what works best in your climate. Some gardeners swear by adding a bit of bone meal to the soil to encourage root growth, while others prefer a slightly acidic mix. You can also try growing your pineapple in a larger container to allow for more root development and potentially a larger fruit. Consider using a self-watering pot to simplify the watering process, especially if you live in a hot, dry climate.
For those in colder climates, consider growing your pineapple indoors in a large pot. Provide it with plenty of sunlight, either through a sunny window or with the help of a grow light. You may need to hand-pollinate the flower if it doesn’t get enough natural pollination indoors.
We understand that growing pineapples at home can seem daunting at first, but we encourage you to take the plunge. The rewards are well worth the effort. Start with a single pineapple top and see where it takes you. You might be surprised at how easy and enjoyable it is to grow your own tropical fruit.
So, grab a pineapple, enjoy the delicious fruit, and then get ready to embark on your own pineapple-growing adventure! Don’t forget to document your progress and share your experiences with us. We’d love to hear your tips, tricks, and triumphs. Share your photos and stories on social media using [Your Hashtag] and let’s create a community of home pineapple growers!
Frequently Asked Questions (FAQ)
1. What kind of pineapple should I use to start growing my own?
The best type of pineapple to use is a fresh, ripe pineapple from your local grocery store. Look for one with healthy, green leaves and a firm, slightly fragrant fruit. Avoid pineapples with brown or damaged leaves, as these may not root properly. The variety doesn’t matter as much as the overall health of the fruit. However, some gardeners find that certain varieties, like Smooth Cayenne, are more reliable for home growing.
2. How long does it take to grow a pineapple from a top?
Patience is key! It typically takes anywhere from 2 to 3 years for a pineapple plant grown from a top to produce fruit. The exact timeframe depends on various factors, including climate, sunlight, soil quality, and watering habits. Don’t be discouraged if it takes longer; the wait will be worth it!
3. What kind of soil is best for growing pineapples?
Pineapples thrive in well-draining, slightly acidic soil. A mixture of equal parts potting soil, perlite, and peat moss is a good starting point. You can also add a bit of compost to provide extra nutrients. Avoid heavy clay soils, as they can retain too much moisture and lead to root rot.
4. How much sunlight does a pineapple plant need?
Pineapples need at least 6 hours of direct sunlight per day. If you’re growing your pineapple indoors, place it near a sunny window or use a grow light to supplement natural sunlight. Insufficient sunlight can stunt growth and delay fruit production.
5. How often should I water my pineapple plant?
Water your pineapple plant thoroughly when the top inch of soil feels dry to the touch. Avoid overwatering, as this can lead to root rot. During the warmer months, you may need to water more frequently. In the winter, reduce watering as the plant’s growth slows down. Ensure the pot has drainage holes to prevent water from accumulating at the bottom.
6. Do I need to fertilize my pineapple plant?
Yes, fertilizing your pineapple plant regularly will help it grow and produce fruit. Use a balanced fertilizer (e.g., 10-10-10) diluted to half strength. Fertilize every 2-3 months during the growing season (spring and summer). Avoid fertilizing during the winter months when the plant is dormant.
7. How do I encourage my pineapple plant to flower and fruit?
One common trick to encourage flowering is to expose the plant to ethylene gas. You can do this by placing a ripe apple or banana near the plant and covering it with a plastic bag for a few days. The ethylene gas released by the fruit can trigger flowering. Another method is to pour a small amount of calcium carbide solution (available at garden centers) into the center of the plant. However, use this method with caution, as calcium carbide can be harmful if used improperly.
8. What are some common problems when growing pineapples, and how can I fix them?
Common problems include root rot (caused by overwatering), mealybugs, and scale insects. To prevent root rot, ensure your soil is well-draining and avoid overwatering. Mealybugs and scale insects can be treated with insecticidal soap or neem oil. Regularly inspect your plant for pests and address any infestations promptly.
9. Can I grow pineapples in containers?
Yes, pineapples are well-suited for container growing. Choose a pot that is at least 12 inches in diameter and has drainage holes. As the plant grows, you may need to repot it into a larger container. Container growing allows you to move the plant indoors during cold weather.
10. Is it safe to eat the pineapple I grow at home?
Absolutely! Homegrown pineapples are perfectly safe to eat, as long as you haven’t used any harmful chemicals or pesticides. Enjoy the fruits of your labor and savor the delicious, homegrown flavor!
Leave a Comment