

Growing Peppers at Home doesn’t have to be a daunting task! Imagine plucking vibrant, flavorful peppers straight from your own backyard, ready to spice up your favorite dishes. Forget those bland, store-bought peppers – with a few clever tricks and DIY hacks, you can cultivate a thriving pepper garden, even if you’re a complete beginner.
For centuries, peppers have held a special place in cultures around the world. From the fiery chilies of South America, used in ancient rituals and culinary traditions, to the sweet bell peppers gracing European tables, these versatile fruits have enriched our lives in countless ways. Today, the desire to connect with nature and enjoy fresh, homegrown produce is driving a resurgence in home gardening, and growing peppers at home is becoming increasingly popular.
But let’s face it, gardening can sometimes feel overwhelming. That’s where this article comes in! I’m going to share some simple yet effective DIY tricks and hacks that will help you overcome common challenges and maximize your pepper harvest. Whether you’re struggling with pests, limited space, or simply unsure where to start, I’ve got you covered. Get ready to unlock the secrets to a bountiful pepper garden and enjoy the satisfaction of growing your own delicious, healthy food. Let’s get started!
Growing Peppers at Home: From Seed to Salsa!
Hey there, fellow gardening enthusiasts! I’m so excited to share my tried-and-true method for growing peppers at home. Whether you’re dreaming of fiery habaneros or sweet bell peppers, this guide will walk you through every step, from starting seeds indoors to harvesting a bountiful crop. Get ready to add some spice (or sweetness!) to your life!
What You’ll Need: The Essential Supplies
Before we dive in, let’s gather our supplies. Having everything on hand will make the process smooth and enjoyable.
* Pepper Seeds: Choose your favorite varieties! Consider your climate and desired heat level. I personally love a mix of bell peppers, jalapeños, and maybe a few ghost peppers for the adventurous.
* Seed Starting Trays or Pots: These provide a controlled environment for germination.
* Seed Starting Mix: This is a light, sterile mix that promotes healthy seedling growth. Avoid using garden soil at this stage.
* Heat Mat (Optional but Recommended): Pepper seeds germinate best with warmth. A heat mat will significantly improve your success rate.
* Grow Lights (Essential if Starting Indoors): Peppers need plenty of light, especially indoors.
* Small Pots (for Transplanting): Once your seedlings have a few true leaves, you’ll need to transplant them into larger pots.
* Potting Mix: A richer mix than seed starting mix, formulated for growing plants in containers.
* Fertilizer: A balanced fertilizer or one specifically formulated for peppers.
* Gardening Gloves: To keep your hands clean and protected.
* Watering Can or Spray Bottle: For gentle watering.
* Outdoor Garden Space or Large Containers: Where your peppers will eventually live.
* Support Stakes or Cages (Optional): For taller pepper varieties that may need support.
* Patience and Enthusiasm: The most important ingredients!
Phase 1: Starting Seeds Indoors (8-10 Weeks Before Last Frost)
This is where the magic begins! Starting seeds indoors gives your peppers a head start, especially in cooler climates.
1. Prepare Your Seed Starting Trays: Fill your seed starting trays or pots with seed starting mix. Gently tamp it down, leaving about half an inch of space at the top.
2. Sow the Seeds: Place 2-3 pepper seeds in each cell or pot, about ¼ inch deep. I like to use a pencil to make a small indentation.
3. Cover and Water: Gently cover the seeds with more seed starting mix and lightly water with a spray bottle. You want the soil to be moist, but not soggy.
4. Provide Warmth: Place the seed starting trays on a heat mat. This will help maintain the optimal soil temperature for germination (around 80-85°F).
5. Provide Light: Position your grow lights about 2-4 inches above the seed starting trays. Set the lights on a timer for 14-16 hours per day.
6. Maintain Moisture: Keep the seed starting mix consistently moist, but not waterlogged. Check the moisture level daily and water as needed.
7. Be Patient: Pepper seeds can take anywhere from 7 to 21 days to germinate, depending on the variety and conditions. Don’t give up!
8. Thin Seedlings (If Necessary): Once the seedlings emerge and have their first true leaves (the second set of leaves), thin them to one seedling per cell or pot. Choose the strongest, healthiest-looking seedling and gently snip off the others at the soil line.
Phase 2: Transplanting Seedlings
Once your seedlings have developed a few sets of true leaves and are a few inches tall, it’s time to transplant them into larger pots.
1. Prepare Your Pots: Fill small pots (3-4 inches in diameter) with potting mix.
2. Gently Remove Seedlings: Carefully remove the seedlings from the seed starting trays or pots. I like to use a small spoon or fork to gently lift them out, being careful not to damage the roots.
3. Transplant Seedlings: Make a small hole in the potting mix in the new pot and gently place the seedling in the hole. Cover the roots with potting mix and gently firm the soil around the base of the plant.
4. Water Thoroughly: Water the transplanted seedlings thoroughly.
5. Provide Light and Warmth: Place the transplanted seedlings under grow lights or in a sunny window. Continue to provide warmth and maintain consistent moisture.
6. Fertilize (Optional): After a week or two, you can start fertilizing the seedlings with a diluted balanced fertilizer. Follow the instructions on the fertilizer package.
Phase 3: Hardening Off Seedlings
Before transplanting your pepper plants outdoors, you need to “harden them off.” This process gradually acclimates them to the outdoor environment, preventing shock and ensuring their survival.
1. Start Slowly: Begin by placing your seedlings outdoors in a sheltered location (e.g., a porch or patio) for just an hour or two each day.
2. Gradually Increase Exposure: Over the next week or two, gradually increase the amount of time the seedlings spend outdoors each day.
3. Protect from Harsh Conditions: Protect the seedlings from strong winds, direct sunlight, and extreme temperatures.
4. Monitor for Stress: Watch for signs of stress, such as wilting or leaf burn. If you notice any stress, bring the seedlings back indoors and reduce their outdoor exposure.
5. Overnight Exposure: After a week or two of gradual exposure, you can start leaving the seedlings outdoors overnight, as long as the temperature doesn’t drop below 50°F.
Phase 4: Transplanting Outdoors
Once the danger of frost has passed and your seedlings are hardened off, it’s time to transplant them into their final growing location.
1. Choose a Sunny Location: Peppers need at least 6-8 hours of sunlight per day.
2. Prepare the Soil: Amend the soil with compost or other organic matter to improve drainage and fertility. Peppers prefer well-drained soil.
3. Space Plants Appropriately: Space pepper plants 18-24 inches apart, depending on the variety. Taller varieties may need more space.
4. Dig Holes: Dig holes that are slightly larger than the root balls of the seedlings.
5. Gently Remove Seedlings: Carefully remove the seedlings from their pots.
6. Transplant Seedlings: Place the seedlings in the holes and cover the roots with soil. Gently firm the soil around the base of the plants.
7. Water Thoroughly: Water the transplanted seedlings thoroughly.
8. Add Support (If Needed): If you’re growing taller pepper varieties, install support stakes or cages to prevent them from falling over.
9. Mulch (Optional): Apply a layer of mulch around the base of the plants to help retain moisture, suppress weeds, and regulate soil temperature.
Phase 5: Ongoing Care
Congratulations! You’ve successfully transplanted your pepper plants outdoors. Now, it’s time to provide ongoing care to ensure a bountiful harvest.
1. Water Regularly: Water pepper plants regularly, especially during hot, dry weather. Aim to keep the soil consistently moist, but not waterlogged.
2. Fertilize Regularly: Fertilize pepper plants every 2-3 weeks with a balanced fertilizer or one specifically formulated for peppers. Follow the instructions on the fertilizer package.
3. Pinch Off Early Flowers (Optional): Pinching off the first few flowers that appear on your pepper plants can encourage them to focus their energy on vegetative growth, resulting in a larger, more productive plant.
4. Monitor for Pests and Diseases: Regularly inspect your pepper plants for pests and diseases. Common pepper pests include aphids, flea beetles, and spider mites. Common pepper diseases include blossom end rot, fungal leaf spot, and viral diseases.
5. Treat Pests and Diseases Promptly: If you find any pests or diseases, treat them promptly with appropriate organic or chemical controls.
6. Provide Support (If Needed): As your pepper plants grow, they may need additional support to prevent them from falling over. Add support stakes or cages as needed.
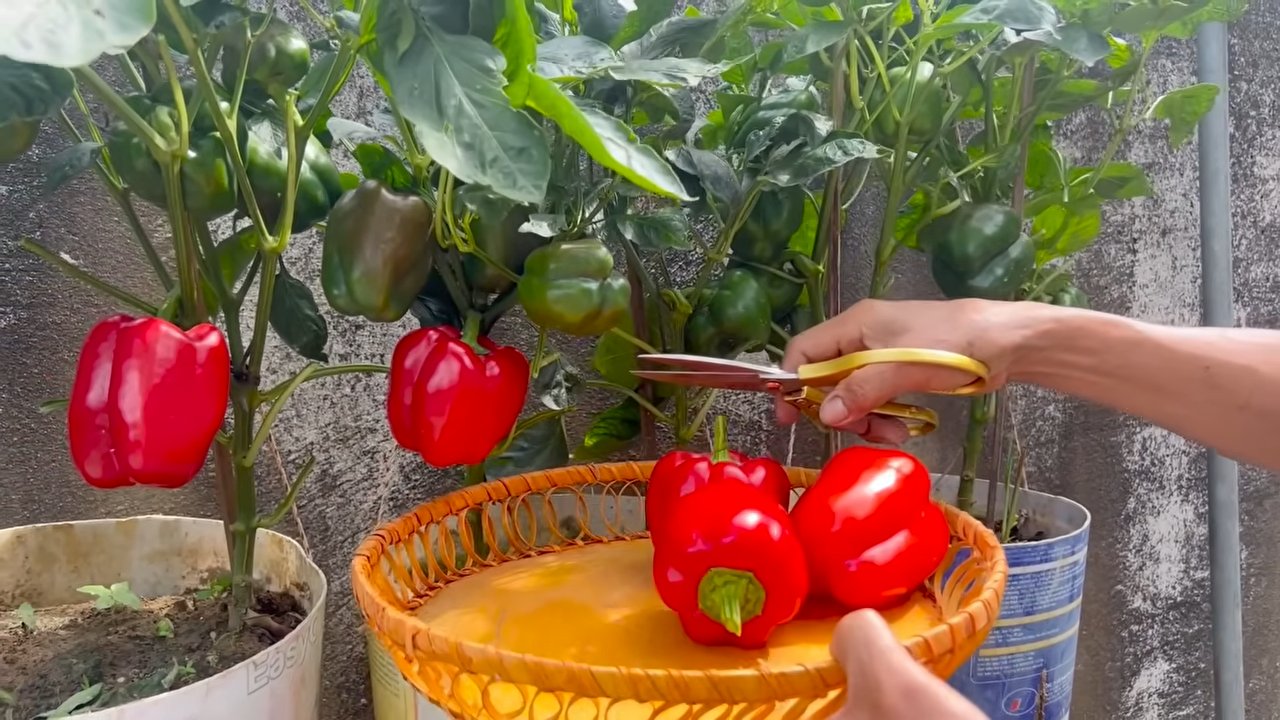
7. Harvest Regularly: Harvest peppers when they are fully ripe and have reached their desired color. Regular harvesting encourages the plant to produce more peppers.
Troubleshooting Common Pepper Problems
Even with the best care, you might encounter some challenges along the way. Here are a few common pepper problems and how to address them:
* Blossom End Rot: This is caused by a calcium deficiency and results in a dark, sunken spot on the bottom of the pepper. To prevent blossom end rot, ensure your soil is rich in calcium and water your plants consistently. You can also add calcium to the soil by

Conclusion
So, there you have it! Growing peppers at home, especially with these simple DIY tricks, is not just a rewarding experience; it’s a gateway to fresher, tastier, and more vibrant meals. We’ve explored how to optimize your pepper plants’ environment, from sunlight and soil to watering and support, all with readily available materials and minimal investment. The beauty of this approach lies in its accessibility – anyone, regardless of their gardening experience, can cultivate a thriving pepper patch right in their backyard or even on a sunny balcony.
Think about the possibilities: fiery habaneros for your homemade hot sauce, sweet bell peppers for colorful stir-fries, or even ornamental peppers to add a touch of beauty to your garden. The choice is yours! And the best part? You’ll know exactly where your peppers came from and what went into growing them. No more worrying about pesticides or long transportation distances.
But don’t just take our word for it. We encourage you to embrace these DIY techniques and embark on your own pepper-growing adventure. Start small, experiment with different varieties, and don’t be afraid to get your hands dirty. You might be surprised at how quickly you become a pepper-growing pro.
Consider these variations to further personalize your pepper-growing journey:
* **Vertical Gardening:** If space is limited, explore vertical gardening options using repurposed pallets or hanging planters. This is a fantastic way to maximize your yield in a small area.
* **Companion Planting:** Research companion plants that can benefit your peppers, such as basil, marigolds, or carrots. These plants can help deter pests and improve soil health.
* **Hydroponics:** For a more advanced approach, consider experimenting with hydroponic pepper growing. This method involves growing peppers in nutrient-rich water without soil.
* **Seed Saving:** Once you’ve harvested your peppers, save the seeds from your favorite varieties to grow again next year. This is a great way to preserve heirloom varieties and adapt your peppers to your local climate.
Growing peppers at home is more than just a hobby; it’s a connection to nature, a source of fresh, healthy food, and a chance to learn and grow. We’re confident that with these DIY tricks, you’ll be well on your way to enjoying a bountiful harvest of delicious peppers.
We’d love to hear about your experiences! Share your pepper-growing stories, tips, and photos in the comments below. Let’s create a community of passionate pepper growers and inspire others to join the fun. Happy growing!
Frequently Asked Questions (FAQ)
What is the best time to start growing peppers from seed?
The ideal time to start growing peppers from seed depends on your local climate. In general, you should start seeds indoors 6-8 weeks before the last expected frost. This allows the seedlings to develop a strong root system before being transplanted outdoors. If you live in a warmer climate with a longer growing season, you can start seeds later in the spring. A good rule of thumb is to check your local frost dates and count back 6-8 weeks. You can also purchase starter plants from a local nursery if you prefer to skip the seed-starting process.
What kind of soil is best for growing peppers?
Peppers thrive in well-draining, fertile soil with a slightly acidic pH (around 6.0-6.8). Amend your garden soil with compost or other organic matter to improve drainage and nutrient content. If you’re growing peppers in containers, use a high-quality potting mix specifically formulated for vegetables. Avoid using garden soil in containers, as it can become compacted and restrict root growth. You can also add perlite or vermiculite to your potting mix to improve drainage.
How much sunlight do peppers need?
Peppers are sun-loving plants and require at least 6-8 hours of direct sunlight per day to produce a good yield. Choose a sunny location in your garden or on your balcony for your pepper plants. If you’re growing peppers indoors, use grow lights to supplement natural sunlight. Rotate your pepper plants regularly to ensure that all sides receive adequate light. Insufficient sunlight can result in leggy plants with fewer peppers.
How often should I water my pepper plants?
Water your pepper plants deeply and regularly, especially during hot, dry weather. Allow the soil to dry out slightly between waterings, but avoid letting the plants wilt. Overwatering can lead to root rot, so it’s important to ensure that the soil is well-draining. Use a soaker hose or drip irrigation to water the plants at the base, avoiding wetting the foliage. This helps to prevent fungal diseases. Check the soil moisture regularly by sticking your finger into the soil about an inch deep. If the soil feels dry, it’s time to water.
What are some common pests and diseases that affect pepper plants?
Pepper plants can be susceptible to various pests and diseases, including aphids, spider mites, whiteflies, blossom-end rot, and fungal diseases. Regularly inspect your plants for signs of pests or diseases. Use organic pest control methods, such as insecticidal soap or neem oil, to control pests. Ensure good air circulation around your plants to prevent fungal diseases. Blossom-end rot is caused by calcium deficiency and can be prevented by adding calcium to the soil or using a calcium-rich fertilizer.
How do I prevent blossom-end rot in my peppers?
Blossom-end rot is a common problem in peppers, characterized by a dark, sunken spot on the bottom of the fruit. It’s caused by a calcium deficiency, which can be due to insufficient calcium in the soil or inconsistent watering. To prevent blossom-end rot, ensure that your soil is rich in calcium and water your plants consistently. You can also add calcium to the soil by incorporating bone meal or crushed eggshells. Avoid over-fertilizing with nitrogen, as this can interfere with calcium uptake.
When should I harvest my peppers?
The harvesting time for peppers depends on the variety and your personal preference. Bell peppers are typically harvested when they are fully colored and firm to the touch. Hot peppers can be harvested at any stage of maturity, depending on your desired level of heat. Use pruning shears or a sharp knife to cut the peppers from the plant, leaving a small stem attached. Regular harvesting encourages the plant to produce more peppers.
Can I grow peppers in containers?
Yes, peppers can be successfully grown in containers. Choose a container that is at least 12 inches in diameter and has drainage holes. Use a high-quality potting mix specifically formulated for vegetables. Place the container in a sunny location and water regularly. Fertilize your container-grown peppers every 2-3 weeks with a balanced fertilizer. Container-grown peppers may require more frequent watering and fertilization than peppers grown in the ground.
How do I overwinter my pepper plants?
In colder climates, you can overwinter your pepper plants indoors to enjoy them for another season. Before the first frost, prune the plants back to about 6-8 inches tall and dig them up carefully. Pot the plants in containers with fresh potting mix and bring them indoors. Place the plants in a sunny location or under grow lights. Water sparingly and fertilize only occasionally during the winter months. In the spring, gradually acclimate the plants to outdoor conditions before transplanting them back into the garden.
What are some good companion plants for peppers?
Companion planting can benefit pepper plants by deterring pests, attracting beneficial insects, and improving soil health. Some good companion plants for peppers include basil, marigolds, carrots, onions, and garlic. Basil repels aphids and whiteflies, while marigolds deter nematodes. Carrots improve soil drainage, and onions and garlic repel various pests. Avoid planting peppers near fennel or brassicas (such as cabbage and broccoli), as these plants can inhibit pepper growth.

Leave a Comment