

Growing oranges indoors might sound like a tropical dream reserved for sun-drenched climates, but I’m here to tell you it’s absolutely achievable, even if you’re miles away from an orange grove! Forget those expensive, store-bought oranges that lack that vibrant, fresh-picked flavor. Imagine plucking a juicy, sun-kissed orange right from your own living room – that’s the magic we’re unlocking today.
Citrus cultivation, including oranges, boasts a rich history, dating back thousands of years to Southeast Asia. These vibrant fruits weren’t just a source of deliciousness; they were symbols of prosperity and good fortune, gracing the tables of emperors and finding their way into traditional medicine. Now, you can bring a piece of that history and a touch of sunshine into your own home.
But why bother with the effort of growing oranges indoors? Well, for starters, it’s incredibly rewarding! Beyond the satisfaction of nurturing a plant and harvesting your own fruit, it’s a fantastic way to add a touch of greenery and a refreshing citrus aroma to your living space. Plus, it’s a fantastic solution for those of us who live in colder climates where outdoor orange trees simply wouldn’t survive. This DIY guide will equip you with all the essential tricks and hacks to successfully cultivate your own indoor orange oasis, regardless of your gardening experience. Let’s get started!

Growing Oranges at Home: Your DIY Guide for Indoor Cultivation
Hey plant friends! Have you ever dreamed of harvesting your own juicy oranges, right in the middle of winter, from the comfort of your living room? Sounds crazy, right? But it’s absolutely doable! I’ll show you how, with a little patience and the right tricks, you can grow your own little orange trees indoors. It’s an exciting project that not only provides delicious fruit but also brings a great green touch to your home. Let’s get started!
What you need: The Right Equipment
Before we start planting, we’ll obviously need the right equipment. Here is a list of everything you’ll need:
- Orange seeds: Preferably from organic oranges, as these are usually untreated.
- Small pots or seed starting trays: Small containers are perfectly fine to start.
- Seed starting mix: This is low in nutrients and loose, ideal for germination.
- All-purpose potting soil: For later, when the seedlings are bigger.
- Pots with good drainage: Important to prevent waterlogging.
- Spray bottle: For moistening the soil.
- Plastic bags or plastic wrap: To create a humid climate.
- A bright windowsill or grow light: Little orange trees need a lot of light.
- Fertilizer for citrus plants: For later nutrient supply.
- Patience: The most important thing of all!
Phase 1: Preparing the Orange Seeds
Preparing the seeds is crucial for successful germination. Here’s how I do it:
- Harvest the seeds: Eat a delicious orange (preferably organic!) and collect the seeds. Make sure the seeds look plump and healthy. Avoid seeds that are damaged or shriveled.
- Clean: Rinse the seeds thoroughly under running water to remove any fruit pulp. Pulp can encourage mold growth, which we obviously want to avoid.
- Stratify (optional, but recommended): Stratification mimics the cold winter months the seeds would experience in nature. This can speed up germination. Wrap the moist seeds in a damp paper towel and place them in a sealed freezer bag in the refrigerator for about 30 days. Important: The paper towel must not dry out!
- Soak: After stratification (or directly after cleaning if you skip this step), place the seeds in lukewarm water for 24 hours. This helps to soften the hard seed coat and facilitate germination.
Phase 2: Sowing the Orange Seeds
Now let’s get down to business! The seeds are prepared, the soil is ready, and we can start sowing.
- Prepare the pots: Fill the small pots or seed starting trays with seed starting mix. Lightly moisten the soil with the spray bottle. It should be damp, but not wet.
- Sow the seeds: Use your finger to press a small hole (about 1 cm deep) into the soil. Place one seed in each hole. Carefully cover the seeds with soil and press down lightly.
- Preserve moisture: Lightly spray the surface of the soil with water again. Then cover the pots with plastic bags or plastic wrap to create a humid climate. This is like a mini greenhouse for your future little orange trees!
- Place in a warm and bright spot: Put the pots in a warm and bright place, but not in direct sun. A temperature between 20 and 25 degrees Celsius (68-77°F) is ideal for germination.
- Be patient: Now it’s time to wait! Germination can take several weeks, sometimes even longer. Regularly check the soil’s moisture and spray it if necessary. Briefly air out the pots daily to prevent mold growth.
Phase 3: Caring for the Young Orange Plants
As soon as the first little plants sprout from the soil, the exciting phase of care begins.
- Remove the plastic: Once the seedlings emerge from the soil, remove the plastic bags or plastic wrap.
- Light: Place the seedlings in a bright spot, preferably a sunny windowsill. If you don’t have enough natural light, you can use a grow light. Little orange trees need at least 6 hours of light per day.
- Watering: Water the seedlings regularly, but not too much. The soil should always be slightly moist, but waterlogging must be avoided. Check the soil’s moisture by sticking your finger into the soil. If it feels dry, it’s time to water.
- Fertilizing: Start fertilizing about 4-6 weeks after germination. Use a special fertilizer for citrus plants and follow the dosage instructions on the package.
- Repotting: When the seedlings get bigger and the roots grow out of the pot’s drainage holes, it’s time to repot. Choose a pot that is slightly larger than the previous one and use all-purpose potting soil.
Phase 4: Long-Term Care for Your Little Orange Tree
Your little orange tree is growing and thriving! Now it’s about keeping it healthy and happy long-term.
- Location: Choose a bright and sunny location for your little orange tree. Avoid drafts and sudden temperature changes.
- Watering: Water your little orange tree regularly, but not too much. The soil should always be slightly moist. It needs less water in the winter than in the summer.
- Fertilizing: Fertilize your little orange tree regularly during the growing season (spring and summer). Use a special fertilizer for citrus plants.
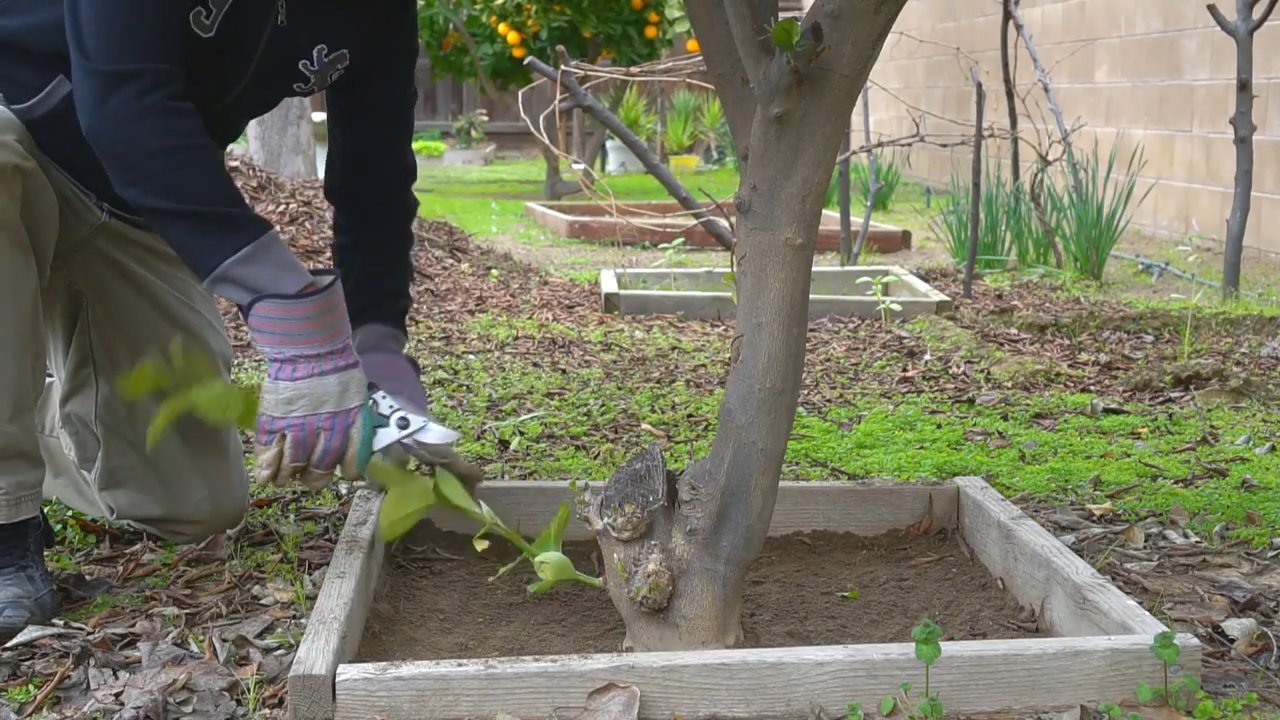
- Pruning: Prune your little orange tree regularly to keep it in shape and encourage fruit production. Remove any dead or diseased branches.
- Overwintering: Little orange trees are not winter-hardy. In the fall, move your orange tree to a cool and bright place, such as a conservatory or an unheated staircase. Reduce watering and fertilizing during the winter months.
- Pests: Keep an eye out for pests like aphids or spider mites. If infested, you can use natural pesticides or wipe the leaves with a damp cloth.
Important Tips and Tricks for Success
- Patience is key: It can take several years for your little orange tree to bear fruit. Don’t be discouraged and enjoy the process!
- The right soil: Always use high-quality soil that is specifically suited for citrus plants.
- Good drainage: Make sure the pots have good drainage to avoid waterlogging.
- Regular misting: Regularly spray the leaves of your little orange tree with water to increase humidity.
- Observation: Observe your little orange tree closely and react to changes. If the leaves turn yellow or fall off, it could be a sign of a nutrient deficiency or disease.
With these tips and tricks, nothing stands in the way of your own little indoor orange grove! Have fun gardening and enjoy
Conclusion
So, there you have it! Growing oranges indoors might seem like a tropical dream reserved for sun-drenched orchards, but with a little know-how and dedication, it’s entirely achievable, even in less-than-ideal climates. This DIY trick isn’t just about adding a touch of greenery to your home; it’s about experiencing the joy of nurturing a plant from seedling to fruit, witnessing the miracle of nature unfold right before your eyes. Imagine the satisfaction of plucking a sun-kissed orange, grown with your own hands, and enjoying its vibrant flavor knowing you created that deliciousness.
This method is a must-try for several compelling reasons. First, it allows you to enjoy fresh, homegrown oranges regardless of your geographical location or the season. No more relying solely on store-bought fruit that may have traveled thousands of miles and lost some of its zest along the way. Second, it’s a fantastic way to connect with nature and bring a touch of the outdoors inside. The fragrant blossoms and vibrant foliage of an orange tree can brighten any room and create a calming, inviting atmosphere. Third, it’s a rewarding and educational experience. You’ll learn about plant care, pollination, and the fascinating process of fruit development.
Don’t be afraid to experiment with different varieties of oranges to find the one that best suits your taste and growing conditions. Dwarf varieties like Calamondin or Kumquat are particularly well-suited for indoor cultivation due to their smaller size and prolific fruiting habits. Consider using different types of potting mixes to see which one promotes the healthiest growth. You can also try different lighting arrangements to optimize fruit production. Perhaps a combination of natural sunlight and supplemental grow lights will yield the best results.
Remember, patience is key. Growing oranges indoors takes time and effort, but the rewards are well worth it. Don’t get discouraged if you encounter challenges along the way. Every plant is different, and what works for one person may not work for another. The most important thing is to keep learning, experimenting, and adapting your approach as needed.
We wholeheartedly encourage you to give this DIY trick a try. Start small, be patient, and enjoy the journey. And most importantly, we want to hear about your experiences! Share your tips, successes, and challenges in the comments below. Let’s create a community of indoor orange growers and learn from each other. Your insights could help someone else achieve their dream of growing oranges indoors. So, grab your seeds, potting mix, and a sunny spot, and get ready to embark on a citrus-filled adventure! Let us know how your indoor orange growing project is going!
Frequently Asked Questions (FAQ)
What type of orange tree is best for growing indoors?
Dwarf varieties are generally the best choice for growing oranges indoors due to their smaller size and adaptability to container life. Some popular options include Calamondin oranges, Kumquats, and Mandarin oranges. These varieties tend to be more compact and produce fruit more readily in indoor environments. Research the specific needs of each variety to ensure you can provide the appropriate care. Consider the available space, lighting conditions, and your personal preferences when making your selection.
How much sunlight do indoor orange trees need?
Orange trees require a significant amount of sunlight to thrive and produce fruit. Ideally, they need at least 6-8 hours of direct sunlight per day. If you don’t have a south-facing window that provides sufficient sunlight, you may need to supplement with grow lights. LED grow lights are a good option as they are energy-efficient and provide the full spectrum of light that plants need. Position the grow lights close enough to the tree to provide adequate illumination, but not so close that they burn the leaves. Monitor the tree’s growth and adjust the lighting as needed.
What type of soil is best for growing oranges in pots?
Well-draining soil is crucial for growing oranges in pots. A mixture of potting soil, perlite, and peat moss is generally recommended. This combination provides good drainage, aeration, and moisture retention. Avoid using garden soil, as it can become compacted and prevent proper drainage. You can also purchase specialized citrus potting mixes that are formulated to meet the specific needs of orange trees. Ensure that the pot has drainage holes to prevent waterlogging, which can lead to root rot.
How often should I water my indoor orange tree?
Watering frequency depends on several factors, including the size of the pot, the type of soil, the temperature, and the humidity. As a general rule, water your orange tree when the top inch of soil feels dry to the touch. Water thoroughly until water drains out of the drainage holes. Avoid overwatering, as this can lead to root rot. During the winter months, when the tree is not actively growing, you may need to water less frequently. Monitor the soil moisture regularly and adjust your watering schedule accordingly.
How do I fertilize my indoor orange tree?
Orange trees are heavy feeders and require regular fertilization to thrive. Use a citrus-specific fertilizer that contains essential nutrients like nitrogen, phosphorus, and potassium. Follow the instructions on the fertilizer label for application rates and frequency. Fertilize your orange tree during the growing season (spring and summer) every 4-6 weeks. Reduce or stop fertilizing during the winter months when the tree is dormant. You can also supplement with micronutrients like iron and magnesium to prevent deficiencies.
How do I pollinate my indoor orange tree?
Indoor orange trees may require hand-pollination to produce fruit, as there are no bees or other pollinators to do the job. Use a small paintbrush or cotton swab to transfer pollen from the stamen (male part) to the pistil (female part) of the flower. Gently brush the pollen onto the pistil of each flower. Repeat this process every few days during the blooming period. You can also use a small fan to circulate air around the tree, which can help to distribute pollen.
What are some common problems with indoor orange trees and how do I fix them?
Some common problems with indoor orange trees include pests, diseases, and nutrient deficiencies. Pests like aphids, spider mites, and scale can infest the tree and damage the leaves and fruit. Treat infestations with insecticidal soap or neem oil. Diseases like root rot and fungal infections can also affect orange trees. Prevent these diseases by providing proper drainage and avoiding overwatering. Nutrient deficiencies can cause yellowing leaves, stunted growth, and poor fruit production. Fertilize your tree regularly with a citrus-specific fertilizer to prevent deficiencies.
How do I prune my indoor orange tree?
Pruning is essential for maintaining the shape and health of your indoor orange tree. Prune your tree in late winter or early spring before new growth begins. Remove any dead, damaged, or diseased branches. Thin out crowded branches to improve air circulation and light penetration. You can also prune to shape the tree and control its size. Use clean, sharp pruning shears to make clean cuts. Avoid pruning too heavily, as this can stress the tree.
Can I move my indoor orange tree outdoors during the summer?
Yes, you can move your indoor orange tree outdoors during the summer months, but you need to acclimate it gradually to avoid shocking the plant. Start by placing the tree in a shady spot for a few hours each day, gradually increasing the amount of sunlight over a week or two. Make sure the tree is protected from strong winds and extreme temperatures. Bring the tree back indoors before the first frost.
How long does it take for an indoor orange tree to produce fruit?
It can take several years for an indoor orange tree to produce fruit, depending on the variety and the growing conditions. Grafted trees typically produce fruit sooner than trees grown from seed. With proper care and attention, you can expect your indoor orange tree to start producing fruit within 3-5 years. Be patient and continue to provide the tree with the necessary care, and you will eventually be rewarded with delicious, homegrown oranges.

Leave a Comment