

Growing Mustard Greens in Bottles: Sounds unconventional, right? But trust me, it’s a game-changer for anyone with limited space or a penchant for upcycling! Have you ever dreamed of having fresh, peppery mustard greens right at your fingertips, even if you only have a tiny balcony or windowsill? Well, dream no more! This DIY guide will show you how to transform ordinary plastic bottles into thriving mini-gardens, bursting with delicious and nutritious greens.
Mustard greens have a rich history, dating back thousands of years in Asian and African cuisines. They’re not just tasty; they’re packed with vitamins and antioxidants, making them a superfood staple. But traditionally, growing them required a garden plot. Now, with this simple trick, anyone can enjoy the benefits of fresh, homegrown mustard greens, regardless of their living situation.
In today’s world, many of us are living in apartments or smaller homes with limited outdoor space. Plus, the rising cost of groceries makes growing your own food more appealing than ever. That’s where this DIY project comes in. Growing Mustard Greens in Bottles is an incredibly easy, affordable, and sustainable way to cultivate your own fresh produce. It’s perfect for beginners, requires minimal effort, and adds a touch of green to any space. So, let’s dive in and discover how to turn those empty bottles into a flourishing mustard green oasis!
Senfgrün in Flaschen ziehen: Ein DIY-Gartenprojekt für Jedermann
Hallo Gartenfreunde! Habt ihr Lust auf frischen, würzigen Senfgrün, direkt aus eurer Küche? Dann seid ihr hier genau richtig! Ich zeige euch, wie ihr Senfgrün ganz einfach in recycelten Plastikflaschen ziehen könnt. Das ist nicht nur super nachhaltig, sondern auch ein tolles Projekt für Kinder und alle, die wenig Platz haben. Los geht’s!
Was ihr braucht:
* Leere Plastikflaschen (am besten 1,5 oder 2 Liter)
* Ein scharfes Messer oder eine Schere
* Erde (Anzuchterde oder Blumenerde)
* Senfsaat (gibt’s im Gartencenter oder online)
* Wasser
* Optional: Sprühflasche
* Optional: Kleine Steine oder Kies für die Drainage
Vorbereitung der Flaschen:
1. Reinigung: Zuerst müsst ihr die Plastikflaschen gründlich reinigen. Entfernt alle Etiketten und spült sie mit warmem Wasser und Spülmittel aus. Achtet darauf, dass keine Spülmittelreste zurückbleiben.
2. Schneiden: Jetzt kommt der spannende Teil! Mit dem Messer oder der Schere schneidet ihr die Flasche horizontal durch. Am besten schneidet ihr sie etwa ein Drittel vom Flaschenhals entfernt ab. So habt ihr einen oberen und einen unteren Teil. Der obere Teil wird später als eine Art Mini-Gewächshaus dienen.
3. Drainagelöcher: Damit das Wasser gut ablaufen kann und eure Senfgrün nicht im Wasser steht, bohrt ihr ein paar kleine Löcher in den Boden des unteren Flaschenteils. Das können 3-5 Löcher sein, je nach Größe der Flasche. Wenn ihr habt, könnt ihr auch einen Bohrer verwenden, aber ein Messer tut’s auch. Seid vorsichtig, damit ihr euch nicht verletzt!
4. Optional: Drainage-Schicht: Um die Drainage noch zu verbessern, könnt ihr eine Schicht kleine Steine oder Kies auf den Boden des unteren Flaschenteils legen. Das verhindert, dass die Erde die Löcher verstopft.
Aussaat des Senfgrüns:
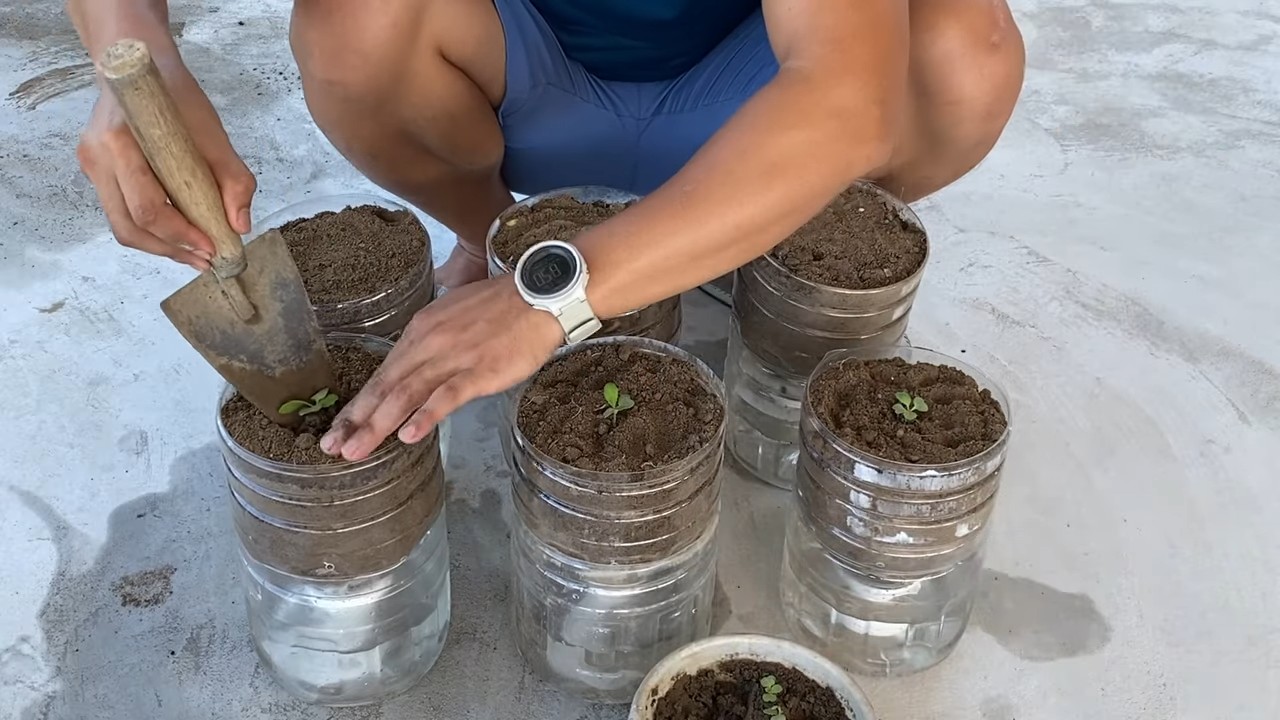
1. Erde einfüllen: Füllt den unteren Teil der Flasche mit Erde. Lasst etwa 2-3 cm Platz bis zum Rand. Die Erde sollte locker und feucht sein.
2. Senfsaat aussäen: Streut die Senfsaat gleichmäßig über die Erde. Achtet darauf, dass die Samen nicht zu dicht liegen, damit die Pflänzchen genug Platz zum Wachsen haben.
3. Leicht bedecken: Bedeckt die Senfsaat mit einer dünnen Schicht Erde. Es reicht, wenn die Samen leicht bedeckt sind.
4. Angießen: Gießt die Erde vorsichtig an. Am besten verwendet ihr eine Sprühflasche, damit die Samen nicht weggespült werden. Die Erde sollte gut durchfeuchtet sein, aber nicht im Wasser stehen.
Das Mini-Gewächshaus:
1. Oberen Teil aufsetzen: Setzt den oberen Teil der Flasche umgekehrt auf den unteren Teil. So entsteht ein kleines Gewächshaus, das die Feuchtigkeit hält und die Keimung beschleunigt.
2. Standort wählen: Stellt die Flasche an einen hellen, warmen Ort. Ein Fensterbrett ist ideal. Vermeidet direkte Sonneneinstrahlung, da die Pflänzchen sonst verbrennen könnten.
Pflege des Senfgrüns:
1. Feuchtigkeit kontrollieren: Überprüft regelmäßig die Feuchtigkeit der Erde. Sie sollte immer leicht feucht sein, aber nicht nass. Wenn die Erde trocken ist, gießt ihr vorsichtig nach.
2. Lüften: Um Schimmelbildung zu vermeiden, solltet ihr das Mini-Gewächshaus regelmäßig lüften. Nehmt den oberen Teil der Flasche einfach für ein paar Stunden ab.
3. Drehen: Dreht die Flasche regelmäßig, damit die Pflänzchen gleichmäßig Licht bekommen und nicht schief wachsen.
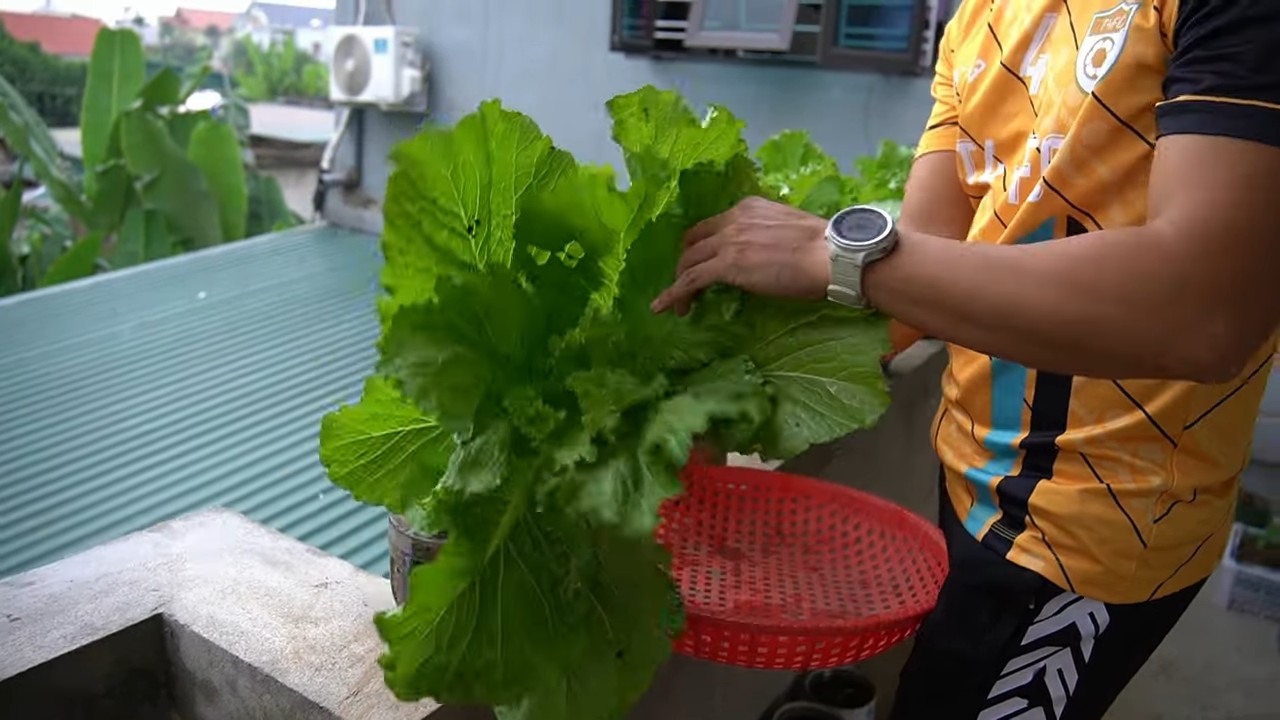
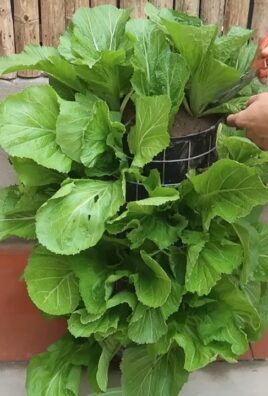
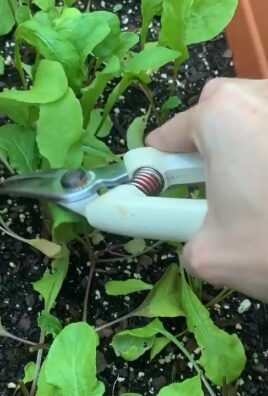
4. Ernten: Nach etwa 1-2 Wochen könnt ihr das Senfgrün ernten. Schneidet die Blätter einfach mit einer Schere ab. Lasst dabei die Wurzeln in der Erde, damit das Senfgrün nachwachsen kann.
Tipps und Tricks:
* Verschiedene Sorten: Es gibt verschiedene Sorten Senfsaat. Probiert verschiedene Sorten aus, um euren Favoriten zu finden. Es gibt mildere und schärfere Sorten.
* Mehrere Flaschen: Zieht Senfgrün in mehreren Flaschen, damit ihr immer frischen Nachschub habt.
* Düngen: Wenn ihr möchtet, könnt ihr das Senfgrün nach der ersten Ernte mit etwas Flüssigdünger düngen. Das fördert das Wachstum.
* Schimmel vermeiden: Achtet auf gute Belüftung, um Schimmelbildung zu vermeiden. Wenn ihr Schimmel entdeckt, entfernt die betroffenen Stellen sofort.
* Kreative Gestaltung: Bemalt die Flaschen oder beklebt sie mit Papier, um sie zu verschönern. So wird euer DIY-Gartenprojekt zu einem echten Hingucker.
* Upcycling: Nutzt verschiedene Arten von Plastikflaschen, um zu experimentieren. Auch Joghurtbecher oder andere Behälter eignen sich gut für die Anzucht von Senfgrün.
* Kinder einbeziehen: Das Projekt ist ideal, um Kinder für das Gärtnern zu begeistern. Sie können beim Reinigen der Flaschen, Aussäen der Samen und Gießen helfen.
* Senfgrün im Winter: Auch im Winter könnt ihr Senfgrün in der Wohnung ziehen. So habt ihr auch in der kalten Jahreszeit frische Kräuter zur Verfügung.
* Lichtmangel: Wenn es im Winter zu wenig Licht gibt, könnt ihr eine Pflanzenlampe verwenden, um das Wachstum zu fördern.
* Schnecken und Schädlinge: Da ihr das Senfgrün in der Wohnung zieht, solltet ihr keine Probleme mit Schnecken oder anderen Schädlingen haben.
Verwendung des Senfgrüns:
Senfgrün ist vielseitig verwendbar. Es schmeckt würzig und leicht scharf.
* Salate: Verwendet Senfgrün in Salaten, um ihnen eine besondere Note zu verleihen.
* Sandwiches: Belegt eure Sandwiches mit Senfgrün.
* Suppen: Gebt Senfgrün kurz vor dem Servieren in Suppen.
* Smoothies: Mixt Senfgrün in Smoothies.
* Pesto: Macht ein leckeres Pesto aus Senfgrün.
* Garnitur: Verwendet Senfgrün als Garnitur für verschiedene Gerichte.
Warum Senfgrün gesund ist:
Senfgrün ist nicht nur lecker, sondern auch sehr gesund. Es enthält viele Vitamine und Mineralstoffe, darunter:
* Vitamin A: Wichtig für die Sehkraft und das Immunsystem.
* Vitamin C: Stärkt das Immunsystem und schützt vor freien Radikalen.
* Vitamin K: Wichtig für die Blutgerinnung.
* Calcium: Wichtig für Knochen und Zähne.
* Eisen: Wichtig für den Sauerstofftransport im Blut.
* Antioxidantien: Schützen die Zellen vor Schäden.
Senfgrün ist also eine tolle Ergänzung für eine gesunde Ernährung.
Häufige Fragen (FAQ):
* Wie lange dauert es, bis das Senfgrün keimt? In der Regel keimt Senfgrün innerhalb von 2-5 Tagen.
* Kann ich auch andere Samen in Flaschen ziehen? Ja, ihr könnt auch andere Samen wie Kresse, Radieschen oder Rucola in Flaschen ziehen.
* Wie oft muss ich gießen? Das hängt von der Temperatur und der Luftfeuchtigkeit ab. Überprüft die Erde regelmäßig und gießt, wenn sie trocken ist.
* Kann ich das Senfgrün auch im Freien ziehen? Ja, ihr könnt das Senfgrün auch im Freien ziehen, aber achtet darauf, dass es nicht zu viel direkter Sonneneinstrahlung ausgesetzt ist.
* Was mache ich, wenn das Senfgrün gelb wird? Gelbe Blätter können ein Zeichen für Nährstoffmangel sein. Düngt das Senfgrün mit etwas Flüssigdünger.
*
Conclusion
So, there you have it! Growing mustard greens in bottles is not just a quirky gardening experiment; it’s a genuinely rewarding and surprisingly efficient way to cultivate fresh, peppery greens right in your own home, regardless of your outdoor space. We’ve walked through the simple steps, highlighting the ease and accessibility of this method. From sourcing your bottles to harvesting your vibrant, flavorful leaves, this DIY project is designed for success, even for the most novice gardener.
But why is this method a must-try? Beyond the sheer convenience, growing mustard greens in bottles offers several compelling advantages. Firstly, it’s incredibly space-saving, making it ideal for apartment dwellers, urban gardeners, or anyone with limited outdoor access. You can transform a sunny windowsill, balcony, or even a well-lit indoor area into a thriving miniature garden. Secondly, it’s a fantastic way to recycle and repurpose plastic bottles, reducing waste and contributing to a more sustainable lifestyle. You’re not just growing food; you’re also making an environmentally conscious choice. Thirdly, the controlled environment of a bottle allows you to better manage moisture levels and protect your plants from pests and harsh weather conditions, leading to healthier and more abundant harvests.
This method is a game-changer for fresh greens!
But the beauty of this DIY project lies in its adaptability. Feel free to experiment with different bottle sizes and shapes to find what works best for your space and aesthetic preferences. You can even create vertical gardens by stacking multiple bottles, adding a touch of greenery and visual interest to your home. Consider using different types of soil or growing mediums to see how they affect the growth and flavor of your mustard greens.
And don’t limit yourself to just mustard greens! While this method is particularly well-suited for these peppery leaves, you can also try growing other leafy greens like spinach, lettuce, or even herbs like basil and parsley. The possibilities are endless!
We encourage you to embrace your inner gardener and give this DIY trick a try. It’s a fun, educational, and ultimately rewarding experience that will provide you with a constant supply of fresh, delicious mustard greens. Imagine adding a handful of homegrown greens to your salads, stir-fries, or sandwiches, knowing that you nurtured them from seed to table.
More importantly, we want to hear about your experiences! Share your photos, tips, and variations on social media using #BottleGreens and #DIYGardening. Let’s create a community of bottle gardeners and inspire others to embrace this sustainable and accessible way to grow their own food. Your insights and feedback will help us refine this method and make it even better for everyone. So, grab some bottles, seeds, and soil, and get ready to embark on a rewarding gardening adventure. Happy growing!
Frequently Asked Questions (FAQ)
What type of bottles are best for growing mustard greens?
Ideally, you should use clear plastic bottles, such as those used for water, soda, or juice. Clear bottles allow sunlight to reach the soil and the plants, which is essential for photosynthesis. Avoid using dark-colored bottles, as they will block sunlight and hinder growth. The size of the bottle is also a factor; larger bottles (2-liter or larger) will provide more space for the roots to grow and can support larger plants. However, smaller bottles can also be used, especially if you plan to harvest the mustard greens when they are still young and tender. Make sure the bottles are clean and free of any residue before using them. Thoroughly wash them with soap and water and rinse them well.
What kind of soil should I use?
A well-draining potting mix is crucial for growing mustard greens in bottles. Avoid using garden soil, as it can be too heavy and compact, leading to poor drainage and root rot. A good potting mix will provide adequate aeration and drainage while retaining enough moisture to keep the plants hydrated. You can also amend the potting mix with compost or other organic matter to improve its fertility and water-holding capacity. Consider using a soilless mix, such as coco coir or peat moss, which are lightweight and provide excellent drainage. If you’re using a soilless mix, you’ll need to supplement it with liquid fertilizer to provide the necessary nutrients for the plants.
How often should I water my mustard greens in bottles?
The frequency of watering will depend on several factors, including the size of the bottle, the type of soil, the temperature, and the humidity. Generally, you should water your mustard greens when the top inch of soil feels dry to the touch. Avoid overwatering, as this can lead to root rot. When watering, make sure to saturate the soil thoroughly, allowing excess water to drain out of the drainage holes. Check the moisture level of the soil regularly, especially during hot or dry weather. You may need to water more frequently during these times.
How much sunlight do mustard greens need?
Mustard greens thrive in full sun, which means they need at least 6 hours of direct sunlight per day. However, they can also tolerate partial shade, especially during the hottest part of the day. If you’re growing your mustard greens indoors, place them near a sunny window or use grow lights to provide adequate light. Rotate the bottles regularly to ensure that all sides of the plants receive equal exposure to sunlight. If the leaves start to look pale or leggy, it’s a sign that they’re not getting enough light.
How long does it take for mustard greens to grow in bottles?
Mustard greens are relatively fast-growing, and you can typically start harvesting them within 30-45 days of planting. The exact time will depend on the variety of mustard greens, the growing conditions, and your desired size. You can harvest the leaves when they are young and tender for a milder flavor, or you can wait until they are more mature for a stronger, more peppery taste. To harvest, simply cut the outer leaves with scissors or a knife, leaving the inner leaves to continue growing. This will allow you to harvest multiple times from the same plant.
Can I grow mustard greens in bottles during the winter?
Yes, you can grow mustard greens in bottles during the winter, especially if you live in a mild climate or if you grow them indoors. If you’re growing them outdoors, protect them from frost and freezing temperatures by covering them with a blanket or bringing them indoors. If you’re growing them indoors, make sure they receive enough light and warmth. You may need to use grow lights to supplement the natural light during the winter months.
What are some common pests and diseases that affect mustard greens?
Mustard greens are generally resistant to pests and diseases, but they can be susceptible to certain problems, such as aphids, flea beetles, and cabbage worms. To prevent these problems, inspect your plants regularly and remove any pests or diseased leaves. You can also use organic pest control methods, such as insecticidal soap or neem oil. Avoid overwatering, as this can create a favorable environment for fungal diseases. Ensure good air circulation around the plants to prevent moisture buildup.
Can I reuse the soil after harvesting mustard greens?
It’s generally not recommended to reuse the soil after harvesting mustard greens, as it may be depleted of nutrients and may contain pests or diseases. However, if you want to reuse the soil, you can amend it with compost or other organic matter to replenish its nutrients. You can also sterilize the soil by baking it in the oven or microwaving it to kill any pests or diseases. However, sterilization can also kill beneficial microorganisms, so it’s important to reintroduce them by adding compost or other organic matter.
How do I prevent my mustard greens from bolting (going to seed)?
Bolting is a natural process that occurs when plants are exposed to stress, such as high temperatures or lack of water. To prevent your mustard greens from bolting, provide them with adequate water and shade during hot weather. Harvest the leaves regularly to encourage continued growth and prevent the plants from focusing on seed production. Choose bolt-resistant varieties of mustard greens.
What are some variations I can try when growing mustard greens in bottles?
Experiment with different varieties of mustard greens to find your favorite flavor and texture. Try growing other leafy greens, such as spinach, lettuce, or kale, in bottles. Add companion plants, such as marigolds or basil, to deter pests and attract beneficial insects. Create a vertical garden by stacking multiple bottles. Use different types of growing mediums, such as coco coir or perlite. Add liquid fertilizer to provide the plants with extra nutrients. Get creative and have fun!
Leave a Comment