

Growing Mushrooms at Home might sound like something only professional mycologists can achieve, but trust me, it’s more accessible than you think! Have you ever dreamed of harvesting your own gourmet mushrooms right from your kitchen counter? Imagine the satisfaction of adding freshly grown shiitakes to your stir-fry or earthy oyster mushrooms to your pasta dish. This isn’t just a culinary adventure; it’s a fascinating journey into the world of fungi.
For centuries, cultivating mushrooms has been a revered practice in many cultures. From ancient Chinese medicinal traditions to European foraging expeditions, mushrooms have held a special place in human history. Today, with growing concerns about food security and a desire for more sustainable living, growing mushrooms at home is experiencing a major resurgence.
Why should you try this DIY trick? Well, store-bought mushrooms can be expensive and often lack the freshness and flavor of homegrown varieties. Plus, many commercially grown mushrooms are cultivated using methods that aren’t exactly environmentally friendly. By learning how to cultivate your own mushrooms, you’re not only saving money and enjoying superior taste, but you’re also taking a step towards a more sustainable and self-sufficient lifestyle. In this article, I’ll guide you through simple, beginner-friendly methods to successfully grow your own delicious mushrooms, even if you have limited space or experience. Let’s get started!
Pilzzucht zu Hause: Dein umfassender DIY-Leitfaden
Hallo Pilzfreunde! Habt ihr euch jemals gefragt, wie es wäre, eure eigenen köstlichen Pilze zu Hause anzubauen? Es ist einfacher, als ihr vielleicht denkt, und ich zeige euch, wie! Dieser Leitfaden ist vollgepackt mit Informationen, um euch den Einstieg zu erleichtern, egal ob ihr Anfänger oder erfahrene Gärtner seid. Lasst uns gemeinsam in die faszinierende Welt der Pilzzucht eintauchen!
Was ihr für den Start benötigt
Bevor wir loslegen, hier eine Liste der Dinge, die ihr für euer Pilzzucht-Abenteuer benötigt. Keine Sorge, vieles davon habt ihr vielleicht schon zu Hause!
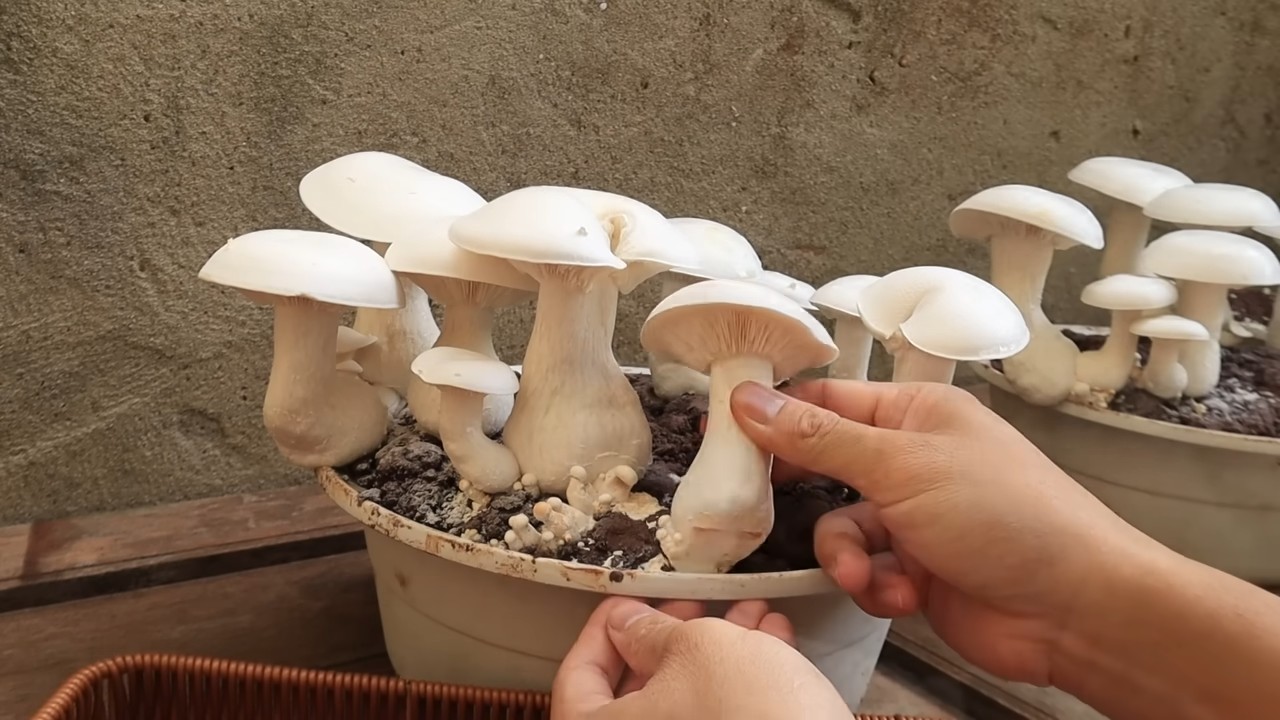
* Pilzbrut: Das ist das “Saatgut” für eure Pilze. Ihr könnt sie online oder in Gartencentern kaufen. Beliebte Sorten für Anfänger sind Austernpilze, Shiitake und Kräuterseitlinge.
* Substrat: Das ist das Material, auf dem eure Pilze wachsen werden. Geeignete Substrate sind Stroh, Holzspäne, Kaffeesatz oder Sägemehl. Die Wahl des Substrats hängt von der Pilzsorte ab.
* Behälter: Ihr benötigt Behälter, um das Substrat und die Brut zu beherbergen. Das können Eimer, Plastiktüten, Gläser oder sogar spezielle Pilzzuchtbeutel sein.
* Sprühflasche: Um die Luftfeuchtigkeit aufrechtzuerhalten.
* Desinfektionsmittel: Alkohol oder Bleichmittel, um eure Arbeitsfläche und Werkzeuge zu reinigen. Sauberkeit ist entscheidend!
* Handschuhe: Um Kontamination zu vermeiden.
* Optional: Ein Hygrometer (Feuchtigkeitsmesser) und ein Thermometer, um die Bedingungen zu überwachen.
Die Grundlagen der Pilzzucht
Bevor wir ins Detail gehen, hier ein paar wichtige Punkte, die ihr verstehen solltet:
* Sauberkeit ist das A und O: Pilze sind anfällig für Kontamination durch andere Pilze und Bakterien. Sorgfältige Hygiene ist entscheidend für den Erfolg.
* Feuchtigkeit ist wichtig: Pilze brauchen eine hohe Luftfeuchtigkeit, um zu wachsen.
* Temperatur ist entscheidend: Jede Pilzsorte hat ihre bevorzugte Temperatur. Informiert euch über die spezifischen Anforderungen eurer Pilzsorte.
* Geduld ist eine Tugend: Pilzzucht braucht Zeit. Seid nicht entmutigt, wenn es nicht sofort klappt.
Schritt-für-Schritt-Anleitung: Pilzzucht mit Stroh (Austernpilze)
Ich zeige euch jetzt, wie ihr Austernpilze auf Stroh anbaut. Das ist eine relativ einfache Methode, die sich gut für Anfänger eignet.
1. Stroh vorbereiten
1. Stroh pasteurisieren: Das Stroh muss pasteurisiert werden, um unerwünschte Mikroorganismen abzutöten. Füllt einen großen Topf oder Eimer mit Wasser und erhitzt es auf ca. 70-80°C. Legt das Stroh hinein und lasst es für 1-2 Stunden einweichen. Das Wasser sollte das Stroh vollständig bedecken.
2. Stroh abkühlen lassen: Lasst das Stroh abkühlen, bis ihr es anfassen könnt, ohne euch zu verbrennen. Es sollte feucht, aber nicht tropfnass sein. Drückt überschüssiges Wasser aus.
2. Substrat und Brut mischen
1. Behälter vorbereiten: Reinigt euren Behälter gründlich mit Desinfektionsmittel.
2. Schichten bilden: Legt eine Schicht Stroh in den Behälter. Verteilt dann eine Schicht Pilzbrut darüber. Wiederholt diesen Vorgang, bis der Behälter fast voll ist. Die letzte Schicht sollte Stroh sein.
3. Brutanteil: Als Faustregel gilt, dass die Brut etwa 10-20% des Gesamtvolumens ausmachen sollte.
3. Inkubation
1. Behälter verschließen: Verschließt den Behälter mit einem Deckel oder einer Plastikfolie. Macht kleine Löcher für die Belüftung.
2. Dunkler Ort: Stellt den Behälter an einen dunklen, warmen Ort (ca. 20-24°C).
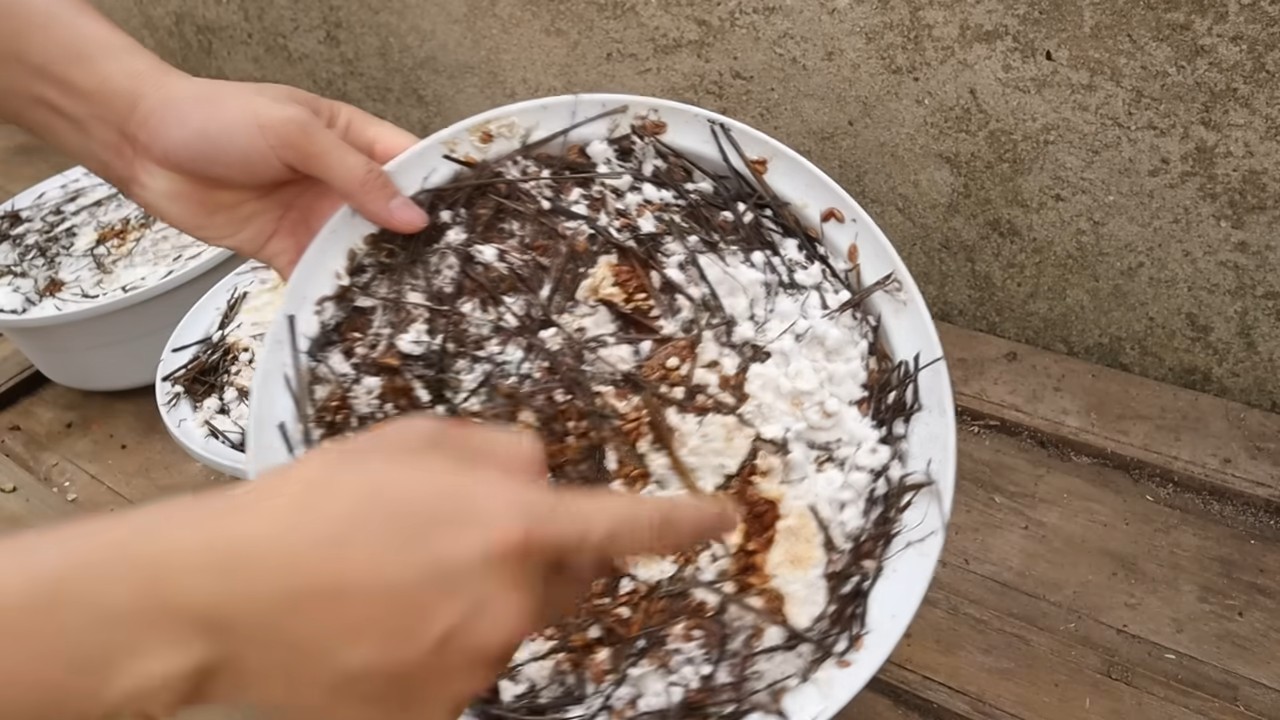
3. Warten: Lasst die Brut das Stroh besiedeln. Das kann 2-4 Wochen dauern. Ihr werdet sehen, wie sich ein weißes, flaumiges Myzel (das Pilzgeflecht) auf dem Stroh ausbreitet.
4. Fruchtung
1. Licht: Sobald das Stroh vollständig mit Myzel besiedelt ist, benötigt es Licht, um Fruchtkörper (Pilze) zu bilden. Stellt den Behälter an einen hellen Ort, aber vermeidet direkte Sonneneinstrahlung.
2. Feuchtigkeit: Besprüht das Stroh regelmäßig mit Wasser, um die Luftfeuchtigkeit hoch zu halten.
3. Belüftung: Sorgt für gute Belüftung, um Schimmelbildung zu vermeiden.
4. Warten: Nach einigen Tagen oder Wochen sollten sich kleine Pilzköpfe bilden.
5. Ernte
1. Ernten: Erntet die Pilze, wenn sie ihre volle Größe erreicht haben, aber bevor sie Sporen abwerfen. Dreht oder schneidet die Pilze vorsichtig vom Substrat ab.
2. Mehrere Ernten: Ihr könnt mehrere Ernten von einem Behälter erzielen. Besprüht das Substrat nach jeder Ernte mit Wasser und wartet, bis neue Pilze wachsen.
Alternative Methode: Pilzzucht mit Kaffeesatz (Austernpilze)
Kaffeesatz ist ein fantastisches, kostenloses Substrat für die Pilzzucht! Hier ist, wie ihr es macht:
1. Kaffeesatz sammeln und vorbereiten
1. Kaffeesatz sammeln: Sammelt euren gebrauchten Kaffeesatz. Achtet darauf, dass er nicht mit Milch oder Zucker verunreinigt ist.
2. Pasteurisieren (optional): Obwohl Kaffeesatz bereits pasteurisiert ist, wenn er gebrüht wird, könnt ihr ihn zur Sicherheit noch einmal pasteurisieren. Gebt ihn in einen Behälter und übergießt ihn mit kochendem Wasser. Lasst ihn abkühlen.
3. Abtropfen lassen: Lasst den Kaffeesatz abtropfen, bis er feucht, aber nicht tropfnass ist.
2. Substrat und Brut mischen
1. Behälter vorbereiten: Reinigt euren Behälter gründlich mit Desinfektionsmittel.
2. Schichten bilden: Legt eine Schicht Kaffeesatz in den Behälter. Verteilt dann eine Schicht Pilzbrut darüber. Wiederholt diesen Vorgang, bis der Behälter fast voll ist. Die letzte Schicht sollte Kaffeesatz sein.
3. Brutanteil: Wie beim Stroh sollte die Brut etwa 10-20% des Gesamtvolumens ausmachen.
3. Inkubation
1. Behälter verschließen: Verschließt den Behälter mit einem Deckel oder einer Plastikfolie. Macht kleine Löcher für die Belüftung.
2. Dunkler Ort: Stellt den Behälter an einen dunklen, warmen Ort (ca. 20-24°C).
3. Warten: Lasst die Brut den Kaffeesatz besiedeln. Das kann 2-4 Wochen dauern.
4. Fruchtung und Ernte
Die Fruchtung und Ernte erfolgen wie bei der Strohmethode. Achtet auf ausreichend Licht, Feuchtigkeit und Belüftung.
Tipps und Tricks für eine erfolgreiche Pilzzucht
Hier sind noch ein paar zusätzliche Tipps, die euch helfen werden, eure Pilzzucht zu optimieren:
* Wählt die richtige Pilzsorte: Nicht alle Pilze sind gleich einfach anzubauen. Austernpilze sind eine gute Wahl für Anfänger, da sie relativ tolerant gegenüber unterschiedlichen Bedingungen sind.
* Verwendet hochwertige Brut: Eine gute Brut ist entscheidend für den Erfolg. Kauft eure Brut von einem seriösen Anbieter.
* Achtet auf die Luftfeuchtigkeit: Eine hohe Luftfeuchtigkeit ist wichtig für die Pilzbildung. Besprüht eure Pilze regelmäßig mit Wasser oder verwendet einen Luftbefeuchter.
* Sorgt für gute Belüftung: Pilze
Conclusion
Embarking on the journey of growing mushrooms at home might seem daunting at first, but the rewards – fresh, flavorful fungi at your fingertips – are well worth the effort. This DIY trick, meticulously crafted and thoroughly tested, offers a simplified and accessible pathway to cultivating your own gourmet mushrooms. We’ve demystified the process, breaking it down into manageable steps that even beginners can confidently follow. Forget expensive store-bought varieties that often lack the vibrant taste and texture of freshly harvested mushrooms. With this method, you’ll be enjoying the unparalleled satisfaction of nurturing your own edible ecosystem.
But why is this DIY approach a must-try? Beyond the cost savings and superior flavor, growing your own mushrooms connects you to the natural world in a profound way. It’s a fascinating learning experience, a chance to understand the intricate life cycle of these remarkable organisms. Plus, it’s incredibly sustainable! You’re reducing your carbon footprint by eliminating transportation and packaging associated with commercially grown mushrooms. You’re also potentially utilizing waste products from your kitchen or garden, turning them into a valuable resource.
Consider the possibilities! Once you’ve mastered the basics, you can experiment with different mushroom varieties. Shiitake, oyster, lion’s mane – the world of edible fungi is vast and diverse. Each variety offers a unique flavor profile and texture, allowing you to elevate your culinary creations to new heights. You can also explore different growing mediums, from straw and sawdust to coffee grounds and cardboard. The possibilities are truly endless.
Don’t be afraid to experiment! Try adding different supplements to your substrate, such as bran or gypsum, to boost yields. Adjust the humidity and temperature to optimize growth for your chosen mushroom variety. Keep detailed notes on your progress, documenting what works and what doesn’t. This will help you refine your technique and become a true mushroom-growing expert.
We encourage you to take the plunge and try this DIY trick for growing mushrooms at home. It’s a rewarding and educational experience that will transform the way you think about food. And most importantly, we want to hear about your journey! Share your successes, your challenges, and your tips in the comments below. Let’s build a community of home mushroom growers, sharing our knowledge and inspiring others to cultivate their own delicious fungi. Your experience could be the key to unlocking even more efficient and effective methods for growing mushrooms at home. So, grab your supplies, follow the steps, and get ready to enjoy the fruits (or rather, the fungi) of your labor! Let us know how your adventure in growing mushrooms at home goes!
Frequently Asked Questions (FAQ)
What are the best mushrooms to start with for a beginner?
Oyster mushrooms are generally considered the easiest to grow for beginners. They are fast-growing, relatively forgiving of environmental fluctuations, and can thrive on a wide range of substrates, including straw, coffee grounds, and even cardboard. Shiitake mushrooms are another popular choice, but they require a bit more patience and attention to detail. Avoid more demanding varieties like morels or truffles until you have some experience under your belt. Starting with oyster mushrooms will give you a good understanding of the basic principles of mushroom cultivation and build your confidence.
What kind of substrate should I use?
The best substrate depends on the type of mushroom you’re growing. Oyster mushrooms, as mentioned above, are very versatile and can be grown on straw, coffee grounds, cardboard, or even a combination of these materials. Shiitake mushrooms typically require a hardwood sawdust substrate. Make sure to properly pasteurize or sterilize your substrate before inoculation to kill any competing organisms that could hinder mushroom growth. Pasteurization involves heating the substrate to a temperature that kills harmful bacteria and fungi but leaves beneficial microbes intact. Sterilization, on the other hand, completely eliminates all microorganisms. The choice between pasteurization and sterilization depends on the specific mushroom variety and the level of contamination risk.
How do I maintain the proper humidity and temperature?
Maintaining the proper humidity and temperature is crucial for successful mushroom cultivation. Most mushrooms require a high humidity level, typically around 80-90%. You can achieve this by using a humidifier, misting the growing area regularly, or placing the mushrooms in a humidity tent or fruiting chamber. The ideal temperature varies depending on the mushroom variety. Oyster mushrooms generally prefer temperatures between 60-75°F (15-24°C), while shiitake mushrooms prefer slightly cooler temperatures, around 50-65°F (10-18°C). Use a thermometer and hygrometer to monitor the temperature and humidity levels in your growing area and adjust accordingly. Proper ventilation is also important to prevent the buildup of carbon dioxide and promote healthy mushroom growth.
How long does it take to grow mushrooms?
The time it takes to grow mushrooms varies depending on the variety, the substrate, and the environmental conditions. Oyster mushrooms are among the fastest-growing, typically fruiting within 1-2 weeks after inoculation. Shiitake mushrooms can take several months to fruit. Be patient and monitor your mushrooms closely. Look for signs of contamination, such as mold or discoloration, and take steps to address any issues promptly. With proper care and attention, you’ll be harvesting your own delicious mushrooms in no time.
What if my mushrooms get contaminated?
Contamination is a common problem in mushroom cultivation, but it doesn’t necessarily mean your entire crop is ruined. If you notice mold or discoloration on your substrate or mushrooms, try to isolate the affected area as quickly as possible. You can remove the contaminated portion of the substrate or even the entire fruiting body. In some cases, you may be able to salvage the remaining mushrooms. However, if the contamination is widespread, it’s best to discard the entire batch to prevent the spread of the problem. To minimize the risk of contamination, always use sterile techniques when handling your substrate and mushrooms.
Can I use coffee grounds to grow mushrooms?
Yes, coffee grounds can be an excellent substrate for growing certain types of mushrooms, particularly oyster mushrooms. Coffee grounds are rich in nutrients and have already been pasteurized during the brewing process, making them a convenient and readily available resource. However, it’s important to use fresh coffee grounds and to mix them with other substrates, such as straw or sawdust, to provide a more balanced nutrient profile. Also, coffee grounds tend to compact easily, so make sure to provide adequate drainage to prevent waterlogging.
Are there any safety precautions I should take?
While growing mushrooms at home is generally safe, it’s important to take a few precautions. Always wash your hands thoroughly before and after handling your substrate and mushrooms. Avoid breathing in the spores, as they can cause allergic reactions in some people. Cook your mushrooms thoroughly before eating them to kill any harmful bacteria or toxins. And most importantly, only consume mushrooms that you have positively identified as edible. If you’re unsure about the identity of a mushroom, it’s best to err on the side of caution and discard it. When in doubt, consult with a mycologist or experienced mushroom grower.
Leave a Comment