

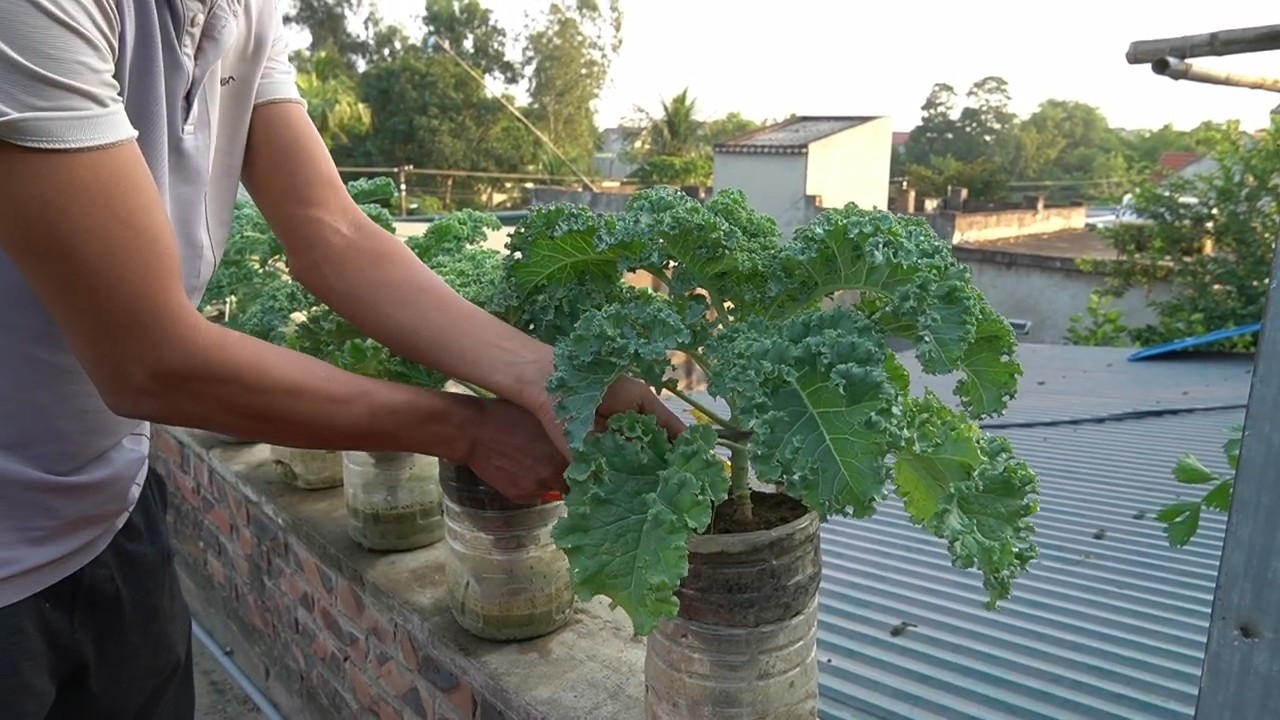
Growing Kale in Bottles: Sounds a little unconventional, right? But trust me, it’s a game-changer! Forget those sprawling garden beds and back-breaking weeding sessions. I’m about to show you how to cultivate a thriving kale patch in something you probably already have lying around – plastic bottles!
For centuries, humans have sought innovative ways to cultivate food, adapting to limited spaces and resources. From ancient terrace farming to modern-day hydroponics, the drive to grow our own food is deeply ingrained. While container gardening isn’t new, upcycling bottles to grow kale is a modern twist on this age-old practice, blending sustainability with self-sufficiency.
Why should you try this DIY trick? Well, imagine fresh, organic kale readily available right outside your door, even if you live in an apartment! Growing Kale in Bottles is perfect for urban dwellers, beginners, or anyone looking to maximize their gardening space. Plus, it’s incredibly budget-friendly and eco-conscious, giving those plastic bottles a new lease on life. This method also minimizes soil-borne diseases and pests, making it easier than ever to enjoy a healthy harvest. So, ditch the store-bought kale and let’s get started on this fun and rewarding DIY project!
Kohl in Flaschen ziehen: Ein DIY-Gartenprojekt für kleine Räume
Hallo liebe Gartenfreunde! Habt ihr auch das Problem, dass ihr zwar Lust auf frisches Gemüse habt, aber keinen riesigen Garten zur Verfügung? Keine Sorge, ich habe da eine tolle Lösung für euch: Kohl in Flaschen ziehen! Ja, ihr habt richtig gehört. Mit dieser Methode könnt ihr auch auf dem Balkon, der Terrasse oder sogar auf der Fensterbank frischen, knackigen Kohl ernten. Und das Beste daran? Es ist super einfach und macht richtig Spaß!
Was ihr für euer Flaschen-Kohl-Projekt braucht:
* Leere Plastikflaschen: Am besten eignen sich 1,5- oder 2-Liter-Flaschen. Achtet darauf, dass sie sauber und unbeschädigt sind.
* Kohlsaat: Ihr könnt verschiedene Kohlsorten verwenden, z.B. Grünkohl, Palmkohl oder auch Rosenkohl. Ich persönlich mag Grünkohl am liebsten, weil er so robust ist.
* Anzuchterde: Diese Erde ist besonders nährstoffarm und eignet sich perfekt für die Anzucht von Jungpflanzen.
* Blumenerde: Wenn die Kohlpflanzen etwas größer sind, brauchen sie nährstoffreichere Erde.
* Schere oder Messer: Zum Zuschneiden der Flaschen.
* Bohrmaschine oder Nagel: Zum Bohren von Löchern in die Flaschen.
* Gießkanne oder Sprühflasche: Zum Bewässern der Pflanzen.
* Optional: Flüssigdünger für Gemüse.
Schritt-für-Schritt-Anleitung: Kohl in Flaschen anpflanzen
Phase 1: Die Vorbereitung der Flaschen
1. Flaschen reinigen: Zuerst müsst ihr die leeren Plastikflaschen gründlich reinigen. Entfernt alle Etiketten und spült sie mit warmem Wasser und etwas Spülmittel aus. Achtet darauf, dass keine Spülmittelreste zurückbleiben.
2. Löcher bohren: Jetzt bohrt ihr mit einer Bohrmaschine oder einem Nagel mehrere kleine Löcher in den Boden der Flaschen. Diese Löcher sind wichtig, damit überschüssiges Wasser ablaufen kann und die Wurzeln nicht faulen. Ich empfehle, mindestens 5-6 Löcher zu bohren.
3. Flaschen zuschneiden: Schneidet die Flaschen mit einer Schere oder einem Messer auf. Es gibt verschiedene Möglichkeiten, wie ihr das machen könnt:
* Variante 1: Schneidet die Flasche etwa 10-15 cm unterhalb des Flaschenhalses ab. So erhaltet ihr einen kleinen Topf.
* Variante 2: Schneidet die Flasche längs auf, sodass ihr zwei halbe Flaschen habt. Diese Variante eignet sich gut, wenn ihr mehrere Pflanzen nebeneinander setzen möchtet.
* Variante 3: Schneidet ein großes Loch in die Seite der Flasche. Diese Variante ist besonders dekorativ, da die Pflanzen seitlich herauswachsen können.
Ich persönlich bevorzuge Variante 1, weil sie am einfachsten ist und die Pflanzen gut schützt.
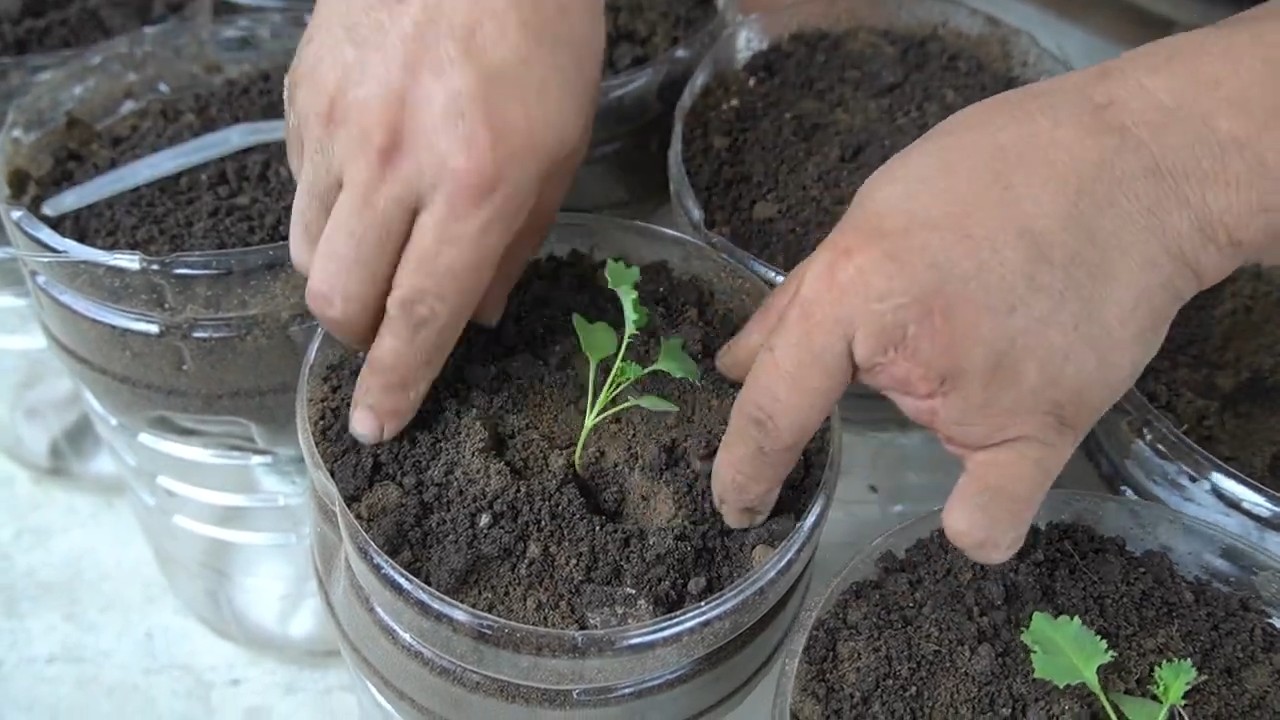
Phase 2: Die Aussaat
1. Anzuchterde einfüllen: Füllt die vorbereiteten Flaschen mit Anzuchterde. Achtet darauf, dass die Erde locker und luftig ist. Drückt sie nicht zu fest an.
2. Kohlsaat aussäen: Verteilt die Kohlsaat gleichmäßig auf der Erde. Ich empfehle, pro Flasche 2-3 Samen auszusäen.
3. Samen bedecken: Bedeckt die Samen mit einer dünnen Schicht Anzuchterde.
4. Angießen: Gießt die Erde vorsichtig mit einer Gießkanne oder einer Sprühflasche an. Die Erde sollte feucht, aber nicht nass sein.
5. Warm stellen: Stellt die Flaschen an einen warmen und hellen Ort. Ideal ist eine Fensterbank oder ein Gewächshaus. Die Keimung dauert in der Regel 5-10 Tage.
Phase 3: Die Pflege der Jungpflanzen
1. Regelmäßig gießen: Haltet die Erde feucht, aber nicht nass. Gießt die Pflanzen regelmäßig, am besten morgens oder abends.
2. Pikieren: Wenn die Jungpflanzen 2-3 Blätter haben, müsst ihr sie pikieren. Das bedeutet, dass ihr die Pflanzen vereinzeln und in größere Töpfe umpflanzen müsst. Füllt die größeren Töpfe mit Blumenerde.
3. Düngen: Nach dem Pikieren könnt ihr die Pflanzen regelmäßig mit Flüssigdünger für Gemüse düngen. Achtet auf die Dosierungsanleitung auf der Verpackung.
4. Lüften: Wenn ihr die Pflanzen in einem Gewächshaus oder unter einer Folie zieht, müsst ihr regelmäßig lüften, um Schimmelbildung zu vermeiden.
Phase 4: Die Auspflanzung
1. Abhärten: Bevor ihr die Kohlpflanzen ins Freie pflanzt, müsst ihr sie abhärten. Das bedeutet, dass ihr sie langsam an die Außentemperaturen gewöhnt. Stellt die Pflanzen tagsüber für einige Stunden ins Freie und holt sie abends wieder herein.
2. Auspflanzen: Nach etwa 2-3 Wochen könnt ihr die Kohlpflanzen ins Freie pflanzen. Wählt einen sonnigen Standort mit gut durchlässigem Boden.
3. Gießen: Gießt die Pflanzen nach dem Auspflanzen gründlich an.
Tipps und Tricks für den erfolgreichen Kohl-Anbau in Flaschen
* Die richtige Kohlsorte wählen: Nicht alle Kohlsorten eignen sich gleich gut für den Anbau in Flaschen. Grünkohl, Palmkohl und Rosenkohl sind besonders robust und pflegeleicht.
* Die richtige Erde verwenden: Anzuchterde ist wichtig für die Keimung der Samen. Blumenerde sorgt für eine gute Nährstoffversorgung der Pflanzen.
* Regelmäßig düngen: Kohlpflanzen sind Starkzehrer und brauchen viele Nährstoffe. Düngt die Pflanzen regelmäßig mit Flüssigdünger für Gemüse.
* Schädlinge bekämpfen: Kohlweißlinge und Blattläuse können Kohlpflanzen befallen. Kontrolliert die Pflanzen regelmäßig und bekämpft Schädlinge bei Bedarf mit natürlichen Mitteln.
* Sonniger Standort: Kohlpflanzen brauchen viel Sonne, um gut zu wachsen. Wählt einen sonnigen Standort für eure Flaschen-Kohl-Garten.
* Regelmäßig ernten: Erntet die Blätter des Kohls regelmäßig, um das Wachstum neuer Blätter anzuregen.
Warum Kohl in Flaschen ziehen? Die Vorteile auf einen Blick
* Platzsparend: Ideal für Balkone, Terrassen und kleine Gärten.
* Kostengünstig: Ihr braucht nur leere Plastikflaschen, Erde und Saatgut.
* Einfach: Auch für Anfänger geeignet.
* Nachhaltig: Ihr recycelt Plastikflaschen und produziert euer eigenes Gemüse.
* Dekorativ: Die Flaschen-Kohl-Gärten sind ein echter Hingucker.
* Frisches Gemüse: Ihr habt immer frischen, knackigen Kohl zur Hand.
Ich hoffe, diese Anleitung hat euch gefallen und inspiriert, euren eigenen Flaschen-Kohl-Garten anzulegen. Es ist wirklich ein tolles Projekt, das nicht nur Spaß macht, sondern auch noch leckeres und gesundes Gemüse liefert. Probiert es aus und lasst mich wissen, wie es euch gefällt! Viel Erfolg beim Gärtnern!
Conclusion
So, there you have it! Growing kale in bottles isn’t just a quirky gardening experiment; it’s a genuinely practical and rewarding way to cultivate fresh, nutritious greens, even if you’re short on space or dealing with less-than-ideal soil conditions. We’ve walked you through the simple steps, from preparing your bottles to harvesting your bountiful kale.
But why is this DIY trick a must-try? Firstly, it’s incredibly space-efficient. Apartment dwellers, balcony gardeners, and anyone with limited yard space can enjoy the satisfaction of growing their own food. Secondly, it’s a fantastic way to recycle plastic bottles, turning potential waste into a thriving mini-garden. Thirdly, it offers excellent drainage and aeration for your kale, promoting healthy root growth and preventing common soilborne diseases. Finally, it’s just plain fun! There’s something deeply satisfying about watching your kale plants flourish in their repurposed bottle homes.
Beyond the basic method, there are plenty of ways to customize your bottle garden. Consider painting the bottles to add a splash of color to your space. You could also experiment with different varieties of kale, from the curly leafed types to the Tuscan or dinosaur kale. For added support, especially as your kale plants mature, you can create a simple trellis system using bamboo stakes or even repurposed wire hangers. And if you live in a colder climate, you can easily move your bottle gardens indoors during the winter months to extend your growing season.
Don’t be afraid to get creative with your setup. You can hang the bottles vertically to create a living wall, or arrange them horizontally on a sunny windowsill. The possibilities are endless!
We wholeheartedly encourage you to give this DIY trick a try. It’s an affordable, eco-friendly, and surprisingly effective way to grow your own fresh kale. Imagine the satisfaction of harvesting your own organic greens for salads, smoothies, or stir-fries, all grown right in your own home.
And most importantly, we want to hear about your experiences! Share your photos, tips, and challenges in the comments below. Let’s build a community of bottle-gardening enthusiasts and learn from each other. What bottle types worked best for you? Did you encounter any unexpected challenges? What varieties of kale did you find thrived in this setup? Your insights will help others succeed and inspire even more people to embrace this innovative gardening technique. Let’s all get growing and enjoy the delicious rewards of our own bottle-grown kale!
Frequently Asked Questions (FAQ)
What type of plastic bottles are best for growing kale?
Ideally, you should use food-grade plastic bottles, such as those that previously contained water, juice, or soda. Avoid bottles that held harsh chemicals or cleaning products, as these could contaminate your kale. The size of the bottle will depend on the variety of kale you’re growing, but generally, 2-3 liter bottles work well. Clear or translucent bottles are preferable, as they allow sunlight to reach the soil. However, if you live in a very hot climate, you might consider using slightly opaque bottles to prevent the soil from overheating. Remember to thoroughly clean and sanitize the bottles before planting.
How often should I water my kale plants in bottles?
The frequency of watering will depend on several factors, including the climate, the size of the bottle, and the type of soil you’re using. As a general rule, check the soil moisture level daily. If the top inch of soil feels dry to the touch, it’s time to water. Water thoroughly until excess water drains out of the drainage holes. Avoid overwatering, as this can lead to root rot. During hot, dry weather, you may need to water more frequently, perhaps even twice a day. Conversely, during cooler, wetter weather, you may only need to water every few days.
What kind of soil should I use for growing kale in bottles?
A well-draining potting mix is essential for growing kale in bottles. Avoid using garden soil, as it can be too heavy and compact, leading to poor drainage and root problems. A good potting mix will typically contain a blend of peat moss, perlite, and vermiculite. You can also amend the potting mix with compost or other organic matter to provide additional nutrients. Consider adding a slow-release fertilizer to the soil at planting time to provide a steady supply of nutrients throughout the growing season.
How much sunlight does kale need when grown in bottles?
Kale thrives in full sun, which means at least 6 hours of direct sunlight per day. However, it can also tolerate partial shade, especially in hot climates. If you’re growing kale indoors, place the bottles near a sunny window or supplement with grow lights. Rotate the bottles regularly to ensure that all sides of the plants receive adequate sunlight. If your kale plants are not getting enough sunlight, they may become leggy and produce fewer leaves.
How do I fertilize kale grown in bottles?
Kale is a heavy feeder, so it’s important to provide it with adequate nutrients. You can fertilize your kale plants every 2-3 weeks with a balanced liquid fertilizer, such as a 10-10-10 or 20-20-20 formula. Alternatively, you can use a slow-release fertilizer at planting time. Be sure to follow the instructions on the fertilizer label carefully to avoid over-fertilizing, which can damage the plants. You can also supplement with organic fertilizers, such as compost tea or fish emulsion.
How do I harvest kale from bottles?
You can begin harvesting kale leaves once they reach a usable size, typically about 4-6 inches long. Harvest the outer leaves first, leaving the inner leaves to continue growing. This will encourage the plant to produce more leaves. You can harvest kale leaves continuously throughout the growing season. Simply snip off the leaves with scissors or a knife. Avoid tearing the leaves, as this can damage the plant.
What are some common pests and diseases that affect kale grown in bottles?
Some common pests that can affect kale include aphids, cabbage worms, and flea beetles. You can control these pests with insecticidal soap, neem oil, or by handpicking them off the plants. Common diseases that can affect kale include powdery mildew and downy mildew. You can prevent these diseases by providing good air circulation, avoiding overwatering, and using a fungicide if necessary. Regularly inspect your plants for signs of pests or diseases and take action promptly to prevent them from spreading.
Can I grow other vegetables in bottles besides kale?
Yes, you can grow a variety of other vegetables in bottles, including lettuce, spinach, herbs, and even some smaller varieties of tomatoes and peppers. The key is to choose vegetables that have shallow root systems and don’t require a lot of space. Be sure to adjust the size of the bottle and the type of soil to suit the specific needs of the vegetable you’re growing.
How do I overwinter kale grown in bottles?
If you live in a climate with cold winters, you can overwinter your kale plants by bringing them indoors. Place the bottles near a sunny window or supplement with grow lights. Water sparingly during the winter months, as the plants will not be growing as actively. You can also protect the plants from frost by covering them with a blanket or tarp on cold nights. With proper care, your kale plants can survive the winter and continue to produce leaves in the spring.
Is growing kale in bottles organic?
Growing kale in bottles can absolutely be organic! By using organic potting mix, organic fertilizers, and natural pest control methods, you can ensure that your kale is grown without the use of synthetic chemicals. This is a great way to enjoy fresh, healthy, and sustainably grown greens right in your own home.

Leave a Comment