

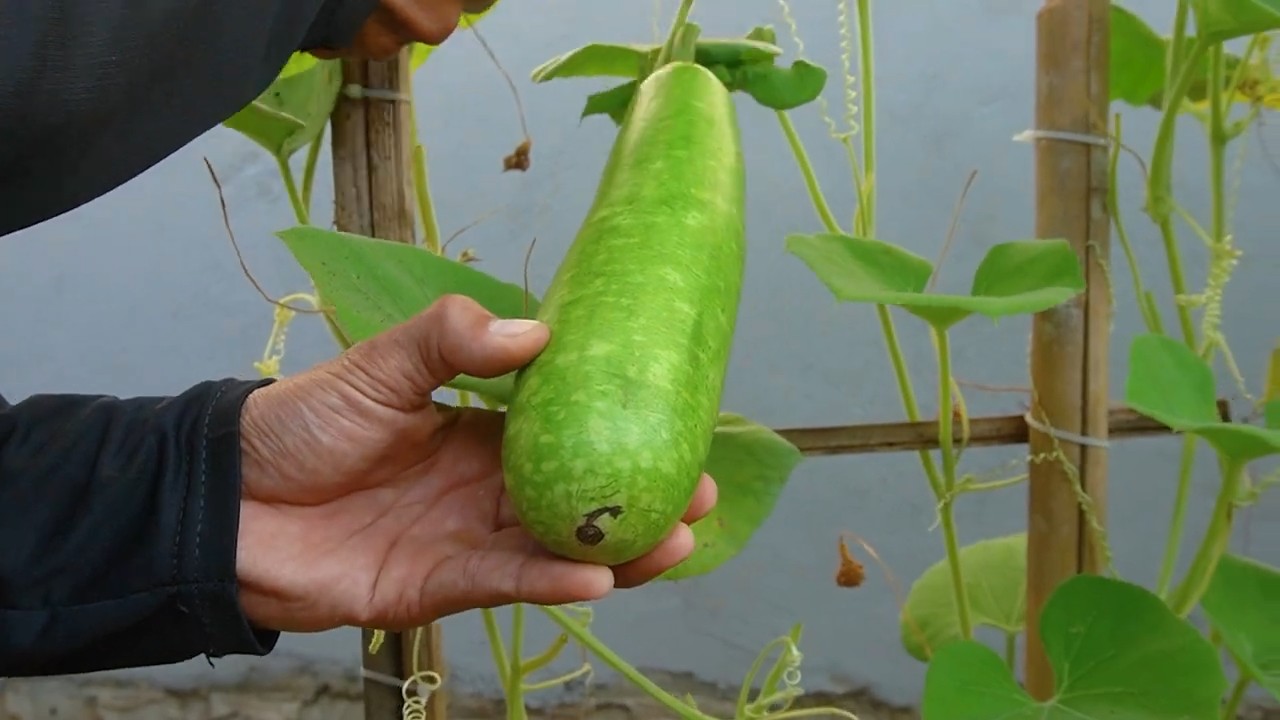
Growing Gourds Successfully can seem like a daunting task, conjuring images of sprawling vines and unpredictable results. But what if I told you that cultivating these fascinating fruits could be a rewarding and surprisingly simple DIY project? Forget the store-bought decorations – imagine adorning your home with unique, handcrafted pieces grown right in your own backyard!
Gourds have a rich history, dating back thousands of years. They weren’t just ornamental; ancient civilizations relied on them for everything from water containers and utensils to musical instruments. Think of them as nature’s original multi-purpose tool! This connection to the past adds a special layer of meaning to the act of growing them.
Why should you try this DIY trick? Well, for starters, it’s incredibly satisfying to nurture a plant from seed to harvest. Plus, growing gourds successfully offers a creative outlet. You can choose from a wide variety of shapes and sizes, each with its own unique character. And let’s be honest, who wouldn’t want to impress their friends and neighbors with their homegrown, handcrafted creations? This article will provide you with the essential tips and tricks to make your gourd-growing dreams a reality, even if you’re a complete beginner. Get ready to unleash your inner gardener and transform your backyard into a gourd-geous paradise!
Kürbisse erfolgreich anbauen: Dein umfassender DIY-Leitfaden
Hallo liebe Gartenfreunde! Ich freue mich riesig, euch heute in die faszinierende Welt des Kürbisanbaus einzuführen. Kürbisse sind nicht nur unglaublich vielseitig in der Küche, sondern auch eine wahre Augenweide im Garten. Egal, ob du dich an riesigen Halloween-Kürbissen, zarten Butternusskürbissen oder dekorativen Zierkürbissen versuchen möchtest, dieser Leitfaden wird dir helfen, deine Kürbisernte zu einem vollen Erfolg zu machen. Los geht’s!
Die Grundlagen: Was Kürbisse lieben
Bevor wir uns ins Detail stürzen, lass uns kurz die wichtigsten Bedürfnisse unserer Kürbispflanzen besprechen. Kürbisse sind Sonnenanbeter und brauchen viel Platz, um sich auszubreiten. Außerdem sind sie hungrig und durstig, also bereite dich darauf vor, sie gut zu füttern und zu wässern.
* Sonne: Mindestens 6-8 Stunden direkte Sonneneinstrahlung pro Tag.
* Platz: Rechne mit mindestens 1-2 Quadratmetern pro Pflanze, je nach Sorte. Riesenkürbisse brauchen noch mehr!
* Boden: Gut durchlässiger, nährstoffreicher Boden mit einem pH-Wert zwischen 6,0 und 7,0.
* Wasser: Regelmäßige Bewässerung, besonders während der Fruchtbildung.
* Nährstoffe: Regelmäßige Düngung mit einem ausgewogenen Dünger.
Schritt-für-Schritt-Anleitung: Vom Samen zum Kürbis
Jetzt geht’s ans Eingemachte! Hier ist eine detaillierte Anleitung, wie du deine eigenen Kürbisse anbauen kannst:
1. Samen vorbereiten (optional): Um die Keimung zu beschleunigen, kannst du die Kürbissamen vor dem Pflanzen für 24 Stunden in lauwarmem Wasser einweichen. Das hilft, die harte Samenschale aufzuweichen.
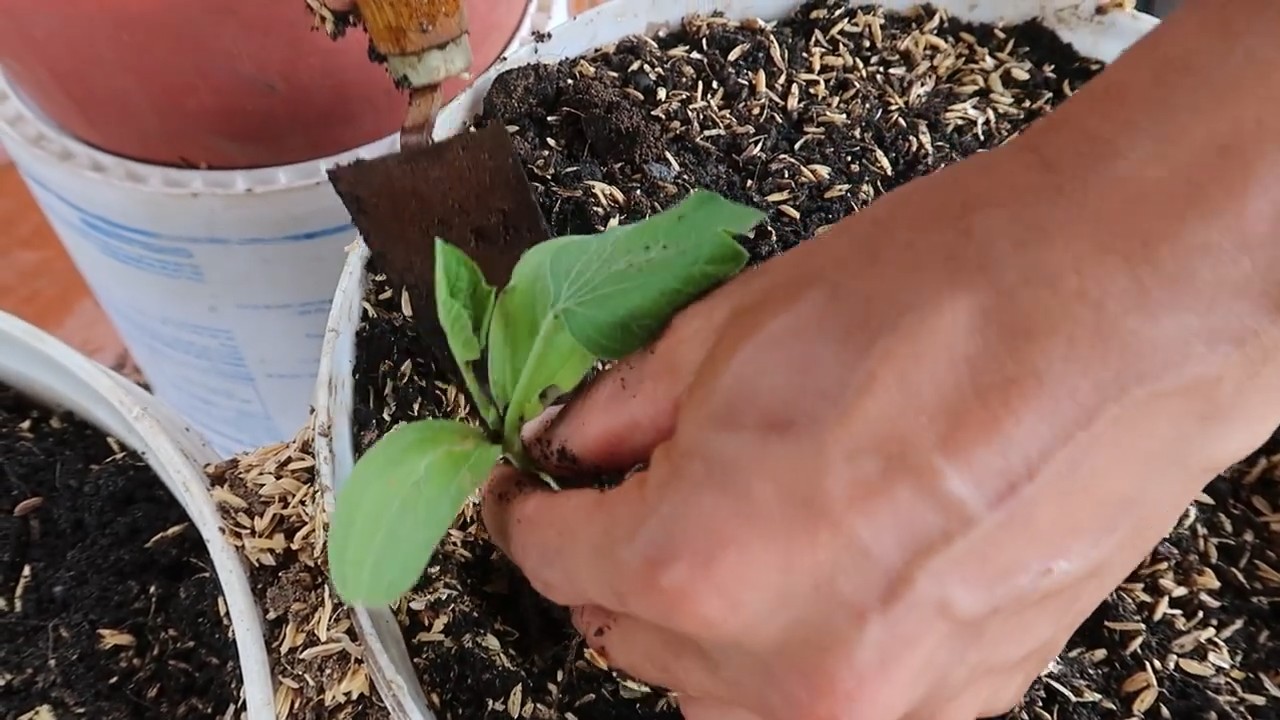
2. Vorkultur (empfohlen): In kälteren Regionen ist es ratsam, die Kürbisse ab Mitte April im Haus vorzuziehen.
* Fülle kleine Töpfe (ca. 8-10 cm Durchmesser) mit Anzuchterde.
* Lege pro Topf 1-2 Samen ca. 2-3 cm tief in die Erde.
* Gieße die Erde vorsichtig an und stelle die Töpfe an einen warmen, hellen Ort (z.B. Fensterbank oder Gewächshaus).
* Halte die Erde feucht, aber nicht nass.
* Nach ca. 1-2 Wochen sollten die Samen keimen. Entferne den schwächeren Sämling, falls beide Samen aufgegangen sind.
3. Direktsaat (möglich): In wärmeren Regionen kannst du die Kürbissamen ab Mitte Mai direkt ins Freiland säen.
* Bereite den Boden vor, indem du ihn lockerst und mit Kompost oder gut verrottetem Mist anreicherst.
* Hebe kleine Mulden (ca. 3-4 cm tief) im Abstand von 1-2 Metern aus.
* Lege pro Mulde 2-3 Samen.
* Bedecke die Samen mit Erde und gieße sie vorsichtig an.
* Sobald die Sämlinge aufgegangen sind, entferne die schwächeren Pflanzen, sodass nur die kräftigste Pflanze pro Mulde übrig bleibt.
4. Auspflanzen (nach den Eisheiligen): Sobald keine Frostgefahr mehr besteht (Mitte Mai), kannst du die vorgezogenen Kürbispflanzen ins Freiland auspflanzen.
* Härte die Pflanzen vor dem Auspflanzen ab, indem du sie tagsüber für einige Stunden ins Freie stellst.
* Hebe Pflanzlöcher aus, die etwas größer sind als die Töpfe.
* Setze die Pflanzen vorsichtig in die Löcher und fülle sie mit Erde auf.
* Gieße die Pflanzen gut an.
5. Pflege während des Wachstums:
* Bewässerung: Gieße die Kürbispflanzen regelmäßig, besonders während trockener Perioden. Vermeide es, die Blätter zu benetzen, um Pilzkrankheiten vorzubeugen. Gieße am besten morgens, damit die Blätter tagsüber abtrocknen können.
* Düngung: Dünge die Kürbispflanzen alle 2-3 Wochen mit einem organischen Dünger oder einem speziellen Kürbisdünger. Achte darauf, dass der Dünger reich an Kalium ist, da dies die Fruchtbildung fördert.
* Unkrautbekämpfung: Halte den Bereich um die Kürbispflanzen unkrautfrei, um die Konkurrenz um Nährstoffe und Wasser zu minimieren.
* Mulchen: Eine Mulchschicht aus Stroh oder Rasenschnitt hilft, die Feuchtigkeit im Boden zu halten und das Unkrautwachstum zu unterdrücken.
* Schutz vor Schädlingen: Kontrolliere die Kürbispflanzen regelmäßig auf Schädlinge wie Schnecken, Blattläuse oder Kürbisfliegen. Bei Bedarf kannst du biologische Schädlingsbekämpfungsmittel einsetzen.
* Ranken lenken: Kürbispflanzen können sehr ausladend werden. Lenke die Ranken in die gewünschte Richtung, um Platz zu sparen und die Früchte vor Beschädigungen zu schützen.
6. Bestäubung: Kürbisse sind einhäusig, das heißt, sie haben männliche und weibliche Blüten auf derselben Pflanze. Die Bestäubung erfolgt in der Regel durch Insekten, insbesondere Bienen. Wenn du sicherstellen möchtest, dass deine Kürbisse gut bestäubt werden, kannst du die Bestäubung auch von Hand vornehmen.
* Identifiziere die männlichen und weiblichen Blüten. Männliche Blüten haben einen langen Stiel und keinen Fruchtansatz, während weibliche Blüten einen kleinen Fruchtansatz direkt unter der Blüte haben.
* Brich eine männliche Blüte ab und entferne die Blütenblätter.
* Tupfe den Stempel der weiblichen Blüte mit dem Pollen der männlichen Blüte ab.
* Wiederhole diesen Vorgang für mehrere weibliche Blüten.
* Die beste Zeit für die Handbestäubung ist am frühen Morgen, wenn die Blüten geöffnet sind.
7. Fruchtentwicklung: Nach der Bestäubung beginnen die weiblichen Blüten, sich zu Früchten zu entwickeln. Achte darauf, dass die Früchte genügend Platz haben und nicht auf feuchter Erde liegen, um Fäulnis zu vermeiden. Du kannst die Früchte auf Stroh oder Holzbretter legen.
8. Ernte: Die Erntezeit hängt von der Kürbissorte ab. In der Regel sind Kürbisse erntereif, wenn die Schale hart ist und sich nicht mehr mit dem Fingernagel eindrücken lässt. Der Stiel sollte ebenfalls trocken und holzig sein.
* Schneide den Kürbis mit einem scharfen Messer oder einer Gartenschere vom Stiel ab. Lasse dabei einen Stielansatz von ca. 5-10 cm stehen, um die Haltbarkeit zu verlängern.
* Behandle die Kürbisse vorsichtig, um Beschädigungen zu vermeiden.
* Lasse die Kürbisse nach der Ernte einige Tage an einem trockenen, luftigen Ort aushärten, bevor du sie lagerst.
Spezielle Tipps für Riesenkürbisse
Wenn du dich an Riesenkürbissen versuchen möchtest, gibt es einige zusätzliche Dinge zu beachten:
* Sorte: Wähle eine Sorte, die für Riesenkürbisse bekannt ist, z.B. ‘Atlantic Giant’.
* Boden: Bereite den Boden besonders gut vor, indem du ihn mit viel Kompost und Mist anreicherst.
* Platz: Riesenkürbisse brauchen enorm viel Platz. Rechne mit mindestens 10 Quadratmetern pro Pflanze.
* Beschneiden: Beschneide die Pflanze, sodass nur 1-2 Früchte pro Pflanze übrig bleiben. Entferne alle anderen Blüten und Früchte, damit die Pflanze ihre ganze Energie in die verbleibenden Früchte stecken kann.
* Bewässerung und Düngung: Gieße und dünge die Pflanze regelmäßig und großzügig.
* Schutz: Schütze die Früchte vor direkter Sonneneinstrahlung und starken Temperaturschwankungen. Du kannst sie mit Tüchern oder Planen abdecken.
*
Conclusion
So, there you have it! Mastering the art of growing gourds successfully isn’t just about planting a seed and hoping for the best. It’s about understanding their needs, providing the right environment, and being proactive in protecting them from pests and diseases. This DIY approach, focusing on creating a thriving environment from the ground up, is a must-try for any gardener, whether you’re a seasoned pro or just starting out. The satisfaction of watching these unique and fascinating plants flourish under your care is truly rewarding.
This method, emphasizing soil health, proper watering techniques, and strategic pest control, offers a significant advantage over simply relying on commercial fertilizers and pesticides. You’re creating a resilient ecosystem that supports healthy gourd growth, leading to larger, more vibrant, and longer-lasting gourds. Plus, you’ll have the peace of mind knowing exactly what went into growing them.
But don’t stop there! Experiment with different gourd varieties to discover your favorites. Try different training methods to shape your gourds into unique forms. Consider companion planting to further enhance your garden’s ecosystem. Perhaps you could try growing them on a trellis for a vertical garden display, or even incorporate them into a decorative archway. The possibilities are endless!
Remember, growing gourds successfully is a journey of learning and discovery. Don’t be afraid to make mistakes, learn from them, and adapt your approach as needed. The key is to be observant, patient, and persistent.
We wholeheartedly encourage you to give this DIY trick a try. We’re confident that you’ll be amazed by the results. And most importantly, we want to hear about your experience! Share your photos, tips, and challenges in the comments below. Let’s create a community of gourd-growing enthusiasts and learn from each other. What varieties did you choose? What challenges did you face, and how did you overcome them? What unique creations did you make with your harvested gourds? Your insights could be invaluable to other gardeners embarking on their own gourd-growing adventures. So, get your hands dirty, embrace the process, and let’s grow some amazing gourds together!
Frequently Asked Questions (FAQ)
What are the best gourd varieties to start with for beginners?
For beginners, I highly recommend starting with smaller, easier-to-manage gourd varieties like birdhouse gourds or apple gourds. These tend to be more forgiving and mature relatively quickly, providing a satisfying first-time growing experience. Once you’ve gained some confidence, you can then move on to larger, more challenging varieties like bottle gourds or dipper gourds. Remember to research the specific needs of each variety before planting.
How often should I water my gourds?
Watering frequency depends on several factors, including the weather, soil type, and the size of your plants. As a general rule, gourds need consistent moisture, especially during hot, dry periods. Aim to water deeply whenever the top inch of soil feels dry to the touch. Avoid overwatering, as this can lead to root rot. A good way to check is to stick your finger into the soil near the base of the plant. If it feels dry, it’s time to water. If it feels moist, hold off. Consider using a soaker hose or drip irrigation to deliver water directly to the roots, minimizing water loss through evaporation.
What are some common pests and diseases that affect gourds, and how can I prevent them?
Common pests include squash bugs, squash vine borers, and aphids. Diseases include powdery mildew and downy mildew. Prevention is key! Start by choosing disease-resistant varieties. Practice crop rotation to prevent soilborne diseases from building up. Regularly inspect your plants for signs of pests or diseases. Handpick pests whenever possible. For diseases, ensure good air circulation around your plants by spacing them properly and pruning excess foliage. You can also use organic pest control methods like neem oil or insecticidal soap. For squash vine borers, consider wrapping the base of the stems with aluminum foil to prevent them from laying their eggs.
How do I know when my gourds are ready to harvest?
The timing of harvest depends on the specific gourd variety and your intended use. Generally, gourds are ready to harvest when the stems have completely dried and turned brown. The gourd itself should feel hard and lightweight. If you’re planning to use your gourds for crafting, it’s best to let them dry on the vine for as long as possible. However, if frost is imminent, harvest them before the first frost to prevent damage.
How do I cure my gourds after harvesting?
Curing is essential for preserving gourds and preventing them from rotting. After harvesting, gently wash the gourds with a mild soap and water solution to remove any dirt or debris. Place them in a well-ventilated, dry, and dark location. A garage, shed, or attic works well. Avoid placing them directly on the ground, as this can promote rot. Elevate them on a rack or pallets to allow for air circulation. Turn the gourds regularly to ensure even drying. The curing process can take several weeks to several months, depending on the size and thickness of the gourd. You’ll know they’re fully cured when they are lightweight and the seeds rattle inside.
Can I grow gourds in containers?
Yes, you can grow gourds in containers, but it’s important to choose a large container with good drainage. Select smaller gourd varieties that are well-suited for container gardening. Use a high-quality potting mix and provide regular watering and fertilization. Keep in mind that container-grown gourds may not grow as large as those grown in the ground.
What kind of soil is best for growing gourds successfully?
Gourds thrive in well-drained, fertile soil that is rich in organic matter. Amend your soil with compost or well-rotted manure before planting to improve its structure and nutrient content. A slightly acidic to neutral soil pH (around 6.0 to 7.0) is ideal.
How much sunlight do gourds need?
Gourds need at least 6-8 hours of direct sunlight per day to thrive. Choose a sunny location in your garden for planting.
Can I save seeds from my gourds to plant next year?
Yes, you can save seeds from your gourds, but keep in mind that they may not come true to type if the plants were cross-pollinated with other gourd varieties. To save seeds, allow the gourds to fully mature and dry on the vine. Once they are dry, crack them open and remove the seeds. Clean the seeds and allow them to dry completely before storing them in an airtight container in a cool, dry place.
What are some creative ways to use my harvested gourds?
The possibilities are endless! Gourds can be used for a wide variety of crafts and decorations. They can be painted, carved, wood-burned, or decorated with beads, shells, or other embellishments. They can be made into birdhouses, bowls, dippers, musical instruments, and decorative ornaments. Let your imagination run wild!

Leave a Comment