

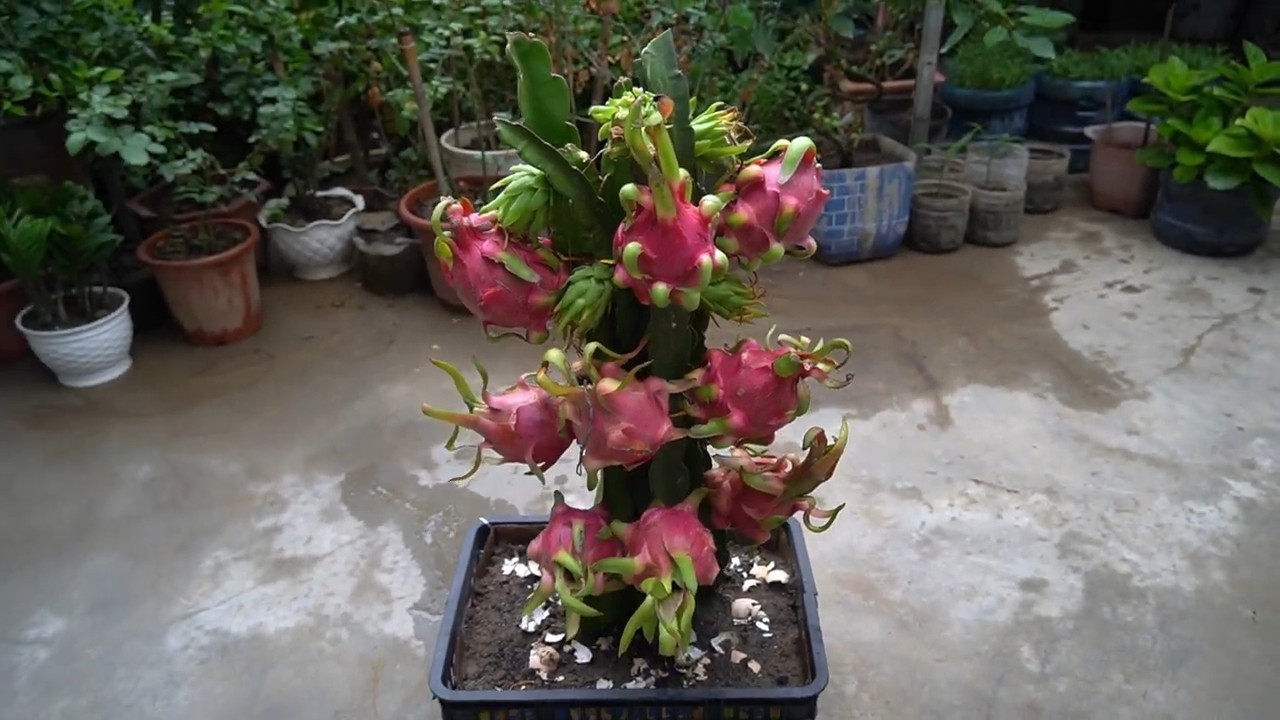
Growing Dragon Fruit Branches might seem like an exotic endeavor reserved for seasoned gardeners, but trust me, with a few clever DIY tricks, you can cultivate your own thriving dragon fruit oasis right at home! I’m so excited to share these secrets with you.
For centuries, the dragon fruit, also known as pitaya, has been revered in Southeast Asia and Latin America, not just for its vibrant color and unique flavor, but also for its perceived health benefits. Imagine harvesting your own supply of this superfruit, knowing exactly where it came from and how it was grown. That’s the power of home gardening!
But why focus on growing dragon fruit branches specifically? Well, starting from seeds can be a slow and unpredictable process. Using branches, or cuttings, allows you to bypass that initial hurdle and get a head start on your dragon fruit journey. Plus, it’s a fantastic way to propagate existing plants and share the dragon fruit love with friends and family. This DIY guide will equip you with the knowledge and simple techniques to successfully propagate and nurture your dragon fruit branches, ensuring a bountiful harvest in the years to come. Get ready to roll up your sleeves and embark on this exciting gardening adventure with me!
Drachenfrucht-Äste vermehren: Dein DIY-Leitfaden für üppige Ernten
Hey Pflanzenfreunde! Drachenfrucht, auch Pitaya genannt, ist nicht nur super lecker, sondern auch eine wunderschöne Kletterpflanze. Und das Beste? Du kannst sie ganz einfach selbst vermehren! In diesem Artikel zeige ich dir, wie du aus einem einfachen Drachenfrucht-Ast neue Pflanzen ziehst. Keine Angst, es ist einfacher als du denkst!
Was du brauchst: Deine Materialliste
Bevor wir loslegen, stell sicher, dass du alles griffbereit hast. Hier ist eine Liste mit den Dingen, die du benötigst:
* Ein gesunder Drachenfrucht-Ast: Am besten wählst du einen Ast, der mindestens 30 cm lang ist und keine Anzeichen von Krankheiten oder Schädlingen aufweist. Ein etwas älterer Ast mit bereits leicht verholzter Basis ist ideal.
* Ein scharfes, sauberes Messer oder eine Gartenschere: Hygiene ist wichtig, um Infektionen zu vermeiden. Desinfiziere dein Werkzeug vor Gebrauch.
* Bewurzelungshormon (optional): Das beschleunigt die Wurzelbildung, ist aber nicht unbedingt notwendig.
* Ein Pflanzgefäß: Wähle einen Topf mit guter Drainage, der groß genug für den Ast ist. Ein Durchmesser von 15-20 cm ist ein guter Anfang.
* Kaktus- oder Sukkulentenerde: Diese Erde ist gut durchlässig und verhindert Staunässe, was für Drachenfrüchte wichtig ist.
* Wasser: Zum Befeuchten der Erde.
* Handschuhe (optional): Drachenfrucht-Äste können kleine Stacheln haben, also schütze deine Hände.
* Ein sonniger Standort: Drachenfrüchte lieben die Sonne!
* Geduld: Die Wurzelbildung kann einige Wochen dauern.
Schritt-für-Schritt-Anleitung: So vermehrst du deine Drachenfrucht
Jetzt geht’s ans Eingemachte! Folge diesen Schritten, um erfolgreich Drachenfrucht-Äste zu vermehren:
1. Den Ast vorbereiten:
* Wähle einen gesunden Drachenfrucht-Ast aus. Achte darauf, dass er keine Beschädigungen oder Anzeichen von Krankheiten aufweist.
* Schneide den Ast mit einem scharfen, desinfizierten Messer oder einer Gartenschere ab. Der Schnitt sollte sauber und glatt sein.
* Entferne die unteren Blätter oder Seitentriebe des Astes, damit er später besser in die Erde gesteckt werden kann. Lass die oberen Blätter dran, sie helfen der Pflanze bei der Photosynthese.
* Lass den Ast für 3-7 Tage an einem trockenen, schattigen Ort abtrocknen. Dadurch bildet sich an der Schnittstelle eine Kallus (eine Art Narbengewebe), was das Risiko von Fäulnis reduziert.
2. Bewurzelungshormon (optional):
* Wenn du Bewurzelungshormon verwendest, tauche das untere Ende des Astes, das in die Erde gesteckt wird, in das Pulver oder die Flüssigkeit. Schüttle überschüssiges Hormon ab. Das Hormon fördert die Wurzelbildung und schützt vor Pilzbefall.
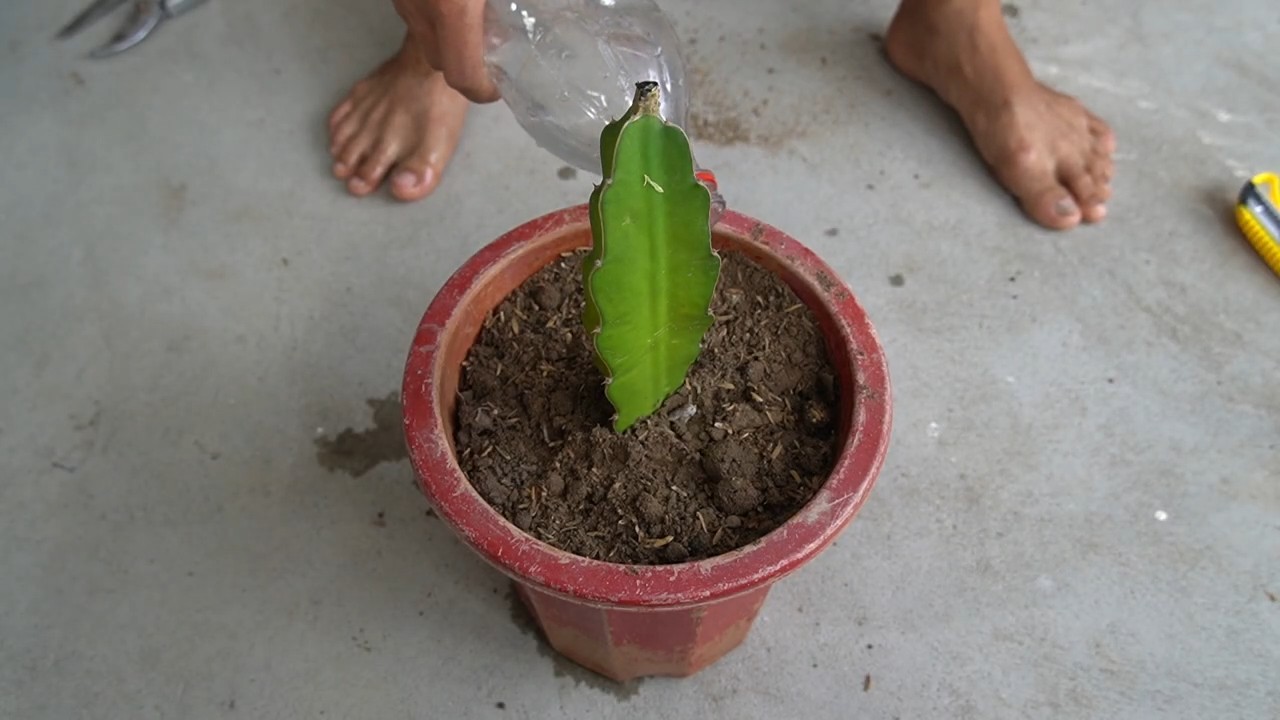
3. Den Ast einpflanzen:
* Fülle das Pflanzgefäß mit Kaktus- oder Sukkulentenerde. Achte darauf, dass die Erde locker und gut durchlässig ist.
* Mache mit einem Finger oder einem Stift ein Loch in die Erde, das tief genug ist, um den Ast aufzunehmen.
* Stecke den Ast vorsichtig in das Loch und drücke die Erde um ihn herum fest. Achte darauf, dass der Ast stabil steht.
* Gieße die Erde leicht an, bis sie feucht, aber nicht nass ist. Vermeide Staunässe, da dies zu Fäulnis führen kann.
4. Der richtige Standort:
* Stelle das Pflanzgefäß an einen warmen, sonnigen Standort. Drachenfrüchte lieben viel Licht, aber direkte Mittagssonne kann die jungen Pflanzen verbrennen. Ein Standort mit Morgen- oder Nachmittagssonne ist ideal.
* Schütze die Pflanze vor Frost. Drachenfrüchte sind nicht winterhart und vertragen keine Temperaturen unter 10°C.
5. Pflege und Geduld:
* Gieße die Erde regelmäßig, aber sparsam. Lass die Erde zwischen den Wassergaben leicht antrocknen. Überwässerung ist einer der häufigsten Fehler bei der Drachenfrucht-Vermehrung.
* Dünge die Pflanze während der Wachstumsperiode (Frühling und Sommer) alle paar Wochen mit einem speziellen Kaktusdünger.
* Beobachte die Pflanze aufmerksam auf Anzeichen von Schädlingen oder Krankheiten. Bei Bedarf behandle sie mit einem geeigneten Mittel.
* Hab Geduld! Die Wurzelbildung kann einige Wochen dauern. Du kannst vorsichtig an dem Ast ziehen, um zu prüfen, ob er Wurzeln gebildet hat. Wenn er fest im Boden sitzt, hat er wahrscheinlich Wurzeln geschlagen.
Spezielle Tipps und Tricks für eine erfolgreiche Vermehrung
Hier sind noch ein paar zusätzliche Tipps, die dir helfen können, deine Erfolgschancen zu erhöhen:
* Die richtige Jahreszeit: Die beste Zeit für die Drachenfrucht-Vermehrung ist im Frühling oder Sommer, wenn die Pflanze aktiv wächst.
* Die Luftfeuchtigkeit: Drachenfrüchte mögen eine hohe Luftfeuchtigkeit. Du kannst die Luftfeuchtigkeit erhöhen, indem du die Pflanze regelmäßig mit Wasser besprühst oder sie in der Nähe einer Wasserschale aufstellst.
* Die Temperatur: Die ideale Temperatur für die Wurzelbildung liegt zwischen 20°C und 30°C.
* Die Drainage: Achte unbedingt auf eine gute Drainage, um Staunässe zu vermeiden. Du kannst eine Schicht Kies oder Blähton auf den Boden des Pflanzgefäßes legen, um die Drainage zu verbessern.
* Die Unterstützung: Drachenfrüchte sind Kletterpflanzen und benötigen eine Unterstützung, um zu wachsen. Du kannst einen Pfahl oder ein Rankgitter in das Pflanzgefäß stecken, an dem die Pflanze hochklettern kann.
* Die Geduld: Wie bereits erwähnt, ist Geduld der Schlüssel zum Erfolg. Gib nicht auf, wenn die Wurzelbildung nicht sofort erfolgt. Mit der richtigen Pflege und etwas Geduld wirst du bald deine eigenen Drachenfrucht-Pflanzen haben!
Häufige Probleme und Lösungen
Auch bei der Drachenfrucht-Vermehrung können Probleme auftreten. Hier sind einige der häufigsten Probleme und wie du sie lösen kannst:
* Fäulnis: Fäulnis ist ein häufiges Problem, das durch Staunässe verursacht wird. Um Fäulnis zu vermeiden, achte auf eine gute Drainage und gieße die Erde nur, wenn sie leicht angetrocknet ist. Wenn Fäulnis auftritt, schneide die betroffenen Stellen ab und behandle die Pflanze mit einem Fungizid.
* Schädlinge: Drachenfrüchte können von verschiedenen Schädlingen befallen werden, wie z.B. Blattläusen, Wollläusen oder Spinnmilben. Kontrolliere die Pflanze regelmäßig auf Schädlinge und behandle sie bei Bedarf mit einem geeigneten Insektizid.
* Wurzelbildung dauert zu lange: Manchmal kann die Wurzelbildung länger dauern als erwartet. Das kann verschiedene Ursachen haben, wie z.B. eine zu niedrige Temperatur, zu wenig Licht oder eine schlechte Drainage. Stelle sicher, dass die Pflanze die richtigen Bedingungen hat, und hab Geduld.
* Der Ast stirbt ab: Wenn der Ast abstirbt, kann das verschiedene Ursachen haben, wie z.B. Fäulnis, Schädlinge oder eine zu geringe Luftfeuchtigkeit. Überprüfe die Pflanze auf diese Probleme und behebe sie.
Nach der erfolgreichen Bewurzelung: Was nun?
Wenn dein Drachenfrucht-Ast erfolgreich Wurzeln geschlagen hat, kannst du ihn in einen größeren Topf umpflanzen. Wähle einen Topf, der mindestens doppelt so groß ist wie der vorherige. Verwende wieder Kaktus- oder Sukkulentenerde.
Gieße die Pflanze regelmäßig, aber sparsam. Dünge sie während der Wachstumsperiode alle paar Wochen mit einem speziellen Kaktusdünger.
Stelle die Pflanze an einen sonnigen Standort und schütze sie vor
Conclusion
So, there you have it! Transforming dragon fruit branches into thriving new plants is not only surprisingly simple, but also incredibly rewarding. This DIY propagation method unlocks a world of possibilities, allowing you to expand your dragon fruit orchard without breaking the bank. Forget expensive nursery plants; with a little patience and these straightforward steps, you can cultivate a flourishing collection of these exotic fruits right in your own backyard.
Why is this DIY trick a must-try? Because it’s cost-effective, sustainable, and deeply satisfying. Imagine the pride you’ll feel when you harvest your first dragon fruit from a plant you nurtured from a simple cutting. Plus, propagating from existing plants allows you to preserve desirable traits, ensuring you’re growing varieties you already know and love. It’s a win-win situation for both your wallet and your garden.
But the adventure doesn’t stop there! Feel free to experiment with different rooting mediums. While we’ve highlighted the success of well-draining soil mixes, some gardeners have found success with perlite, vermiculite, or even a combination of these. Consider also exploring different training methods for your young dragon fruit plants. Providing a sturdy trellis or support structure early on will encourage healthy growth and abundant fruiting in the years to come. You can even try grafting different dragon fruit varieties onto a single rootstock for a truly unique and productive plant.
Don’t be afraid to get creative with your propagation setup. While a simple pot works perfectly fine, you could also explore using a humidity dome or a DIY greenhouse to create an optimal environment for root development, especially in drier climates. Remember to monitor your cuttings regularly, adjusting watering and light levels as needed to ensure they thrive.
We wholeheartedly encourage you to embark on this exciting journey of dragon fruit propagation. It’s a fantastic way to connect with nature, learn new gardening skills, and ultimately, enjoy the delicious rewards of your labor. The beauty of this method lies in its accessibility; anyone, regardless of their gardening experience, can successfully propagate dragon fruit branches.
And now, we want to hear from you! Have you tried propagating dragon fruit from cuttings before? What challenges did you face, and what tips would you share with fellow gardeners? Share your experiences, photos, and questions in the comments below. Let’s build a community of dragon fruit enthusiasts and learn from each other’s successes and failures. Together, we can unlock the full potential of this amazing fruit and spread the joy of growing our own food. So go ahead, grab those dragon fruit branches, and let the propagation adventure begin! Mastering the art of **dragon fruit propagation** is easier than you think, and the rewards are well worth the effort.
Frequently Asked Questions (FAQ)
What is the best time of year to propagate dragon fruit branches?
The ideal time to propagate dragon fruit is during the warmer months, typically spring or early summer. This is when the plants are actively growing and have the best chance of developing roots quickly. However, with proper care and environmental control (like a greenhouse), you can attempt propagation at other times of the year as well. Just be aware that root development may be slower during cooler periods.
How long does it take for dragon fruit cuttings to root?
Rooting time can vary depending on several factors, including the variety of dragon fruit, the temperature, humidity, and the rooting medium used. Generally, you can expect to see roots developing within 2-4 weeks. However, it may take longer in cooler conditions or if the cuttings are not receiving adequate moisture. Be patient and avoid disturbing the cuttings too frequently, as this can hinder root development.
What type of soil is best for rooting dragon fruit cuttings?
Dragon fruit cuttings thrive in well-draining soil. A mix of cactus potting mix, perlite, and a bit of compost is ideal. The cactus mix provides the necessary drainage, while the perlite improves aeration and prevents the soil from becoming waterlogged. The compost adds essential nutrients to support root growth. Avoid using heavy clay soils, as they retain too much moisture and can lead to root rot.
How often should I water dragon fruit cuttings?
Water dragon fruit cuttings sparingly, allowing the soil to dry out slightly between waterings. Overwatering is a common mistake that can lead to root rot. Check the moisture level of the soil by inserting your finger about an inch deep. If the soil feels dry, it’s time to water. When watering, saturate the soil thoroughly, but ensure that excess water drains freely from the pot.
What kind of light do dragon fruit cuttings need?
Dragon fruit cuttings need bright, indirect light to thrive. Avoid placing them in direct sunlight, especially during the hottest part of the day, as this can scorch the leaves. A location near an east-facing window is ideal, or you can use a grow light to supplement natural light. As the cuttings develop roots, you can gradually acclimate them to more direct sunlight.
How do I know if my dragon fruit cutting has rooted?
The best way to check for root development is to gently tug on the cutting. If it resists being pulled out of the soil, it has likely developed roots. You can also carefully remove the cutting from the pot and inspect the roots directly. Look for small, white roots emerging from the cut end of the stem. Once the cutting has developed a healthy root system, you can transplant it into a larger pot or directly into the ground.
Can I use rooting hormone to propagate dragon fruit cuttings?
While not strictly necessary, using rooting hormone can significantly increase the success rate and speed up the rooting process. Rooting hormone contains auxins, which are plant hormones that stimulate root development. Simply dip the cut end of the dragon fruit branch into the rooting hormone powder or liquid before planting it in the rooting medium.
What if my dragon fruit cutting starts to rot?
If you notice signs of rot, such as soft, mushy spots or a foul odor, it’s important to take action immediately. Remove the affected portion of the cutting with a clean, sharp knife. Allow the cut surface to callous over for a few days before replanting it in fresh, well-draining soil. Avoid overwatering and ensure that the cutting is receiving adequate ventilation.
How big should the dragon fruit branch be for propagation?
A good size for a dragon fruit cutting is typically between 12 and 18 inches long. This provides enough stem for root development and allows the cutting to establish itself quickly. However, you can also propagate smaller cuttings, but they may take longer to root and require more careful attention.
Can I propagate dragon fruit from seeds?
Yes, you can propagate dragon fruit from seeds, but it’s a much slower and less predictable process than propagating from cuttings. Seed-grown plants may not produce fruit that is true to the parent variety, and it can take several years for them to mature and bear fruit. Propagation from cuttings is generally preferred because it’s faster, more reliable, and allows you to preserve the desirable traits of the parent plant.

Leave a Comment