

Growing Celery in Pots might sound like a challenge reserved for seasoned gardeners, but trust me, it’s a surprisingly achievable and rewarding DIY project, even if you’re a beginner like I once was! Have you ever dreamt of snipping fresh, crisp celery stalks right from your own patio for a healthy snack or a flavorful addition to your soup? Well, dream no more! This guide will unlock the secrets to successfully cultivating this crunchy vegetable in the comfort of your own home.
Celery has a rich history, dating back to ancient times where it was valued for its medicinal properties long before it became a culinary staple. From its origins in the Mediterranean, celery has journeyed across continents, adapting to various climates and cultures. Now, we’re bringing it even closer – right to your doorstep!
Why bother with growing celery in pots, you ask? Well, for starters, it’s incredibly convenient! No more last-minute grocery store runs when you need a few stalks. Plus, homegrown celery boasts a flavor that’s far superior to anything you’ll find on supermarket shelves. More importantly, this DIY project allows you to control the growing environment, ensuring your celery is free from harmful pesticides and chemicals. So, let’s dive in and discover how you can enjoy the satisfaction of harvesting your own delicious, homegrown celery!
Growing Celery in Pots: A Beginner’s Guide
Hey there, fellow plant enthusiasts! Ever thought about growing your own celery? It’s surprisingly easy, even if you don’t have a sprawling garden. Growing celery in pots is a fantastic way to have fresh, crunchy stalks right at your fingertips. I’m going to walk you through everything you need to know, from choosing the right pot to harvesting your homegrown celery. Let’s get started!
Choosing the Right Pot and Soil
Before we dive into the planting process, let’s talk about the essentials: the pot and the soil. These are crucial for healthy celery growth.
* Pot Size: Celery needs room to grow, both above and below the soil. I recommend a pot that’s at least 12 inches in diameter and 12 inches deep. A larger pot is even better, as it will give the roots more space to spread out. You can use plastic, terracotta, or even a repurposed container, as long as it has good drainage.
* Drainage: This is non-negotiable! Celery needs consistently moist soil, but it absolutely hates sitting in soggy conditions. Make sure your pot has drainage holes at the bottom to allow excess water to escape.
* Soil: Celery thrives in rich, well-draining soil that’s high in organic matter. I like to use a mix of equal parts potting soil, compost, and perlite or vermiculite. The potting soil provides a good base, the compost adds nutrients, and the perlite or vermiculite improves drainage and aeration. You can also add a slow-release fertilizer to the soil mix to give your celery a boost.
Starting from Seed vs. Transplanting
You have two main options for starting your celery: from seed or from transplants. Both have their pros and cons.
* Starting from Seed: This is the more economical option, but it requires more patience. Celery seeds are tiny and can be slow to germinate. You’ll need to start them indoors about 10-12 weeks before the last expected frost.
* Transplanting: This is the easier and faster option. You can purchase celery seedlings from your local garden center or nursery. Look for healthy, robust seedlings with green leaves and strong stems.
Step-by-Step Planting Guide
Alright, let’s get our hands dirty! Here’s how to plant your celery, whether you’re starting from seed or using transplants.
Planting from Seed (Indoor Start)
1. Prepare Seed Trays or Small Pots: Fill seed trays or small pots with a seed-starting mix. Moisten the mix thoroughly.
2. Sow the Seeds: Sprinkle the celery seeds thinly over the surface of the soil. Since they need light to germinate, don’t bury them too deeply. Gently press them into the soil.
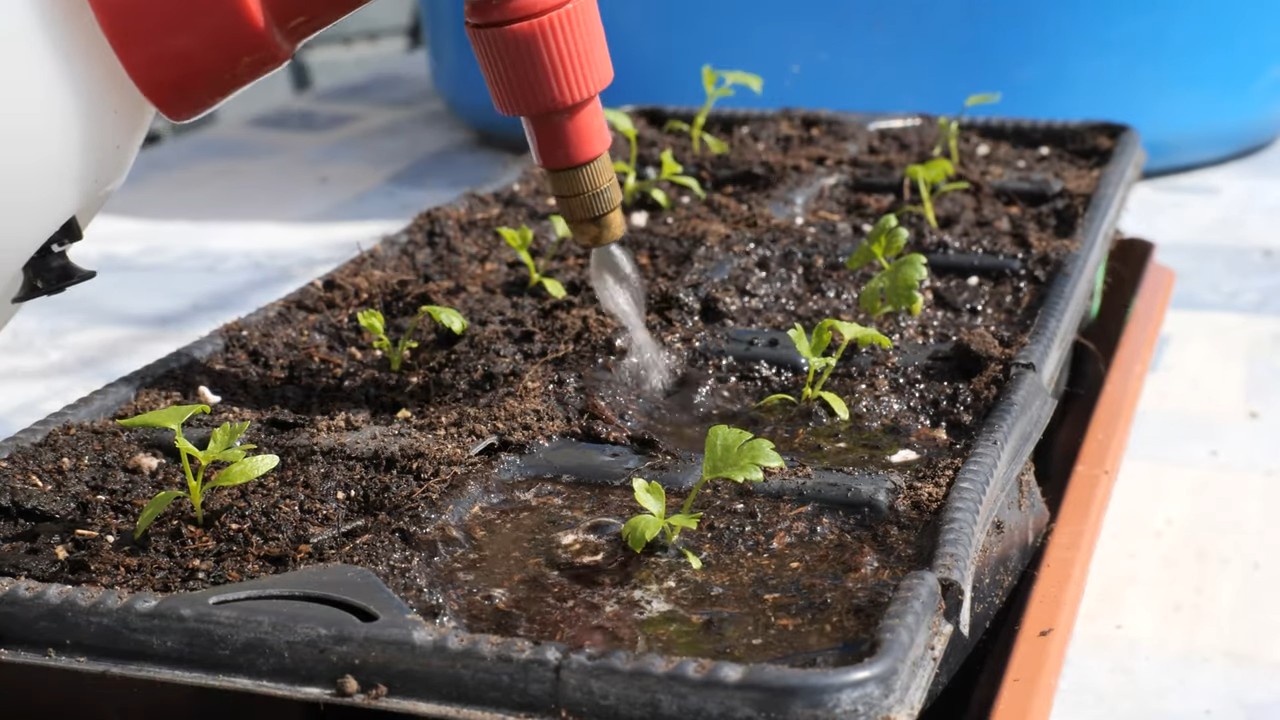
3. Provide Light and Moisture: Cover the seed trays or pots with a clear plastic dome or plastic wrap to create a humid environment. Place them in a warm location with bright, indirect light. You can also use a grow light. Keep the soil consistently moist, but not soggy.
4. Germination: Celery seeds can take 2-3 weeks to germinate. Once the seedlings emerge, remove the plastic cover and provide them with plenty of light.
5. Thinning: Once the seedlings have a few sets of true leaves, thin them out, leaving only the strongest seedlings in each pot or cell.
6. Hardening Off: Before transplanting the seedlings outdoors, you’ll need to harden them off. This means gradually exposing them to outdoor conditions over a period of 7-10 days. Start by placing them in a sheltered location for a few hours each day, gradually increasing the amount of time they spend outdoors.
7. Transplanting Seedlings: Once the seedlings are hardened off and the danger of frost has passed, you can transplant them into your prepared pots.
Planting Transplants
1. Prepare the Pot: Fill your chosen pot with the soil mixture we discussed earlier, leaving a few inches of space at the top.
2. Create a Planting Hole: Dig a hole in the center of the pot that’s large enough to accommodate the root ball of the celery transplant.
3. Remove the Transplant: Gently remove the celery transplant from its container. If the roots are pot-bound (tightly circling the root ball), gently loosen them with your fingers.
4. Plant the Transplant: Place the transplant in the planting hole, making sure the top of the root ball is level with the surrounding soil.
5. Fill and Water: Fill in the hole with soil, gently firming it around the base of the plant. Water thoroughly to settle the soil.
Caring for Your Celery Plants
Now that your celery is planted, it’s time to provide it with the care it needs to thrive.
* Watering: Celery needs consistently moist soil, so water regularly, especially during hot, dry weather. Check the soil moisture daily and water when the top inch feels dry to the touch. Avoid overhead watering, as this can lead to fungal diseases. Instead, water at the base of the plant.
* Fertilizing: Celery is a heavy feeder, so it needs regular fertilization. I recommend fertilizing every 2-3 weeks with a balanced liquid fertilizer. You can also side-dress the plants with compost or aged manure.
* Sunlight: Celery needs at least 6 hours of sunlight per day. Place your pot in a sunny location, such as a patio or balcony. If you live in a hot climate, provide some afternoon shade to prevent the leaves from scorching.
* Blanching (Optional): Blanching is the process of excluding light from the celery stalks to make them paler and milder in flavor. It’s not essential, but it can improve the taste and texture of your celery. To blanch celery, you can wrap the stalks with newspaper, cardboard, or even old pantyhose a few weeks before harvest. Leave the tops of the leaves exposed to sunlight.
* Pest and Disease Control: Celery can be susceptible to a few pests and diseases, such as aphids, celery leaf miners, and fungal diseases. Inspect your plants regularly for signs of infestation or disease. If you spot any problems, take action immediately. You can use insecticidal soap or neem oil to control aphids and leaf miners. For fungal diseases, improve air circulation and avoid overhead watering.
Harvesting Your Celery
The moment we’ve all been waiting for! Harvesting your homegrown celery is incredibly rewarding.
* When to Harvest: Celery is typically ready to harvest about 80-100 days after planting. The stalks should be at least 6-8 inches long and thick enough to eat.
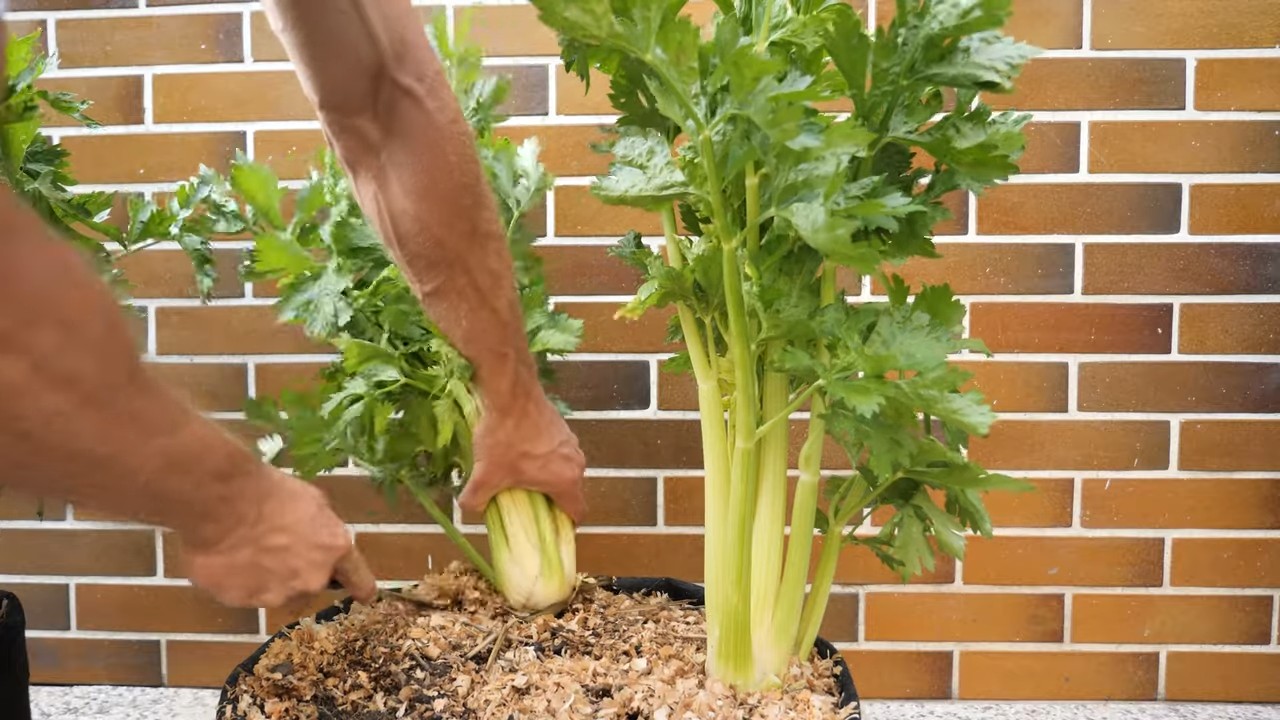
* How to Harvest: You can harvest the entire plant at once, or you can harvest individual stalks as needed. To harvest the entire plant, use a sharp knife to cut the stalks at the base of the plant. To harvest individual stalks, simply snap them off at the base.
* Storage: Freshly harvested celery can be stored in the refrigerator for up to 2 weeks. Wrap the stalks in a damp paper towel and place them in a plastic bag or container.
Troubleshooting Tips
Even with the best care, you might encounter a few challenges when growing celery in pots. Here are some common problems and how to fix them:
* Yellowing Leaves: This can be caused by a number of factors, including nutrient deficiencies, overwatering, or underwatering. Check the soil moisture and fertilize if necessary.
* Bolting (Premature Flowering): Bolting can occur if the celery plants are exposed to prolonged periods of cold weather. Protect your plants from frost and cold temperatures.
* Pest Infestations: As mentioned earlier, celery can be susceptible to aphids and leaf miners. Use insecticidal soap or neem oil to control these pests.
* Fungal Diseases: Fungal diseases can be caused by poor air circulation and overhead watering. Improve air circulation and avoid overhead watering.
Enjoying Your Homegrown Celery
Congratulations! You’ve successfully grown your own celery in pots. Now it’s time to enjoy the fruits (or rather, vegetables) of your labor.
* Raw: Celery is delicious eaten raw as a snack or added to salads.
* Cooked: Celery can be cooked in soups, stews, and stir-fries.
* Juiced: Celery juice is a popular health drink.
* Dips: Celery sticks are perfect for dipping in hummus, guacamole, or ranch dressing.
Growing celery in pots is a fun and rewarding experience. With a little bit of care and attention, you can enjoy fresh, crunchy celery all season long. Happy gardening!
Conclusion
So, there you have it! Growing celery in pots is not only achievable, but it’s also a surprisingly rewarding experience. Forget the limp, flavorless stalks from the grocery store. Imagine crisp, vibrant celery, bursting with fresh flavor, right at your fingertips. This DIY trick transforms your patio, balcony, or even a sunny windowsill into a miniature celery farm.
Why is this a must-try? Because it puts you in control. You dictate the quality of the soil, the amount of sunlight, and the watering schedule, resulting in celery that’s far superior to anything you can buy. Plus, it’s incredibly satisfying to nurture a plant from a tiny seedling to a mature, edible vegetable.
Beyond the basic method, there’s plenty of room for experimentation. Try different celery varieties! ‘Utah Tall’ is a classic choice, but ‘Golden Self-Blanching’ offers a sweeter, milder flavor. You can also adjust the soil mix to suit your specific climate and growing conditions. Consider adding a slow-release fertilizer to the potting mix for an extra boost of nutrients. Companion planting is another avenue to explore. Marigolds, for example, can help deter pests, while basil can improve the flavor of your celery.
Don’t be intimidated if you’re a beginner gardener. Growing celery in pots is a forgiving process, and the rewards are well worth the effort. The key is to provide consistent moisture, plenty of sunlight, and a nutrient-rich environment. With a little patience and attention, you’ll be harvesting your own delicious celery in no time.
We wholeheartedly encourage you to give this DIY trick a try. It’s a fantastic way to connect with nature, reduce your reliance on store-bought produce, and enjoy the unparalleled flavor of homegrown celery. And most importantly, we want to hear about your experiences! Share your tips, successes, and even your challenges in the comments below. Let’s build a community of potted celery growers and learn from each other. What are you waiting for? Grab a pot, some soil, and some celery seeds, and get growing! Embrace the joy of fresh, homegrown goodness and discover the simple pleasure of growing celery in pots.
Frequently Asked Questions (FAQ)
What kind of pot is best for growing celery?
The ideal pot for growing celery should be at least 10-12 inches in diameter and depth. Celery has a relatively shallow but spreading root system, so a wider pot is generally better than a tall, narrow one. Ensure the pot has drainage holes to prevent waterlogging, which can lead to root rot. Terracotta pots are a good choice as they allow for good air circulation, but plastic pots are also suitable and tend to retain moisture better, which can be beneficial in hotter climates.
How much sunlight does potted celery need?
Celery thrives in full sun, which means at least 6-8 hours of direct sunlight per day. However, in very hot climates, some afternoon shade can be beneficial to prevent the leaves from scorching. If you’re growing celery indoors, place it near a south-facing window or supplement with grow lights to ensure it receives adequate light. Insufficient sunlight can result in leggy, weak plants with poor flavor.
What type of soil is best for growing celery in pots?
Celery prefers rich, well-draining soil that is high in organic matter. A good potting mix for celery would consist of a combination of compost, peat moss (or coconut coir as a sustainable alternative), and perlite or vermiculite. The compost provides essential nutrients, the peat moss or coconut coir helps retain moisture, and the perlite or vermiculite improves drainage and aeration. Aim for a soil pH between 6.0 and 6.8. You can also amend the soil with slow-release fertilizer to provide a steady supply of nutrients throughout the growing season.
How often should I water my potted celery?
Celery needs consistent moisture to thrive. Water your potted celery deeply whenever the top inch of soil feels dry to the touch. During hot, dry weather, you may need to water daily or even twice a day. Avoid letting the soil dry out completely, as this can stress the plants and affect their growth. However, be careful not to overwater, as soggy soil can lead to root rot. Ensure the pot has good drainage to prevent water from pooling at the bottom.
How do I fertilize my potted celery?
Celery is a heavy feeder and requires regular fertilization to produce healthy, flavorful stalks. Start by incorporating a slow-release fertilizer into the potting mix at planting time. Then, supplement with a liquid fertilizer every 2-3 weeks throughout the growing season. A balanced fertilizer with an NPK ratio of 10-10-10 or 14-14-14 is a good choice. You can also use organic fertilizers such as compost tea or fish emulsion. Be sure to follow the instructions on the fertilizer label to avoid over-fertilizing, which can burn the roots.
What are some common pests and diseases that affect celery, and how can I prevent them?
Common pests that affect celery include aphids, celery leaf miners, and slugs. Aphids can be controlled with insecticidal soap or a strong spray of water. Celery leaf miners can be managed by removing and destroying infested leaves. Slugs can be trapped with beer traps or handpicked off the plants. Diseases that can affect celery include early blight, late blight, and pink rot. To prevent these diseases, ensure good air circulation around the plants, avoid overhead watering, and remove any infected leaves promptly. You can also use a copper-based fungicide as a preventative measure.
How long does it take to grow celery in pots?
Celery typically takes 100-130 days to mature from seed. However, you can shorten the growing time by starting with transplants instead of seeds. Transplants will typically be ready to harvest in 70-90 days. The exact time will depend on the variety of celery, the growing conditions, and the size of the transplants.
How do I harvest celery from a pot?
You can harvest celery stalks as needed once they reach a usable size. Simply cut the outer stalks near the base of the plant with a sharp knife. The inner stalks will continue to grow and can be harvested later. Alternatively, you can harvest the entire plant at once by cutting it off at the base.
Can I regrow celery from the base I buy at the store?
Yes, you can regrow celery from the base you buy at the store. Cut off the stalks, leaving about 2 inches of the base intact. Place the base in a shallow dish of water, with the cut side facing up. Change the water every day or two. After a few days, you should see new roots and leaves starting to grow. Once the roots are well-developed, you can transplant the celery base into a pot filled with potting mix.
What are some creative ways to use homegrown celery?
Homegrown celery is incredibly versatile and can be used in a variety of dishes. Of course, it’s delicious raw in salads, with dips, or as a crunchy snack. You can also add it to soups, stews, and stir-fries for extra flavor and texture. Celery juice is a popular and healthy beverage. Don’t forget about the celery leaves! They can be used as a flavorful herb in salads, soups, and sauces. You can even dehydrate the leaves and grind them into a celery salt. The possibilities are endless!


Leave a Comment