

Growing Celery Hydroponically might sound like something out of a futuristic farm, but trust me, it’s surprisingly simple and incredibly rewarding! Forget battling soil pests and unpredictable weather; with a few clever tricks, you can enjoy crisp, homegrown celery right from your kitchen counter.
Celery, with its satisfying crunch and refreshing flavor, has been cultivated for centuries. Originating in the Mediterranean, it was initially valued for its medicinal properties before becoming a culinary staple. Now, imagine enjoying that same fresh, healthy celery, but grown by your own hands, indoors, without the fuss of traditional gardening!
Why should you consider this DIY project? Well, for starters, it’s a fantastic way to have fresh produce readily available, regardless of the season. Plus, growing celery hydroponically is a great space-saver, perfect for apartment dwellers or anyone with limited outdoor space. But the real magic lies in the control you have over the growing environment. You can minimize pests, optimize nutrient intake, and ultimately, harvest healthier, tastier celery. I’m excited to share these easy-to-follow steps that will have you enjoying homegrown celery in no time!
DIY Hydroponischer Staudensellerie-Anbau: Dein Leitfaden für knackigen Erfolg
Hey Pflanzenfreunde! Habt ihr Lust, euren eigenen Staudensellerie anzubauen, ohne Erde? Mit Hydroponik ist das einfacher, als ihr denkt! Ich zeige euch, wie ihr mit ein paar einfachen Materialien und etwas Geduld knackigen, frischen Staudensellerie direkt in eurer Küche oder auf eurem Balkon ernten könnt. Los geht’s!
Was du für deinen hydroponischen Staudensellerie brauchst:
* Samen oder Staudensellerie-Strunk: Du kannst entweder mit Samen beginnen oder einen Strunk von gekauftem Staudensellerie verwenden. Ich persönlich finde den Strunk-Ansatz schneller und einfacher für den Anfang.
* Hydroponisches System: Hier gibt es viele Möglichkeiten! Du kannst ein einfaches Kratky-System (passives System ohne Pumpe) bauen, ein NFT-System (Nutrient Film Technique) oder ein Tiefwasserkultur-System (DWC). Für Anfänger empfehle ich das Kratky-System, da es am unkompliziertesten ist.
* Hydroponischer Nährstoffdünger: Speziell für Hydroponik formuliert. Achte darauf, dass er alle wichtigen Nährstoffe für das Wachstum von Gemüse enthält.
* Anzuchtmedium: Steinwolle, Kokosfasern oder Torfquelltöpfe eignen sich hervorragend für die Anzucht von Samen oder das Bewurzeln von Staudensellerie-Strunks.
* Behälter: Ein undurchsichtiger Behälter für dein Hydroponik-System. Ein Eimer, eine Plastikbox oder sogar ein umfunktionierter Kanister funktionieren gut.
* Netztöpfe: Diese halten deine Pflanzen und das Anzuchtmedium im Behälter.
* pH-Messgerät und pH-Up/Down: Um den pH-Wert deiner Nährlösung im optimalen Bereich zu halten (5,5-6,5).
* EC-Messgerät (optional, aber empfohlen): Um die Nährstoffkonzentration in deiner Lösung zu überwachen.
* Lichtquelle: Wenn du deinen Staudensellerie drinnen anbaust, brauchst du eine gute Pflanzenlampe.
* Schere oder Messer: Zum Zuschneiden des Staudensellerie-Strunks.
* Wasser: Am besten destilliertes Wasser oder gefiltertes Leitungswasser.
Staudensellerie aus einem Strunk ziehen: Schritt-für-Schritt-Anleitung
Das ist meine bevorzugte Methode, weil sie schnell geht und man schon bald erste Ergebnisse sieht.
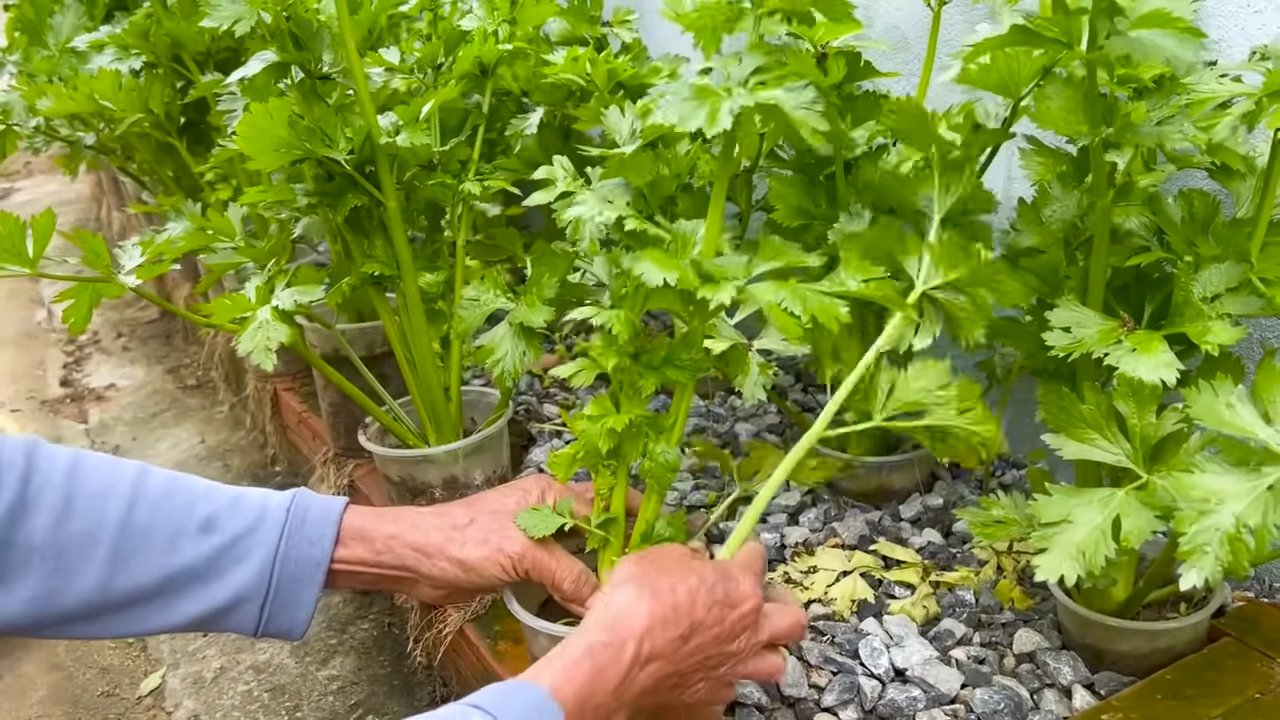
1. Strunk vorbereiten: Nachdem du deinen Staudensellerie im Supermarkt gekauft und die Stangen verbraucht hast, schneide den Strunk etwa 5-7 cm vom unteren Ende ab. Achte darauf, dass die Basis intakt ist.
2. In Wasser stellen: Stelle den Strunk in ein Glas mit etwa 2-3 cm Wasser. Stelle das Glas an einen hellen Ort, aber nicht in direkte Sonneneinstrahlung.
3. Wasser wechseln: Wechsle das Wasser alle 1-2 Tage, um Fäulnis zu vermeiden.
4. Wurzeln bilden: Nach etwa einer Woche solltest du sehen, wie kleine Wurzeln aus dem Strunk sprießen.
5. In den Netztopf umpflanzen: Sobald die Wurzeln etwa 2-3 cm lang sind, kannst du den Strunk in einen Netztopf mit Anzuchtmedium (z.B. Kokosfasern) umpflanzen. Achte darauf, dass die Wurzeln gut bedeckt sind.
Dein Kratky-System bauen: Eine einfache Hydroponik-Lösung
Das Kratky-System ist ideal für Anfänger, da es keine Pumpe oder Belüfter benötigt.
1. Behälter vorbereiten: Bohre Löcher in den Deckel deines Behälters, die groß genug sind, um die Netztöpfe aufzunehmen. Die Anzahl der Löcher hängt von der Größe deines Behälters und der Anzahl der Staudensellerie-Pflanzen ab, die du anbauen möchtest.
2. Nährlösung mischen: Fülle den Behälter mit Wasser und füge den hydroponischen Nährstoffdünger gemäß den Anweisungen auf der Verpackung hinzu. Verwende dein pH-Messgerät, um den pH-Wert auf 5,5-6,5 einzustellen. Verwende pH-Up oder pH-Down, um den Wert anzupassen, falls nötig. Ein EC-Messgerät hilft dir, die Nährstoffkonzentration zu überwachen.
3. Netztöpfe einsetzen: Setze die Netztöpfe mit den Staudensellerie-Pflanzen in die Löcher im Deckel ein. Achte darauf, dass die Wurzeln in die Nährlösung eintauchen, aber nicht der gesamte Strunk.
4. Lichtquelle installieren: Stelle sicher, dass deine Pflanzen ausreichend Licht bekommen. Wenn du sie drinnen anbaust, verwende eine Pflanzenlampe. Stelle die Lampe so ein, dass sie etwa 14-16 Stunden pro Tag leuchtet.
5. Beobachten und anpassen: Überprüfe regelmäßig den Wasserstand und den pH-Wert deiner Nährlösung. Fülle Wasser nach, wenn der Pegel sinkt, und passe den pH-Wert bei Bedarf an.
Pflege deines hydroponischen Staudenselleries
Die richtige Pflege ist entscheidend für eine reiche Ernte.
* Licht: Staudensellerie braucht viel Licht, um gut zu wachsen. Stelle sicher, dass deine Pflanzen mindestens 6 Stunden direktes Sonnenlicht oder 14-16 Stunden künstliches Licht pro Tag bekommen.
* Nährstoffe: Überprüfe regelmäßig die Nährstoffkonzentration deiner Lösung mit einem EC-Messgerät und passe sie bei Bedarf an. Achte darauf, dass du einen hochwertigen hydroponischen Nährstoffdünger verwendest, der alle wichtigen Nährstoffe enthält.
* pH-Wert: Der optimale pH-Wert für Staudensellerie liegt zwischen 5,5 und 6,5. Überprüfe den pH-Wert regelmäßig und passe ihn bei Bedarf mit pH-Up oder pH-Down an.
* Wasserstand: Im Kratky-System ist es wichtig, dass die Wurzeln immer Zugang zu Wasser haben. Fülle Wasser nach, wenn der Pegel sinkt.
* Belüftung: Obwohl das Kratky-System passiv ist, kann eine gute Belüftung helfen, das Wachstum zu fördern. Stelle sicher, dass deine Pflanzen nicht zu dicht beieinander stehen und dass die Luft gut zirkulieren kann.
* Schädlinge und Krankheiten: Überprüfe deine Pflanzen regelmäßig auf Schädlinge und Krankheiten. Bei Bedarf kannst du biologische Schädlingsbekämpfungsmittel verwenden.
Erntezeit!
Nach etwa 80-100 Tagen solltest du deinen ersten Staudensellerie ernten können!
* Ernten: Schneide die Stangen nach Bedarf ab. Du kannst entweder die äußeren Stangen einzeln ernten oder die gesamte Pflanze auf einmal.
* Genießen: Dein frisch geernteter Staudensellerie ist perfekt für Salate, Suppen, Smoothies oder einfach zum Knabbern!
Zusätzliche Tipps für den Erfolg:
* Starte klein: Beginne mit ein paar Pflanzen, um ein Gefühl für den hydroponischen Anbau zu bekommen.
* Dokumentiere deine Fortschritte: Mache Fotos und notiere dir, was funktioniert und was nicht. So kannst du deine Anbaumethoden im Laufe der Zeit verbessern.
* Sei geduldig: Der hydroponische Anbau erfordert etwas Geduld. Gib nicht auf, wenn du nicht sofort Ergebnisse siehst.
* Experimentiere: Probiere verschiedene Nährstofflösungen, Lichtquellen und Anbaumethoden aus, um herauszufinden, was für dich am besten funktioniert.
* Reinigung: Reinige dein System regelmäßig, um Algenbildung und Krankheiten vorzubeugen.
Ich hoffe, diese Anleitung hilft dir dabei, deinen eigenen hydroponischen Staudensellerie anzubauen! Es ist ein lohnendes und befriedigendes Hobby, das dir frisches Gemüse direkt vor deiner Haustür liefert. Viel Erfolg und happy growing!

Conclusion
So, there you have it! Growing celery hydroponically is not only achievable but also surprisingly rewarding. We’ve walked you through the process, from seed germination to harvesting crisp, flavorful stalks, all without the need for soil. Why is this a must-try? Because it offers a faster growth rate, higher yields, and significantly reduced risk of pests and diseases compared to traditional soil-based gardening. Imagine fresh, organic celery readily available right in your home, free from harmful pesticides and herbicides. That’s the power of hydroponics!
But the benefits extend beyond just the practical. Hydroponics is a fascinating and engaging hobby. It connects you to the food you eat in a profound way, allowing you to witness the miracle of plant growth up close. It’s also a fantastic educational tool, especially for children, teaching them about plant biology, nutrient cycles, and sustainable agriculture.
Don’t be afraid to experiment! Once you’ve mastered the basic technique, you can explore different nutrient solutions to fine-tune the flavor and texture of your celery. Try adding a touch more potassium for sweeter stalks or adjusting the pH to optimize nutrient uptake. You can also experiment with different hydroponic systems, such as deep water culture (DWC) or nutrient film technique (NFT), to find what works best for your space and resources.
Consider these variations to elevate your hydroponic celery game:
* **Flavored Celery:** Infuse your nutrient solution with natural flavorings like lemon peel or ginger to impart subtle notes to your celery stalks.
* **Colored Celery:** Experiment with different lighting spectrums to influence the color of your celery. Blue light, for example, can promote darker green foliage.
* **Baby Celery:** Harvest your celery at a younger stage for tender, bite-sized stalks perfect for salads and snacks.
The key to success with hydroponic celery is consistency and observation. Regularly monitor your nutrient solution, pH levels, and plant health. Adjust your setup as needed to ensure your celery thrives.
We are confident that with a little patience and attention, you’ll be enjoying homegrown hydroponic celery in no time. So, ditch the soil, embrace the future of gardening, and give this DIY trick a try! We’re eager to hear about your experiences. Share your photos, tips, and challenges in the comments below. Let’s build a community of hydroponic celery enthusiasts! What are you waiting for? Get growing!
Frequently Asked Questions (FAQ)
What are the best celery varieties for hydroponics?
While most celery varieties can be grown hydroponically, some tend to perform better than others. Look for varieties that are known for their compact growth habit and resistance to bolting (premature flowering). Some popular choices include ‘Tango’, ‘Conquistador’, and ‘Ventura’. These varieties are generally more tolerant of the controlled environment of a hydroponic system and produce crisp, flavorful stalks. Remember to research the specific needs of the variety you choose to ensure optimal growth.
How often should I change the nutrient solution?
The frequency of nutrient solution changes depends on several factors, including the size of your reservoir, the number of plants, and the environmental conditions. As a general rule, you should aim to change the nutrient solution every 1-2 weeks. However, it’s crucial to monitor the pH and EC (electrical conductivity) levels of your solution regularly. If the pH drifts significantly or the EC drops below the recommended range, it’s a sign that the nutrients are depleted and the solution needs to be replaced. Additionally, if you notice any signs of nutrient deficiencies in your plants, such as yellowing leaves or stunted growth, a nutrient solution change may be necessary.
What is the ideal pH level for hydroponic celery?
Maintaining the correct pH level is crucial for nutrient absorption in hydroponic systems. Celery thrives in a slightly acidic environment, with an ideal pH range of 6.0 to 6.5. Regularly test the pH of your nutrient solution using a pH meter or test kit and adjust it as needed using pH up or pH down solutions. Keep in mind that the pH can fluctuate over time due to plant uptake and environmental factors, so consistent monitoring is essential.
How much light does hydroponic celery need?
Celery requires ample light to thrive in a hydroponic system. Aim for at least 12-16 hours of light per day. If you’re growing indoors, you’ll likely need to supplement natural light with artificial grow lights. LED grow lights are a popular choice due to their energy efficiency and full-spectrum output. Position the lights close enough to the plants to provide adequate illumination, but not so close that they cause leaf burn. Observe your plants closely for signs of light stress, such as bleached leaves or elongated stems, and adjust the lighting accordingly.
How long does it take to grow celery hydroponically?
The time it takes to grow celery hydroponically can vary depending on several factors, including the variety, environmental conditions, and nutrient management. Generally, you can expect to harvest your celery in about 80-100 days from seed. However, some faster-growing varieties may be ready in as little as 70 days. To accelerate growth, ensure that your plants receive adequate light, nutrients, and water. Maintaining optimal temperature and humidity levels can also help to speed up the growing process.
What are common problems when growing celery hydroponically and how to fix them?
Several common problems can arise when growing celery hydroponically, but most can be easily addressed with proper care and attention. One common issue is nutrient deficiencies, which can manifest as yellowing leaves, stunted growth, or other abnormalities. To prevent nutrient deficiencies, use a high-quality hydroponic nutrient solution specifically formulated for leafy greens and monitor the pH and EC levels regularly. Another common problem is root rot, which is caused by overwatering or poor aeration. To prevent root rot, ensure that your hydroponic system has adequate drainage and aeration. You can also add beneficial bacteria or fungi to your nutrient solution to help protect the roots from pathogens. Pest infestations can also be a problem, but they can usually be controlled with organic pesticides or by introducing beneficial insects.
Can I use tap water for my hydroponic system?
While it’s possible to use tap water for your hydroponic system, it’s generally not recommended. Tap water often contains chlorine, chloramine, and other chemicals that can be harmful to plants. It can also have a high mineral content, which can interfere with nutrient uptake. If you must use tap water, let it sit out for 24-48 hours to allow the chlorine to evaporate. Alternatively, you can use a water filter to remove chlorine and other impurities. The best option is to use distilled water or reverse osmosis (RO) water, which is free of contaminants and has a neutral pH.
How do I harvest hydroponic celery?
Harvesting hydroponic celery is a simple process. Once the stalks have reached the desired size, you can harvest them by cutting them off at the base of the plant with a sharp knife or scissors. You can harvest individual stalks as needed, or you can harvest the entire plant at once. After harvesting, rinse the stalks thoroughly with water and store them in the refrigerator. Hydroponic celery typically has a longer shelf life than soil-grown celery, so you can enjoy fresh, crisp stalks for several weeks.


Leave a Comment