

Growing Celery at Home might seem like a challenge reserved for seasoned gardeners, but I’m here to tell you it’s totally achievable, even if you’re a beginner! Have you ever bought a bunch of celery, used a few stalks, and watched the rest wilt away in the fridge? I know I have, countless times! That’s where the magic of DIY comes in. This guide is all about transforming those forgotten celery bases into thriving plants, right in your own kitchen or garden.
Celery, with its crisp texture and refreshing flavor, has been cultivated for centuries. Originating in the Mediterranean, it was initially valued for its medicinal properties before becoming a culinary staple. Now, imagine having a constant supply of fresh, organic celery, grown with your own two hands. No more sad, limp stalks!
In today’s world, where we’re all striving for sustainability and reducing food waste, learning how to propagate celery from scraps is more relevant than ever. Plus, it’s incredibly rewarding to watch something grow from what would otherwise be tossed in the compost. This DIY project is not only budget-friendly but also a fantastic way to connect with nature and enjoy the freshest celery possible. So, let’s dive in and discover the simple tricks and hacks for successfully growing celery at home!
Growing Celery at Home: A Comprehensive DIY Guide
Hello garden friends! Have you ever wondered if you can grow your own celery instead of just buying it at the supermarket? The answer is a clear YES! And I’m going to show you how. Growing celery might seem a bit tricky at first, but with a little patience and the right steps, you’ll soon be harvesting your own fresh celery. Let’s get started!
What You Need for Growing Celery
Before we begin the actual growing process, you should make sure you have all the necessary materials and tools on hand. Here is a list to help you:
- Celery base with root end: It’s best to use a fresh celery from the supermarket with the roots still intact.
- A sharp knife: To cut off the base.
- A glass or bowl: For rooting the base.
- Water: For rooting and later for watering.
- Seed starting mix: For the initial growth phases.
- Pots or a garden bed: for later planting.
- Garden trowel or scoop: For repotting.
- Fertilizer (optional): For an optimal supply of nutrients. I recommend an organic fertilizer.
- Patience: Celery takes time to grow!
Growing Celery from a Base: A Step-by-Step Guide
The first step is to root the celery base. Here, I’ll show you the best way to do that:
- Prepare the base: Take your celery and cut off the base about 5-7 cm (2-3 inches) from the bottom end. Make sure the roots remain as intact as possible. You can, of course, use the upper celery stalks for your cooking!
- Place the base in water: Fill a glass or bowl with about 2-3 cm (1 inch) of water. Place the celery base in the water with the cut side up. Make sure only the bottom part of the base is in the water, not the entire cut surface.
- Choose a bright location: Place the glass with the celery base in a bright, but not directly sunny, location. A windowsill is ideal.
- Change the water regularly: Change the water every 1-2 days to prevent rot. Fresh water keeps the base healthy and promotes root formation.
- Be patient: You should see the first roots after about a week. However, it can sometimes take a bit longer. Be patient and give the base time to develop.
- Watch for growth: Observe the base closely. Gradually, not only should roots form, but new green leaves should also start growing from the center of the base. This is a good sign!
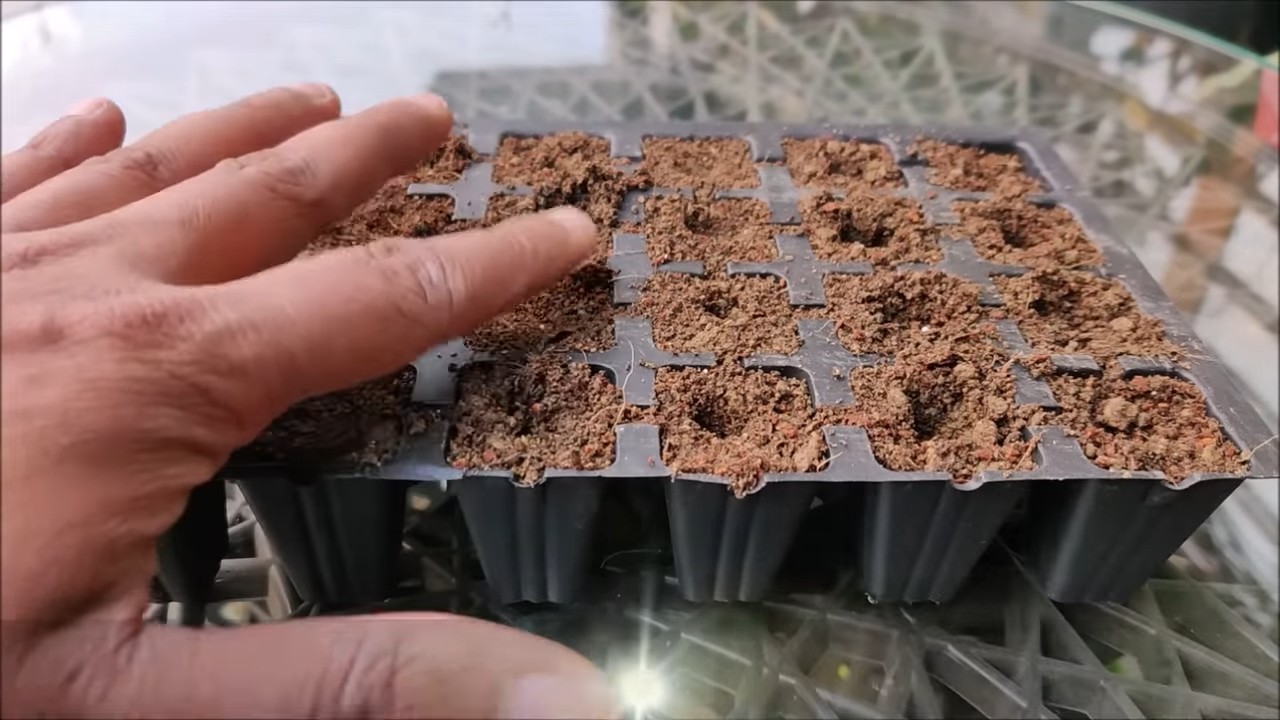
Planting Celery in Soil: The Next Step
Once the celery base has formed sufficient roots (about 2-3 cm or 1 inch long), it’s time to plant it in soil.
- Prepare the seed starting mix: Fill a small pot with seed starting mix. The soil should be loose and well-draining.
- Dig a planting hole: Use your finger or a small trowel to make a small hole in the center of the soil. The hole should be deep enough for the celery base to fit without the leaves being covered by soil.
- Plant the celery base: Carefully place the celery base into the hole. Be careful not to damage the roots.
- Cover with soil: Gently fill the hole with soil and press it down lightly.
- Water: Water the celery gently. The soil should be moist, but not wet.
- Choose a bright location: Place the pot in a bright, but not directly sunny, spot.
Planting Celery in the Garden: When Space Gets Tight
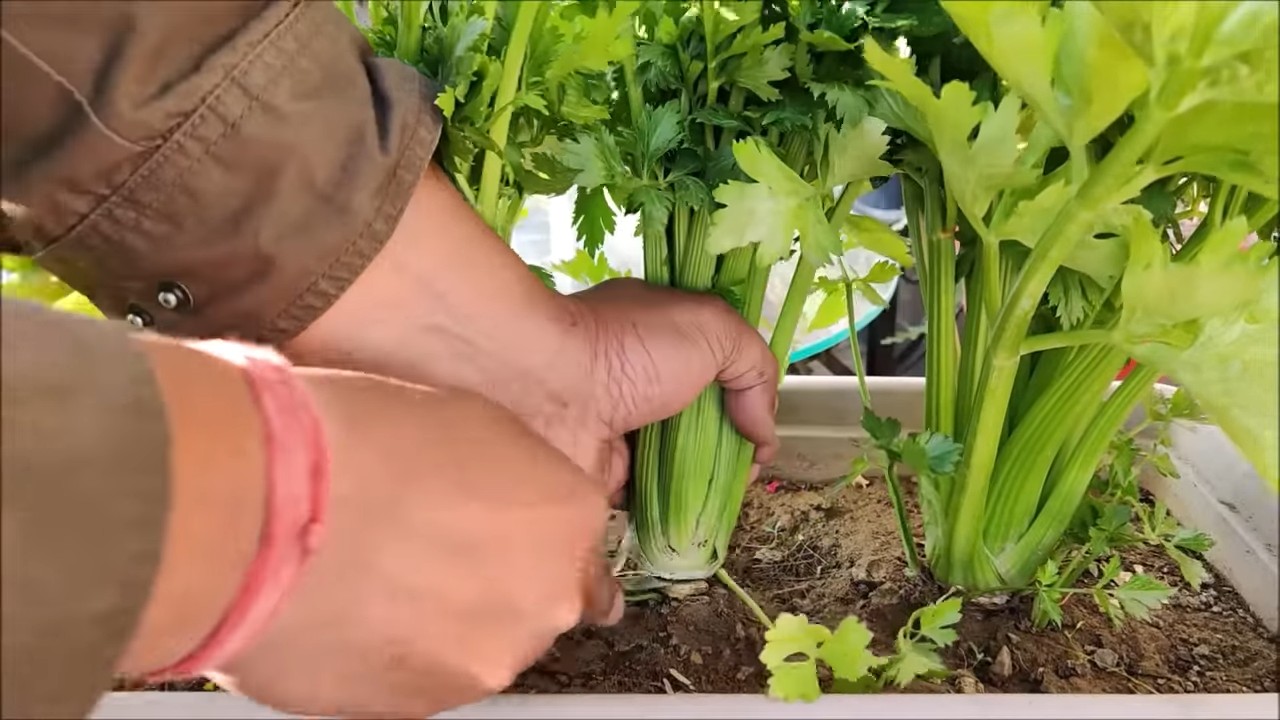
If the celery gets too big for its pot or if you want to grow it directly in the garden, it’s time to plant it out.
- Choose the right time: The best time to plant out is after the last frosts in spring. The soil should be warm enough.
- Select a suitable location: Celery prefers a sunny to partially shaded spot with well-draining soil.
- Prepare the soil: Loosen the soil well and remove weeds. You can also work some compost or organic fertilizer into the soil to improve the nutrient supply.
- Dig a planting hole: Dig a planting hole that is slightly larger than the celery’s root ball.
- Plant out the celery: Carefully remove the celery from its pot and place it in the planting hole. Be careful not to damage the roots.
- Cover with soil: Fill the planting hole with soil and press it down lightly.
- Water: Water the celery thoroughly.
- Keep your distance: If you are planting multiple celery plants, you should maintain a distance of about 20-30 cm (8-12 inches) between them.
Caring for Celery: Tips for Healthy Growth
To ensure your celery grows well and thrives, you should care for it regularly. Here are some tips:
- Watering: Celery needs regular water, especially during dry periods. The soil should always be moist, but not wet.
- Fertilizing: Fertilize the celery regularly with an organic fertilizer. This ensures an optimal supply of nutrients and healthy growth.
- Weeding: Regularly remove weeds from around the celery. Weeds compete with celery for nutrients and water.
- Pest control: Watch out for pests like slugs or aphids. You can use natural pest control methods if needed.
- Hilling up: As the celery root grows larger, you can gently mound soil around it. This protects it from sunburn and promotes growth.
Harvesting Celery: The Reward for Your Efforts
After about 3-4 months, you can harvest your homegrown celery.
- Choose the right time: The celery is ready to harvest when the root has reached a reasonable size and the stalks are strong and crisp.
- Harvest the celery: Carefully dig the celery out of the ground. Be careful not to damage the root.
- Cleaning: Remove the soil from the root and stalks.
- Use: You can use the celery immediately or store it in the refrigerator.
Common Problems and Solutions
Problems can also arise when growing celery. Here are some common issues and how you can solve them:
Rot: Rot can occur if the celery is kept too wet. Make sure the soil is well-draining and do not overwater the celery.
Yellow leaves: Yellow leaves can be a sign of a nutrient deficiency. Fertilize the celery with an organic fertilizer.
Slug infestation: Slugs can eat the leaves of the celery. Hand-pick the slugs or use natural slug deterrents.
Aphids: Aphids can infest the celery and weaken it. Spray the celery with a soap solution.
Conclusion
So, there you have it! Growing celery at home, while it might seem a little daunting at first, is a surprisingly rewarding and ultimately achievable endeavor. We’ve walked through the process, from rescuing that celery base from the grocery store to nurturing it into a thriving plant, ready to provide you with crisp, flavorful stalks. But why should you bother? Why not just keep buying celery from the supermarket?
The answer lies in the unparalleled freshness and flavor you simply can’t replicate with store-bought celery. Imagine the vibrant crunch and intense celery taste, bursting with natural sweetness, in your salads, soups, and snacks. This isn’t just about saving a few dollars; it’s about experiencing celery in its purest form, free from the potential degradation of long-distance transportation and storage. Plus, there’s an undeniable satisfaction in nurturing something from scrap to sustenance. It’s a connection to your food that’s both grounding and empowering.
Beyond the superior taste, growing your own celery allows you to control the growing environment. You can choose organic methods, avoiding harmful pesticides and herbicides, ensuring that what you’re putting into your body is as clean and healthy as possible. This is especially important for celery, which can sometimes be heavily treated in commercial agriculture.
Ready to take your celery game to the next level? Consider these variations and suggestions:
* Experiment with different celery varieties: While standard green celery is a great starting point, explore other options like golden celery or even celeriac (celery root) for a unique flavor profile.
* Hydroponic celery: If you’re short on space or live in an apartment, consider growing celery hydroponically. It’s a fun and efficient way to cultivate celery indoors.
* Companion planting: Celery thrives alongside certain plants like tomatoes, onions, and garlic. Research companion planting to maximize your garden’s yield and health.
* Celery seed harvesting: Once your celery plant bolts (produces flowers), you can harvest the seeds for future planting or even use them as a spice.
Don’t be afraid to experiment and adapt the techniques we’ve discussed to suit your specific environment and preferences. Growing celery at home is a journey of discovery, and there’s no one-size-fits-all approach. The most important thing is to get started and learn as you go.
We wholeheartedly encourage you to give this DIY trick a try. It’s a fantastic way to reduce food waste, connect with nature, and enjoy the freshest, most flavorful celery imaginable. And most importantly, we want to hear about your experiences! Share your successes, your challenges, and any tips you’ve discovered along the way in the comments below. Let’s build a community of home celery growers and learn from each other. Your insights could be invaluable to someone just starting out. So, grab that celery base, get your hands dirty, and embark on this rewarding gardening adventure. Happy growing!
Frequently Asked Questions (FAQ)
How long does it take to grow celery from a base?
The time it takes to grow celery from a base to a harvestable plant can vary depending on several factors, including your climate, the amount of sunlight your plant receives, and the overall growing conditions. Generally, you can expect it to take anywhere from 80 to 120 days from the time you replant the base to when you can harvest mature stalks. The initial regrowth from the base, where you see new leaves emerging, usually takes a couple of weeks. Be patient and consistent with watering and fertilizing, and you’ll be enjoying homegrown celery before you know it.
What kind of soil is best for growing celery?
Celery thrives in rich, well-draining soil that is high in organic matter. The ideal soil pH should be between 6.0 and 6.8. Before planting, amend your soil with compost, well-rotted manure, or other organic materials to improve its fertility and drainage. Celery needs consistent moisture, so the soil should be able to retain water without becoming waterlogged. If your soil is heavy clay, consider adding sand or perlite to improve drainage. A good quality potting mix is also suitable if you’re growing celery in containers.
How much sunlight does celery need?
Celery needs at least 6 hours of direct sunlight per day to thrive. However, in hotter climates, it can benefit from some afternoon shade to prevent the leaves from scorching. If you’re growing celery indoors, place it near a sunny window or use grow lights to provide adequate light. Insufficient sunlight can result in leggy growth and smaller, less flavorful stalks. Observe your plant closely and adjust its position as needed to ensure it’s getting enough light.
How often should I water my celery plant?
Celery is a thirsty plant and requires consistent moisture to grow properly. Water your celery plant deeply whenever the top inch of soil feels dry to the touch. During hot, dry weather, you may need to water it daily. Avoid letting the soil dry out completely, as this can stress the plant and affect its growth. However, be careful not to overwater, as soggy soil can lead to root rot. Mulching around the base of the plant can help retain moisture and reduce the need for frequent watering.
What are some common problems when growing celery and how can I fix them?
Several common problems can affect celery growth. One is bolting, where the plant prematurely produces flowers and seeds, making the stalks bitter. This can be caused by stress, such as extreme temperature fluctuations or lack of water. To prevent bolting, ensure consistent watering and protect your plants from extreme weather. Another common issue is celery blight, a fungal disease that causes brown spots on the leaves. To prevent blight, provide good air circulation around your plants and avoid overhead watering. If blight occurs, remove affected leaves and treat the plant with a fungicide. Pests like aphids and celery worms can also attack celery plants. Inspect your plants regularly and treat infestations with insecticidal soap or neem oil.
Can I grow celery in a container?
Yes, you can successfully grow celery in a container, especially if you have limited garden space. Choose a container that is at least 12 inches deep and wide to accommodate the plant’s root system. Use a high-quality potting mix and ensure the container has good drainage. Water regularly and fertilize every few weeks with a balanced fertilizer. Place the container in a sunny location that receives at least 6 hours of direct sunlight per day. Container-grown celery may require more frequent watering than celery grown in the ground, so monitor the soil moisture closely.
How do I harvest celery?
You can harvest celery stalks as needed once they reach a desirable size, typically around 6-8 inches tall. To harvest, use a sharp knife to cut the outer stalks near the base of the plant. Leave the inner stalks to continue growing. Alternatively, you can harvest the entire plant by cutting it off at the base. After harvesting, store celery in the refrigerator in a plastic bag or container to keep it fresh. Homegrown celery is best enjoyed soon after harvesting for the best flavor and texture.
What fertilizer should I use for celery?
Celery is a heavy feeder and benefits from regular fertilization. Use a balanced fertilizer with equal amounts of nitrogen, phosphorus, and potassium (e.g., 10-10-10) every few weeks during the growing season. You can also use a fertilizer that is slightly higher in nitrogen to promote leafy growth. Organic options include compost tea, fish emulsion, and seaweed extract. Apply fertilizer according to the package instructions and avoid over-fertilizing, as this can burn the roots.
Can I save seeds from my celery plant?
Yes, you can save seeds from your celery plant, but it requires allowing the plant to bolt (produce flowers). Celery is a biennial, meaning it typically flowers in its second year. After the flowers dry and turn brown, you can harvest the seeds. Cut off the flower heads and place them in a paper bag to dry completely. Once dry, shake the bag to release the seeds. Store the seeds in an airtight container in a cool, dark place. Keep in mind that celery seeds can be slow to germinate, so it’s best to start them indoors several weeks before the last frost.
Is growing celery at home worth it?
Absolutely! While it requires some effort and patience, growing celery at home offers numerous benefits. You’ll enjoy fresher, more flavorful celery that is free from harmful pesticides and herbicides. It’s also a sustainable way to reduce food waste and connect with nature. Plus, the satisfaction of harvesting your own homegrown celery is truly rewarding. Give it a try and experience the difference for yourself!


Leave a Comment