

Growing Brussels Sprouts Beginners, listen up! Have you ever looked at those tiny cabbages on a stalk at the grocery store and thought, “I could never grow those”? Well, I’m here to tell you that you absolutely can! Forget the mystery and intimidation – we’re diving into the surprisingly simple world of cultivating your own Brussels sprouts, even if you’re a complete newbie to the gardening game.
For centuries, Brussels sprouts have been a staple in European cuisine, with their cultivation dating back to, you guessed it, Brussels, Belgium! They’ve earned a reputation (sometimes unfairly!) for being bitter, but homegrown Brussels sprouts, picked fresh from your garden, are a world away from the store-bought variety. They’re sweeter, more tender, and packed with nutrients.
Why should you bother with this DIY project? Because nothing beats the satisfaction of harvesting your own food, knowing exactly where it came from and what went into it. Plus, growing Brussels Sprouts Beginners will find it’s a fantastic way to extend your gardening season into the cooler months. Imagine serving up a delicious, homegrown side dish during the holidays – your family and friends will be amazed! This guide will provide you with easy-to-follow steps and helpful tips to ensure your Brussels sprouts journey is a success. Let’s get started!
Rosenkohl Anbauen für Anfänger: Dein DIY-Leitfaden
Hallo Gartenfreunde! Rosenkohl, diese kleinen, kohlartigen Köstlichkeiten, sind gar nicht so schwer anzubauen, wie man vielleicht denkt. Ich zeige dir, wie du mit ein bisschen Geduld und den richtigen Schritten deinen eigenen Rosenkohl ernten kannst. Los geht’s!
Was du brauchst:
* Rosenkohlsamen oder Jungpflanzen
* Anzuchterde (falls du mit Samen startest)
* Gartenerde (gut durchlässig und nährstoffreich)
* Kompost oder organischen Dünger
* Pflanzgefäße (für die Anzucht)
* Gartenspaten oder Schaufel
* Gießkanne oder Gartenschlauch
* Pflanzstäbe (optional, für zusätzlichen Halt)
* Schneckenkorn oder andere Schneckenabwehr (optional)
* Netz oder Vlies (zum Schutz vor Kohlweißlingen)
Der richtige Zeitpunkt:
* Aussaat: Für eine Ernte im Herbst/Winter solltest du die Samen im Frühjahr (März/April) vorziehen. Für eine frühere Ernte kannst du bereits im Februar mit der Voranzucht beginnen.
* Pflanzung: Die Jungpflanzen können dann ab Mai ins Freiland gesetzt werden, sobald keine Frostgefahr mehr besteht.
Aussaat und Voranzucht (optional, aber empfohlen):
Wenn du mit Samen beginnst, ist die Voranzucht im Haus oder Gewächshaus ideal.
1. Vorbereitung der Anzuchtgefäße: Fülle kleine Töpfe oder Anzuchtschalen mit Anzuchterde. Drücke die Erde leicht an.
2. Aussaat der Samen: Lege 2-3 Samen pro Topf etwa 1 cm tief in die Erde. Bedecke die Samen leicht mit Erde und gieße sie vorsichtig an.
3. Der richtige Standort: Stelle die Anzuchtgefäße an einen hellen und warmen Ort (ca. 18-20°C).
4. Feuchtigkeit: Halte die Erde gleichmäßig feucht, aber nicht nass. Am besten sprühst du die Erde regelmäßig mit einer Sprühflasche an.
5. Pikieren: Sobald die Keimlinge 2-3 echte Blätter haben (nicht nur die Keimblätter), kannst du sie pikieren. Das bedeutet, du setzt die stärksten Pflänzchen in größere Töpfe um, damit sie mehr Platz zum Wachsen haben. Sei dabei vorsichtig mit den Wurzeln!
Vorbereitung des Beetes:
Rosenkohl braucht einen sonnigen Standort und einen nährstoffreichen Boden.
1. Bodenvorbereitung: Lockere den Boden gründlich auf und entferne Unkraut.
2. Bodenverbesserung: Arbeite Kompost oder organischen Dünger in den Boden ein, um ihn mit Nährstoffen anzureichern. Rosenkohl ist ein Starkzehrer und braucht ausreichend Nahrung.
3. pH-Wert: Der ideale pH-Wert für Rosenkohl liegt zwischen 6,5 und 7,5. Du kannst den pH-Wert mit einem Bodentest überprüfen und gegebenenfalls mit Kalk anpassen.
Pflanzung der Jungpflanzen:
Jetzt geht es ans Eingemachte!
1. Abhärten: Bevor du die Jungpflanzen ins Freiland setzt, solltest du sie einige Tage lang abhärten. Das bedeutet, du stellst sie tagsüber für ein paar Stunden ins Freie, damit sie sich an die Sonne und die Temperaturen gewöhnen können.
2. Pflanzabstand: Pflanze die Rosenkohlpflanzen im Abstand von etwa 60-70 cm zueinander. Zwischen den Reihen solltest du etwa 70-80 cm Platz lassen.
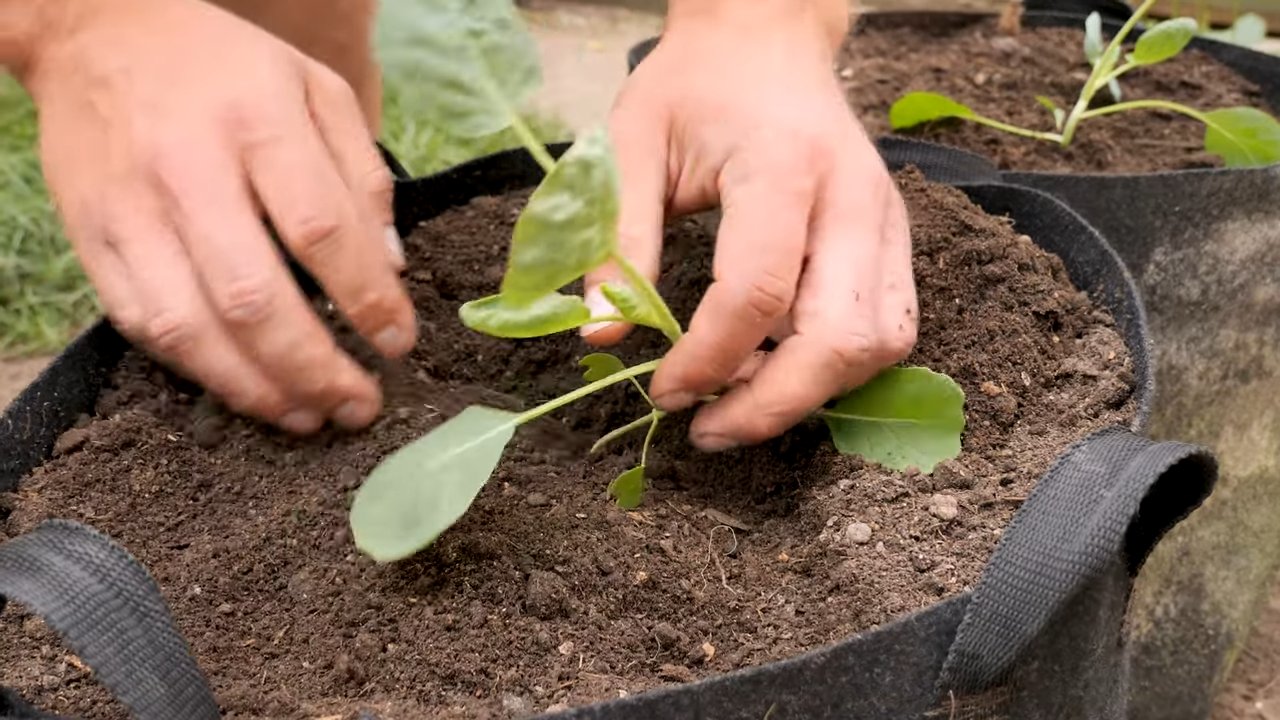
3. Pflanzloch: Grabe ein Pflanzloch, das etwas größer ist als der Wurzelballen der Jungpflanze.
4. Einsetzen der Pflanze: Setze die Jungpflanze vorsichtig in das Pflanzloch und fülle es mit Erde auf. Drücke die Erde leicht an.
5. Angießen: Gieße die Pflanzen nach dem Einsetzen gründlich an.
Pflege des Rosenkohls:
Rosenkohl braucht regelmäßige Pflege, um gut zu wachsen und viele Röschen zu bilden.
1. Gießen: Gieße die Pflanzen regelmäßig, besonders in trockenen Perioden. Achte darauf, dass der Boden immer leicht feucht ist, aber vermeide Staunässe.
2. Düngen: Dünge die Pflanzen regelmäßig mit einem organischen Dünger oder Kompost. Eine zusätzliche Düngung mit stickstoffbetontem Dünger im Sommer kann das Wachstum fördern.
3. Unkrautbekämpfung: Halte das Beet unkrautfrei, damit die Rosenkohlpflanzen nicht um Nährstoffe konkurrieren müssen.
4. Häufeln: Häufle die Pflanzen regelmäßig an, um sie zu stabilisieren und die Bildung von Seitentrieben zu fördern.
5. Schutz vor Schädlingen: Rosenkohl ist anfällig für verschiedene Schädlinge, wie Kohlweißlinge, Erdflöhe und Schnecken.
* Kohlweißlinge: Schütze die Pflanzen mit einem Netz oder Vlies vor den Raupen des Kohlweißlings.
* Erdflöhe: Halte den Boden feucht und streue Holzasche um die Pflanzen, um Erdflöhe abzuwehren.
* Schnecken: Verwende Schneckenkorn oder andere Schneckenabwehr, um die Pflanzen vor Schneckenfraß zu schützen.
6. Entfernen der unteren Blätter: Wenn die Rosenkohlpflanzen größer werden, kannst du die unteren Blätter entfernen, um die Luftzirkulation zu verbessern und die Bildung der Röschen zu fördern.
Erntezeit:
Die Erntezeit für Rosenkohl beginnt in der Regel im Herbst und dauert bis in den Winter hinein.
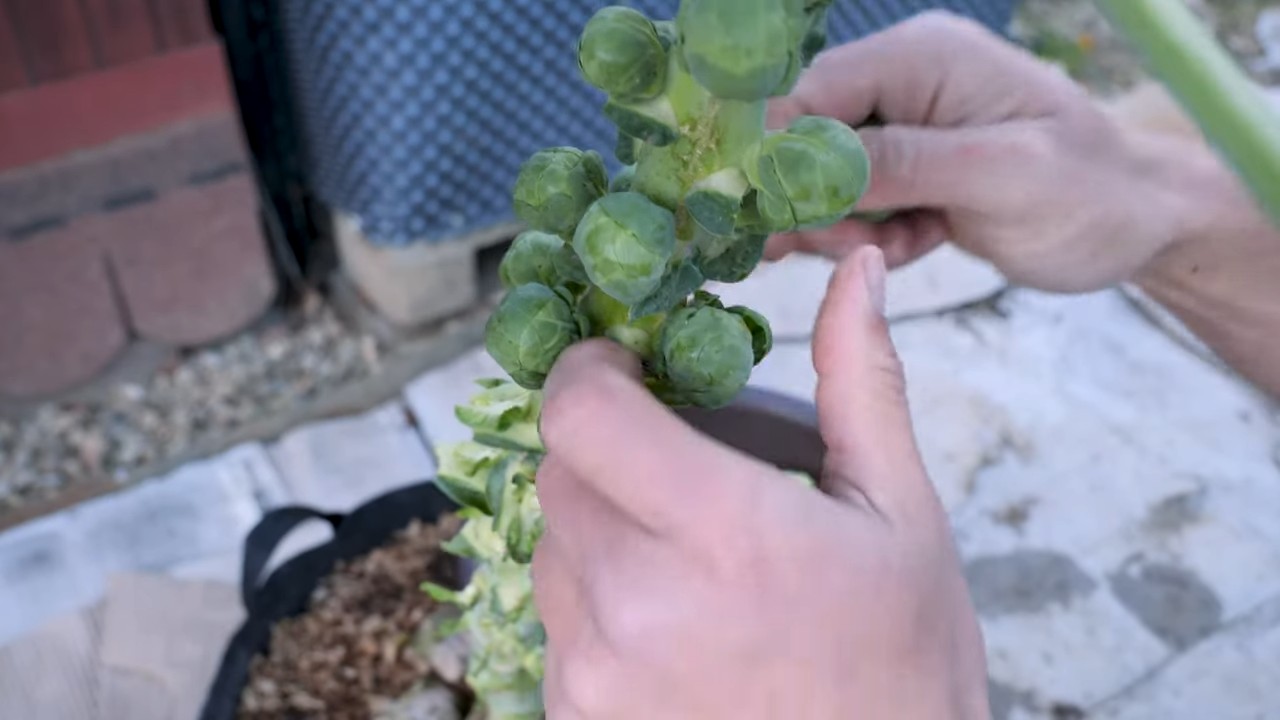
1. Reife: Die Röschen sind reif, wenn sie fest und geschlossen sind.
2. Ernten: Breche die Röschen von unten nach oben ab. Die unteren Röschen reifen zuerst.
3. Lagerung: Rosenkohl kann im Kühlschrank einige Tage gelagert werden. Du kannst ihn auch einfrieren, um ihn länger haltbar zu machen.
Zusätzliche Tipps und Tricks:
* Sortenwahl: Es gibt verschiedene Rosenkohlsorten, die sich in Reifezeit, Größe und Geschmack unterscheiden. Informiere dich vor dem Kauf über die verschiedenen Sorten und wähle diejenige aus, die am besten zu deinen Bedürfnissen passt.
* Mischkultur: Rosenkohl verträgt sich gut mit anderen Gemüsesorten, wie Salat, Spinat und Radieschen. Eine Mischkultur kann helfen, Schädlinge abzuwehren und den Boden zu verbessern.
* Nachhaltigkeit: Verwende organischen Dünger und Kompost, um den Boden zu schonen und die Umwelt zu schützen.
* Geduld: Rosenkohl braucht Zeit zum Wachsen. Sei geduldig und gib den Pflanzen die nötige Pflege, dann wirst du mit einer reichen Ernte belohnt.
Häufige Probleme und Lösungen:
* Gelbe Blätter: Gelbe Blätter können ein Zeichen für Nährstoffmangel sein. Dünge die Pflanzen mit einem stickstoffbetonten Dünger.
* Kleine Röschen: Kleine Röschen können durch Wassermangel oder Nährstoffmangel verursacht werden. Gieße die Pflanzen regelmäßig und dünge sie bei Bedarf.
* Schädlinge: Schütze die Pflanzen vor Schädlingen mit Netzen, Vlies oder anderen geeigneten Maßnahmen.
Rosenkohl im Topf anbauen:
Auch wenn du keinen Garten hast, kannst du Rosenkohl im Topf anbauen.
1. Topfgröße: Wähle einen Topf mit einem Durchmesser von mindestens 30 cm.
2. Erde: Verwende eine hochwertige Gartenerde, die mit Kompost angereichert ist.
3. Standort: Stelle den Topf an einen sonnigen Standort.
4. Pflege: Gieße und dünge die Pflanzen regelmäßig.
Rosenkohl überwintern:
Rosenkohl ist winterhart und kann im Beet überwintert werden.
1. Schutz: Schütze die Pflanzen vor starkem Frost mit einem Vlies oder Reisig.
2. Ernte: Du kannst die Röschen auch im Winter ernten.
Conclusion
So, there you have it! Growing Brussels sprouts, while it might seem intimidating at first, is entirely achievable for beginners with a little patience and the right approach. We’ve walked you through the entire process, from selecting the perfect variety to harvesting those delicious, miniature cabbages. The key takeaway is that consistent care, proper spacing, and diligent pest control are your best friends in this endeavor.
Why is this DIY trick a must-try? Because fresh, homegrown Brussels sprouts are simply incomparable to anything you can buy in the store. The flavor is sweeter, the texture is crisper, and the satisfaction of nurturing your own food from seed to table is immeasurable. Plus, you have complete control over the growing process, ensuring that your Brussels sprouts are free from harmful pesticides and grown with love.
But don’t stop there! Experiment with different varieties to discover your personal favorite. Try ‘Long Island Improved’ for a classic taste, or ‘Redarling’ for a visually stunning and slightly sweeter sprout. Consider companion planting with herbs like rosemary or thyme to deter pests and enhance the flavor of your Brussels sprouts. You can also try succession planting, sowing seeds every few weeks, to extend your harvest season.
And if you’re feeling adventurous, why not try roasting your Brussels sprouts with balsamic vinegar and bacon, or shredding them raw into a vibrant winter salad? The possibilities are endless!
We wholeheartedly encourage you to give growing Brussels sprouts a try. It’s a rewarding experience that will not only provide you with delicious, healthy food but also connect you with the natural world in a meaningful way. Don’t be afraid to get your hands dirty and embrace the challenges along the way. Remember, even experienced gardeners face setbacks, but the key is to learn from your mistakes and keep growing.
Most importantly, we want to hear about your experience! Share your tips, tricks, and triumphs in the comments below. Let us know what varieties you’ve tried, what challenges you’ve faced, and what delicious dishes you’ve created with your homegrown Brussels sprouts. Your insights will not only inspire other beginners but also help us all learn and grow together as a community of gardeners. So, grab your seeds, get planting, and let’s cultivate a bountiful harvest of delicious, homegrown Brussels sprouts! This **growing Brussels sprouts** guide is just the beginning of your journey.
Frequently Asked Questions (FAQ)
What if my Brussels sprouts plants are growing tall and leggy instead of producing sprouts?
This is a common issue and usually indicates that your plants aren’t getting enough sunlight. Brussels sprouts need at least 6-8 hours of direct sunlight per day to thrive. If your plants are in a shady location, consider transplanting them to a sunnier spot. If transplanting isn’t an option, you might need to supplement with grow lights. Also, ensure that you’re not over-fertilizing with nitrogen, as this can promote leafy growth at the expense of sprout production. A balanced fertilizer or one slightly higher in phosphorus and potassium is ideal.
My Brussels sprouts are bitter. What can I do to prevent this?
Bitterness in Brussels sprouts can be caused by several factors, including overwatering, underwatering, and harvesting too early. Consistent watering is crucial, especially during sprout formation. Avoid letting the soil dry out completely, but also ensure good drainage to prevent root rot. Harvesting after a frost can also help to sweeten the sprouts, as the cold temperatures convert starches into sugars. Finally, choose varieties known for their milder flavor.
How do I deal with pests like aphids and cabbage worms on my Brussels sprouts plants?
Pest control is essential for successful Brussels sprouts cultivation. For aphids, try spraying your plants with a strong stream of water to dislodge them. You can also use insecticidal soap or neem oil. For cabbage worms, handpicking them off the plants is often the most effective method, especially for smaller infestations. Bacillus thuringiensis (Bt) is a biological insecticide that is safe for humans and pets but deadly to cabbage worms. Row covers can also be used to prevent moths from laying eggs on your plants. Regularly inspect your plants for signs of pests and take action promptly to prevent infestations from becoming severe.
When is the best time to harvest my Brussels sprouts?
Brussels sprouts are typically ready for harvest 90-100 days after planting. The sprouts should be firm, tightly closed, and about 1-2 inches in diameter. Start harvesting from the bottom of the plant upwards, as the lower sprouts mature first. You can twist or snap them off the stem. Harvesting after a frost can improve the flavor. Don’t wait too long to harvest, as overripe sprouts can become loose and bitter.
Can I grow Brussels sprouts in containers?
Yes, you can grow Brussels sprouts in containers, but you’ll need a large container (at least 12-18 inches in diameter and depth) to accommodate their root system. Choose a well-draining potting mix and ensure that the container receives plenty of sunlight. Water regularly and fertilize every few weeks with a balanced fertilizer. Container-grown Brussels sprouts may not grow as large as those grown in the ground, but you can still harvest a decent crop.
What kind of soil is best for growing Brussels sprouts?
Brussels sprouts prefer well-drained, fertile soil with a pH of 6.0 to 7.5. Amend your soil with compost or other organic matter to improve drainage and fertility. If your soil is heavy clay, consider adding sand or perlite to improve drainage. A soil test can help you determine the pH and nutrient levels of your soil and make necessary adjustments.
How often should I water my Brussels sprouts plants?
Water your Brussels sprouts plants regularly, especially during dry periods. Aim to keep the soil consistently moist but not waterlogged. Water deeply and less frequently, rather than shallowly and more often. Mulching around the plants can help to retain moisture and suppress weeds.
Can I save seeds from my Brussels sprouts plants?
Saving seeds from Brussels sprouts can be tricky because they are often cross-pollinated. If you want to save seeds, you’ll need to isolate your plants from other members of the Brassica family (such as cabbage, kale, and broccoli) to prevent cross-pollination. Allow the plants to bolt (flower and produce seeds) in their second year. Collect the seeds when the pods are dry and brown. However, keep in mind that the resulting plants may not be true to type.
What are some good companion plants for Brussels sprouts?
Good companion plants for Brussels sprouts include herbs like rosemary, thyme, and sage, which can help to deter pests. Marigolds are also effective at repelling nematodes. Other beneficial companion plants include dill, chamomile, and nasturtiums. Avoid planting Brussels sprouts near strawberries or tomatoes, as they can inhibit growth.
How do I prevent my Brussels sprouts plants from falling over?
Brussels sprouts plants can become quite tall and top-heavy, especially when loaded with sprouts. To prevent them from falling over, you can stake them or hill the soil around the base of the plants. Staking involves inserting a sturdy stake next to the plant and tying the stem to the stake with twine. Hilling involves mounding soil around the base of the plant to provide extra support.
Leave a Comment