

Growing Big Onions at Home might seem like a challenge reserved for seasoned farmers, but I’m here to tell you it’s totally achievable, even in your own backyard! Forget those tiny, lackluster onions from the grocery store; imagine pulling plump, juicy onions straight from your garden, bursting with flavor.
For centuries, onions have been a staple in cuisines around the world, dating back to ancient civilizations. From the Egyptians who revered them to the Romans who carried them on their conquests, onions have always been valued for their culinary and medicinal properties. Now, you can tap into that rich history and cultivate your own onion bounty.
Why bother with the effort, you ask? Well, besides the unparalleled taste of homegrown produce, growing big onions at home offers a sense of accomplishment and connection to nature. Plus, you’ll know exactly what went into your food – no harmful pesticides or mysterious additives. In this article, I’m going to share some simple yet effective DIY tricks and hacks that will help you cultivate impressive onions, regardless of your gardening experience. Get ready to impress your friends and family with your green thumb and enjoy the delicious rewards of your labor!
Zwiebelglück: So ziehst du riesige Zwiebeln im eigenen Garten
Hallo liebe Gartenfreunde! Ich liebe Zwiebeln. Egal ob roh im Salat, karamellisiert zu Fleisch oder als Basis für eine leckere Suppe – Zwiebeln sind einfach unverzichtbar in meiner Küche. Und was gibt es Schöneres, als die eigenen, prallen Zwiebeln zu ernten? Ich zeige euch, wie ihr zu Hause riesige Zwiebeln ziehen könnt, die eure Nachbarn vor Neid erblassen lassen! Keine Angst, es ist einfacher als ihr denkt.
Was du für den Zwiebelanbau brauchst
Bevor wir loslegen, hier eine Liste mit allem, was du benötigst:
* Zwiebelsamen oder Steckzwiebeln: Ich empfehle dir, mit Steckzwiebeln zu beginnen, da sie einfacher zu handhaben sind und schneller Ergebnisse liefern. Achte auf Sorten, die für ihre Größe bekannt sind, wie z.B. ‘Ailsa Craig’ oder ‘Kelsae’.
* Anzuchterde (optional): Wenn du deine Zwiebeln aus Samen ziehen möchtest.
* Töpfe oder Anzuchtschalen (optional): Für die Anzucht aus Samen.
* Gartenboden: Lockere, gut durchlässige Erde ist ideal.
* Kompost oder gut verrotteter Mist: Für die Bodenverbesserung.
* Organischer Dünger: Zwiebeln sind Starkzehrer und brauchen ausreichend Nährstoffe.
* Gießkanne oder Gartenschlauch: Für die Bewässerung.
* Gartenwerkzeug: Spaten, Harke, Pflanzkelle.
* Geduld: Zwiebeln brauchen Zeit, um zu wachsen!
Die Vorbereitung ist das A und O
Bevor du mit dem Pflanzen beginnst, ist eine gute Vorbereitung entscheidend für den Erfolg.
Boden vorbereiten
1. Boden lockern: Grabe den Boden gründlich um, am besten bis zu einer Tiefe von 30 cm. Entferne dabei Steine, Wurzeln und Unkraut.
2. Boden verbessern: Mische reichlich Kompost oder gut verrotteten Mist unter die Erde. Das verbessert die Bodenstruktur und versorgt die Zwiebeln mit wichtigen Nährstoffen. Ich gebe immer eine ordentliche Schaufel voll pro Quadratmeter dazu.
3. Düngen: Arbeite einen organischen Dünger in den Boden ein. Achte auf einen Dünger mit einem hohen Phosphor- und Kaliumanteil, da diese Nährstoffe das Wurzelwachstum und die Zwiebelbildung fördern.
4. Boden ebnen: Harke den Boden glatt, um eine ebene Pflanzfläche zu erhalten.
Steckzwiebeln vorbereiten
1. Steckzwiebeln auswählen: Wähle gesunde, feste Steckzwiebeln aus. Vermeide weiche oder schimmelige Zwiebeln.
2. Steckzwiebeln sortieren: Sortiere die Steckzwiebeln nach Größe. Pflanze gleich große Zwiebeln zusammen, damit sie gleichmäßig wachsen.
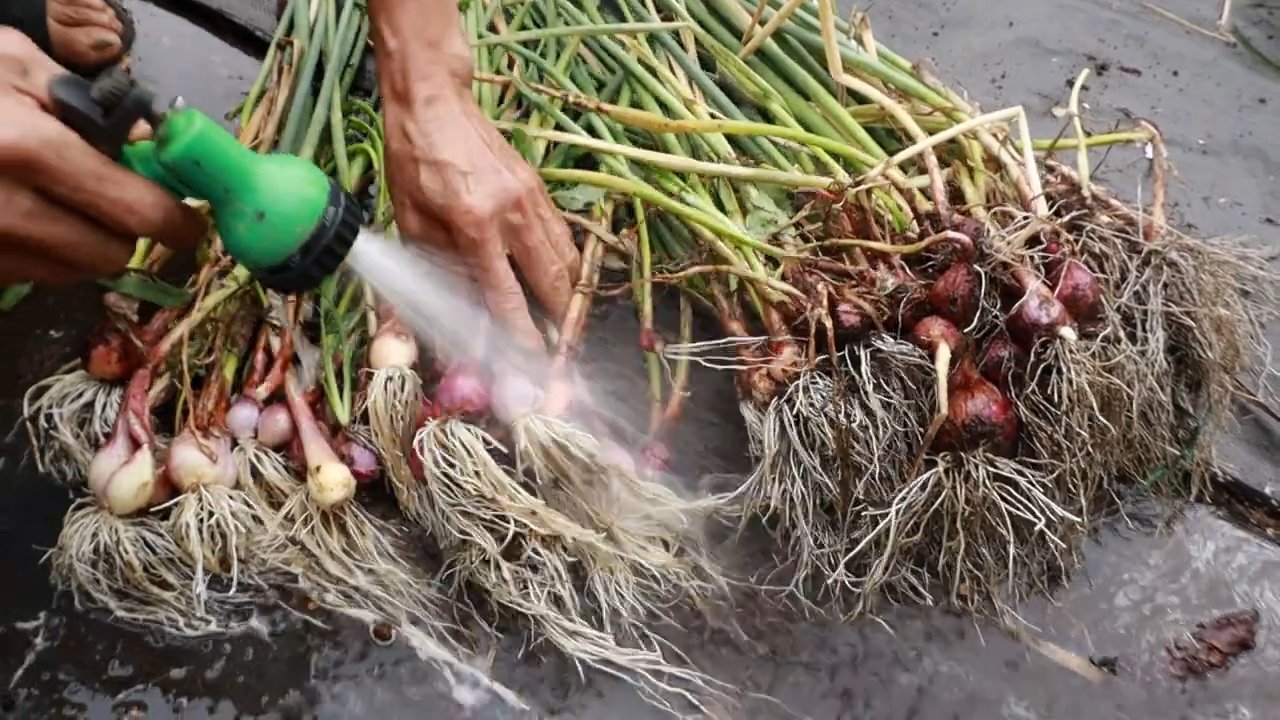
3. Steckzwiebeln kurz wässern (optional): Du kannst die Steckzwiebeln vor dem Pflanzen kurz in Wasser legen, um sie zu rehydrieren. Das fördert das Anwachsen.
Zwiebeln pflanzen: Schritt für Schritt
Jetzt geht es ans Eingemachte! Hier zeige ich dir, wie du deine Zwiebeln richtig pflanzt.
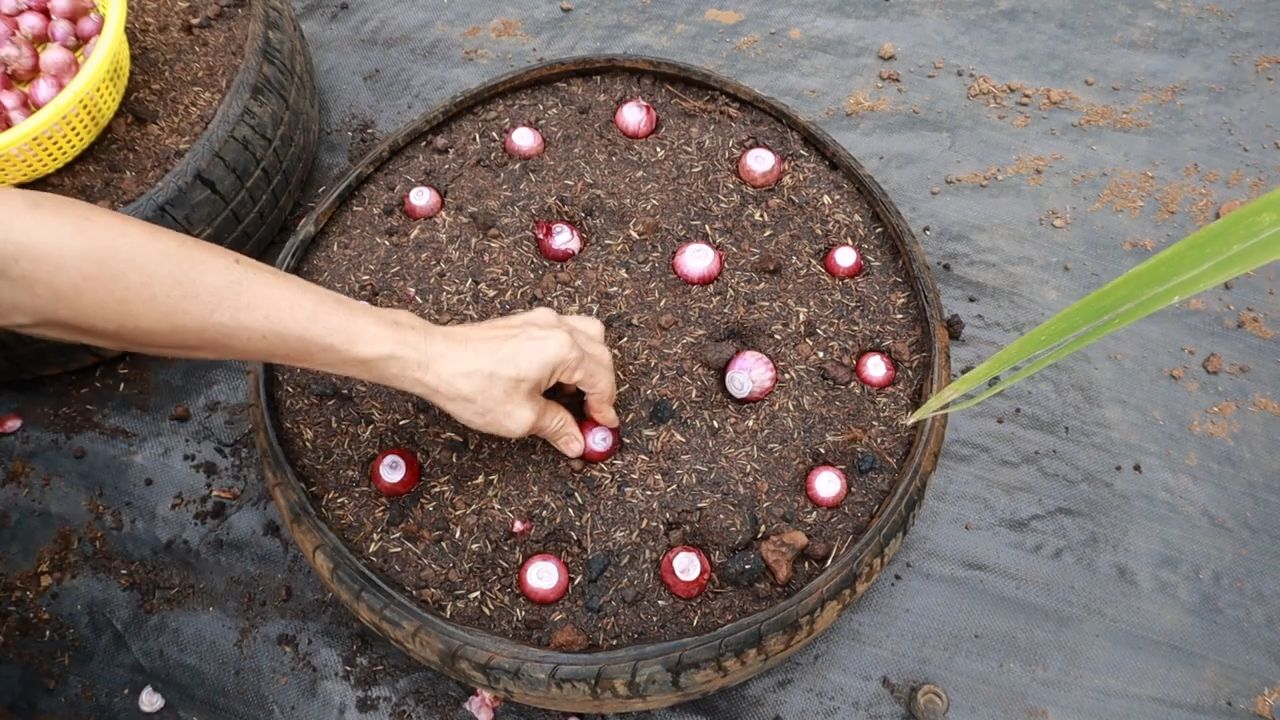
1. Pflanzzeitpunkt wählen: Der beste Zeitpunkt zum Pflanzen von Steckzwiebeln ist im Frühjahr (März/April), sobald der Boden frostfrei ist. Für die Aussaat von Zwiebelsamen beginnst du am besten im Februar/März im Haus.
2. Pflanzabstand beachten: Pflanze die Steckzwiebeln in einem Abstand von 10-15 cm in der Reihe und 20-30 cm zwischen den Reihen. So haben die Zwiebeln genügend Platz zum Wachsen.
3. Pflanztiefe bestimmen: Stecke die Zwiebeln so tief in die Erde, dass nur die Spitze herausschaut. Drücke die Erde leicht an.
4. Gießen: Gieße die Zwiebeln nach dem Pflanzen gründlich an.
Zwiebeln aus Samen ziehen (optional)
Wenn du dich traust, kannst du deine Zwiebeln auch aus Samen ziehen. Das ist zwar etwas aufwendiger, aber du hast eine größere Sortenvielfalt zur Auswahl.
1. Aussaat im Haus: Säe die Zwiebelsamen im Februar/März in Anzuchtschalen oder Töpfe mit Anzuchterde aus. Bedecke die Samen leicht mit Erde und halte sie feucht.
2. Keimung: Stelle die Anzuchtschalen an einen hellen, warmen Ort. Die Samen keimen in der Regel innerhalb von 1-2 Wochen.
3. Pikieren: Sobald die Sämlinge groß genug sind (ca. 5-7 cm), pikierst du sie in größere Töpfe oder Anzuchtschalen.
4. Auspflanzen: Ab Mitte Mai, nach den Eisheiligen, kannst du die Jungpflanzen ins Freiland auspflanzen. Achte dabei auf den gleichen Pflanzabstand wie bei Steckzwiebeln.
Die richtige Pflege für dicke Zwiebeln
Damit deine Zwiebeln prächtig gedeihen, ist die richtige Pflege unerlässlich.
Bewässerung
1. Regelmäßig gießen: Zwiebeln brauchen regelmäßig Wasser, besonders während der Wachstumsphase. Achte darauf, dass der Boden immer leicht feucht ist, aber vermeide Staunässe.
2. Gießmenge anpassen: Die Gießmenge hängt von der Witterung und dem Boden ab. An heißen Tagen musst du möglicherweise täglich gießen.
Düngung
1. Nachdüngen: Zwiebeln sind Starkzehrer und brauchen während der Wachstumsphase zusätzliche Nährstoffe. Dünge die Zwiebeln alle 2-3 Wochen mit einem organischen Dünger.
2. Stickstoff vermeiden: Vermeide eine stickstoffbetonte Düngung, da dies das Blattwachstum fördert und die Zwiebelbildung beeinträchtigen kann.
Unkrautbekämpfung
1. Unkraut jäten: Halte das Beet unkrautfrei, da Unkraut den Zwiebeln Nährstoffe und Wasser entzieht.
2. Mulchen: Eine Mulchschicht aus Stroh oder Rasenschnitt kann helfen, das Unkrautwachstum zu unterdrücken und den Boden feucht zu halten.
Schutz vor Schädlingen und Krankheiten
1. Zwiebelfliege: Die Zwiebelfliege kann großen Schaden anrichten. Schütze deine Zwiebeln mit einem Kulturschutznetz.
2. Falscher Mehltau: Falscher Mehltau ist eine Pilzkrankheit, die bei feuchtem Wetter auftreten kann. Sorge für eine gute Belüftung und entferne befallene Blätter.
3. Vorbeugende Maßnahmen: Eine gute Fruchtfolge und der Anbau von resistenten Sorten können helfen, Krankheiten und Schädlinge zu vermeiden.
Erntezeit: Wenn die Zwiebeln reif sind
Die Erntezeit ist der Höhepunkt der Zwiebelzucht!
1. Erntezeitpunkt erkennen: Die Zwiebeln sind reif, wenn das Laub gelb wird und umknickt.
2. Zwiebeln ernten: Ziehe die Zwiebeln vorsichtig aus der Erde.
3. Trocknen: Lasse die Zwiebeln einige Tage an einem trockenen, luftigen Ort trocknen.
4. Lagern: Lagere die getrockneten Zwiebeln an einem kühlen, dunklen und trockenen Ort. So halten sie sich mehrere Monate.
Extra-Tipps für riesige Zwiebeln
Hier noch ein paar Geheimtipps, die ich im Laufe der Jahre gelernt habe:
* Regelmäßig die Blütenstände entfernen: Wenn deine Zwiebeln Blütenstände bilden, entferne diese sofort. Das lenkt die Energie der Pflanze in die Zwiebelbildung.
* Boden auflockern: Lockere den Boden regelmäßig um die Zwiebeln herum auf, um die Belüftung zu verbessern.
*
Conclusion
So, there you have it! Unlocking the secret to growing big onions at home isn’t some mystical art reserved for seasoned gardeners. It’s a combination of understanding the onion’s needs, providing the right environment, and employing a few simple, yet effective, DIY tricks. This method, focusing on nutrient-rich soil amendments and strategic watering, is a game-changer for anyone dreaming of harvesting those impressive, tear-inducing bulbs.
Why is this DIY trick a must-try? Because it empowers you to take control of your onion-growing destiny! No more settling for small, lackluster onions from the grocery store. Imagine the satisfaction of slicing into a homegrown onion, bursting with flavor and knowing you nurtured it from seedling to substantial size. Beyond the bragging rights, this method often yields onions that are denser, more flavorful, and store longer than commercially grown varieties. Plus, you know exactly what went into growing them – no mystery chemicals or questionable practices.
But the beauty of this DIY approach lies in its adaptability. Feel free to experiment! For instance, instead of bone meal, try using rock phosphate as a phosphorus source. If you live in an area with acidic soil, consider adding lime to raise the pH to the optimal range for onions (around 6.0 to 6.8). You can also explore different varieties of onions to see which thrive best in your specific climate and soil conditions. Some gardeners swear by long-day onions in northern regions and short-day onions in southern regions.
Consider companion planting! Carrots, marigolds, and chamomile are known to deter onion pests and improve overall garden health. Interplanting these with your onions can create a more balanced and productive ecosystem.
Don’t be afraid to tweak the watering schedule based on your local weather. If you’re experiencing a particularly dry spell, increase the frequency of watering. Conversely, if it’s been raining heavily, hold back on watering to prevent root rot. The key is to observe your plants closely and adjust your approach accordingly.
We wholeheartedly encourage you to give this DIY trick a try. It’s a rewarding experience that connects you with nature and provides you with delicious, homegrown onions. The process is not only fulfilling but also educational, teaching you valuable lessons about soil science, plant nutrition, and the interconnectedness of the garden ecosystem.
And most importantly, we want to hear about your experience! Did you grow the biggest onions of your life? Did you encounter any challenges along the way? What variations did you try? Share your stories, tips, and photos in the comments below. Let’s create a community of onion-growing enthusiasts and learn from each other’s successes and failures. Together, we can unlock the full potential of our gardens and enjoy the bounty of homegrown produce. Remember, the journey of growing big onions is just as rewarding as the harvest itself. So, grab your gardening gloves, prepare your soil, and get ready to witness the magic of this simple yet powerful DIY trick. Happy growing!
Frequently Asked Questions (FAQ)
What kind of soil is best for growing big onions?
Onions thrive in well-drained, fertile soil that is rich in organic matter. A sandy loam soil is ideal, as it allows for good drainage while still retaining moisture. Amend your soil with compost, well-rotted manure, or other organic materials to improve its structure and fertility. The soil pH should be slightly acidic to neutral, ideally between 6.0 and 6.8. Conduct a soil test to determine your soil’s pH and nutrient levels, and amend accordingly.
How often should I water my onions?
Onions need consistent moisture, especially during bulb formation. Water deeply and regularly, aiming for about 1 inch of water per week. Avoid overwatering, as this can lead to root rot. Check the soil moisture regularly by sticking your finger about an inch into the soil. If it feels dry, it’s time to water. During hot, dry weather, you may need to water more frequently. Reduce watering as the onions mature and the tops begin to fall over.
What are the best fertilizers for growing big onions?
Onions are heavy feeders and require a balanced fertilizer with a higher phosphorus content to promote root development and bulb formation. A fertilizer with an NPK ratio of 10-20-10 or similar is a good choice. Apply fertilizer according to the package instructions, typically every 2-3 weeks during the growing season. You can also supplement with organic fertilizers such as bone meal, fish emulsion, or compost tea. Avoid over-fertilizing, as this can lead to excessive foliage growth at the expense of bulb development.
How do I prevent onion pests and diseases?
Several pests and diseases can affect onions, including onion maggots, thrips, and fungal diseases like downy mildew and botrytis blight. To prevent these problems, practice good garden hygiene, such as removing plant debris and weeds. Rotate your crops each year to avoid building up pest and disease populations in the soil. Use row covers to protect your onions from pests. Apply organic pesticides or fungicides as needed, following the manufacturer’s instructions carefully. Ensure good air circulation around your plants to reduce the risk of fungal diseases.
When is the best time to harvest onions?
Onions are typically ready to harvest when the tops begin to fall over and turn yellow or brown. This usually occurs in late summer or early fall, depending on the variety and your climate. Once the tops have fallen over, stop watering and allow the onions to dry in the ground for a few days. Then, carefully dig up the onions, being careful not to damage the bulbs. Cure the onions by laying them out in a dry, well-ventilated place for 2-3 weeks. This allows the outer layers to dry and toughen, which helps to prevent spoilage during storage.
Can I grow onions from sets or seeds?
Yes, you can grow onions from either sets or seeds. Sets are small, immature onion bulbs that are easier to plant and grow faster than seeds. However, they may be more prone to bolting (going to seed) if exposed to cold temperatures. Seeds offer a wider variety of options and are generally less expensive than sets. Start onion seeds indoors 8-10 weeks before the last frost, or direct sow them in the garden after the last frost.
What are some good companion plants for onions?
Onions benefit from companion planting with several other vegetables and herbs. Carrots deter onion flies, while onions deter carrot rust flies. Marigolds repel nematodes and other soil pests. Chamomile attracts beneficial insects and improves soil health. Other good companion plants for onions include lettuce, tomatoes, peppers, and cabbage. Avoid planting onions near beans or peas, as they can inhibit each other’s growth.
How do I store my harvested onions?
Proper storage is essential for extending the shelf life of your harvested onions. After curing, trim the roots and tops of the onions, leaving about 1-2 inches of the neck. Store the onions in a cool, dry, and well-ventilated place, such as a basement or pantry. Use mesh bags or crates to allow for good air circulation. Avoid storing onions near potatoes, as they can cause each other to spoil more quickly. Properly stored onions can last for several months.
What if my onions start to bolt (go to seed)?
Bolting is when an onion plant prematurely sends up a flower stalk, which can reduce the size and quality of the bulb. Bolting is often triggered by cold temperatures or stress. If your onions start to bolt, you can still harvest them, but they may not store as well. Use bolted onions as soon as possible, as they tend to be more pungent and less sweet than non-bolted onions. To prevent bolting, choose onion varieties that are well-suited to your climate and avoid exposing them to cold temperatures.

Leave a Comment