

Grow Snap Peas Indoors? Absolutely! Imagine harvesting crisp, sweet snap peas right from your kitchen, even when the weather outside is frightful. Forget those sad, flavorless supermarket versions – we’re talking about homegrown goodness, bursting with sunshine (or grow light, at least!).
For centuries, humans have cultivated peas, with evidence suggesting their domestication dates back to the Near East. While traditionally grown outdoors, the desire for fresh produce year-round has led to innovative indoor gardening techniques. And that’s where this DIY guide comes in!
Let’s face it, waiting for spring to arrive can feel like an eternity, especially when you’re craving the taste of fresh vegetables. Plus, not everyone has access to a sprawling garden. That’s why learning how to grow snap peas indoors is a game-changer. I’m going to show you how to bypass the weather and space constraints, bringing the joy of gardening right into your home. This DIY project is not only rewarding but also a fantastic way to add fresh, healthy ingredients to your meals. Get ready to enjoy a continuous supply of delicious snap peas, no matter the season!
Growing Snap Peas Indoors: A Complete DIY Guide
Hey there, fellow plant enthusiasts! Ever dreamt of fresh, crunchy snap peas right at your fingertips, even when the weather outside is frightful? Well, dream no more! I’m going to walk you through the surprisingly simple process of growing snap peas indoors. Get ready to enjoy a taste of spring, no matter the season!
What You’ll Need
Before we dive in, let’s gather our supplies. Here’s a checklist to make sure you’re all set:
* Snap Pea Seeds: Choose a bush variety specifically bred for smaller spaces. I personally love ‘Sugar Ann’ or ‘Bush Champion’ for indoor growing.
* Large Containers: Think big! Snap peas need room for their roots to spread. I recommend containers that are at least 6-8 inches deep and wide. Fabric pots are great because they allow for good drainage and air circulation.
* Well-Draining Potting Mix: This is crucial! Avoid garden soil, as it’s too heavy and can compact. Opt for a high-quality potting mix designed for vegetables.
* Grow Lights: Unless you have a super sunny south-facing window, you’ll need grow lights. Snap peas need at least 6-8 hours of direct light per day. LED grow lights are energy-efficient and work wonders.
* Trellis or Support System: Even bush varieties can get a little leggy, so a small trellis or some stakes will help keep them upright.
* Watering Can or Spray Bottle: For gentle watering.
* Optional: Liquid fertilizer formulated for vegetables.
Getting Started: Planting Your Snap Peas
Okay, let’s get our hands dirty! This is the fun part.
1. Soaking the Seeds: To give your seeds a head start, soak them in lukewarm water for 12-24 hours before planting. This helps soften the seed coat and encourages faster germination. I usually put them in a small bowl on the counter.
2. Preparing the Containers: Fill your containers with the well-draining potting mix, leaving about an inch of space at the top. Gently pat down the soil to remove any large air pockets.
3. Sowing the Seeds: Plant the seeds about 1 inch deep and 2-3 inches apart. I usually plant 3-4 seeds per container to ensure at least one sprouts.
4. Watering: Gently water the soil until it’s evenly moist but not soggy. You want the soil to feel like a wrung-out sponge.
5. Finding the Right Spot: Place your containers in a warm location (around 65-70°F) with access to plenty of light. If you’re using grow lights, position them a few inches above the soil surface.
Nurturing Your Snap Peas: From Seedling to Harvest
Now comes the waiting game, but don’t worry, it’s not too long!
1. Germination: Keep the soil consistently moist. You should see seedlings emerge in about 7-14 days.
2. Thinning: Once the seedlings have a few sets of true leaves (the leaves that look like miniature pea leaves), thin them out to the strongest one per container or every 4-6 inches if you planted multiple seeds in a larger container. I know it’s hard to choose, but it’s necessary for healthy growth!
3. Watering: Water regularly, allowing the top inch of soil to dry out between waterings. Overwatering can lead to root rot, so be careful. I usually check the soil moisture with my finger before watering.
4. Lighting: Ensure your snap peas are getting enough light. If you’re using grow lights, adjust their height as the plants grow to keep them a few inches above the foliage. If you’re using natural light, rotate the containers regularly to ensure even growth.
5. Support System: As your snap peas grow, they’ll need support. Install a small trellis or insert stakes into the containers and gently tie the vines to them with twine. This will prevent them from sprawling and becoming tangled.
6. Fertilizing (Optional): If you notice your plants are looking pale or growing slowly, you can supplement with a liquid fertilizer formulated for vegetables. Follow the instructions on the fertilizer label carefully. I usually fertilize every 2-3 weeks.
7. Pest Control: Keep an eye out for common pests like aphids or spider mites. If you spot any, you can try spraying them with insecticidal soap or neem oil. I prefer to use organic methods whenever possible.
Harvest Time: Enjoying Your Homegrown Snap Peas
This is the moment you’ve been waiting for!
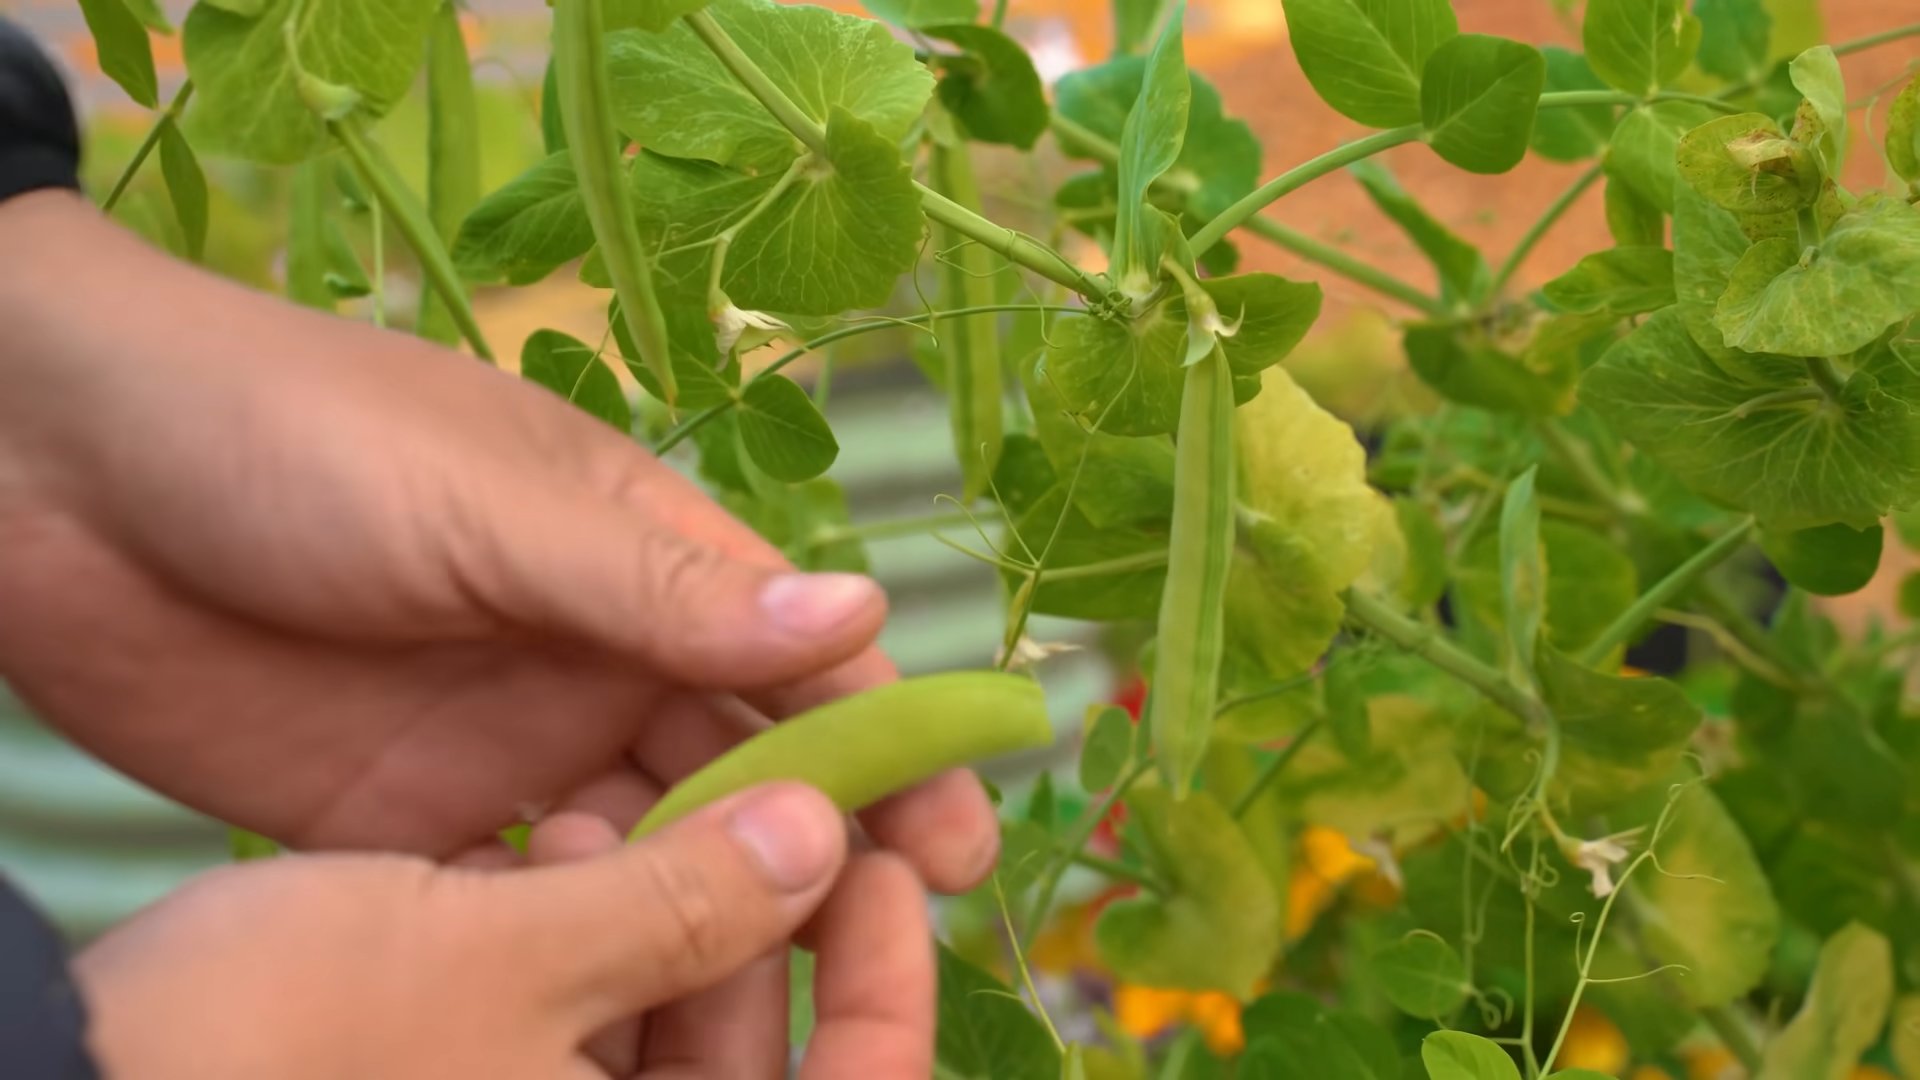
1. When to Harvest: Snap peas are ready to harvest when the pods are plump and the peas inside are well-developed but not too large. The pods should be bright green and snap easily when bent.
2. How to Harvest: Gently snap the pods off the vine with your fingers. Be careful not to damage the plant.
3. Enjoying Your Harvest: Snap peas are delicious eaten raw, steamed, stir-fried, or added to salads. They’re a healthy and flavorful addition to any meal.
4. Successive Planting: To extend your harvest, you can plant new seeds every few weeks. This will ensure a continuous supply of fresh snap peas.
Troubleshooting: Common Issues and Solutions
Even with the best care, you might encounter a few challenges along the way. Here are some common issues and how to address them:
* Yellowing Leaves: This could be a sign of overwatering, underwatering, or nutrient deficiency. Check the soil moisture and adjust your watering accordingly. If the soil is consistently moist, reduce watering. If it’s dry, water more frequently. You can also try fertilizing with a balanced fertilizer.
* Leggy Growth: This usually indicates insufficient light. Move your plants to a brighter location or increase the intensity of your grow lights.
* Lack of Pods: This could be due to a lack of pollination. While snap peas are self-pollinating, you can help the process along by gently shaking the plants or using a small paintbrush to transfer pollen from one flower to another.
* Pests: As mentioned earlier, keep an eye out for pests and treat them promptly with insecticidal soap or neem oil.
Choosing the Right Snap Pea Variety for Indoors
Not all snap pea varieties are created equal, especially when it comes to indoor growing. You’ll want to prioritize bush varieties that are compact and don’t require extensive trellising. Here are a few of my top recommendations:
* Sugar Ann: This is a super early variety that produces sweet, crunchy pods in just 50-60 days. It’s compact and well-suited for containers.
* Bush Champion: As the name suggests, this variety is a champion when it comes to bush-type snap peas. It’s productive and disease-resistant.
* Sugar Bon: This is another excellent bush variety that produces sweet, tender pods. It’s also relatively compact and easy to grow in containers.
Optimizing Your Indoor Growing Environment
To maximize your success with indoor snap peas, consider these environmental factors:
* Temperature: Snap peas prefer temperatures between 60-75°F. Avoid exposing them to extreme temperatures or drafts.
* Humidity: While snap peas aren’t overly sensitive to humidity, they do appreciate moderate humidity levels. You can increase humidity by placing a tray of water near the plants or using a humidifier.
* Air Circulation: Good air circulation is essential for preventing fungal diseases. Ensure there’s adequate airflow around your plants by spacing them properly and using a small fan if necessary.
Extra Tips for Success
Here are a few extra tips to help you grow the best indoor snap peas possible:
* Use a self-watering container: This can help prevent overwatering and underwatering, especially if you’re prone to forgetting to water your plants.
* Rotate your plants regularly: This will ensure that all sides of the plant receive equal light exposure, preventing them from leaning towards the light source.
* Pinch off the growing tips: This will encourage the plant to produce more side shoots and more pods.
* Don’t be afraid to experiment: Every growing environment is different, so don’t be afraid to experiment with different techniques to find what works best for you.
Growing snap peas indoors is a rewarding experience that allows you to enjoy fresh, delicious produce year-round. With a little bit of care and attention, you can have a thriving indoor garden that provides you with a continuous supply of snap peas. Happy growing!

Conclusion
So, there you have it! Growing snap peas indoors is not only achievable, but it’s also a remarkably rewarding experience. Imagine fresh, crisp snap peas right at your fingertips, even when the weather outside is frightful. This DIY project brings a touch of spring into your home, offering a continuous supply of delicious, healthy snacks and ingredients for your favorite dishes.
Why is this a must-try? Because it’s more than just growing food; it’s about connecting with nature, learning new skills, and enjoying the satisfaction of nurturing something from seed to harvest. It’s a fantastic way to introduce children to gardening, providing a hands-on learning experience about plant life cycles and the importance of fresh produce. Plus, it’s a sustainable way to reduce your reliance on store-bought vegetables, minimizing your carbon footprint and ensuring you know exactly where your food comes from.
But the best part? The taste! Homegrown snap peas, bursting with sweetness and a satisfying crunch, are simply incomparable to those you find in the grocery store. The difference is truly remarkable.
Looking for variations? Absolutely! Consider experimenting with different varieties of snap peas. Some are bushier and more compact, ideal for smaller spaces, while others are climbing varieties that will thrive with a taller trellis. You can also try companion planting. Herbs like basil and mint can deter pests and enhance the flavor of your snap peas. Marigolds are another excellent choice, adding a splash of color and further protecting your plants from unwanted visitors.
Another fun variation is to use different types of containers. While we’ve discussed using pots, you could also repurpose items like old buckets or even create a vertical garden using recycled materials. Get creative and find what works best for your space and aesthetic.
Don’t be afraid to experiment with different lighting conditions as well. While a sunny windowsill is ideal, you might find that supplementing with a grow light during the darker months can significantly boost your yield. Observe your plants closely and adjust your setup as needed.
Ultimately, the key to success with growing snap peas indoors is observation and adaptation. Pay attention to your plants’ needs, adjust your watering schedule based on the humidity levels in your home, and don’t be afraid to troubleshoot any issues that arise. Remember, gardening is a learning process, and every mistake is an opportunity to grow (pun intended!).
We wholeheartedly encourage you to give this DIY trick a try. It’s easier than you might think, and the rewards are well worth the effort. Once you’ve harvested your first batch of homegrown snap peas, we’d love to hear about your experience! Share your photos, tips, and any challenges you encountered in the comments below. Let’s create a community of indoor gardeners and inspire others to embrace the joy of growing their own food. So, grab some seeds, prepare your soil, and get ready to enjoy the deliciousness of fresh, homegrown snap peas! This is your chance to master the art of growing snap peas indoors and enjoy the fruits (or rather, vegetables) of your labor all year round.
FAQ
What are the best snap pea varieties to grow indoors?
Choosing the right variety is crucial for indoor success. Bush varieties like ‘Sugar Ann’ or ‘Sugar Daddy’ are generally recommended because they are more compact and don’t require as much vertical space as climbing varieties. However, if you have ample vertical space and a sturdy trellis, you can certainly try climbing varieties like ‘Sugar Snap’ or ‘Super Sugar Snap.’ Just be prepared to provide adequate support for their growth. Consider the size of your growing space and the amount of light available when making your selection. Read seed packet descriptions carefully to understand the specific needs of each variety.
How much light do snap peas need when grown indoors?
Snap peas are sun-loving plants and require at least 6-8 hours of direct sunlight per day. A south-facing window is usually the best option. However, if you don’t have access to sufficient natural light, you’ll need to supplement with grow lights. Fluorescent or LED grow lights are excellent choices. Position the lights about 6-12 inches above the plants and keep them on for 12-16 hours per day. Monitor your plants closely for signs of insufficient light, such as leggy growth or pale leaves. Adjust the position of the lights or increase the duration of illumination as needed.
What type of soil is best for growing snap peas indoors?
Snap peas thrive in well-draining, fertile soil. A good potting mix specifically formulated for vegetables is ideal. Avoid using garden soil, as it can be too heavy and may contain pests or diseases. You can also create your own potting mix by combining equal parts of peat moss, perlite, and vermiculite. Ensure that the soil is loose and airy to allow for proper root development. Before planting, amend the soil with compost or other organic matter to provide essential nutrients.
How often should I water my indoor snap peas?
Watering frequency depends on several factors, including the size of the container, the type of soil, and the humidity levels in your home. Generally, you should water your snap peas when the top inch of soil feels dry to the touch. Avoid overwatering, as this can lead to root rot. Ensure that the container has drainage holes to allow excess water to escape. During warmer months or in drier climates, you may need to water more frequently. Check the soil moisture regularly and adjust your watering schedule accordingly.
What kind of support do snap peas need indoors?
Climbing varieties of snap peas require a trellis or other support structure to grow properly. Even bush varieties can benefit from some support to prevent them from sprawling. You can use a variety of materials to create a trellis, such as bamboo stakes, netting, or even repurposed household items. Ensure that the support is sturdy enough to hold the weight of the mature plants. Position the trellis close to the plants so that they can easily attach themselves. As the plants grow, gently guide the tendrils towards the support.
How do I deal with pests and diseases on my indoor snap peas?
While indoor plants are generally less susceptible to pests and diseases than outdoor plants, they can still be affected. Common pests that may attack snap peas include aphids, spider mites, and whiteflies. Regularly inspect your plants for signs of infestation, such as sticky residue, webbing, or distorted leaves. If you detect pests, you can try washing them off with a strong stream of water or using insecticidal soap. For diseases, ensure good air circulation and avoid overwatering. If you notice any signs of disease, such as spots or lesions on the leaves, remove the affected foliage immediately.
When can I harvest my indoor snap peas?
Snap peas are typically ready to harvest about 60-70 days after planting. The pods should be plump and filled with peas, but still tender and crisp. Harvest them regularly to encourage continued production. Simply snap the pods off the vine when they are ready. The more you harvest, the more the plant will produce. Enjoy your fresh, homegrown snap peas in salads, stir-fries, or as a healthy snack!
Leave a Comment