

Grow Romanesco Cauliflower, and you’ll not only have a stunningly beautiful vegetable gracing your garden, but you’ll also be the envy of all your neighbors! Forget boring broccoli and predictable peas; we’re diving into the world of fractal food! For centuries, Romanesco cauliflower has captivated gardeners and mathematicians alike with its mesmerizing spiral patterns, a testament to nature’s inherent artistry. Originating in Italy, this unique vegetable has a rich history, often associated with Renaissance gardens and culinary innovation.
But beyond its aesthetic appeal, why should you bother to grow Romanesco Cauliflower? Well, for starters, it’s packed with vitamins and nutrients, making it a healthy and delicious addition to your diet. Plus, let’s be honest, who wouldn’t want to impress their dinner guests with a vegetable that looks like it belongs in a sci-fi movie? I know I would! This DIY guide will walk you through every step, from selecting the right seeds to harvesting your own perfectly spiraled Romanesco heads. We’ll cover common pitfalls, offer insider tips, and ensure you have a successful and rewarding gardening experience. Get ready to unlock the secrets to cultivating this captivating vegetable and transform your garden into a work of art!
Growing Romanesco Cauliflower: A Step-by-Step Guide to Fractal Fun!
Okay, let’s dive into the fascinating world of Romanesco cauliflower! This isn’t your grandma’s boring white cauliflower. We’re talking about a vibrant, lime-green vegetable with a stunning fractal pattern that’s as delicious as it is beautiful. I’m going to walk you through everything you need to know to successfully grow your own Romanesco, from seed to harvest. Get ready to impress your friends and family with this unique addition to your garden!
Choosing the Right Variety and Starting Seeds
First things first, you need to get your hands on some Romanesco seeds. Look for varieties specifically labeled “Romanesco” or “Romanesco Broccoli.” They’re usually available at most garden centers or online seed suppliers.
* Seed Starting Time: Romanesco needs a long growing season, typically 75-100 days from transplant. This means you’ll likely need to start your seeds indoors 6-8 weeks before the last expected frost in your area. Check your local frost dates to be sure!
* Seed Starting Mix: Use a good quality seed starting mix. This is important because it’s sterile and provides the right nutrients for young seedlings.
* Containers: You can use seed trays, peat pots, or even recycled yogurt containers (with drainage holes, of course!). I personally prefer seed trays with individual cells because they make transplanting easier.
* Lighting: Seedlings need plenty of light to grow strong and healthy. If you don’t have a sunny windowsill, consider using grow lights. I use a simple fluorescent shop light, and it works great.
Now, let’s get those seeds planted!
1. Moisten the Seed Starting Mix: Before you fill your containers, moisten the seed starting mix with water. You want it to be damp but not soggy.
2. Fill the Containers: Fill your chosen containers with the moistened seed starting mix, leaving about half an inch of space at the top.
3. Sow the Seeds: Plant the seeds about ¼ inch deep in the soil. I usually plant 2-3 seeds per cell to increase my chances of germination.
4. Cover the Seeds: Gently cover the seeds with more seed starting mix.
5. Water Gently: Water the seeds gently using a spray bottle or watering can with a fine rose. You don’t want to dislodge the seeds.
6. Provide Warmth: Romanesco seeds germinate best in warm temperatures, around 70-75°F (21-24°C). You can use a heat mat to help maintain the right temperature.
7. Provide Light: Place the seed tray under grow lights or in a sunny windowsill. If using a windowsill, rotate the tray regularly to prevent the seedlings from leaning towards the light.
8. Keep the Soil Moist: Keep the soil consistently moist, but not waterlogged. Check the soil daily and water as needed.
9. Thin the Seedlings: Once the seedlings have emerged and have a couple of true leaves (the second set of leaves that appear after the initial seed leaves), thin them to one seedling per cell. Choose the strongest, healthiest-looking seedling and snip off the others at the soil line. Don’t pull them out, as this can disturb the roots of the remaining seedling.
Preparing the Garden Bed
While your seedlings are growing indoors, it’s time to prepare the garden bed where you’ll eventually transplant them. Romanesco needs well-drained soil that’s rich in organic matter.
* Sunlight: Romanesco needs at least 6 hours of sunlight per day. Choose a location in your garden that gets plenty of sun.
* Soil Testing: It’s always a good idea to test your soil to determine its pH and nutrient levels. Romanesco prefers a slightly acidic to neutral soil pH of 6.0-7.0. You can purchase a soil testing kit at most garden centers.
* Amending the Soil: Amend the soil with plenty of compost or well-rotted manure. This will improve drainage, add nutrients, and help retain moisture. I usually add a few inches of compost to my garden bed and work it into the soil.
* Fertilizing: Romanesco is a heavy feeder, so it’s important to fertilize the soil before planting. Use a balanced fertilizer, such as 10-10-10, or an organic fertilizer specifically formulated for vegetables. Follow the instructions on the fertilizer package.
Here’s how I prepare my garden bed:
1. Clear the Area: Remove any weeds, rocks, or debris from the area where you’ll be planting.
2. Till the Soil: Till the soil to a depth of at least 12 inches. This will loosen the soil and make it easier for the roots to grow.
3. Amend the Soil: Add compost or well-rotted manure to the soil and work it in thoroughly.
4. Fertilize the Soil: Apply fertilizer according to the package instructions and work it into the soil.
5. Rake the Soil: Rake the soil smooth and level.
Transplanting the Seedlings
Once the danger of frost has passed and your seedlings have developed several sets of true leaves, it’s time to transplant them into the garden.
* Hardening Off: Before transplanting, you need to harden off the seedlings. This means gradually acclimating them to outdoor conditions. Start by placing the seedlings outdoors in a sheltered location for a few hours each day, gradually increasing the amount of time they spend outdoors over the course of a week. This will help them adjust to the sun, wind, and temperature changes.
* Spacing: Space the seedlings about 18-24 inches apart in rows that are 24-36 inches apart. This will give them enough room to grow and prevent overcrowding.
* Watering: Water the seedlings thoroughly after transplanting.
Let’s get those seedlings in the ground!
1. Dig Holes: Dig holes that are slightly larger than the root balls of the seedlings.
2. Remove Seedlings from Containers: Gently remove the seedlings from their containers. If they’re in peat pots, you can plant the entire pot in the ground. If they’re in plastic containers, gently loosen the roots and remove the seedling.
3. Place Seedlings in Holes: Place the seedlings in the holes, making sure that the top of the root ball is level with the soil surface.
4. Fill Holes with Soil: Fill the holes with soil and gently firm the soil around the seedlings.
5. Water Thoroughly: Water the seedlings thoroughly after transplanting.
6. Mulch: Apply a layer of mulch around the plants to help retain moisture, suppress weeds, and regulate soil temperature. I like to use straw or wood chips.
Caring for Your Romanesco Plants
Now that your Romanesco plants are in the ground, it’s important to provide them with the care they need to thrive.
* Watering: Water the plants regularly, especially during dry periods. Romanesco needs consistent moisture to produce large, healthy heads. Aim for about 1-2 inches of water per week.
* Fertilizing: Fertilize the plants every 2-3 weeks with a balanced fertilizer or an organic fertilizer specifically formulated for vegetables.
* Weeding: Keep the garden bed free of weeds. Weeds compete with the Romanesco plants for nutrients and water.
* Pest Control: Romanesco is susceptible to several pests, including cabbage worms, aphids, and flea beetles. Inspect your plants regularly for signs of pests and take action to control them if necessary. I prefer to use organic pest control methods, such as insecticidal soap or neem oil.
* Disease Control: Romanesco can also be affected by diseases, such as black rot and clubroot. To prevent diseases, choose disease-resistant varieties, practice crop rotation, and avoid overwatering.
Here are some specific tips for caring for your Romanesco plants:
* Water deeply and infrequently: This encourages deep root growth, which makes the plants more drought-tolerant.
* Apply fertilizer in small doses: This prevents fertilizer burn and ensures that the plants get the nutrients they need.
* Hand-pull weeds: This is the most effective way to control weeds without damaging the Romanesco plants.
* Inspect plants regularly for pests and diseases: Early detection is key to controlling pests and diseases.
* Use row covers to protect plants from pests: Row covers are lightweight fabric covers that can be placed over the plants to prevent pests from reaching them.
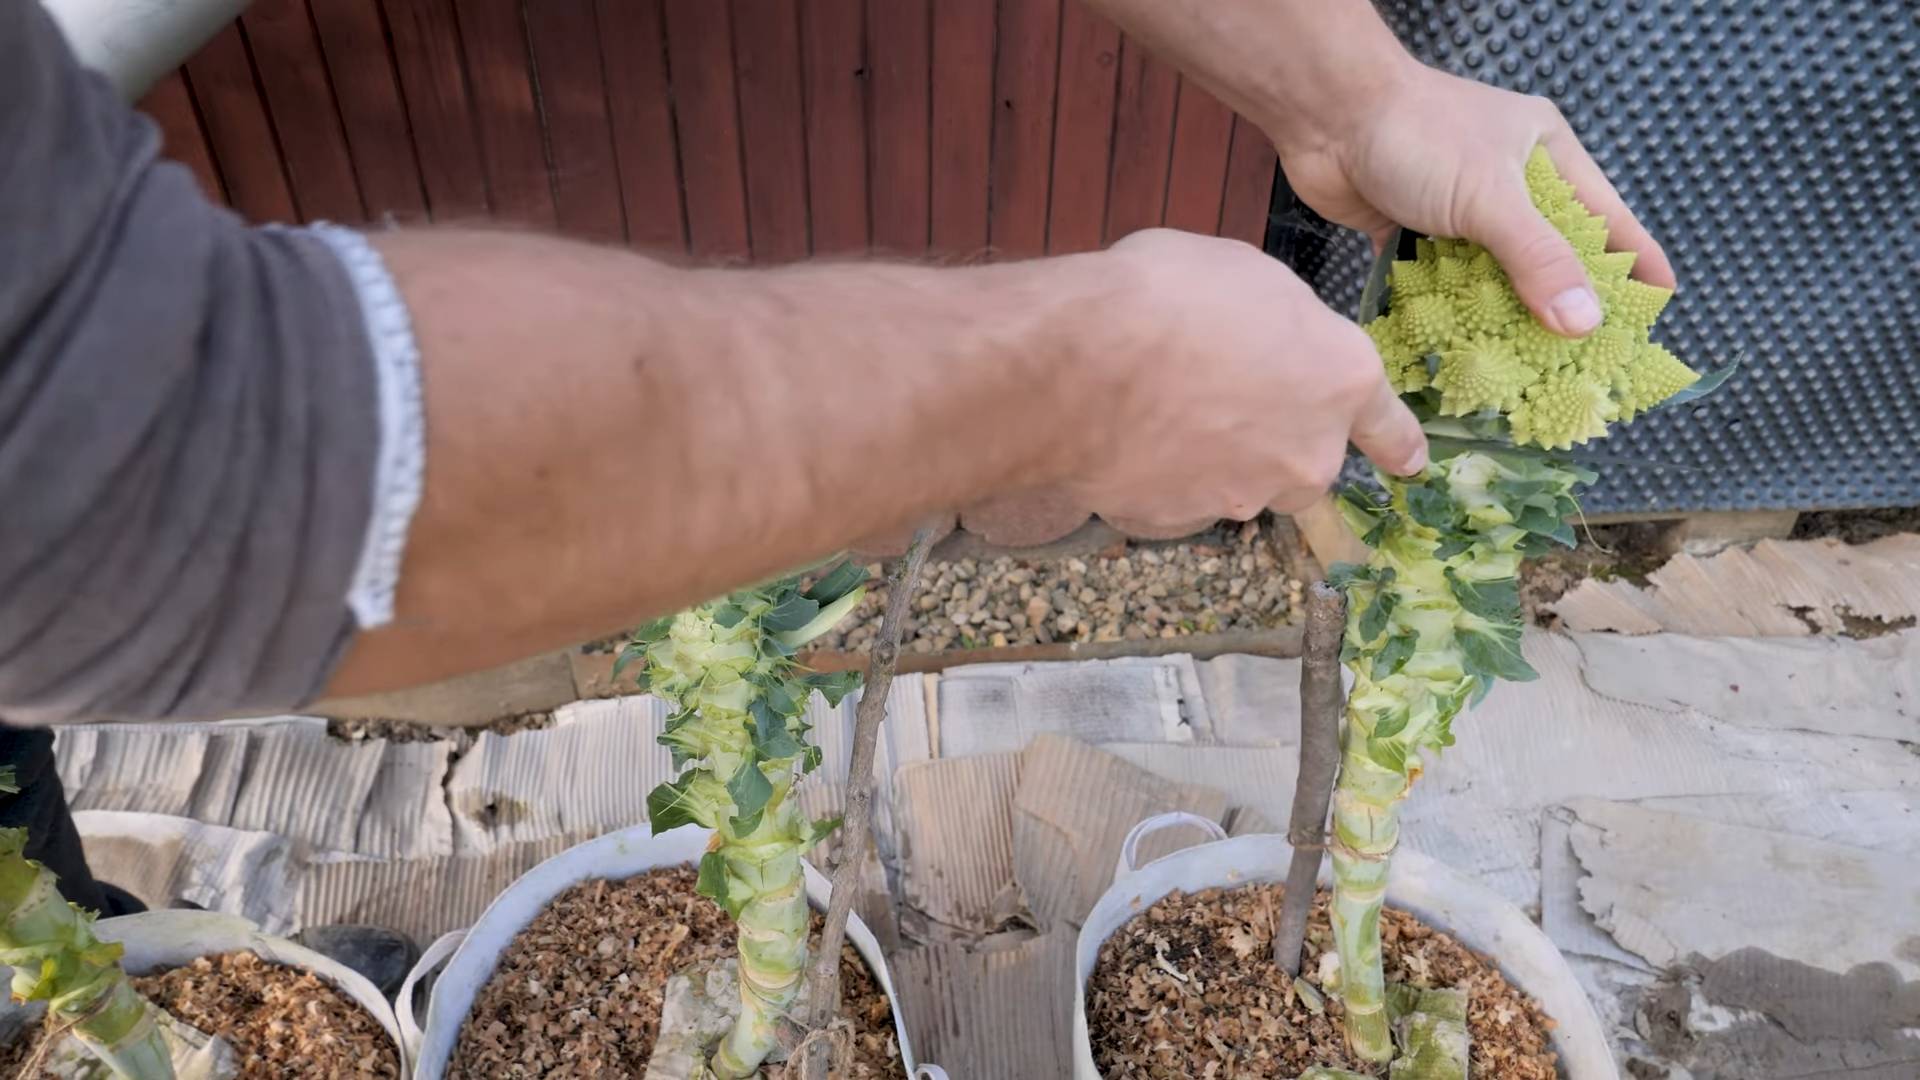
Harvesting Your Romanesco
The moment you’ve been waiting for! Romanesco is typically ready to harvest 75-100 days after transplanting. The head should be firm, compact, and about 6-8 inches in diameter.
* Harvesting Time: Harvest the Romanesco head when it’

Conclusion
So, there you have it! Growing Romanesco cauliflower at home might seem like a daunting task at first, but with a little patience, the right techniques, and this DIY trick, you’ll be harvesting those stunning, fractal florets in no time. This isn’t just about growing another vegetable; it’s about cultivating a conversation starter, a culinary masterpiece, and a testament to your green thumb.
Why is this DIY trick a must-try? Because it addresses the most common challenges faced by home gardeners attempting to grow Romanesco cauliflower: inconsistent watering, nutrient deficiencies, and pest infestations. By implementing this simple, cost-effective method, you’re creating a more controlled and supportive environment for your plants to thrive. You’re essentially giving them a head start and boosting their chances of producing those coveted, geometrically perfect heads.
But don’t stop there! Feel free to experiment and adapt this DIY trick to suit your specific garden conditions and preferences. For example, if you live in a particularly hot climate, consider adding shade cloth to your DIY growing structure to protect your Romanesco cauliflower from scorching sun. You could also incorporate companion planting, such as marigolds to deter pests or herbs like rosemary to attract beneficial insects. Another variation involves using different types of organic fertilizers, such as compost tea or fish emulsion, to provide your plants with a wider range of nutrients. You can even try succession planting, starting new seedlings every few weeks to ensure a continuous harvest throughout the growing season.
The key is to observe your plants closely and adjust your approach as needed. Pay attention to the color of the leaves, the size of the developing heads, and any signs of pests or diseases. Remember, gardening is a learning process, and every season brings new opportunities to refine your skills and techniques.
We’re confident that this DIY trick will significantly improve your success rate when growing Romanesco cauliflower. It’s a simple, effective, and rewarding way to cultivate this unique and beautiful vegetable. So, grab your seeds, gather your materials, and get ready to embark on a Romanesco cauliflower growing adventure!
We can’t wait to hear about your experiences! Share your photos, tips, and challenges in the comments below. Let’s create a community of Romanesco cauliflower enthusiasts and learn from each other’s successes and failures. Together, we can unlock the secrets to growing these fractal wonders and enjoy the delicious rewards of our labor. Happy gardening!
Frequently Asked Questions (FAQ)
What exactly is the DIY trick you’re referring to?
The DIY trick involves creating a mini-greenhouse or protective structure around your Romanesco cauliflower plants. This can be as simple as using repurposed plastic bottles, constructing a small frame covered with netting, or utilizing row covers. The purpose is to provide a more controlled environment, protecting the plants from extreme weather conditions, pests, and diseases. It also helps to retain moisture and warmth, promoting faster and healthier growth.
Why is Romanesco cauliflower so difficult to grow?
Romanesco cauliflower is more demanding than regular cauliflower varieties. It requires consistent watering, well-drained soil, and a specific range of temperatures to thrive. It’s also susceptible to pests like cabbage worms and diseases like clubroot. The DIY trick helps to mitigate these challenges by creating a more favorable growing environment.
What materials do I need to build the DIY growing structure?
The materials will vary depending on the type of structure you choose to build. However, some common materials include:
* Repurposed plastic bottles or containers
* Wooden or metal stakes
* Netting or row covers
* PVC pipes or other framing materials
* Clamps or ties to secure the structure
The key is to use materials that are readily available, cost-effective, and durable enough to withstand the elements.
How often should I water my Romanesco cauliflower plants?
Romanesco cauliflower requires consistent moisture, especially during head formation. Water deeply and regularly, aiming for about 1-1.5 inches of water per week. Check the soil moisture regularly and adjust your watering schedule accordingly. The DIY trick can help to retain moisture, reducing the frequency of watering.
What type of fertilizer should I use for Romanesco cauliflower?
Romanesco cauliflower is a heavy feeder, so it requires a nutrient-rich soil. Amend your soil with compost or well-rotted manure before planting. During the growing season, fertilize regularly with a balanced organic fertilizer or a fertilizer specifically formulated for brassicas. Compost tea and fish emulsion are also excellent options.
How do I protect my Romanesco cauliflower from pests?
Pests like cabbage worms, aphids, and flea beetles can be a major problem for Romanesco cauliflower. The DIY trick, especially when using netting or row covers, can provide a physical barrier against these pests. You can also use organic pest control methods, such as insecticidal soap or neem oil. Companion planting with marigolds or other pest-repelling plants can also be helpful.
How long does it take to grow Romanesco cauliflower?
Romanesco cauliflower typically takes 75-100 days to mature from seed. The exact time will depend on the variety, growing conditions, and climate. Start your seeds indoors 6-8 weeks before the last expected frost. Transplant the seedlings outdoors after the danger of frost has passed.
What are some signs that my Romanesco cauliflower is ready to harvest?
The head of the Romanesco cauliflower should be firm, compact, and have a vibrant green color. The florets should be tightly packed together and have a distinct fractal pattern. The head should be about 6-8 inches in diameter. Harvest the head when it reaches the desired size and before the florets start to separate or turn yellow.
Can I grow Romanesco cauliflower in containers?
Yes, you can grow Romanesco cauliflower in containers, but you’ll need a large container (at least 12 inches in diameter) to accommodate the plant’s root system. Use a well-draining potting mix and fertilize regularly. Container-grown plants may require more frequent watering than those grown in the ground.
What if my Romanesco cauliflower doesn’t form a head?
There are several reasons why your Romanesco cauliflower might not form a head. These include:
* Insufficient sunlight
* Inconsistent watering
* Nutrient deficiencies
* Extreme temperatures
* Pest or disease problems
Make sure your plants are getting at least 6 hours of sunlight per day, water them regularly, fertilize them properly, and protect them from pests and diseases. The DIY trick can help to address some of these issues by creating a more favorable growing environment.
Is Romanesco cauliflower more nutritious than regular cauliflower?
Yes, Romanesco cauliflower is a nutritional powerhouse. It’s packed with vitamins, minerals, and antioxidants. It’s a good source of vitamin C, vitamin K, fiber, and carotenoids. It also contains glucosinolates, which have been shown to have anti-cancer properties.
Can I save seeds from my Romanesco cauliflower?
Saving seeds from Romanesco cauliflower can be challenging because it’s a biennial plant, meaning it takes two years to produce seeds. You’ll need to overwinter the plant and allow it to flower and produce seeds in the second year. However, if you’re growing hybrid varieties, the seeds may not produce plants that are true to type.
Where can I buy Romanesco cauliflower seeds?
Romanesco cauliflower seeds are available from many online seed retailers and garden centers. Look for reputable seed companies that offer high-quality seeds.
What are some other tips for growing successful Romanesco cauliflower?
* Choose a sunny location with well-drained soil.
* Amend your soil with compost or well-rotted manure before planting.
* Start your seeds indoors 6-8 weeks before the last expected frost.
* Transplant the seedlings outdoors after the danger of frost has passed.
* Water deeply and regularly, especially during head formation.
* Fertilize regularly with a balanced organic fertilizer.
* Protect your plants from pests and diseases.
* Monitor your plants closely and adjust your approach as needed.
* Don’t be afraid to experiment and learn from your mistakes.
By following these tips and implementing the DIY trick, you’ll be well on your way to growing beautiful and delicious Romanesco cauliflower in your own backyard.
Leave a Comment