

Grow Radishes Quickly and unlock the secrets to a vibrant, peppery harvest in just weeks! Have you ever dreamt of plucking crisp, ruby-red radishes straight from your own backyard, adding a zesty kick to your salads and snacks? Well, dream no more! This DIY guide is your express ticket to radish-growing success, even if you’re a complete beginner.
Radishes, humble as they may seem, have a rich history, dating back to ancient Egypt where they were a staple food. They were even used as currency! Today, they’re a global favorite, prized for their ease of cultivation and delightful flavor. But let’s face it, waiting for vegetables to mature can be agonizing. That’s where this guide comes in. We’re going to show you simple, effective tricks to grow radishes quickly, bypassing the usual waiting game and maximizing your yield.
In today’s fast-paced world, who has time to wait? Whether you’re a seasoned gardener looking for a quick win or a newbie eager to experience the joy of homegrown produce, these DIY hacks will revolutionize your radish-growing experience. Imagine the satisfaction of harvesting a bountiful crop in record time, impressing your friends and family with your gardening prowess. Let’s dive in and discover the secrets to a speedy radish harvest!
Grow Radishes Quickly: My Foolproof DIY Guide
Hey there, fellow gardening enthusiasts! I’m so excited to share my secrets for growing radishes faster than you ever thought possible. Radishes are fantastic – they’re crisp, peppery, and add a delightful zing to salads and snacks. Plus, they’re incredibly rewarding to grow because you can harvest them in just a few weeks! This guide will walk you through every step, from choosing the right variety to ensuring the perfect growing conditions. Let’s get started!
Choosing the Right Radish Variety
Not all radishes are created equal, especially when it comes to speed. Some varieties are specifically bred for quick growth, so selecting the right one is crucial. Here’s what I recommend:
* Cherry Belle: This is a classic for a reason. It matures in about 22-25 days and has a mild, slightly sweet flavor.
* French Breakfast: These elongated radishes are ready in around 23-28 days. They have a milder, more delicate flavor than Cherry Belle.
* Sparkler: Another quick grower, maturing in about 22 days. They’re known for their crisp texture and slightly spicy flavor.
* Easter Egg: If you want a colorful harvest, Easter Egg radishes are a great choice. They come in a mix of red, pink, purple, and white and mature in about 25 days.
Preparing the Soil
Radishes need loose, well-drained soil to thrive. Compacted soil can lead to misshapen roots and slow growth. Here’s how I prepare my radish beds:
* Soil Type: Radishes prefer a slightly acidic to neutral soil pH (around 6.0 to 7.0).
* Amendments: I always amend my soil with plenty of compost or well-rotted manure. This adds nutrients and improves drainage.
* Loosening the Soil: Use a garden fork or tiller to loosen the soil to a depth of at least 6 inches. Break up any large clumps and remove rocks or debris.
* Leveling: Rake the soil surface smooth to create a level planting bed.
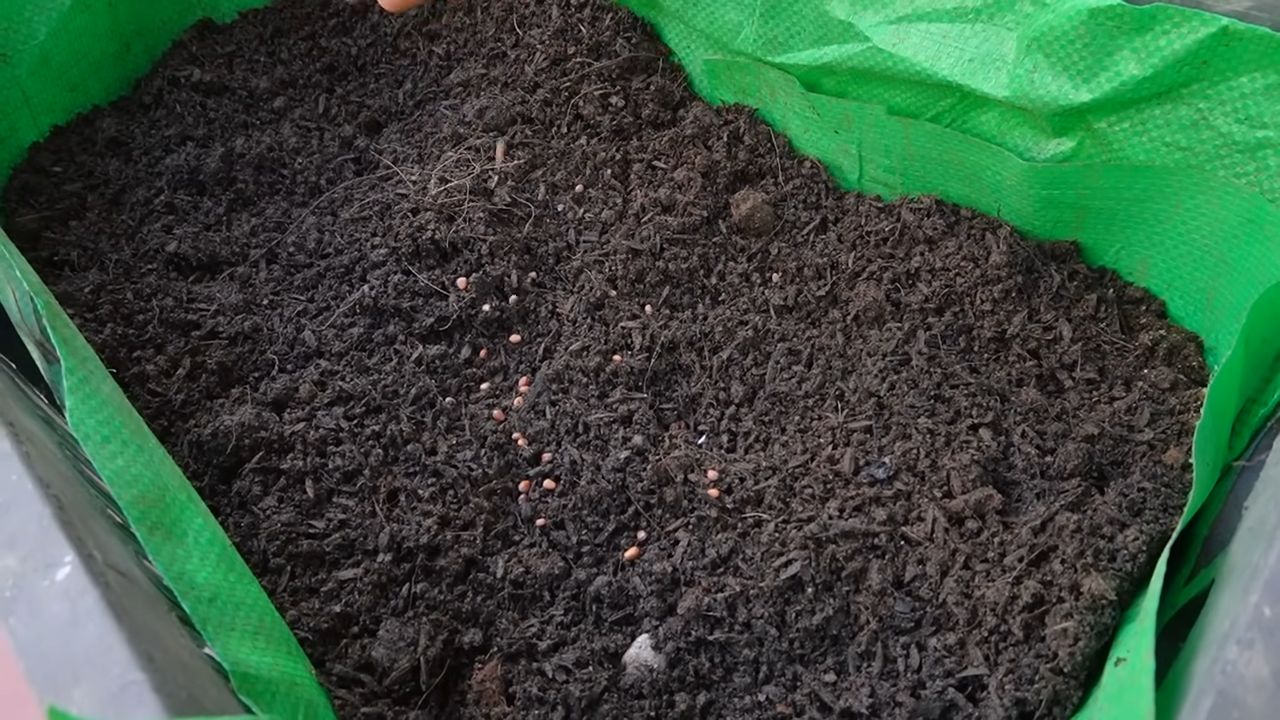
Planting Radish Seeds
Now for the fun part – planting! Here’s my step-by-step guide:
1. Timing is Key: Radishes are a cool-season crop, so plant them in early spring or late summer/early fall. Avoid planting during the hottest part of the summer, as the heat can cause them to bolt (go to seed). I usually start planting as soon as the soil can be worked in the spring.
2. Sowing Seeds: Sow seeds directly into the prepared soil. I create shallow furrows about ½ inch deep and 1 inch apart.
3. Spacing: Sprinkle the seeds evenly in the furrows, spacing them about ½ to 1 inch apart. Don’t overcrowd them!
4. Covering the Seeds: Gently cover the seeds with soil and lightly pat down the surface.
5. Watering: Water the planting bed thoroughly but gently. You don’t want to wash away the seeds. Keep the soil consistently moist until the seeds germinate.
Caring for Your Radishes
Consistent care is essential for fast radish growth. Here’s what I do:
1. Watering: Radishes need consistent moisture to grow quickly and develop crisp roots. Water regularly, especially during dry spells. Aim for about 1 inch of water per week.
2. Thinning: Once the seedlings emerge (usually in 4-7 days), thin them to about 1-2 inches apart. This gives the radishes enough room to develop properly. Don’t be afraid to pull out the extra seedlings – it’s better to have fewer, larger radishes than a crowded bed of small ones.
3. Weeding: Keep the planting bed free of weeds. Weeds compete with radishes for nutrients and water, slowing their growth. I prefer to hand-weed to avoid damaging the radish roots.
4. Fertilizing: Radishes don’t need a lot of fertilizer, but a light feeding can help boost their growth. I use a balanced organic fertilizer, following the instructions on the package. Avoid over-fertilizing, as this can lead to excessive foliage growth at the expense of root development.
5. Sunlight: Radishes need at least 6 hours of sunlight per day. Choose a sunny location in your garden.
Protecting Your Radishes from Pests and Diseases
Radishes are generally pest-resistant, but there are a few things to watch out for:
* Flea Beetles: These tiny beetles can chew small holes in the radish leaves. To prevent flea beetle damage, I use row covers to protect the plants. You can also spray the leaves with insecticidal soap.
* Root Maggots: These pests can tunnel into the radish roots, causing damage and decay. To prevent root maggot infestations, I practice crop rotation and avoid planting radishes in the same location year after year. You can also use row covers to prevent the adult flies from laying eggs near the plants.
* Clubroot: This fungal disease can cause swollen, distorted roots. To prevent clubroot, I ensure good soil drainage and avoid planting radishes in areas where clubroot has been a problem in the past.
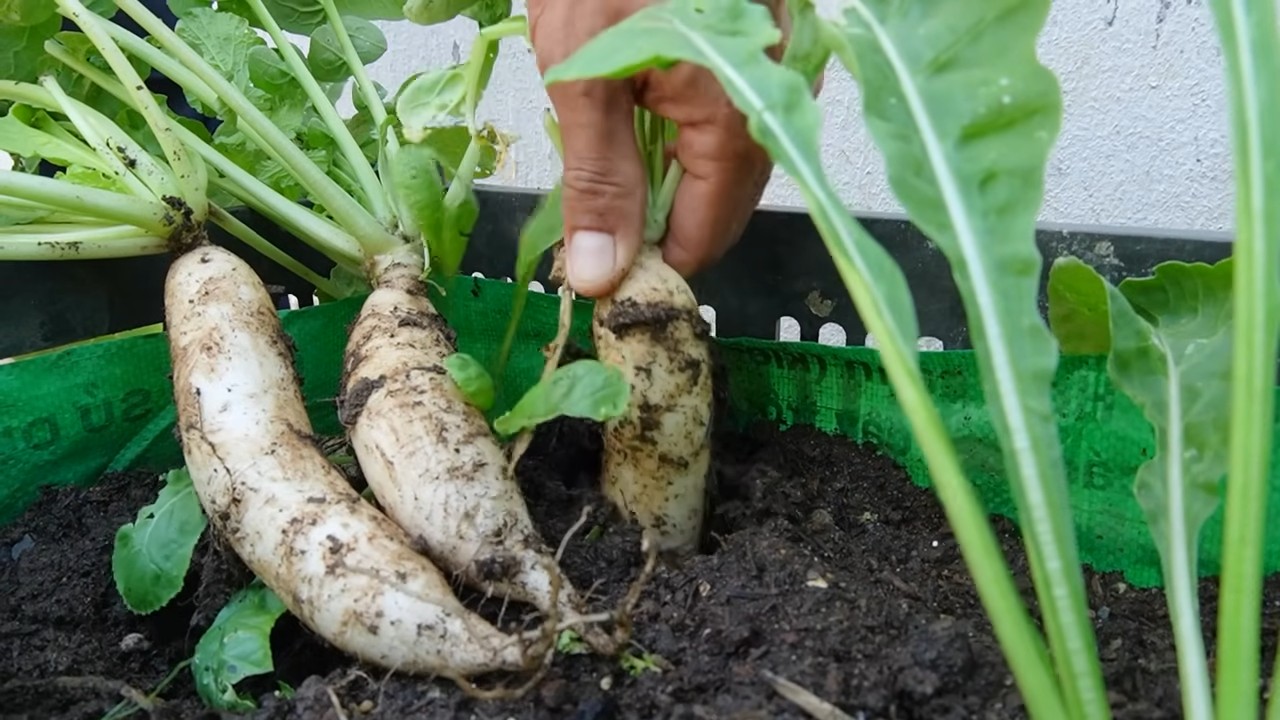
Harvesting Your Radishes
This is the moment you’ve been waiting for! Radishes are ready to harvest when the roots are about 1 inch in diameter.
1. Check for Size: Gently brush away the soil around the base of the plant to check the size of the radish.
2. Pulling: Grasp the radish leaves near the base of the plant and gently pull straight up. The radish should come out of the ground easily.
3. Washing: Wash the radishes thoroughly to remove any soil.
4. Storing: Store radishes in the refrigerator in a plastic bag or container. They will keep for about a week.
Troubleshooting Common Radish Problems
Even with the best care, you might encounter some problems. Here’s how I deal with them:
* Radishes are too spicy: This can be caused by hot weather or inconsistent watering. Try planting radishes in a shadier location or providing more consistent moisture.
* Radishes are small and stunted: This can be caused by overcrowding, poor soil, or lack of water. Thin the seedlings, amend the soil with compost, and water regularly.
* Radishes are cracked: This can be caused by inconsistent watering. Water regularly and deeply, especially during dry spells.
* Radishes are bolting (going to seed): This can be caused by hot weather or stress. Plant radishes in early spring or late summer/early fall to avoid the hottest part of the year.
Extra Tips for Super-Fast Growth
Want to give your radishes an extra boost? Here are a few of my favorite tricks:
* Soak the Seeds: Before planting, soak the radish seeds in water for 12-24 hours. This helps to soften the seed coat and speed up germination.
* Use a Cold Frame: If you live in a colder climate, you can start radishes in a cold frame to get a head start on the growing season.
* Succession Planting: Plant a new batch of radishes every week or two to ensure a continuous harvest throughout the spring and fall.
* Companion Planting: Plant radishes alongside carrots. Radishes help to deter carrot root flies, and carrots help to loosen the soil for radishes.
Enjoying Your Homegrown Radishes
Now that you’ve harvested your delicious radishes, it’s time to enjoy them! Here are a few of my favorite ways to eat them:
* Raw: Slice radishes thinly and add them to salads, sandwiches, or veggie platters.
* Roasted: Roast radishes with a little olive oil and salt for a sweet and savory side dish.
* Pickled: Pickle radishes for a tangy and crunchy snack.
* Radish Greens: Don’t throw away the radish greens! They’re edible and nutritious. Add them to salads, soups, or stir-fries.
Section: Maximizing Your Radish Yield
To really maximize your radish harvest, consider these advanced techniques:
1. Soil Solarization: Before planting, especially if you’ve had pest or disease problems in the past, consider solarizing your soil. This involves covering the planting area with clear plastic for several weeks during the hottest part of the summer. The heat trapped under the plastic will kill many soilborne pests and diseases.
2. Raised Beds: Growing radishes in raised beds can improve drainage and soil aeration, leading to faster growth and higher yields.
3. Vertical Gardening: If you’re short on space, you can even grow radishes in vertical planters or hanging baskets. Just make sure to choose a well-draining potting mix and water
Conclusion
So, there you have it! Mastering the art of how to grow radishes quickly is not only achievable but also incredibly rewarding. We’ve explored a simple yet effective method that bypasses common gardening pitfalls and puts you on the fast track to enjoying crisp, peppery radishes straight from your garden. This isn’t just about speed; it’s about maximizing your yield, minimizing wasted effort, and experiencing the pure joy of harvesting something you’ve nurtured from seed to table in record time.
Why is this DIY trick a must-try? Because it empowers you to take control of your radish-growing journey. No more relying on store-bought radishes that may lack the freshness and flavor you crave. No more waiting weeks for a meager harvest. This method offers a tangible solution to common radish-growing challenges, such as poor germination, slow growth, and pest infestations. By implementing these techniques, you’re setting yourself up for success, regardless of your gardening experience.
But the beauty of gardening lies in its adaptability. Feel free to experiment with variations to suit your specific needs and preferences. For instance, if you’re dealing with particularly poor soil, consider amending it with compost or well-rotted manure before planting. If you live in a warmer climate, providing afternoon shade can prevent your radishes from bolting (going to seed prematurely). You can also try different varieties of radishes to discover your favorites – from the classic Cherry Belle to the spicy French Breakfast or the colorful Easter Egg blend.
Don’t be afraid to get creative with your planting schedule. Succession planting, where you sow a small batch of seeds every week or two, ensures a continuous supply of radishes throughout the growing season. This is especially useful if you enjoy adding radishes to salads, sandwiches, or as a crunchy snack.
Ultimately, the best way to learn is by doing. So, grab your seeds, prepare your soil, and put this DIY trick to the test. We’re confident that you’ll be amazed by the results. And more importantly, we encourage you to share your experiences with us! Let us know what worked well for you, what challenges you encountered, and any variations you tried. Your feedback will not only help us refine this method but also inspire other gardeners to embark on their own radish-growing adventures.
Remember, gardening is a journey, not a destination. Embrace the process, learn from your mistakes, and celebrate your successes. With a little patience and the right techniques, you’ll be enjoying a bountiful harvest of delicious, homegrown radishes in no time. Happy gardening!
Frequently Asked Questions (FAQ)
What kind of soil is best for growing radishes quickly?
Radishes thrive in loose, well-drained soil that is rich in organic matter. Compacted soil can hinder root development and result in misshapen or stunted radishes. Before planting, amend your soil with compost, well-rotted manure, or other organic materials to improve its texture and fertility. A slightly acidic to neutral pH (around 6.0 to 7.0) is ideal. If your soil is heavy clay, consider adding sand or perlite to improve drainage.
How much sunlight do radishes need to grow quickly?
Radishes require at least six hours of direct sunlight per day to grow quickly and develop properly. While they can tolerate some shade, insufficient sunlight can lead to leggy growth and smaller roots. Choose a planting location that receives ample sunlight throughout the day. If you live in a particularly hot climate, providing some afternoon shade can help prevent bolting.
How often should I water my radishes?
Consistent moisture is crucial for rapid radish growth. Water your radishes regularly, especially during dry periods. Aim to keep the soil consistently moist but not waterlogged. Overwatering can lead to root rot, while underwatering can cause the radishes to become tough and bitter. A good rule of thumb is to water deeply whenever the top inch of soil feels dry to the touch. Mulching around the plants can help retain moisture and suppress weeds.
What are some common pests and diseases that affect radishes, and how can I prevent them?
Radishes are generally relatively pest-resistant, but they can be susceptible to certain issues. Common pests include flea beetles, root maggots, and aphids. Flea beetles can be controlled with row covers or insecticidal soap. Root maggots can be prevented by practicing crop rotation and using diatomaceous earth. Aphids can be washed off with a strong stream of water or treated with insecticidal soap. Diseases such as damping-off and white rust can also affect radishes. Damping-off can be prevented by using well-drained soil and avoiding overwatering. White rust can be controlled with fungicides.
How do I know when my radishes are ready to harvest?
Radishes are typically ready to harvest within three to four weeks of planting, depending on the variety and growing conditions. The best way to determine if they are ready is to check their size. Most radish varieties are ready to harvest when the roots are about one inch in diameter. Gently pull one or two radishes to check their size and maturity. If they are the desired size and have a crisp, peppery flavor, you can begin harvesting the rest. Don’t let them get too large, as they can become tough and bitter.
Can I grow radishes in containers?
Yes, radishes are well-suited for container gardening. Choose a container that is at least six inches deep and has drainage holes. Use a well-draining potting mix and follow the same planting and care instructions as for growing radishes in the ground. Container-grown radishes may require more frequent watering, as the soil tends to dry out more quickly.
What are some creative ways to use radishes in cooking?
Radishes are incredibly versatile and can be used in a variety of dishes. They are delicious raw in salads, sandwiches, or as a crunchy snack. You can also roast, sauté, or grill them for a milder flavor. Radish greens are also edible and can be used in salads, soups, or stir-fries. Try pickling radishes for a tangy condiment or adding them to tacos for a spicy kick.
How can I prevent my radishes from becoming too spicy?
The spiciness of radishes is influenced by several factors, including variety, growing conditions, and harvest time. Some varieties are naturally spicier than others. Hot weather and dry soil can also contribute to increased spiciness. Harvesting radishes promptly when they reach the desired size can help prevent them from becoming overly spicy.
What is succession planting, and how can it help me grow radishes quickly?
Succession planting is the practice of sowing seeds at regular intervals, typically every week or two, to ensure a continuous harvest. This is particularly useful for radishes, as they mature quickly. By succession planting, you can avoid having a glut of radishes all at once and enjoy a steady supply throughout the growing season.
My radishes are all leaves and no root. What am I doing wrong?
This is a common problem, and it usually indicates that the radishes are not getting enough sunlight or that the soil is too rich in nitrogen. Ensure that your radishes are receiving at least six hours of direct sunlight per day. Avoid over-fertilizing with nitrogen-rich fertilizers, as this can promote leafy growth at the expense of root development. A balanced fertilizer or one that is slightly lower in nitrogen can help encourage root growth. Also, make sure the soil is loose and well-drained, as compacted soil can hinder root development.

Leave a Comment