

Grow pineapple from chair? Sounds like something out of a whimsical fairytale, doesn’t it? But trust me, it’s not magic 鈥?it’s a surprisingly simple and rewarding DIY project that will bring a touch of the tropics right into your home! For centuries, pineapples have been symbols of hospitality and luxury, gracing tables and welcoming guests with their sweet, tangy flavor. Originating in South America, they’ve traveled the world, becoming a beloved fruit in countless cultures.
But what if I told you that you don’t need a sprawling plantation to enjoy the satisfaction of harvesting your own pineapple? In this article, I’m going to show you how to grow pineapple from chair, or rather, on a chair, or a table, or even a sunny windowsill! This DIY trick is perfect for anyone who wants to add a unique and sustainable element to their home decor, while also enjoying the delicious reward of a homegrown pineapple.
Let’s face it, store-bought pineapples can be expensive, and sometimes, they just don’t have that fresh, vibrant flavor we crave. Plus, there’s something incredibly satisfying about nurturing a plant from start to finish, especially when that plant produces such a delicious and exotic fruit. So, ditch the grocery store and get ready to embark on a fun and educational journey. I’ll guide you through each step, from preparing the pineapple top to providing the right care, so you can successfully grow pineapple from chair and impress your friends and family with your green thumb!
Growing a Pineapple from a Store-Bought Fruit: A DIY Guide
Hey there, fellow plant enthusiasts! Ever looked at a pineapple and thought, “I bet I could grow another one of those”? Well, you absolutely can! It’s a fun, rewarding, and surprisingly easy DIY project. Forget buying expensive pineapple plants; we’re going to recycle that delicious fruit into a brand new, spiky friend. Let’s dive in!
What You’ll Need
Before we get started, let’s gather our supplies. This is a pretty low-cost project, which is always a win in my book!
* A fresh pineapple with a healthy-looking top (more on this later).
* A sharp knife (adult supervision recommended if you’re doing this with kids).
* A small bowl or jar.
* Toothpicks (optional, but helpful).
* Potting mix suitable for tropical plants.
* A well-draining pot (6-8 inches in diameter is a good starting point).
* Water.
* Patience (this is key!).
Choosing the Right Pineapple
This is crucial! Not all pineapples are created equal when it comes to propagation. Here’s what to look for:
* Healthy Green Top: The leaves should be a vibrant green, not brown or yellowing. Avoid pineapples with damaged or wilted leaves.
* Firm Base: The base of the crown (where the leaves meet the fruit) should be firm and free from rot.
* No Obvious Damage: Check for any signs of pests or diseases on the leaves or base.
* Organic (Optional, but Recommended): While not essential, an organic pineapple is less likely to have been treated with growth inhibitors.
Preparing the Pineapple Top
This is where the magic begins! We need to carefully separate the top from the fruit without damaging the potential roots.
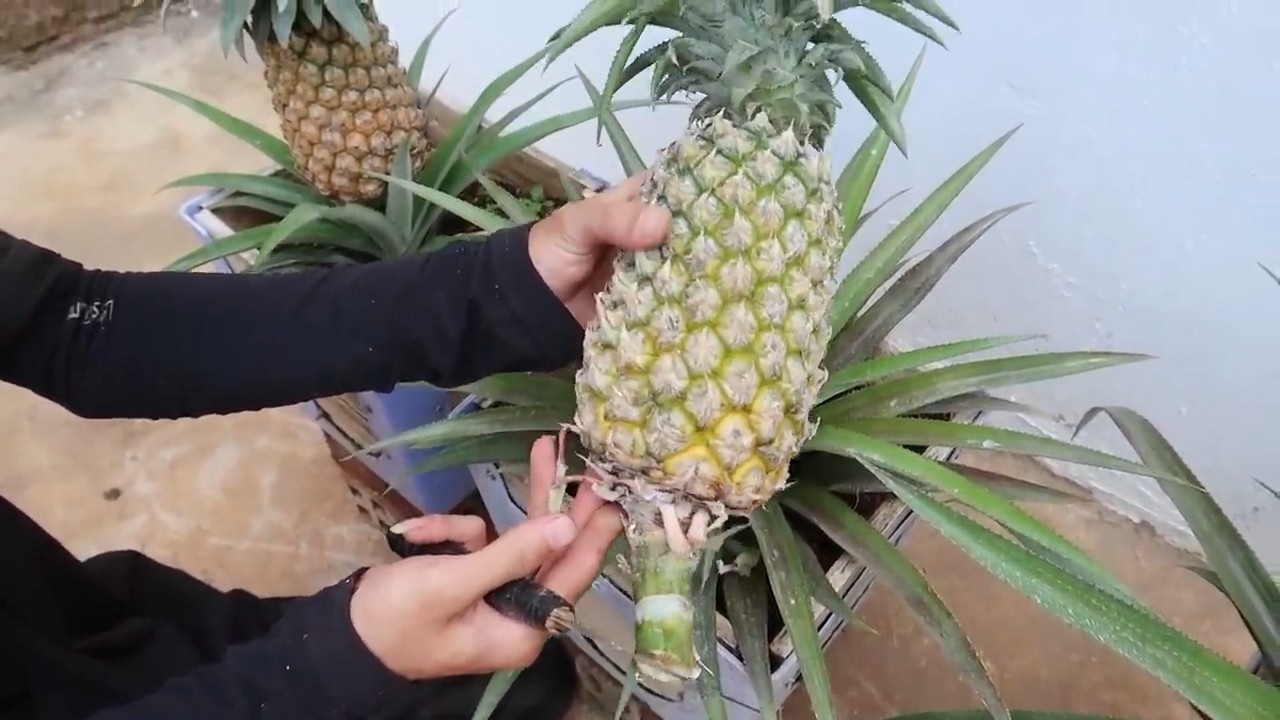
1. Twist and Pull (or Cut): There are two main methods for removing the top. The first is to firmly grip the base of the leaves and twist the top off the pineapple. Sometimes this works like a charm! If it doesn’t budge, don’t force it. The second method is to use your sharp knife to carefully cut the top off, about an inch or two below the base of the leaves.
2. Remove Excess Fruit: Whether you twisted or cut, you’ll likely have some pineapple flesh attached to the base. This needs to be removed to prevent rot. Carefully trim away all the fruit, leaving only the white, fibrous core where the roots will emerge. I find a small paring knife works best for this.
3. Peel Back Lower Leaves: This is an important step! Gently peel back the bottom few layers of leaves, exposing about an inch of the stem. This will encourage root growth. Don’t be afraid to pull off a few leaves; you want to see that stem.
4. Let it Callous (Optional): Some people recommend letting the pineapple top callous over for a few days before planting. This helps prevent rot. Simply place the prepared top in a cool, dry place for 2-3 days. I’ve had success both with and without this step, so it’s up to you.
Rooting the Pineapple Top in Water
This is my preferred method because you can actually see the roots growing!
1. Prepare Your Water Container: Fill your small bowl or jar with fresh water. Make sure the water is clean and free of any debris.
2. Suspend the Pineapple Top: This is where the toothpicks come in handy. Insert 3-4 toothpicks evenly spaced around the base of the pineapple top, making sure they’re firmly embedded. These toothpicks will rest on the rim of the bowl or jar, suspending the base of the pineapple just above the water. You only want the very bottom of the stem to be submerged. If you don’t want to use toothpicks, you can find a jar with a narrow enough opening to hold the top in place.
3. Place in a Sunny Location: Put your pineapple top in a bright, indirect sunlight location. Avoid direct sunlight, which can scorch the leaves.
4. Change the Water Regularly: Change the water every 2-3 days to prevent algae growth and keep the water fresh.
5. Wait for Roots: This is where the patience comes in! It can take anywhere from 2 to 8 weeks for roots to appear. You should start to see small, white roots emerging from the stem. Once the roots are about 2-3 inches long, it’s time to plant!
Planting Your Rooted Pineapple Top
Congratulations! You’ve successfully rooted your pineapple top. Now it’s time to give it a permanent home.
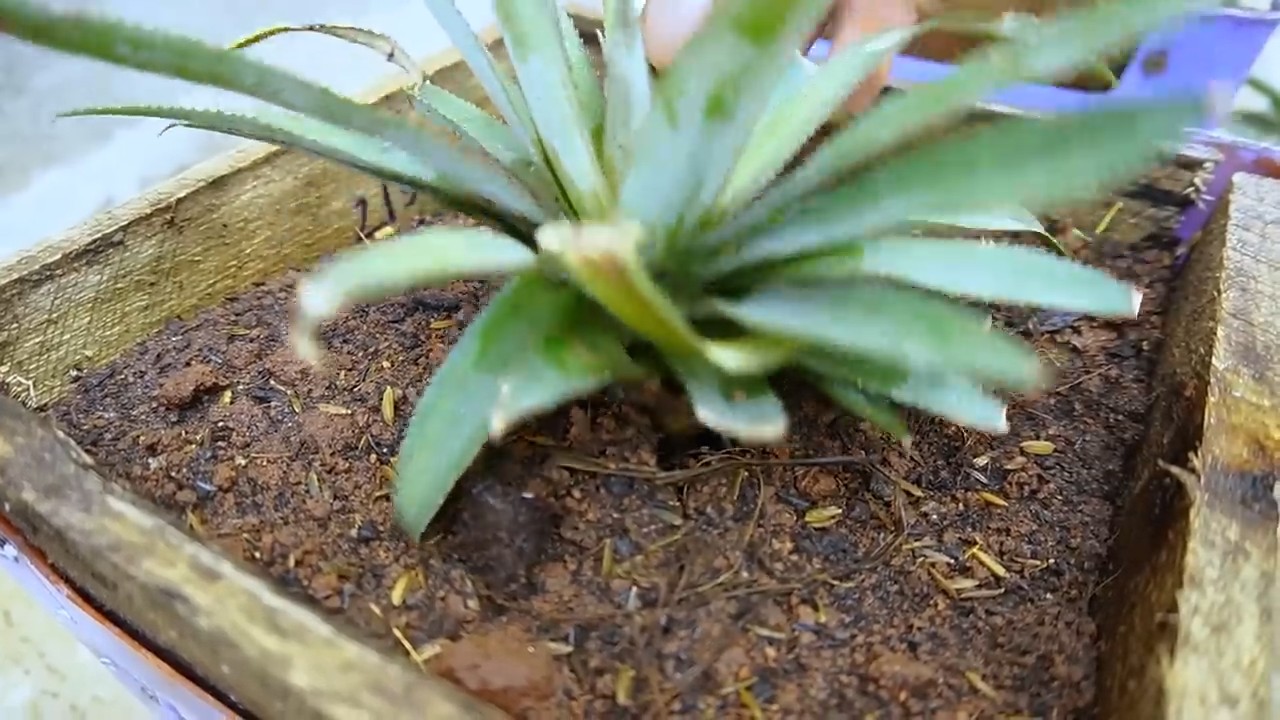
1. Prepare Your Pot: Fill your well-draining pot with potting mix suitable for tropical plants. Make sure the pot has drainage holes to prevent waterlogging.
2. Create a Planting Hole: Make a hole in the center of the potting mix, large enough to accommodate the roots of your pineapple top.
3. Plant the Pineapple Top: Carefully remove the pineapple top from the water and gently place it in the planting hole. Make sure the roots are spread out and not crammed together.
4. Backfill with Potting Mix: Gently backfill the hole with potting mix, making sure the base of the leaves is just above the soil line.
5. Water Thoroughly: Water the newly planted pineapple top thoroughly, until water drains out of the drainage holes.
6. Place in a Sunny Location: Place your potted pineapple plant in a bright, sunny location. Pineapples love sunlight!
Caring for Your Pineapple Plant
Now that your pineapple plant is potted, it’s time to provide it with the care it needs to thrive.
* Watering: Water your pineapple plant regularly, allowing the soil to dry out slightly between waterings. Avoid overwatering, which can lead to root rot. I usually water mine when the top inch of soil feels dry to the touch.
* Fertilizing: Feed your pineapple plant with a balanced liquid fertilizer every 2-3 months during the growing season (spring and summer). Follow the instructions on the fertilizer label.
* Temperature: Pineapples thrive in warm temperatures (65-85掳F). Protect your plant from frost and cold drafts.
* Humidity: Pineapples appreciate humidity. You can increase humidity by misting the leaves regularly or placing the pot on a tray filled with pebbles and water.
* Repotting: As your pineapple plant grows, you may need to repot it into a larger pot. Repot in the spring, using fresh potting mix.
* Pest Control: Keep an eye out for pests such as mealybugs and scale. If you notice any pests, treat them with insecticidal soap or neem oil.
Flowering and Fruiting
This is the ultimate goal, right? Getting your pineapple plant to actually produce a pineapple!
* Maturity: It can take 2-3 years for a pineapple plant grown from a top to flower and fruit. Patience is key!
* Forcing Flowering (Optional): If your pineapple plant is mature but not flowering, you can try forcing it to flower by placing an apple core or a banana peel near the base of the plant. The ethylene gas released by the fruit can stimulate flowering. You can also cover the plant with a clear plastic bag for a week to trap the ethylene gas.
* Pollination: Pineapples are self-pollinating, so you don’t need to worry about hand-pollinating them.
* Fruiting: Once your pineapple plant flowers, it will take several months for the fruit to develop. The pineapple will start out green and gradually turn yellow as it ripens.
* Harvesting: You’ll know your pineapple is ripe when it turns a golden yellow color and has a sweet, fragrant aroma. Gently twist the pineapple off the plant.
Troubleshooting
Even with the best care, you might encounter some problems along the way. Here are a few common issues and how to address them:
* Yellowing Leaves: This can be caused by overwatering, underwatering, or nutrient deficiencies. Adjust your watering schedule and fertilize your plant regularly.
* Brown Leaf Tips: This is often caused by dry air. Increase humidity by misting the leaves or placing the pot on a tray filled with pebbles and water.
* Root Rot: This is caused by overwatering. Make sure your pot has drainage holes and allow the soil to dry out slightly between waterings. If you suspect root rot, repot your plant in fresh potting mix.
* No Root Growth: If your pineapple top isn’t rooting, make sure it’s getting enough sunlight and that you’re changing the water regularly. You can also try adding a rooting hormone to the water.
Growing a pineapple from a store-bought fruit is a truly rewarding experience. It takes time and patience, but the satisfaction of harvesting your own homegrown pineapple is well worth
Conclusion
So, there you have it! Transforming a humble pineapple top into a thriving plant is not only surprisingly simple, but also incredibly rewarding. Forget those expensive nursery trips for exotic greenery; with a little patience and our easy-to-follow guide, you can cultivate your own tropical paradise right at home. This DIY pineapple growing trick is a must-try for anyone looking to add a touch of the tropics to their living space, teach children about plant life cycles, or simply enjoy the satisfaction of nurturing something from scratch.
But why is this DIY pineapple growing trick so compelling? Beyond the cost savings and the sheer novelty, it’s about connecting with nature in a tangible way. Watching roots emerge from that seemingly lifeless pineapple top, witnessing the slow but steady growth of new leaves, and knowing that you played a direct role in that process is an experience that’s hard to replicate. It’s a reminder that even the most ordinary things can hold extraordinary potential.
Don’t be afraid to experiment! Once you’ve mastered the basic technique, consider exploring different variations. Try using different types of pineapples 鈥?perhaps a smaller variety for a more compact plant, or a particularly sweet one in the hopes of influencing the flavor of future fruit (though, realistically, the fruit will likely be similar to the parent plant). You could also experiment with different potting mixes, adding amendments like perlite or vermiculite to improve drainage and aeration.
For a decorative touch, consider planting your pineapple in a unique container. An old terracotta pot, a repurposed bucket, or even a woven basket can add personality and charm to your growing project. Just be sure that the container has adequate drainage holes to prevent waterlogging.
And speaking of drainage, remember that pineapples are susceptible to root rot if they sit in soggy soil. Be mindful of your watering habits, allowing the soil to dry out slightly between waterings. During the winter months, when growth slows down, you’ll need to water even less frequently.
Finally, don’t be discouraged if your pineapple plant doesn’t produce fruit right away. It can take several years for a pineapple plant grown from a top to mature and bear fruit. But even without the fruit, the plant itself is a beautiful and unique addition to any home.
We wholeheartedly encourage you to give this DIY pineapple growing trick a try. It’s a fun, educational, and ultimately rewarding project that will bring a touch of the tropics into your life. And once you’ve embarked on your pineapple-growing adventure, we’d love to hear about your experience! Share your photos, tips, and stories in the comments below. Let’s create a community of pineapple enthusiasts and inspire others to discover the joys of growing their own tropical treats. What are you waiting for? Grab a pineapple and get growing!
Frequently Asked Questions (FAQ)
1. What kind of pineapple should I use for growing?
Any commercially available pineapple will work, but the key is to choose one that is ripe and healthy. Look for a pineapple with vibrant green leaves and a firm, fragrant body. Avoid pineapples with brown or wilted leaves, or those that feel soft or mushy to the touch. Organic pineapples are often preferred, as they are less likely to have been treated with chemicals that could inhibit root growth. Ultimately, the best pineapple to use is simply the freshest and healthiest one you can find.
2. How long does it take for a pineapple plant to produce fruit?
Patience is key! It typically takes 2 to 3 years for a pineapple plant grown from a top to produce fruit. The exact timeframe can vary depending on factors such as climate, sunlight exposure, and soil conditions. Don’t be discouraged if you don’t see fruit right away; focus on providing your plant with the best possible care, and eventually, your efforts will be rewarded.
3. What kind of soil is best for growing pineapples?
Pineapples thrive in well-draining, slightly acidic soil. A mixture of potting soil, perlite, and peat moss is a good option. The perlite helps to improve drainage, while the peat moss adds acidity. You can also use a commercially available potting mix specifically formulated for bromeliads, as these mixes are typically well-draining and slightly acidic. Avoid using heavy clay soils, as they can retain too much moisture and lead to root rot.
4. How much sunlight does a pineapple plant need?
Pineapples need plenty of sunlight to thrive. Aim for at least 6 hours of direct sunlight per day. If you’re growing your pineapple indoors, place it near a sunny window, preferably one that faces south or west. You may also need to supplement with artificial light, especially during the winter months. Insufficient sunlight can result in stunted growth and a lack of fruit production.
5. How often should I water my pineapple plant?
Water your pineapple plant when the top inch of soil feels dry to the touch. Avoid overwatering, as this can lead to root rot. During the growing season (spring and summer), you’ll likely need to water more frequently than during the dormant season (fall and winter). When watering, be sure to thoroughly saturate the soil, allowing excess water to drain out of the bottom of the pot. You can also water the plant by pouring water into the central cup formed by the leaves.
6. What are some common problems that can affect pineapple plants?
Some common problems that can affect pineapple plants include root rot, mealybugs, and scale insects. Root rot is typically caused by overwatering and poor drainage. Mealybugs and scale insects are sap-sucking pests that can weaken the plant. To prevent root rot, be sure to use well-draining soil and avoid overwatering. To control mealybugs and scale insects, you can try wiping them off with a cotton swab dipped in rubbing alcohol, or using an insecticidal soap.
7. Can I grow a pineapple plant indoors?
Yes, you can absolutely grow a pineapple plant indoors! In fact, many people successfully grow pineapples as houseplants. The key is to provide the plant with plenty of sunlight, well-draining soil, and adequate humidity. You may also need to supplement with artificial light, especially during the winter months.
8. How do I encourage my pineapple plant to fruit?
Getting your pineapple plant to fruit can sometimes be a challenge. One trick is to expose the plant to ethylene gas, which can stimulate flowering. You can do this by placing a ripe apple or banana near the plant, or by covering the plant with a plastic bag along with a ripe apple or banana for a few days. The ripening fruit will release ethylene gas, which can trigger flowering.
9. What do I do with my pineapple plant during the winter?
During the winter months, when growth slows down, you’ll need to reduce watering and fertilizing. Place your pineapple plant in a sunny location, and protect it from drafts and cold temperatures. If you live in a cold climate, you may need to bring your pineapple plant indoors for the winter.
10. Is growing a pineapple from a top really worth the effort?
Absolutely! While it may take some time and effort, growing a pineapple from a top is a rewarding and educational experience. Not only will you have a beautiful and unique plant, but you’ll also gain a deeper appreciation for the wonders of nature. Plus, the satisfaction of harvesting your own homegrown pineapple is simply unmatched. So, go ahead and give it a try 鈥?you might just surprise yourself!


Leave a Comment