

Grow peanuts at home? Absolutely! Imagine the satisfaction of harvesting your own homegrown peanuts, ready to be roasted, turned into creamy peanut butter, or simply enjoyed as a healthy snack. It’s easier than you might think, and this DIY guide will walk you through every step of the process, from planting to harvesting.
Peanuts, also known as groundnuts, have a rich history, dating back thousands of years in South America. They’ve since become a staple crop worldwide, enjoyed in countless cuisines and cultures. But did you know you can cultivate these nutritional powerhouses right in your own backyard, even if you have limited space?
In today’s world, where we’re increasingly conscious of where our food comes from, growing your own peanuts offers a fantastic opportunity to connect with nature and enjoy fresh, sustainable produce. Plus, it’s a fun and rewarding project for the whole family! This DIY trick is essential because it empowers you to control the quality of your food, reduce your carbon footprint, and experience the joy of nurturing something from seed to harvest. So, let’s dive in and discover how you can successfully grow peanuts at home and enjoy the delicious rewards!
Erdnüsse zu Hause anbauen: Dein umfassender DIY-Leitfaden
Hallo liebe Gartenfreunde! Habt ihr euch jemals gefragt, ob ihr eure eigenen Erdnüsse zu Hause anbauen könnt? Die Antwort ist ein klares JA! Es ist einfacher als ihr denkt und macht unglaublich viel Spaß. In diesem Artikel zeige ich euch Schritt für Schritt, wie ihr eure eigenen Erdnüsse anbauen könnt, egal ob im Garten oder im Topf. Lasst uns loslegen!
Was du brauchst: Die richtige Vorbereitung
Bevor wir mit dem Pflanzen beginnen, müssen wir sicherstellen, dass wir alles haben, was wir brauchen. Hier ist eine Liste der wichtigsten Dinge:
* Erdnusskerne: Wähle rohe, ungesalzene Erdnusskerne aus. Am besten sind solche, die speziell als Saatgut verkauft werden. Du findest sie in Gartencentern oder online. Vermeide geröstete oder gesalzene Erdnüsse, da diese nicht keimen werden.
* Geeigneter Boden: Erdnüsse bevorzugen lockeren, gut durchlässigen Boden. Eine Mischung aus Gartenerde, Sand und Kompost ist ideal. Vermeide schwere, lehmige Böden, da diese die Entwicklung der Erdnüsse behindern können.
* Pflanzgefäße (optional): Wenn du Erdnüsse in Töpfen anbauen möchtest, benötigst du große Töpfe mit einem Durchmesser von mindestens 30 cm und einer Tiefe von 30 cm.
* Sonniger Standort: Erdnüsse lieben die Sonne! Wähle einen Standort, der mindestens 6-8 Stunden direkte Sonneneinstrahlung pro Tag erhält.
* Gießkanne oder Schlauch: Regelmäßiges Gießen ist wichtig, besonders während der Keimung und der Fruchtbildung.
* Kompost oder Dünger: Um die Nährstoffversorgung sicherzustellen, kannst du Kompost oder einen speziellen Erdnussdünger verwenden.
* Geduld: Erdnüsse brauchen Zeit, um zu wachsen und zu reifen. Sei geduldig und gib nicht auf!
Schritt-für-Schritt-Anleitung: So pflanzt du deine Erdnüsse
Jetzt, wo wir alles vorbereitet haben, können wir mit dem Pflanzen beginnen. Hier ist eine detaillierte Anleitung:
1. Erdnusskerne vorbereiten:
* Weiche die Erdnusskerne für 24 Stunden in lauwarmem Wasser ein. Dies hilft, die Keimung zu beschleunigen.
* Entferne die äußere Schale der Erdnusskerne vorsichtig. Achte darauf, die inneren Kerne nicht zu beschädigen.
2. Boden vorbereiten:
* Lockere den Boden im Gartenbeet oder im Topf auf.
* Mische Kompost oder Dünger unter den Boden, um die Nährstoffversorgung zu verbessern.
* Achte darauf, dass der Boden gut durchlässig ist.
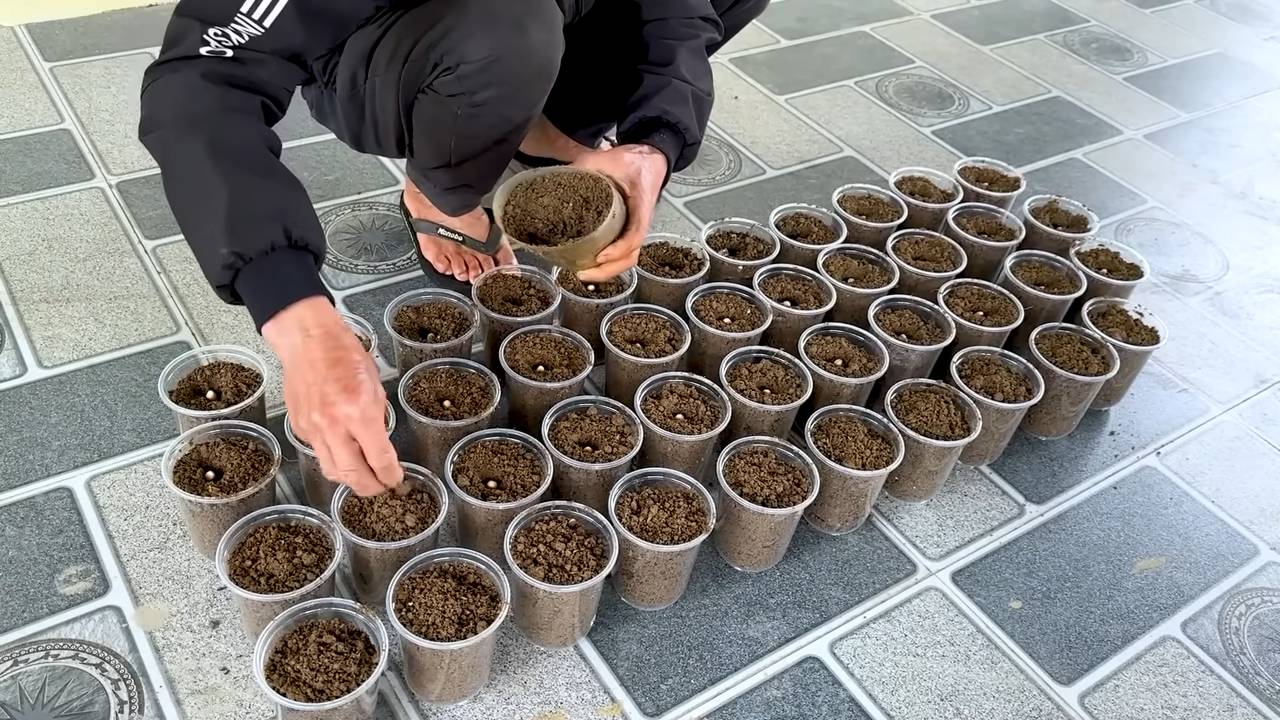
3. Erdnüsse pflanzen:
* Grabe kleine Löcher im Abstand von etwa 15-20 cm zueinander. Die Löcher sollten etwa 2-3 cm tief sein.
* Lege in jedes Loch 2-3 Erdnusskerne. Dies erhöht die Wahrscheinlichkeit, dass mindestens eine Erdnuss keimt.
* Bedecke die Löcher mit Erde und drücke sie leicht an.
4. Gießen:
* Gieße die Erde gründlich, aber vermeide Staunässe. Der Boden sollte feucht, aber nicht nass sein.
5. Standort:
* Stelle sicher, dass die Erdnüsse an einem sonnigen Standort stehen.
* Wenn du Erdnüsse in Töpfen anbaust, kannst du die Töpfe bei Bedarf an einen sonnigeren Ort verschieben.
Pflege deiner Erdnusspflanzen: So sorgst du für ein gesundes Wachstum
Nach dem Pflanzen ist es wichtig, die Erdnusspflanzen richtig zu pflegen, um ein gesundes Wachstum und eine reiche Ernte zu gewährleisten.
1. Gießen:
* Gieße die Erdnusspflanzen regelmäßig, besonders während trockener Perioden.
* Achte darauf, dass der Boden immer leicht feucht ist.
* Vermeide Staunässe, da dies zu Wurzelfäule führen kann.
2. Düngen:
* Dünge die Erdnusspflanzen alle 4-6 Wochen mit Kompost oder einem speziellen Erdnussdünger.
* Befolge die Anweisungen auf der Verpackung des Düngers.
3. Unkrautbekämpfung:
* Entferne regelmäßig Unkraut, das um die Erdnusspflanzen wächst.
* Unkraut kann Nährstoffe und Wasser stehlen und das Wachstum der Erdnüsse beeinträchtigen.
4. Häufeln:
* Wenn die Erdnusspflanzen etwa 15-20 cm hoch sind, häufele Erde um die Basis der Pflanzen.
* Dies fördert die Bildung von Seitentrieben, an denen sich die Erdnüsse entwickeln.
5. Schutz vor Schädlingen und Krankheiten:
* Überprüfe die Erdnusspflanzen regelmäßig auf Schädlinge und Krankheiten.
* Blattläuse und Spinnmilben können Probleme verursachen.
* Verwende bei Bedarf biologische Schädlingsbekämpfungsmittel.
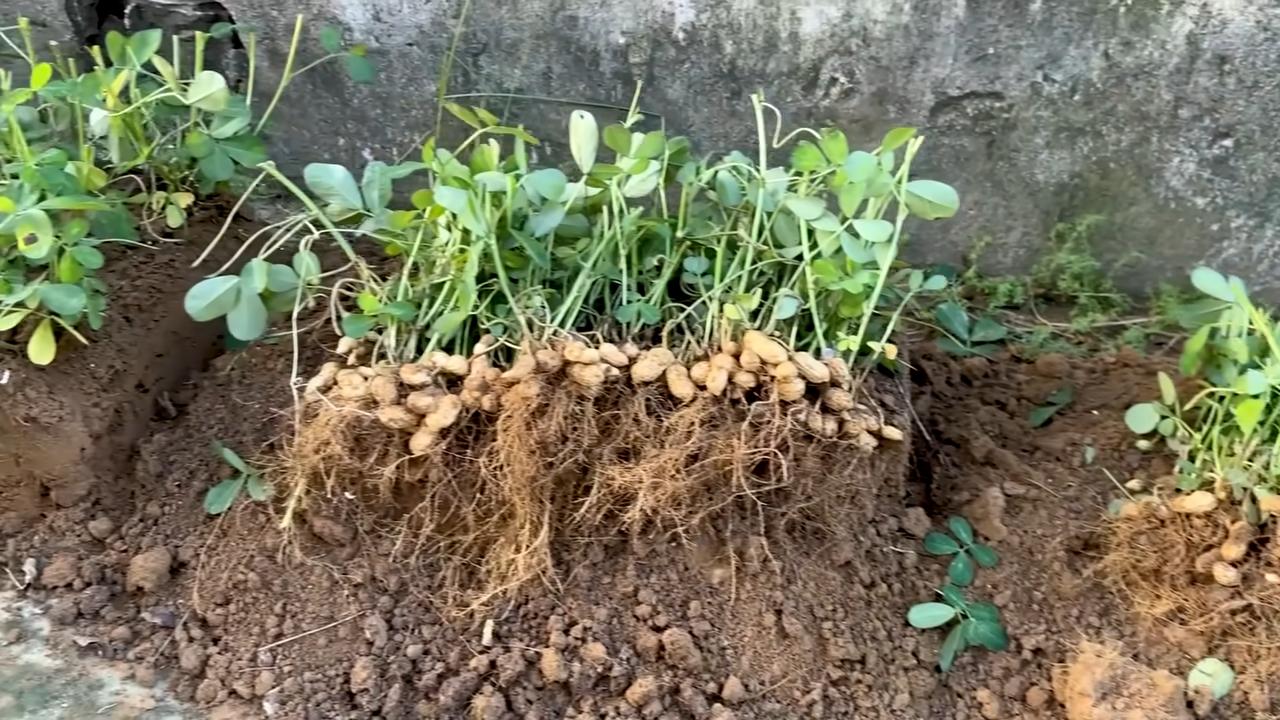
Die Blütezeit: Ein besonderes Ereignis
Erdnusspflanzen haben eine einzigartige Art der Fruchtbildung. Nachdem die Pflanze geblüht hat, bilden sich sogenannte “Pegs” (Fruchtstiele), die sich in den Boden bohren. An diesen Pegs entwickeln sich dann die Erdnüsse unter der Erde.
1. Beobachtung der Blüten:
* Erdnusspflanzen blühen in der Regel etwa 4-6 Wochen nach dem Pflanzen.
* Die Blüten sind klein und gelb.
2. Peg-Bildung:
* Nach der Blüte bilden sich die Pegs.
* Achte darauf, dass der Boden um die Pflanzen locker ist, damit die Pegs leicht in den Boden eindringen können.
3. Bodenkontakt:
* Stelle sicher, dass die Pegs guten Bodenkontakt haben.
* Du kannst die Erde um die Pflanzen leicht auflockern, um dies zu fördern.
Die Ernte: Der Lohn deiner Arbeit
Die Erntezeit ist der aufregendste Teil des Erdnussanbaus. Es ist Zeit, die Früchte deiner Arbeit zu ernten!
1. Erntezeitpunkt:
* Erdnüsse sind in der Regel etwa 120-150 Tage nach dem Pflanzen reif.
* Ein Zeichen für die Reife ist, wenn die Blätter der Pflanze gelb werden und absterben.
2. Erntevorgang:
* Grabe die Erdnusspflanzen vorsichtig aus dem Boden.
* Schüttle die Erde von den Erdnüssen ab.
* Lasse die Erdnüsse an einem trockenen, luftigen Ort trocknen.
3. Trocknung:
* Die Trocknung dauert in der Regel etwa 2-3 Wochen.
* Wende die Erdnüsse regelmäßig, um eine gleichmäßige Trocknung zu gewährleisten.
4. Lagerung:
* Nach dem Trocknen kannst du die Erdnüsse in einem luftdichten Behälter lagern.
* Lagere die Erdnüsse an einem kühlen, trockenen Ort.
Erdnüsse im Topf anbauen: Eine Alternative für Balkon und Terrasse
Wenn du keinen Garten hast, kannst du Erdnüsse auch problemlos im Topf anbauen. Hier sind einige Tipps:
* Topfgröße: Verwende große Töpfe mit einem Durchmesser von mindestens 30 cm und einer Tiefe von 30 cm.
* Boden: Verwende eine gut durchlässige Erdmischung.
* Standort: Stelle die Töpfe an einen sonnigen Standort.
* Gießen: Gieße die Erdnüsse regelmäßig, aber vermeide Staunässe.
* Düngen: Dünge die Erdnüsse alle 4-6 Wochen mit Kompost oder einem speziellen Erdnussdünger.
Häufige Probleme und Lösungen
Auch beim Erdnussanbau können Probleme auftreten. Hier sind einige häufige Probleme und Lösungen:
Conclusion
So, there you have it! Growing peanuts at home is not only achievable, but it’s also a deeply rewarding experience that connects you to the source of your food in a tangible way. Forget the store-bought peanuts that may have traveled thousands of miles – imagine the satisfaction of harvesting your own fresh, flavorful peanuts right from your backyard or even a container on your balcony.
This DIY trick is a must-try for several compelling reasons. First, it’s incredibly cost-effective. Once you have your initial seeds or raw peanuts, the ongoing costs are minimal, primarily consisting of water and perhaps some fertilizer. Compared to the price of commercially grown peanuts, especially organic varieties, you’ll be saving money in the long run.
Second, you have complete control over the growing process. You can choose organic methods, avoiding harmful pesticides and herbicides, ensuring that your peanuts are as healthy and natural as possible. This is particularly important for those with allergies or sensitivities to certain chemicals.
Third, it’s a fantastic educational opportunity, especially for children. Witnessing the entire life cycle of a peanut plant, from seed to harvest, is a valuable learning experience that fosters an appreciation for nature and where our food comes from.
But the best reason to try growing peanuts at home is the unparalleled flavor. Freshly harvested peanuts have a sweetness and nuttiness that you simply can’t find in store-bought varieties. Roasting them yourself intensifies this flavor, creating a truly unforgettable snack.
Don’t be afraid to experiment with variations! Try different peanut varieties, such as Virginia, Spanish, or Runner, to discover your favorite flavor profile. You can also adjust the roasting time and temperature to achieve your desired level of crispness. Consider adding spices like chili powder, smoked paprika, or garlic powder to your roasted peanuts for an extra kick. For a sweeter treat, toss them with a little honey or maple syrup before roasting.
We encourage you to take the plunge and try this DIY trick for growing peanuts at home. It’s easier than you might think, and the rewards are well worth the effort. Once you’ve harvested your first batch, be sure to share your experience with us! Post photos of your peanut plants and roasted peanuts on social media using #HomeGrownPeanuts and tell us about your successes and challenges. We’re eager to hear your stories and learn from your experiences. Let’s build a community of home peanut growers!
Growing peanuts at home is more than just a gardening project; it’s a journey of discovery, a celebration of flavor, and a connection to the earth. So, grab some seeds, get your hands dirty, and experience the joy of growing your own delicious peanuts. You won’t regret it!
Frequently Asked Questions (FAQ)
What is the best time of year to plant peanuts?
Peanuts require a long, warm growing season of at least 120 days. Therefore, the best time to plant peanuts is in the spring, after the last frost and when the soil temperature has warmed to at least 65 degrees Fahrenheit (18 degrees Celsius). In most regions, this is typically between April and June. If you live in a colder climate, you may need to start your peanut plants indoors a few weeks before the last frost to give them a head start.
What kind of soil is best for growing peanuts?
Peanuts thrive in well-drained, sandy loam soil. This type of soil allows the peanut pegs (the stems that grow down from the plant and into the soil where the peanuts develop) to easily penetrate the ground. Avoid heavy clay soils, as they can become compacted and hinder peanut development. The ideal soil pH for peanuts is between 6.0 and 6.5. Before planting, you can amend your soil with compost or other organic matter to improve drainage and fertility.
How much sunlight do peanut plants need?
Peanut plants need at least 6-8 hours of direct sunlight per day to thrive. Choose a planting location that receives plenty of sunlight throughout the day. If you are growing peanuts in containers, make sure to place them in a sunny spot. Insufficient sunlight can result in stunted growth and reduced peanut production.
How often should I water my peanut plants?
Peanut plants need consistent moisture, especially during flowering and pegging. Water deeply and regularly, aiming to keep the soil consistently moist but not waterlogged. Avoid overhead watering, as this can promote fungal diseases. A good rule of thumb is to water when the top inch of soil feels dry to the touch. During hot, dry weather, you may need to water more frequently.
Do peanut plants need fertilizer?
While peanuts are legumes and can fix nitrogen from the air, they still benefit from fertilization. Before planting, incorporate a balanced fertilizer into the soil. During the growing season, you can side-dress your peanut plants with a fertilizer that is low in nitrogen and higher in phosphorus and potassium. Avoid over-fertilizing with nitrogen, as this can promote excessive foliage growth at the expense of peanut production.
How do I know when my peanuts are ready to harvest?
The best way to determine when your peanuts are ready to harvest is to check the maturity of the pods. About 120-150 days after planting, dig up a few plants and examine the pods. The inside of the peanut shells should be dark brown or reddish-brown, and the kernels should be plump and well-formed. If the shells are still white or pale, the peanuts are not yet mature. Another sign of maturity is yellowing and browning of the foliage.
How do I harvest peanuts?
To harvest peanuts, carefully dig up the entire plant, being careful not to damage the pods. Shake off any excess soil and hang the plants upside down in a well-ventilated area to dry for several weeks. This process, called curing, allows the peanuts to dry properly and develop their full flavor.
How do I store peanuts after harvesting?
Once the peanuts are fully cured, you can remove them from the plants and store them in a cool, dry place. Shelled peanuts can be stored in an airtight container in the refrigerator or freezer for longer storage. Roasted peanuts should also be stored in an airtight container to prevent them from becoming stale.
Can I grow peanuts in containers?
Yes, you can successfully grow peanuts in containers. Choose a large container that is at least 18 inches deep and wide to allow ample room for root development. Use a well-draining potting mix and ensure that the container has drainage holes. Follow the same planting and care instructions as for growing peanuts in the ground. Container-grown peanuts may require more frequent watering and fertilization.
Are there any common pests or diseases that affect peanut plants?
Peanut plants can be susceptible to various pests and diseases, including aphids, spider mites, leaf spot, and root rot. Monitor your plants regularly for signs of infestation or disease. If you notice any problems, take action promptly to prevent them from spreading. Organic pest control methods, such as insecticidal soap or neem oil, can be effective for controlling aphids and spider mites. To prevent fungal diseases, ensure good air circulation around your plants and avoid overhead watering.
Leave a Comment