

Grow ginger indoors? Absolutely! Imagine stepping into your kitchen and snipping off a piece of fresh, zesty ginger root whenever you need it. No more last-minute grocery store runs or settling for dried-out spices. This isn’t just a dream; it’s a reality you can easily create with a little know-how and a sunny windowsill.
For centuries, ginger has been prized in Asian cultures, not only as a culinary staple but also for its medicinal properties. From soothing upset stomachs to adding a spicy kick to stir-fries, ginger’s versatility is unmatched. While traditionally grown in warmer climates, bringing this incredible plant indoors allows anyone, regardless of their location or garden size, to enjoy its benefits.
But why should you bother learning how to grow ginger indoors? Well, beyond the convenience of having fresh ginger at your fingertips, it’s also incredibly rewarding. It’s a fantastic way to connect with nature, even within the confines of your home. Plus, it’s a sustainable practice that reduces your reliance on store-bought produce. In this article, I’ll share my favorite DIY tricks and hacks to help you cultivate a thriving ginger plant right in your own home. Get ready to unleash your inner gardener and enjoy the spicy goodness of homegrown ginger!
Growing Ginger Indoors: A Spicy DIY Adventure!
Hey there, fellow plant enthusiasts! Ever thought about growing your own ginger? It’s surprisingly easy and rewarding, and you don’t even need a garden! I’m going to walk you through the whole process of growing ginger indoors, from picking the perfect rhizome to harvesting your own spicy treasure. Get ready to add a little zing to your life!
Choosing Your Ginger Rhizome
Before we dive into the nitty-gritty, let’s talk about the star of the show: the ginger rhizome. This is essentially the “root” (though technically it’s a modified stem) that we’ll be planting.
* Look for plump, healthy rhizomes: When you’re at the grocery store or garden center, choose ginger rhizomes that are firm, plump, and free from wrinkles or signs of shriveling.
* Eyes are key: The rhizome should have visible “eyes” or buds. These are the little bumps that will eventually sprout into new ginger shoots. The more eyes, the better!
* Organic is best: Opt for organic ginger if possible. Non-organic ginger may have been treated with growth inhibitors to prevent sprouting, which isn’t what we want.
* Soak it up: If your ginger looks a little dry, soak it in water overnight before planting. This will help rehydrate it and encourage sprouting.
Preparing Your Ginger for Planting
Okay, you’ve got your ginger. Now, let’s get it ready for its new home!
* Cutting the rhizome (optional): If you have a large rhizome with multiple eyes, you can cut it into smaller pieces, ensuring each piece has at least one or two eyes. This will give you multiple ginger plants! I like to use a clean, sharp knife for this.
* Let it callous: After cutting, let the pieces sit out for a day or two to allow the cut surfaces to callous over. This helps prevent rot.
* Choosing the right pot: Ginger needs room to spread, so select a pot that’s at least 12 inches in diameter and 12 inches deep. A wider pot is better than a taller one.
* Drainage is crucial: Make sure your pot has drainage holes! Ginger doesn’t like soggy soil.
Planting Your Ginger
Now for the fun part! Let’s get that ginger in the ground (or, well, in the pot).
Step-by-Step Planting Instructions:
1. Prepare your potting mix: Ginger thrives in well-draining, nutrient-rich soil. I like to use a mix of equal parts potting soil, compost, and perlite. The perlite helps with drainage.
2. Fill the pot: Fill your pot about two-thirds full with the potting mix.
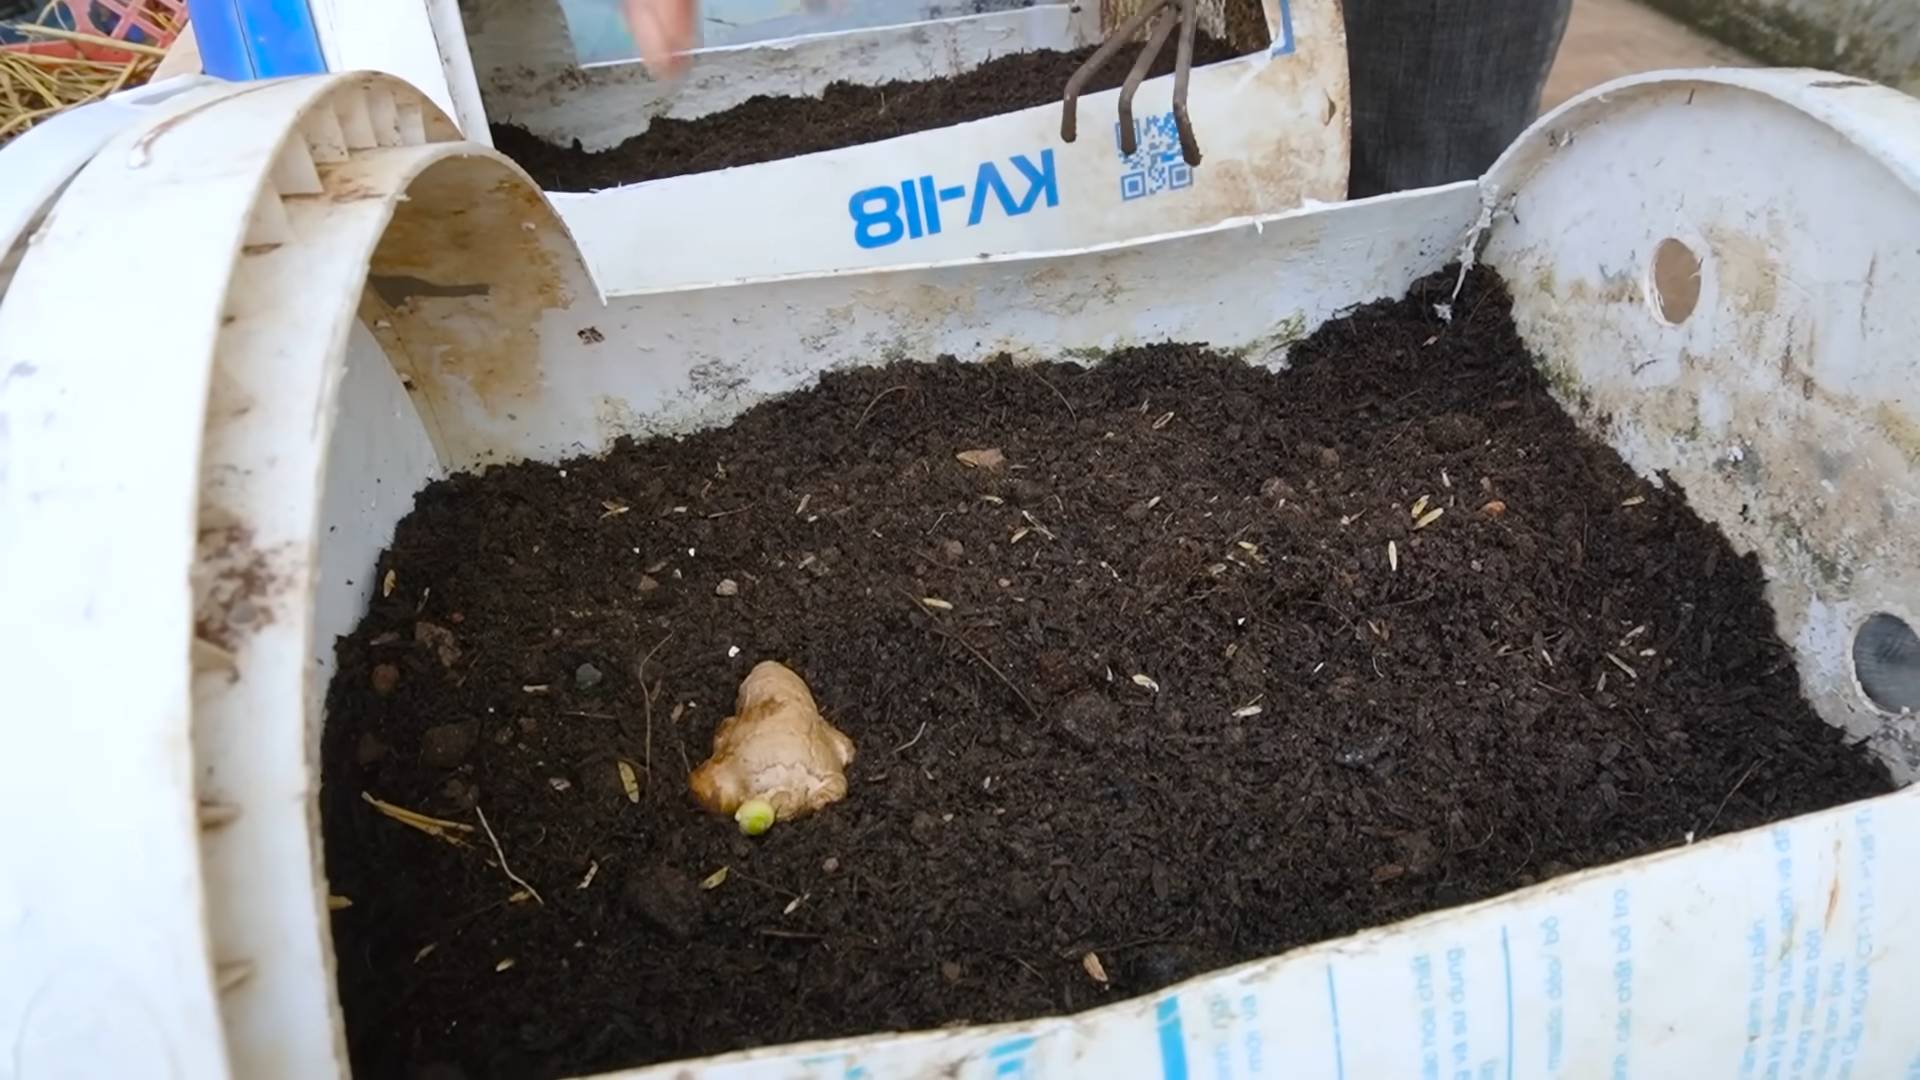
3. Position the rhizome: Place the ginger rhizome on top of the soil, with the eyes facing upwards.
4. Cover with soil: Cover the rhizome with about 1-2 inches of soil.
5. Water gently: Water the soil gently until it’s moist but not soggy.
6. Find the perfect spot: Place the pot in a warm location with indirect sunlight. Ginger loves bright, indirect light. A spot near an east-facing window is ideal. Avoid direct sunlight, which can scorch the leaves.
7. Be patient: It can take several weeks for the ginger to sprout, so don’t get discouraged if you don’t see anything happening right away. Just keep the soil consistently moist and be patient!
Caring for Your Growing Ginger
Once your ginger sprouts, it’s time to provide it with the care it needs to thrive.
* Watering: Keep the soil consistently moist, but not waterlogged. Water when the top inch of soil feels dry to the touch. I usually water mine every few days, but it depends on the humidity and temperature.
* Humidity: Ginger loves humidity! If your home is dry, you can increase the humidity around your plant by misting it regularly, placing it on a pebble tray filled with water, or using a humidifier.
* Fertilizing: Feed your ginger plant every few weeks with a balanced liquid fertilizer diluted to half strength. This will help it grow strong and healthy.
* Temperature: Ginger prefers temperatures between 65°F and 80°F (18°C and 27°C). Avoid exposing it to temperatures below 50°F (10°C).
* Repotting (if needed): If your ginger plant outgrows its pot, you can repot it into a larger container. Choose a pot that’s a few inches larger in diameter than the current one.
Troubleshooting Common Issues
Even with the best care, you might encounter a few challenges along the way. Here are some common issues and how to address them:
* Yellowing leaves: Yellowing leaves can be a sign of overwatering, underwatering, or nutrient deficiency. Check the soil moisture and adjust your watering accordingly. If the soil is consistently moist, you may be overwatering. If the soil is dry, you may be underwatering. If the leaves are yellowing all over, it could be a nutrient deficiency. Try fertilizing with a balanced liquid fertilizer.
* Brown leaf tips: Brown leaf tips are often caused by dry air. Increase the humidity around your plant by misting it regularly or using a humidifier.
* Lack of growth: If your ginger plant isn’t growing, it could be due to insufficient light, low temperatures, or nutrient deficiency. Make sure your plant is getting enough indirect sunlight and that the temperature is within the ideal range. Fertilize regularly to provide it with the nutrients it needs.
* Root rot: Root rot is a serious problem that can kill your ginger plant. It’s caused by overwatering and poor drainage. If you suspect root rot, carefully remove the plant from the pot and inspect the roots. If the roots are brown and mushy, you’ll need to trim away the affected areas and repot the plant in fresh, well-draining soil.
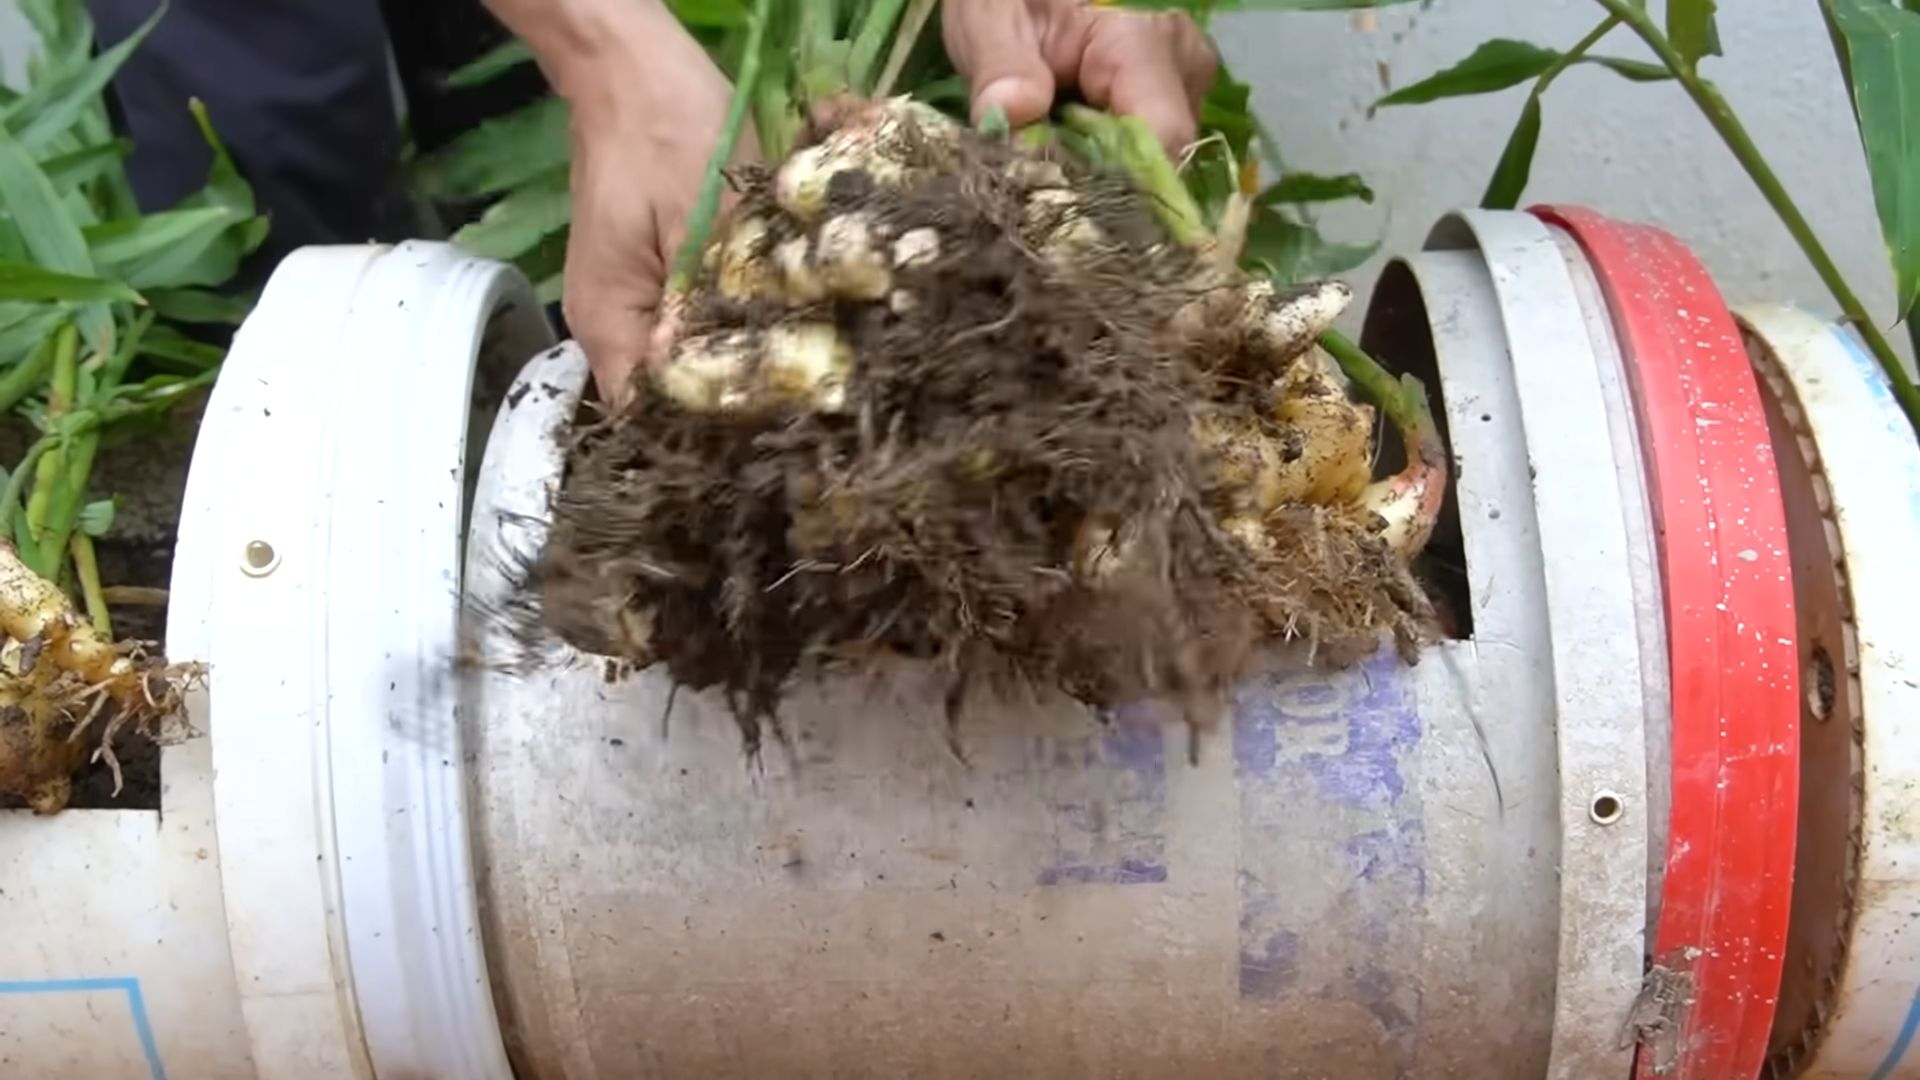
Harvesting Your Homegrown Ginger
The moment you’ve been waiting for! Harvesting your own ginger is incredibly satisfying.
* When to harvest: You can start harvesting ginger about 8-10 months after planting. The leaves will start to turn yellow and die back when the ginger is ready to harvest.
* How to harvest: Gently dig around the plant and lift the rhizome out of the soil. You can harvest the entire rhizome or just a portion of it, leaving the rest to continue growing.
* Storing your ginger: Freshly harvested ginger can be stored in the refrigerator for several weeks. You can also freeze it for longer storage. To freeze ginger, peel it and then grate or slice it. Place the grated or sliced ginger in a freezer bag and store it in the freezer.
Using Your Homegrown Ginger
Now that you’ve harvested your ginger, it’s time to put it to good use!
* Cooking: Fresh ginger adds a wonderful flavor to stir-fries, soups, curries, and other dishes.
* Tea: Ginger tea is a soothing and warming beverage that can help with digestion and nausea. Simply steep a few slices of fresh ginger in hot water for 5-10 minutes.
* Baking: Ginger can be used in a variety of baked goods, such as gingerbread cookies, cakes, and muffins.
* Medicinal uses: Ginger has been used for centuries for its medicinal properties. It can help with nausea, inflammation, and pain relief.
Extra Tips for Ginger Growing Success
Here are a few extra tips to help you grow the best ginger possible:
* Rotate your ginger: If you’re growing ginger in the same pot year after year, it’s a good idea to rotate the soil to prevent nutrient depletion.
* Use rainwater: Rainwater is naturally soft and free of chemicals, making it ideal for watering your ginger plant.
* Mulch with compost: Mulching with compost helps retain moisture in the soil and provides your ginger plant with extra nutrients.
* Observe your plant: Pay attention to your ginger plant and learn to recognize the signs of stress or disease. The sooner you identify a problem, the easier it will be to fix it.
Growing ginger indoors is a fun and rewarding experience. With a little patience and care, you can enjoy your own supply of fresh, flavorful ginger year-round. Happy growing!
Conclusion
So, there you have it! Growing ginger indoors is not only achievable, but it’s also a remarkably rewarding experience that brings a touch of the exotic right into your home. Forget those bland, store-bought rhizomes; imagine the vibrant flavor of freshly harvested, homegrown ginger gracing your culinary creations. This DIY trick is a must-try for anyone who appreciates fresh ingredients, enjoys a bit of gardening, or simply wants to add a unique and sustainable element to their kitchen.
Why is this a must-try? Because it empowers you to control the quality and freshness of your ginger. You’ll know exactly where it came from and how it was grown, free from the pesticides and long-distance transportation that often plague commercially available ginger. Plus, it’s incredibly satisfying to nurture a plant from a humble rhizome to a thriving, flavorful ingredient.
But the fun doesn’t stop there! Feel free to experiment with different varieties of ginger. Try growing the common culinary ginger (Zingiber officinale), or venture into the world of ornamental gingers for their stunning foliage and flowers. You can also play around with different potting mixes to see what works best in your environment. Some gardeners swear by a mix rich in compost, while others prefer a lighter, well-draining blend.
Consider these variations to personalize your indoor ginger growing experience:
* Ginger in Water Culture: Instead of soil, try growing your ginger in water using a hydroponic setup. This method can be visually appealing and allows you to monitor root growth easily.
* Ginger Tea Garden: Plant ginger alongside other tea-friendly herbs like mint, lemon balm, and chamomile to create a soothing and aromatic tea garden right on your windowsill.
* Ginger Bonsai: With careful pruning and training, you can even shape your ginger plant into a miniature bonsai, adding an artistic touch to your indoor garden.
Don’t be intimidated by the process. Growing ginger indoors is surprisingly forgiving, and even if you encounter a few bumps along the way, the learning experience is invaluable. The key is to provide the right conditions: warmth, humidity, and plenty of indirect sunlight.
We wholeheartedly encourage you to give this DIY trick a try. It’s a simple, sustainable, and incredibly rewarding way to elevate your cooking and connect with nature. Once you’ve harvested your first batch of homegrown ginger, we’d love to hear about your experience! Share your tips, tricks, and photos in the comments below. Let’s build a community of indoor ginger growers and inspire others to embrace the joy of homegrown goodness. Your success with growing ginger indoors is just a few steps away!
Frequently Asked Questions (FAQs)
What kind of ginger should I use to start growing indoors?
The best type of ginger to start with is fresh, plump ginger rhizomes from your local grocery store or farmers market. Look for rhizomes that are firm, with smooth skin and visible “eyes” or buds. Avoid any that are shriveled, moldy, or have soft spots. Organic ginger is often recommended, as it’s less likely to have been treated with growth inhibitors. You can also purchase specific varieties of ginger online from reputable seed companies.
How long does it take to grow ginger indoors?
The time it takes to grow ginger indoors can vary depending on the growing conditions, the variety of ginger, and your climate. Generally, you can expect to see sprouts emerging from the rhizome within a few weeks. It typically takes about 8-10 months to grow ginger to a harvestable size. However, you can start harvesting small pieces of ginger root after about 4 months, as needed.
What kind of soil is best for growing ginger indoors?
Ginger thrives in well-draining, nutrient-rich soil. A good potting mix for ginger should be loose and airy, allowing for good root development. You can create your own mix by combining equal parts of potting soil, compost, and perlite or vermiculite. The compost provides essential nutrients, while the perlite or vermiculite improves drainage and aeration. Avoid using heavy clay soils, as they can retain too much moisture and lead to root rot.
How much sunlight does ginger need when grown indoors?
Ginger prefers bright, indirect sunlight. Avoid placing your ginger plant in direct sunlight, as it can scorch the leaves. A spot near an east-facing or north-facing window is ideal. If you don’t have access to a bright location, you can supplement with artificial grow lights. Aim for about 6-8 hours of light per day.
How often should I water my indoor ginger plant?
Water your ginger plant regularly, keeping the soil consistently moist but not waterlogged. Allow the top inch of soil to dry out slightly between waterings. Overwatering can lead to root rot, so it’s important to ensure good drainage. During the active growing season (spring and summer), you may need to water more frequently than during the dormant season (fall and winter).
How can I increase humidity for my ginger plant?
Ginger thrives in humid environments. To increase humidity for your indoor ginger plant, you can try the following:
* Misting: Mist the leaves of your ginger plant regularly with water.
* Humidity Tray: Place the pot on a tray filled with pebbles and water. As the water evaporates, it will increase the humidity around the plant.
* Humidifier: Use a humidifier to increase the overall humidity in the room.
* Grouping Plants: Grouping plants together can create a more humid microclimate.
What are some common problems when growing ginger indoors?
Some common problems when growing ginger indoors include:
* Root Rot: Caused by overwatering and poor drainage. Ensure good drainage and avoid overwatering.
* Leaf Spot: A fungal disease that can cause brown spots on the leaves. Improve air circulation and avoid wetting the foliage when watering.
* Pests: Common pests that can affect ginger plants include aphids, spider mites, and mealybugs. Inspect your plants regularly and treat any infestations promptly with insecticidal soap or neem oil.
* Yellowing Leaves: Can be caused by a variety of factors, including overwatering, underwatering, nutrient deficiencies, or lack of sunlight. Adjust your watering and fertilizing practices as needed.
When and how should I harvest my indoor ginger?
You can start harvesting small pieces of ginger root after about 4 months. To harvest, gently dig around the edges of the pot and carefully remove a portion of the rhizome. Leave the rest of the plant undisturbed to continue growing. For a larger harvest, wait until the plant is about 8-10 months old. At this point, the leaves may start to turn yellow and die back, indicating that the plant is ready for harvest. To harvest the entire plant, carefully dig it up and separate the rhizomes from the roots.
Can I grow ginger in containers other than pots?
Yes, you can grow ginger in various containers as long as they provide adequate drainage and space for the rhizomes to spread. Consider using raised beds, large tubs, or even fabric grow bags. The container should be at least 12 inches deep and wide to accommodate the growing roots.
How do I store harvested ginger?
Freshly harvested ginger can be stored in the refrigerator for several weeks. Wrap the ginger in a paper towel and place it in a plastic bag or container. You can also freeze ginger for longer storage. To freeze, peel and chop the ginger into small pieces or grate it. Place the ginger in a freezer bag or container and store it in the freezer for up to 6 months. You can also pickle ginger or make ginger syrup for longer-term preservation.
Leave a Comment