

Grow Garlic From Cloves: Unlock the secrets to a bountiful harvest right in your backyard! Have you ever dreamt of the rich, pungent aroma of freshly harvested garlic filling your kitchen? Imagine the satisfaction of knowing you nurtured those flavorful bulbs from tiny cloves, all with your own two hands. This isn’t just about growing garlic; it’s about connecting with a tradition that stretches back millennia.
Garlic, a culinary staple and medicinal marvel, has been cultivated for over 5,000 years, with roots tracing back to Central Asia. Ancient Egyptians revered it, feeding it to the pyramid builders for strength and endurance. Today, we may not be building pyramids, but we can certainly benefit from the vitality and flavor that homegrown garlic provides. Plus, store-bought garlic often lacks the robust taste of freshly grown varieties.
That’s where this DIY guide comes in! I’m going to show you how incredibly easy it is to grow garlic from cloves, even if you’re a complete beginner. We’ll cover everything from selecting the best cloves to planting techniques and harvesting tips. Say goodbye to bland, store-bought garlic and hello to a garden bursting with flavor. Get ready to embark on a rewarding journey that will transform your cooking and connect you with the earth in a whole new way. Let’s get planting!
Growing Garlic From Cloves: A Beginner’s Guide
Hey there, fellow garden enthusiasts! I’m so excited to share one of my favorite and easiest gardening projects with you: growing garlic from cloves! It’s incredibly rewarding to harvest your own pungent, flavorful garlic, and it’s surprisingly simple. Trust me, if I can do it, you can too! Let’s dive in!
Choosing Your Garlic
Before we get our hands dirty, let’s talk garlic. Not all garlic is created equal, and the type you choose will significantly impact your harvest.
* Hardneck vs. Softneck: This is the big one. Hardneck garlic is generally more flavorful and cold-hardy, making it ideal for colder climates. It produces a flower stalk called a scape, which you can harvest and eat (they’re delicious!). Softneck garlic is better suited for warmer climates and stores longer. You’ll usually find softneck varieties braided in stores.
* Variety Matters: Within hardneck and softneck, there are tons of varieties! Do some research to find what grows well in your area and what flavor profile you prefer. Some popular hardneck varieties include ‘German Extra Hardy,’ ‘Music,’ and ‘Spanish Roja.’ For softneck, ‘California Early’ and ‘Silverskin’ are common choices.
* Source Wisely: Don’t just grab a bulb from the grocery store! While it *might* work, it’s often treated to prevent sprouting. The best option is to buy seed garlic from a reputable nursery or online supplier. This ensures you’re getting a disease-free variety that’s suited for planting. Local farmers markets are another great source.
Preparing for Planting
Okay, you’ve got your garlic. Now, let’s get ready to plant!
* Timing is Key: Garlic is typically planted in the fall, about 4-6 weeks before the ground freezes. This allows the cloves to establish roots before winter sets in. In warmer climates, you can plant in late winter or early spring, but fall planting generally yields the best results.
* Location, Location, Location: Garlic needs at least 6 hours of sunlight per day. Choose a spot in your garden that gets plenty of sunshine.
* Soil Preparation: Garlic loves well-drained, fertile soil. Amend your soil with compost or well-rotted manure before planting. This will provide essential nutrients and improve drainage. I like to add a generous amount of compost – the more, the merrier!
* Testing Your Soil: If you’re serious about gardening, consider getting your soil tested. This will tell you the pH level and nutrient content, allowing you to make targeted amendments. Garlic prefers a slightly acidic to neutral pH (around 6.0-7.0).
Planting Your Garlic Cloves
Alright, the moment we’ve been waiting for! Let’s get those cloves in the ground.
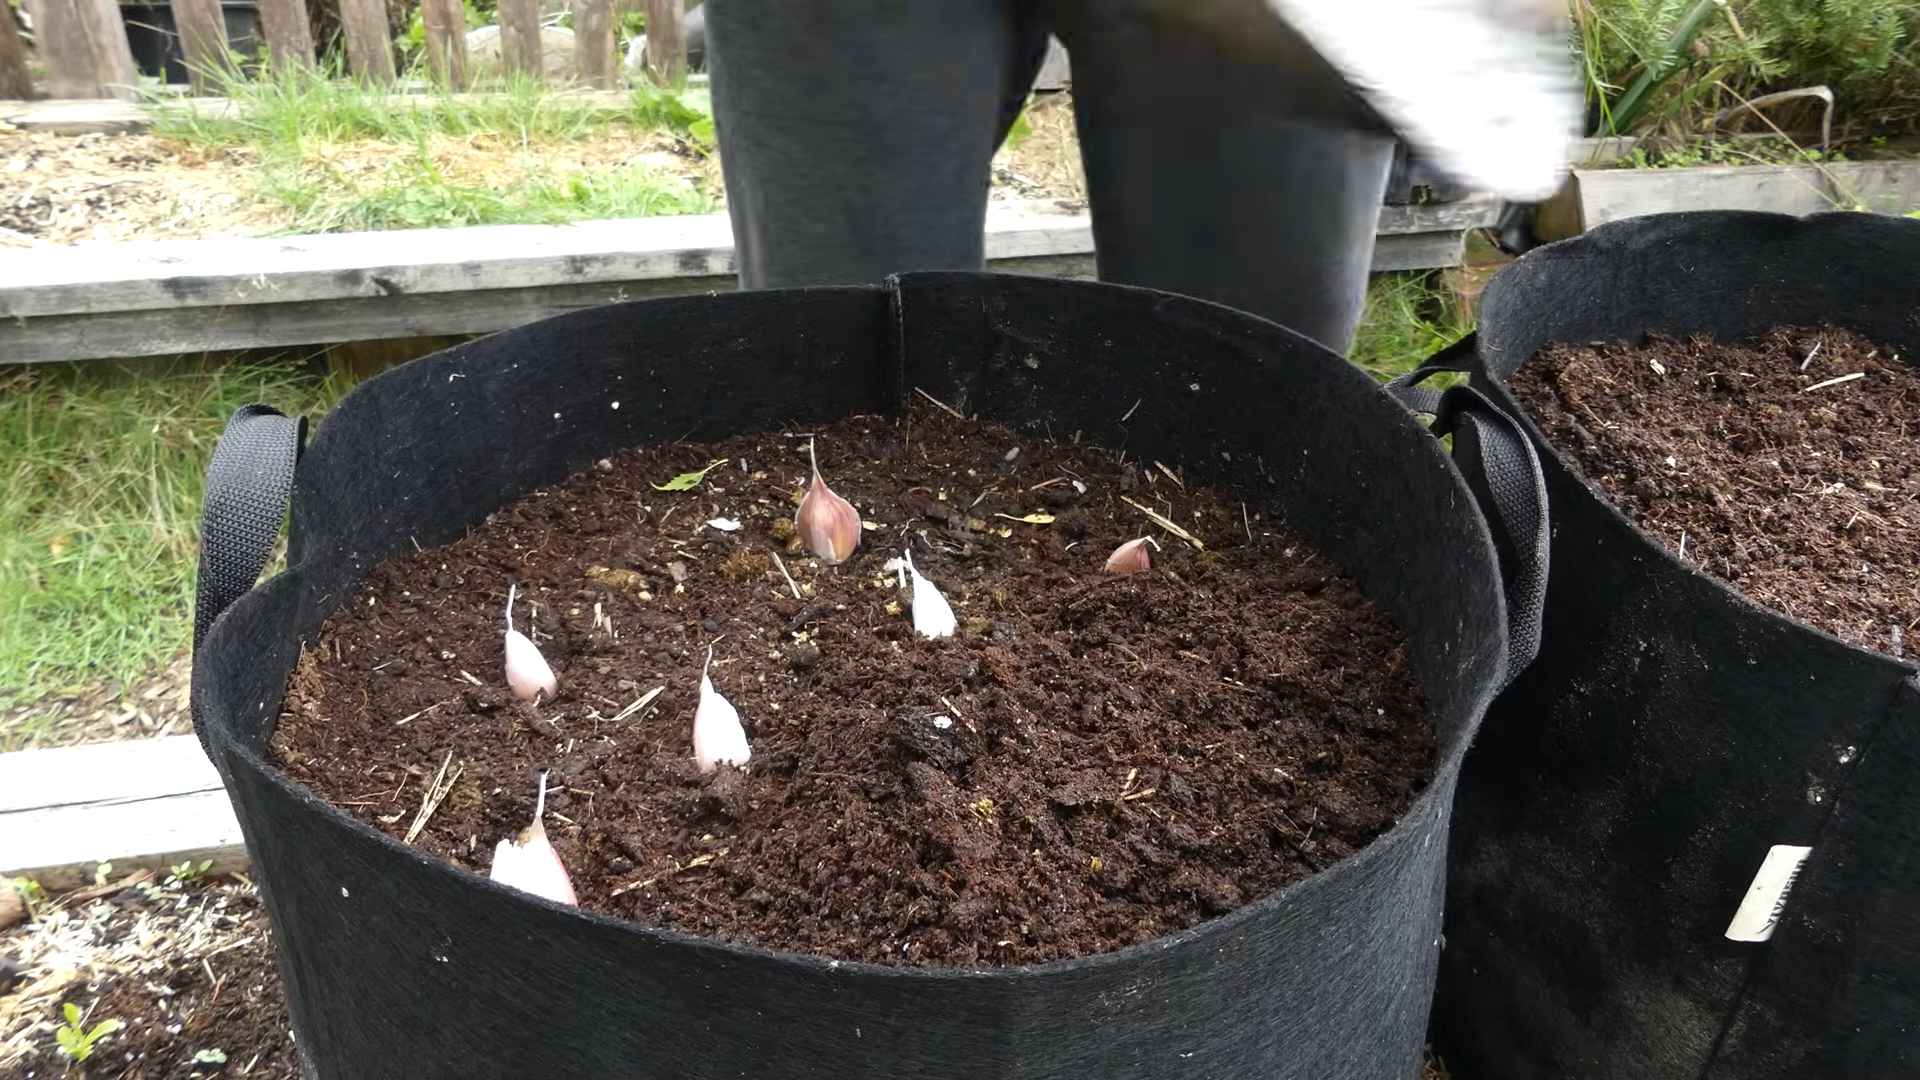
1. Separate the Cloves: Gently separate the cloves from the bulb. Leave the papery skin on each clove intact. Don’t peel them! Only separate the cloves right before planting.
2. Prepare the Planting Bed: Create rows that are about 6-8 inches apart. Within each row, space the cloves about 4-6 inches apart.
3. Planting Depth: Dig holes that are about 2-3 inches deep.
4. Orientation Matters: Place each clove in the hole with the pointy end facing up. This is crucial! The roots will emerge from the bottom (the flat end).
5. Cover and Water: Cover the cloves with soil and gently water the planting bed. You want the soil to be moist, but not soggy.
6. Mulch, Mulch, Mulch: Apply a thick layer of mulch (straw, shredded leaves, or wood chips) over the planting bed. This will help retain moisture, suppress weeds, and protect the cloves from extreme temperature fluctuations. I personally love using straw – it’s readily available and breaks down nicely over time.
Winter Care
Even though your garlic is underground, it still needs some TLC during the winter months.
* Watering: If you live in an area with little rainfall, water the planting bed occasionally to keep the soil moist. Avoid overwatering, as this can lead to rot.
* Mulch Maintenance: Check the mulch layer periodically and add more if needed. The mulch should be thick enough to insulate the soil but not so thick that it smothers the garlic.
* Patience is a Virtue: Don’t be discouraged if you don’t see any growth until spring. Garlic is a slow grower, and it needs the cold winter months to vernalize (a process that triggers bulb formation).
Spring and Summer Care
As the weather warms up, your garlic will start to grow rapidly. Here’s how to keep it happy and healthy:
1. Fertilizing: In the spring, fertilize your garlic with a balanced fertilizer or compost tea. This will provide the nutrients it needs to grow strong and produce large bulbs. I like to use a liquid seaweed fertilizer – it’s gentle and packed with micronutrients.
2. Watering: Water regularly, especially during dry periods. Garlic needs consistent moisture to thrive. Aim for about 1 inch of water per week.
3. Weed Control: Keep the planting bed free of weeds. Weeds compete with garlic for nutrients and water. Hand-pulling is the best option, as herbicides can damage your garlic.
4. Scape Removal (Hardneck Garlic): If you’re growing hardneck garlic, you’ll notice a flower stalk (scape) emerging in the spring. Cut off the scape as soon as it starts to curl. This will redirect the plant’s energy into bulb development. Don’t throw the scapes away! They’re delicious sautéed, grilled, or made into pesto.
5. Pest and Disease Control: Keep an eye out for pests and diseases. Common garlic pests include aphids and onion thrips. Diseases can include white rot and garlic rust. Treat any problems promptly with organic pest control methods or fungicides.
Harvesting Your Garlic
The moment of truth! Harvesting your garlic is the most rewarding part of the process.
1. Timing is Everything: Garlic is typically ready to harvest in mid-summer, about 8-9 months after planting. The leaves will start to turn yellow and brown, and the stalks will begin to fall over. This is a sign that the bulbs are mature.
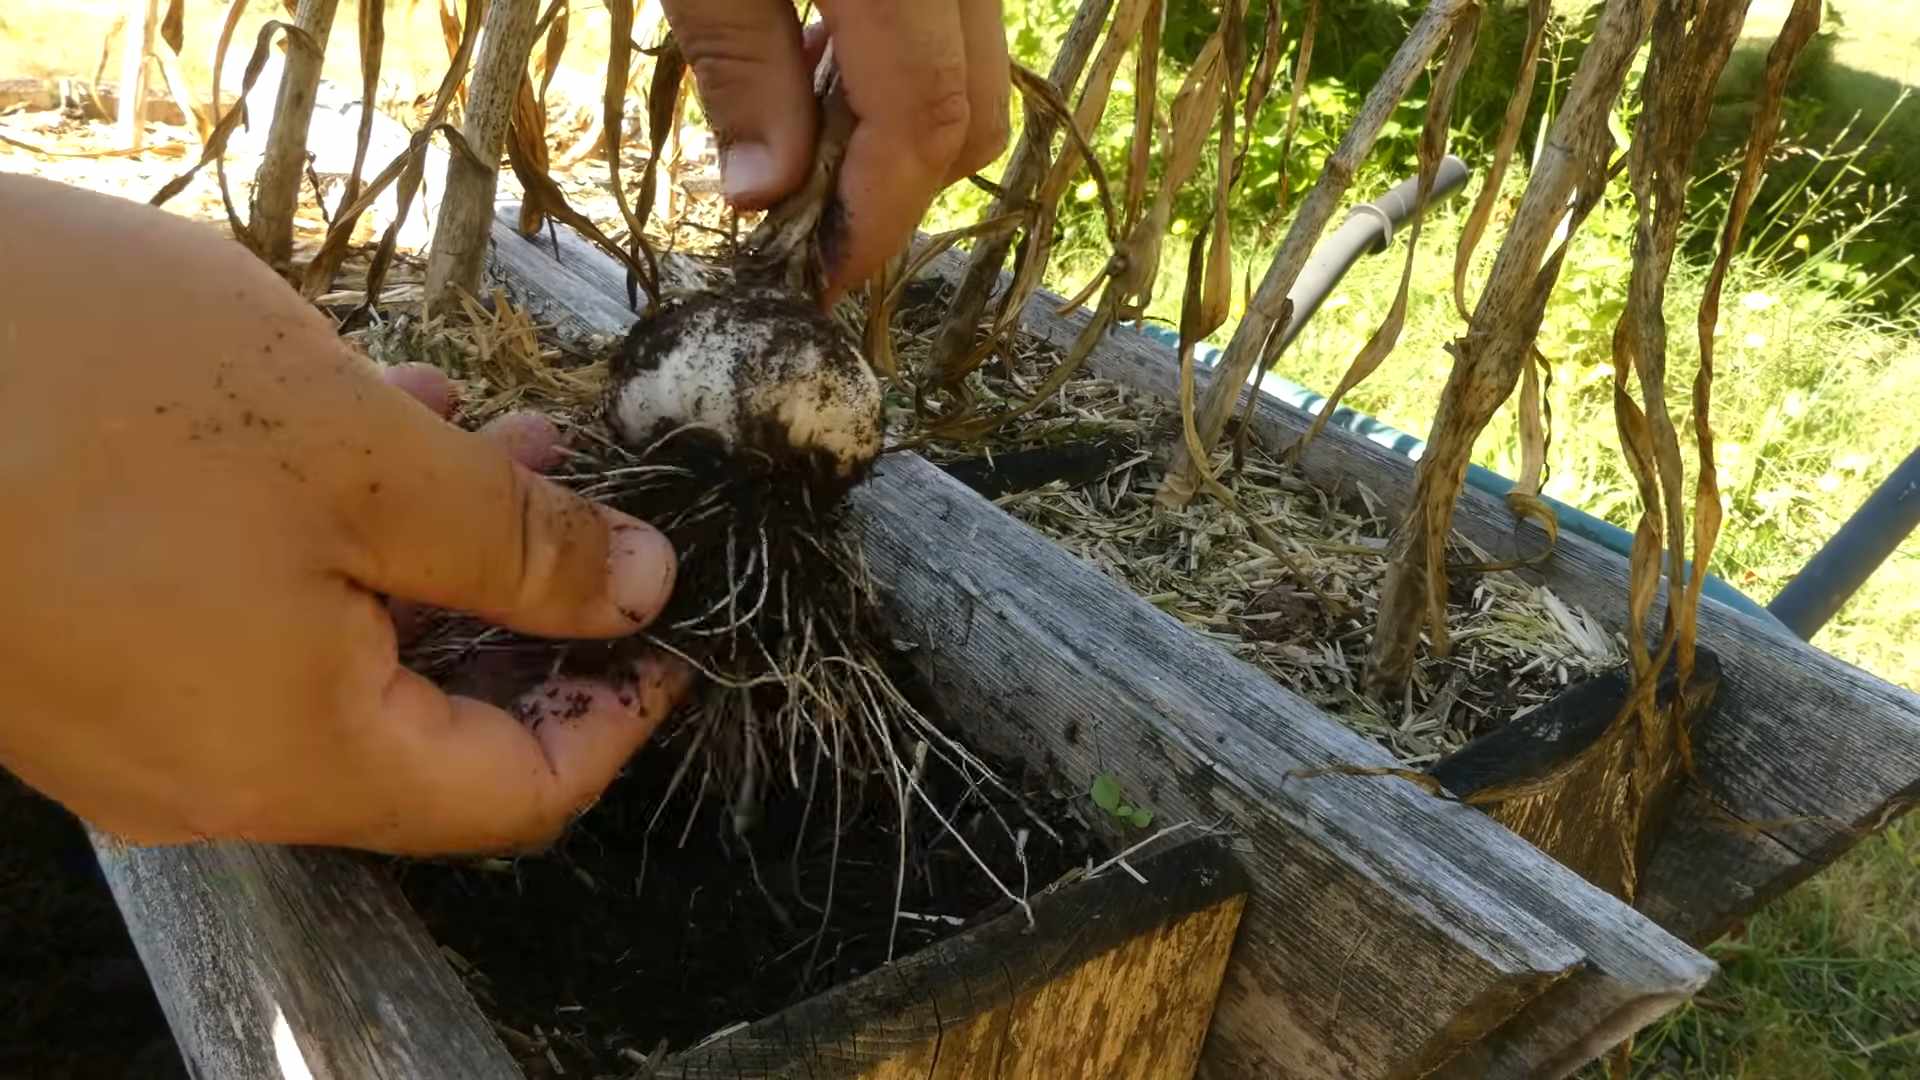
2. Digging Up the Bulbs: Use a garden fork or shovel to carefully dig up the bulbs. Be gentle, as you don’t want to damage them.
3. Cleaning the Bulbs: Gently brush off any excess soil from the bulbs. Don’t wash them!
4. Curing the Garlic: Curing is essential for long-term storage. Tie the garlic plants together in bundles and hang them in a cool, dry, well-ventilated place for 2-4 weeks. This allows the bulbs to dry and the skins to tighten.
5. Trimming and Storing: Once the garlic is cured, trim the roots and stalks. Store the bulbs in a cool, dry, dark place. Braided softneck garlic can be hung in the kitchen for easy access.
Troubleshooting
Even with the best planning, things can sometimes go wrong. Here are some common problems and how to fix them:
* Small Bulbs: This could be due to several factors, including poor soil, insufficient sunlight, or not removing scapes from hardneck garlic. Make sure your garlic is getting enough sunlight, amend your soil with compost, and remove scapes promptly.
* Rotting Cloves: This is usually caused by overwatering or poor drainage. Make sure your soil is well-drained and avoid overwatering.
* Pest Infestations: Treat pest infestations promptly with organic pest control methods.
* Disease Problems: Choose disease-resistant varieties and practice good sanitation to prevent disease problems.
Enjoying Your Harvest
Congratulations! You’ve successfully grown your own garlic! Now it’s time to enjoy the fruits (or rather, bulbs) of your labor. Use your homegrown garlic in all your favorite recipes. It’s so much more flavorful than store-bought garlic! You can also save some of the largest, healthiest bulbs to plant next year.
Growing garlic is a fun and rewarding experience. With a little bit of planning and effort, you can enjoy a bountiful harvest of delicious, homegrown garlic. Happy gardening!
Conclusion
So, there you have it! Growing garlic from cloves isn’t just a gardening project; it’s a rewarding experience that connects you to the earth and provides you with fresh, flavorful garlic right from your own backyard. Forget those bland, store-bought bulbs – imagine the robust aroma and intense taste of homegrown garlic elevating your culinary creations. This simple DIY trick is a must-try for anyone who appreciates fresh ingredients and enjoys the satisfaction of nurturing something from seed (or in this case, clove) to harvest.
Why is this a must-try? Because it’s incredibly easy, surprisingly productive, and undeniably delicious. You don’t need a sprawling farm or years of gardening experience. A small pot on your balcony or a corner of your garden is all you need to embark on this flavorful adventure. Plus, you’ll be amazed at how much better homegrown garlic tastes compared to what you find in the supermarket. The flavor is more complex, the aroma is more potent, and the satisfaction of harvesting your own crop is simply unmatched.
But the benefits don’t stop there. Growing your own garlic allows you to control the entire process, from the type of garlic you grow to the soil it’s grown in. This means you can ensure your garlic is organic and free from harmful pesticides and chemicals. You’ll also be contributing to a more sustainable food system by reducing your reliance on commercially produced garlic that often travels long distances.
Looking for variations? Absolutely! Experiment with different varieties of garlic to discover your favorite flavor profile. Softneck garlic is known for its mild flavor and suitability for braiding, while hardneck garlic offers a bolder taste and produces scapes, which are delicious when sautéed or used in pesto. You can also try growing garlic in raised beds or containers if you have limited space or poor soil quality. Consider companion planting with herbs like rosemary or thyme to deter pests and enhance the flavor of your garlic.
Don’t be afraid to experiment and personalize your garlic-growing journey. The possibilities are endless!
We wholeheartedly encourage you to try this DIY trick and experience the joy of growing your own garlic. It’s a simple, rewarding, and delicious way to connect with nature and elevate your cooking. Once you taste the difference between homegrown and store-bought garlic, you’ll never go back.
And most importantly, we want to hear about your experience! Share your photos, tips, and stories with us in the comments below. Let us know what varieties you tried, what challenges you faced, and what successes you celebrated. Together, we can create a community of garlic growers and inspire others to embark on this flavorful adventure. So, grab some cloves, get your hands dirty, and get ready to enjoy the taste of homegrown garlic! Let us know how your garlic growing journey goes!
Frequently Asked Questions (FAQ)
What kind of garlic should I use to grow garlic from cloves?
The best garlic to use for growing is organic garlic purchased from a reputable source, such as a local farmer’s market or garden center. Avoid using garlic from the grocery store, as it may have been treated to prevent sprouting. You can use either softneck or hardneck varieties. Softneck garlic is better suited for warmer climates and produces many cloves, while hardneck garlic is more cold-hardy and has a stronger flavor. Experiment with different varieties to find your favorite!
When is the best time to plant garlic cloves?
The ideal time to plant garlic cloves is in the fall, about 4-6 weeks before the ground freezes. This allows the cloves to establish roots before winter sets in. In colder climates, this is typically in October or November. In milder climates, you can plant in late November or December. If you miss the fall planting window, you can still plant garlic in early spring as soon as the ground can be worked, but the bulbs may not be as large.
How do I prepare the soil for planting garlic?
Garlic thrives in well-drained soil that is rich in organic matter. Before planting, amend the soil with compost or well-rotted manure to improve its fertility and drainage. Ensure the soil is loose and free of rocks or debris. A slightly acidic to neutral pH (around 6.0-7.0) is ideal. You can test your soil pH with a simple soil testing kit available at most garden centers.
How deep and far apart should I plant the garlic cloves?
Separate the garlic bulb into individual cloves, being careful not to damage them. Plant the cloves pointy-end up, about 2 inches deep and 6 inches apart. Space rows about 12 inches apart. Mulch the planting area with straw or leaves to help retain moisture, suppress weeds, and protect the cloves from extreme temperatures.
How much sunlight does garlic need?
Garlic needs at least 6 hours of sunlight per day to thrive. Choose a planting location that receives full sun for optimal growth. If you are growing garlic in containers, make sure to place them in a sunny spot.
How often should I water garlic?
Water garlic regularly, especially during dry periods. Keep the soil consistently moist but not waterlogged. Avoid overwatering, as this can lead to rot. During the spring, when the garlic is actively growing, increase the watering frequency. Reduce watering as the bulbs mature and the leaves begin to yellow.
How do I know when the garlic is ready to harvest?
Garlic is typically ready to harvest in late spring or early summer, about 8-9 months after planting. The leaves will begin to turn yellow and brown, and the stalks may start to fall over. To check if the bulbs are ready, carefully dig up a few plants. The bulbs should be well-formed and have papery skins.
How do I cure and store garlic?
After harvesting, gently brush off any excess soil from the bulbs. Tie the garlic plants together in bundles and hang them in a cool, dry, and well-ventilated place for 2-3 weeks to cure. Curing allows the garlic to dry properly, which helps to prevent rot and extend its shelf life. Once the garlic is cured, trim the roots and stalks, leaving about 1-2 inches of stalk above the bulb. Store the cured garlic in a cool, dry, and dark place, such as a pantry or basement. Properly cured and stored garlic can last for several months.
Can I grow garlic in containers?
Yes, you can successfully grow garlic in containers. Choose a large container that is at least 12 inches deep and wide. Use a well-draining potting mix and plant the cloves as described above. Water regularly and fertilize with a balanced fertilizer every few weeks. Make sure the container receives at least 6 hours of sunlight per day.
What are garlic scapes and how do I use them?
Garlic scapes are the curly flower stalks that grow from hardneck garlic varieties. They are a delicious and versatile ingredient that can be used in a variety of dishes. Harvest the scapes when they are still tender and curly, usually in late spring or early summer. You can use them in pesto, stir-fries, soups, or simply sauté them with olive oil and garlic. They have a mild garlic flavor and a slightly grassy taste.
What are some common pests and diseases that affect garlic?
Some common pests that affect garlic include aphids, thrips, and nematodes. Diseases that can affect garlic include white rot, bulb rot, and downy mildew. To prevent pests and diseases, practice good garden hygiene, such as removing weeds and debris, and avoid overwatering. You can also use organic pest control methods, such as insecticidal soap or neem oil. If you suspect your garlic is infected with a disease, remove the affected plants and dispose of them properly.
Can I save some of my homegrown garlic to plant next year?
Absolutely! In fact, saving your own garlic to plant next year is a great way to ensure a continuous supply of fresh garlic. Choose the largest and healthiest bulbs from your harvest and set them aside for planting in the fall. Store them in a cool, dry, and dark place until planting time. This ensures you are using the best possible seed stock for your next crop.

Leave a Comment