

Grow Endive at Home and unlock the secrets to fresh, slightly bitter greens right from your own backyard! Have you ever dreamt of strolling through your garden and harvesting crisp, flavorful endive for a vibrant salad or a sophisticated side dish? Well, dream no more! This DIY guide is your passport to cultivating this unique vegetable with ease.
Endive, with its intriguing history, has been enjoyed for centuries. Originating in Belgium, legend has it that endive was discovered accidentally when a farmer stored chicory roots in a dark cellar during the winter. The resulting pale, tightly packed heads were a delightful surprise, and thus, endive was born! This resourceful discovery highlights the beauty of experimentation and the potential hidden within our gardens.
Why should you embark on this endive-growing adventure? Because fresh, homegrown produce simply tastes better! Plus, store-bought endive can be pricey and sometimes lacks the vibrant flavor you crave.
Growing your own endive allows you to control the entire process, ensuring the freshest, most flavorful greens possible.
I’m here to guide you through every step, from selecting the right seeds to harvesting your bountiful crop. With a few simple tricks and a little patience, you’ll be enjoying delicious, homegrown endive in no time. Let’s get started and grow endive at home together!

Growing Endive Indoors: A Beginner’s Guide
Endive, with its slightly bitter and crisp leaves, is a delicious and nutritious addition to salads and cooked dishes. While it might seem intimidating to grow, forcing endive indoors during the colder months is surprisingly achievable and rewarding. I’m going to walk you through the entire process, from choosing the right roots to harvesting your own homegrown endive.
Choosing and Preparing Your Endive Roots
The key to successful indoor endive forcing lies in starting with healthy, well-developed roots. You can either grow your own endive outdoors specifically for forcing, or purchase pre-grown roots from a reputable supplier.
* Root Selection: Look for roots that are at least 1-1.5 inches in diameter at the crown. They should be firm and free from any signs of rot or damage. Avoid roots that are soft, mushy, or have visible blemishes.
* Root Storage (if necessary): If you’re not forcing the roots immediately, store them in a cool, dark, and humid place, like a refrigerator crisper drawer. Wrap them loosely in damp paper towels to prevent them from drying out. They can be stored this way for several weeks.
* Pre-Soaking: Before planting, soak the roots in a bucket of water for about 2-3 hours. This rehydrates them and encourages them to sprout.
Planting and Forcing Your Endive
Now comes the fun part – planting your endive roots and creating the ideal environment for them to produce those delicious chicons (the tightly packed heads of endive).
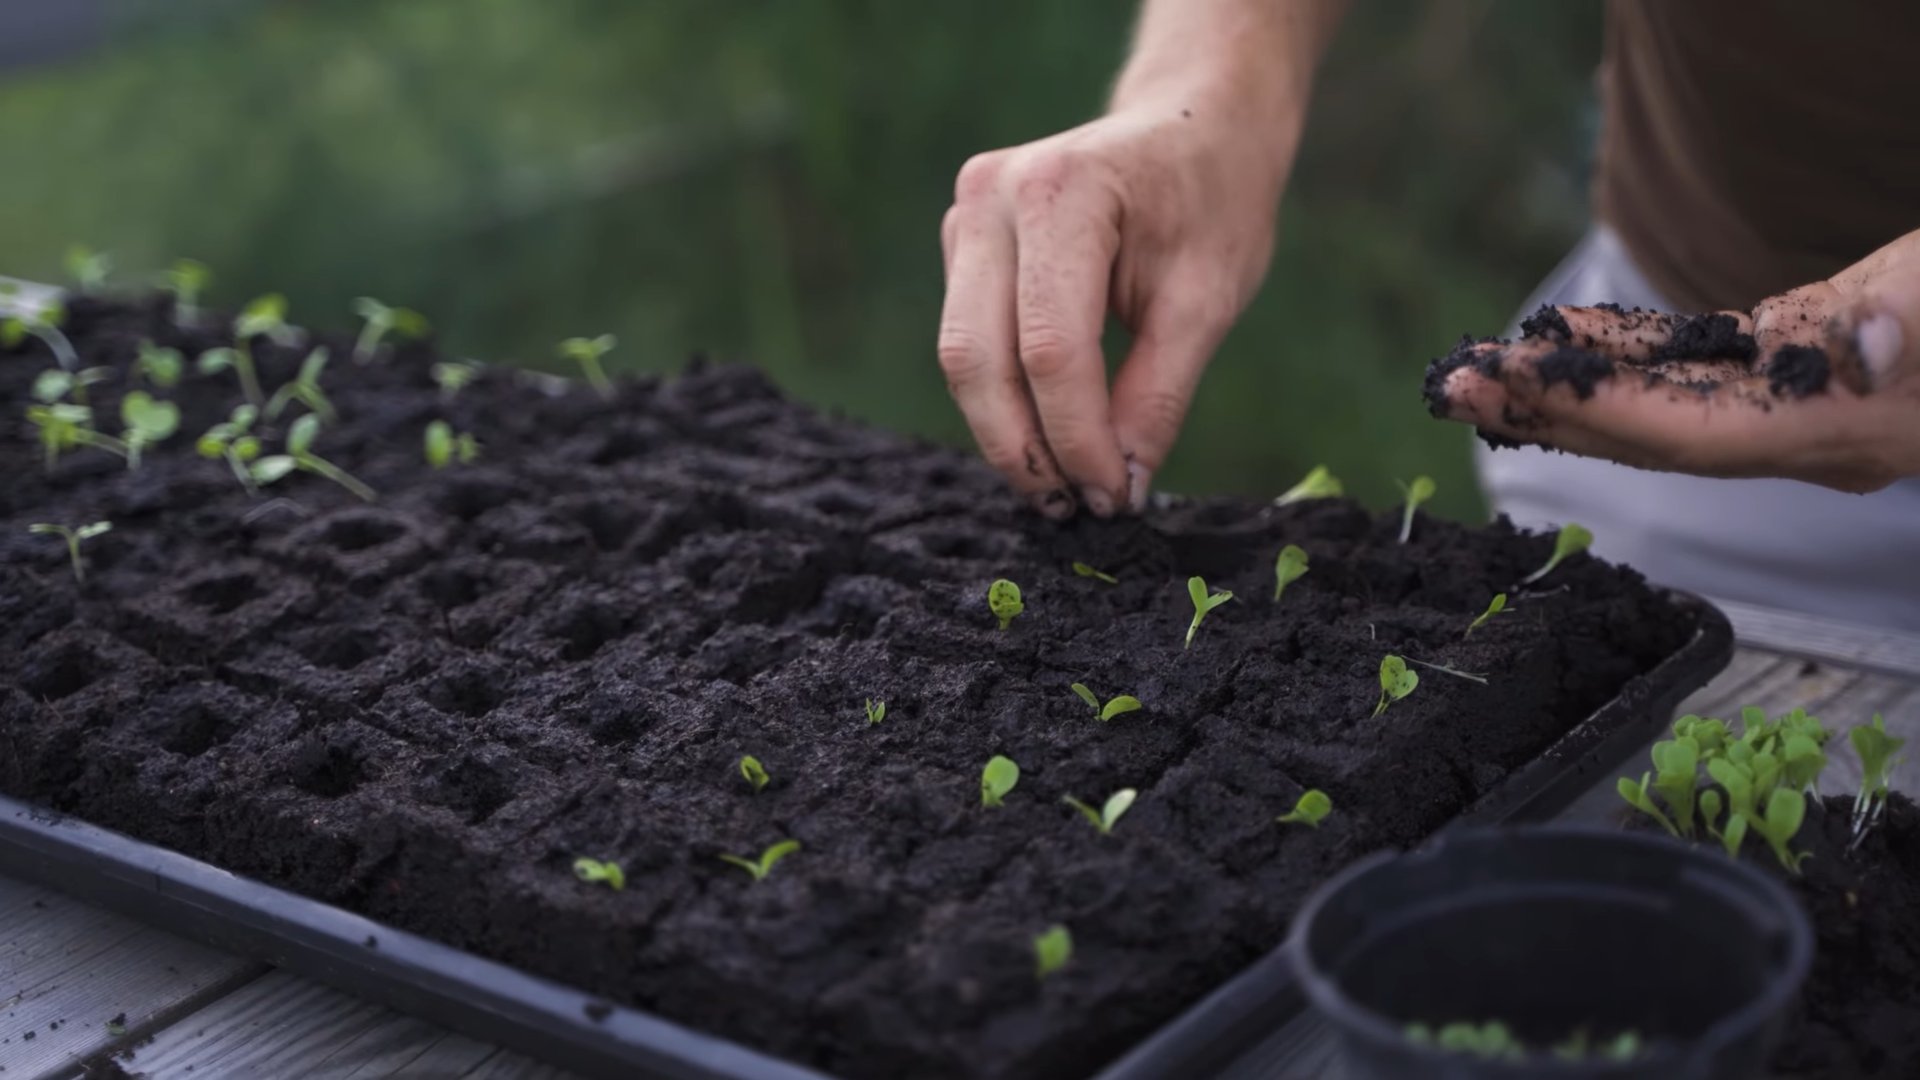
1. Choose Your Container: Select a container that is at least 8-10 inches deep. This will give the roots enough room to grow. A plastic tub, a large pot, or even a repurposed container will work just fine. Make sure it has drainage holes.
2. Prepare the Planting Medium: Endive isn’t too picky about soil, but a well-draining mix is essential. I like to use a combination of potting soil, compost, and perlite or vermiculite. This provides good drainage, aeration, and nutrients. Aim for a mix that’s about 1/3 potting soil, 1/3 compost, and 1/3 perlite/vermiculite.
3. Plant the Roots: Fill the container with your planting medium, leaving about 2-3 inches of space at the top. Plant the endive roots upright, close together, but not touching. The tops of the roots (the crown) should be just below the surface of the soil.
4. Water Thoroughly: After planting, water the container thoroughly until water drains out of the bottom. This helps settle the soil and ensures the roots are well-hydrated.
5. The Dark Period: This is the most crucial step in forcing endive. Endive needs to be grown in complete darkness to produce those pale, tightly packed chicons. Light exposure will cause the leaves to turn green and bitter.
* Creating Darkness: There are several ways to create a dark environment. You can place the container in a dark basement, a closet, or even cover it with a large, opaque container like a garbage can or a cardboard box.
* Ventilation: Regardless of the method you choose, make sure there is some ventilation to prevent mold and mildew growth. If using a garbage can or box, you can cut a few small holes in the sides.
6. Maintain Moisture: While the endive is growing in the dark, it’s important to keep the soil consistently moist, but not soggy. Check the soil moisture every few days and water as needed. I usually water every 5-7 days, but this will depend on the temperature and humidity of your growing environment.
7. Temperature Control: Endive prefers cool temperatures for forcing. The ideal temperature range is between 60-70°F (15-21°C). Avoid placing the container near a heat source, such as a radiator or a sunny window.
Monitoring and Troubleshooting
While forcing endive is relatively straightforward, you might encounter a few challenges along the way. Here are some common issues and how to address them:
* Mold or Mildew: If you notice mold or mildew growth on the soil surface or the endive leaves, it’s usually a sign of poor ventilation or excessive moisture. Improve ventilation by adding more holes to your covering container or moving the container to a less humid location. You can also try spraying the affected areas with a diluted solution of baking soda and water.
* Rotting Roots: If the roots start to rot, it’s usually a sign of overwatering. Make sure the soil is well-draining and avoid watering too frequently. Remove any affected roots immediately to prevent the rot from spreading.
* Slow Growth: If the endive is growing very slowly, it could be due to insufficient moisture, low temperatures, or poor root quality. Make sure the soil is consistently moist, and the temperature is within the ideal range. If you suspect the roots are the problem, you might need to start with a new batch of roots.
* Green Leaves: If the leaves are turning green, it means they are being exposed to light. Double-check your dark environment to ensure it is completely opaque.
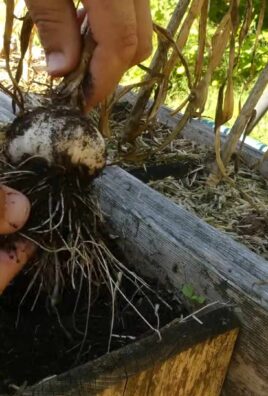
Harvesting Your Endive
After about 3-5 weeks in the dark, your endive should be ready to harvest.
1. Check for Readiness: The chicons should be firm, tightly packed, and about 4-6 inches long. The tips of the leaves may be slightly yellow or white.
2. Harvesting: To harvest, carefully cut the chicons off at the base with a sharp knife.
3. Post-Harvest Storage: After harvesting, store the endive in the refrigerator in a plastic bag. They will keep for about a week.
Second Forcing (Optional)
After harvesting the first crop of chicons, you can try forcing the roots a second time.
1. Prepare the Roots: After harvesting the first chicons, leave the roots in the container and water them lightly.
2. Repeat the Process: Return the container to the dark environment and continue to maintain moisture.
3. Second Harvest: You may get a smaller second harvest of chicons, but it’s worth a try!
Tips for Success
* Start with Quality Roots: This is the most important factor in successful endive forcing.
* Maintain Darkness: Ensure a completely dark environment to prevent bitter, green leaves.
* Don’t Overwater: Soggy soil can lead to root rot.
* Be Patient: It takes time for the endive to grow, so don’t get discouraged if you don’t see results immediately.
* Experiment: Try different varieties of endive and different forcing methods to find what works best for you.
Enjoying Your Homegrown Endive
Now that you’ve successfully grown your own endive, it’s time to enjoy the fruits (or rather, vegetables) of your labor! Endive can be used in a variety of dishes. Here are a few ideas:
* Salads: Endive adds a crisp and slightly bitter flavor to salads. Try pairing it with walnuts, blue cheese, and a vinaigrette dressing.
* Grilled or Roasted: Endive can be grilled or roasted to bring out its sweetness. Drizzle it with olive oil and balsamic vinegar before cooking.
* Braised: Braised endive is a classic French dish. It’s cooked slowly in butter and broth until tender and caramelized.
* Endive Boats: Use endive leaves as boats for appetizers or snacks. Fill them with hummus, guacamole, or other dips.
Troubleshooting Common Issues in Detail
Let’s delve deeper into some common problems you might encounter while forcing endive and how to fix them.
Dealing with Mold and Mildew
Mold and mildew are common issues in indoor gardening, especially in dark and humid environments. Here’s a more detailed approach to tackling them:
* Identify the Type of Mold: Is it white and fuzzy (likely powdery mildew) or dark and slimy? This can help you determine the best course of action.
* Increase Air Circulation: This is the most crucial step. If you’re using a box or container, add more ventilation holes. Consider using a small fan (on a low setting) to gently circulate air around the container.
* Reduce Humidity: If the humidity in your growing area is high, try using a dehumidifier.
* Baking Soda Solution: Mix 1 teaspoon of baking soda with 1 quart of water. Spray the affected areas thoroughly. This works well for powdery mildew.
* Neem Oil: Neem oil is a natural fungicide and insecticide. Dilute it according to the instructions on the bottle and spray the affected areas. Be sure to apply it in the evening, as neem oil can make plants more susceptible to sunburn.
* Remove Affected Leaves: If only a few leaves are affected, remove
Conclusion
So, there you have it! Growing endive at home, while it might seem a little intimidating at first, is a surprisingly rewarding experience. We’ve walked you through the entire process, from planting the seeds to forcing the chicons, and hopefully, you’re now feeling confident enough to give it a try.
Why is this DIY trick a must-try? Because it offers you a level of freshness and control you simply can’t get from store-bought endive. Imagine serving a salad with crisp, slightly bitter leaves that you nurtured from seed to table. The flavor is unparalleled, and the satisfaction of knowing you grew it yourself is immense. Plus, you’ll be reducing your carbon footprint by avoiding transportation and packaging associated with commercially grown produce.
But the benefits don’t stop there. Growing your own endive allows you to experiment with different varieties. While we’ve focused on the classic Belgian endive, there are other types you might want to explore. Broadleaf Batavian endive offers a milder flavor, while Frisee endive adds a feathery texture and slightly more pronounced bitterness to your dishes. Don’t be afraid to branch out and discover your favorite!
And speaking of variations, consider experimenting with different forcing methods. While we’ve outlined a simple soil-based method, you can also try forcing endive in water. This method is slightly faster and can be a fun way to observe the chicons developing. You can also play around with the amount of light the chicons receive during forcing. Less light will result in paler, more tender leaves, while more light will produce slightly greener and more bitter leaves.
Beyond salads, homegrown endive is incredibly versatile in the kitchen. Try grilling it for a smoky flavor, braising it in wine for a sophisticated side dish, or adding it to soups and stews for a touch of bitterness. The possibilities are endless!
Ultimately, the best way to discover the joys of growing endive at home is to simply dive in and try it. Don’t be discouraged if your first attempt isn’t perfect. Gardening is a learning process, and every mistake is an opportunity to improve. We encourage you to embrace the challenge, get your hands dirty, and experience the satisfaction of harvesting your own delicious endive.
We’re confident that once you taste the difference between homegrown and store-bought endive, you’ll be hooked. So, grab some seeds, follow our guide, and get ready to enjoy the freshest, most flavorful endive you’ve ever tasted. And most importantly, we want to hear about your experience! Share your tips, tricks, and photos with us in the comments below. Let’s build a community of home endive growers and inspire others to discover the joys of this rewarding DIY project. Happy gardening!
Frequently Asked Questions (FAQ)
1. Is growing endive at home difficult?
While it requires a bit more attention than some other vegetables, growing endive at home is definitely achievable for the average gardener. The key is understanding the two-stage process: the initial growing phase and the forcing phase. The initial phase is similar to growing lettuce or spinach, requiring well-drained soil, consistent watering, and adequate sunlight. The forcing phase, where you encourage the chicons to develop, requires a dark, cool environment. By following our guide and paying attention to the specific needs of the plant, you can successfully grow delicious endive in your own backyard. Don’t be afraid to experiment and learn from your mistakes!
2. What are the best conditions for growing endive?
Endive thrives in cool weather, making it an ideal crop for spring and fall. The optimal temperature range for growth is between 60°F and 70°F (15°C and 21°C). In the initial growing phase, endive needs at least six hours of sunlight per day. The soil should be well-drained and rich in organic matter. Amend your soil with compost or aged manure before planting to provide the necessary nutrients. During the forcing phase, endive requires complete darkness and a cool temperature, ideally between 50°F and 60°F (10°C and 15°C). This can be achieved by placing the roots in a dark container or cellar.
3. How long does it take to grow endive?
The entire process of growing endive, from seed to harvest, typically takes around 120 to 150 days. The initial growing phase, where you cultivate the leafy greens, takes approximately 90 to 120 days. The forcing phase, where you encourage the chicons to develop, takes an additional 30 to 45 days. Keep in mind that these are just estimates, and the actual time may vary depending on the variety of endive, the growing conditions, and the forcing method you use.
4. Can I grow endive indoors?
Yes, you can absolutely grow endive indoors, especially during the forcing phase. In fact, forcing endive indoors is often easier than forcing it outdoors, as you have more control over the temperature and light conditions. To grow endive indoors, start by planting the seeds in containers filled with well-draining potting mix. Once the plants have matured and developed a good root system, you can transplant them into larger containers for forcing. Place the containers in a dark, cool room or closet, and keep the soil consistently moist.
5. What are some common problems when growing endive, and how can I prevent them?
Some common problems when growing endive include bolting (premature flowering), tip burn, and pest infestations. Bolting can occur if the plants are exposed to excessive heat or stress. To prevent bolting, choose heat-tolerant varieties and provide adequate shade during hot weather. Tip burn, which is characterized by browning of the leaf tips, can be caused by calcium deficiency or inconsistent watering. To prevent tip burn, ensure that your soil is rich in calcium and water regularly, especially during dry periods. Pests such as aphids and slugs can also be a problem. To prevent pest infestations, inspect your plants regularly and remove any pests you find. You can also use organic pest control methods, such as insecticidal soap or diatomaceous earth.
6. What is the best way to store endive after harvesting?
After harvesting your endive, it’s important to store it properly to maintain its freshness and flavor. The best way to store endive is to wrap it loosely in a damp paper towel and place it in a plastic bag in the refrigerator. This will help to keep the leaves crisp and prevent them from drying out. Endive can typically be stored in the refrigerator for up to a week. Before using, rinse the leaves thoroughly and pat them dry.
7. Can I eat the green leaves of the endive plant before forcing?
Yes, you can absolutely eat the green leaves of the endive plant before forcing. In fact, these leaves are often used in salads and other dishes. They have a slightly bitter flavor, similar to arugula or radicchio. However, keep in mind that the green leaves will be more bitter than the chicons that develop during the forcing phase. If you prefer a milder flavor, you can blanch the leaves by briefly immersing them in boiling water before using them.
8. What are some creative ways to use homegrown endive in recipes?
Homegrown endive is incredibly versatile and can be used in a wide variety of recipes. Here are a few ideas to get you started:
* **Endive Salad with Walnuts and Blue Cheese:** A classic combination that highlights the slightly bitter flavor of endive.
* **Grilled Endive with Balsamic Glaze:** Grilling endive softens its bitterness and adds a smoky flavor.
* **Endive and Apple Salad with Lemon Vinaigrette:** A refreshing and flavorful salad that’s perfect for a light lunch.
* **Braised Endive with Ham and Gruyere:** A comforting and sophisticated dish that’s perfect for a cold winter evening.
* **Endive Soup:** A creamy and flavorful soup that’s perfect for using up extra endive.
Don’t be afraid to experiment and get creative with your homegrown endive! The possibilities are endless.
9. Where can I find endive seeds?
Endive seeds are readily available at most garden centers and online retailers. Look for reputable seed companies that offer a variety of endive varieties. When choosing seeds, consider the climate in your area and the type of endive you prefer. Some popular varieties include Belgian endive, Broadleaf Batavian endive, and Frisee endive.
10. Is growing endive organically possible?
Yes, growing endive organically is definitely possible and highly recommended. By using organic gardening practices, you can ensure that your endive is free from harmful chemicals and pesticides. To grow endive organically, start by using organic seeds and potting mix. Amend your soil with compost or aged manure to provide the necessary nutrients. Use organic pest control methods, such as insecticidal soap or diatomaceous earth, to prevent pest infestations. And most importantly, avoid using synthetic fertilizers and pesticides.

Leave a Comment