

Grow chilies indoors easily? Absolutely! Imagine plucking fiery red chilies straight from your windowsill, adding a burst of homegrown flavor to your favorite dishes, even in the dead of winter. Sounds like a dream, right? Well, it’s a dream within reach! For centuries, cultures around the globe have cultivated chilies, not just for their culinary kick, but also for their medicinal properties and even as ornamental plants. From the ancient Aztecs using them in rituals to modern-day chefs crafting complex sauces, chilies have a rich and vibrant history.
But let’s be honest, not everyone has a sprawling garden or the perfect climate to grow these spicy gems outdoors. That’s where this DIY guide comes in! I’m going to share some simple, yet effective, tricks and hacks to help you grow chilies indoors easily, regardless of your experience level. Whether you’re a seasoned gardener or a complete newbie, you’ll discover how to create the ideal environment, choose the right varieties, and troubleshoot common problems. Say goodbye to bland meals and hello to a constant supply of fresh, flavorful chilies right at your fingertips! Let’s get started!
Growing Chilies Indoors: My Foolproof Guide to Spicy Success!
Hey there, fellow chili enthusiast! Ever dreamt of having a constant supply of fresh, fiery chilies right at your fingertips, regardless of the season? Well, you’ve come to the right place! I’m going to walk you through my tried-and-true method for growing chilies indoors, ensuring you’ll be harvesting a bumper crop of spicy goodness in no time. Trust me, it’s easier than you think!
What You’ll Need: The Chili Grower’s Toolkit
Before we dive in, let’s gather our supplies. Having everything ready beforehand will make the whole process smoother and more enjoyable. Here’s what you’ll need:
* Chili Seeds: Obviously! Choose varieties that suit your taste and growing space. Some good options for indoors include Thai chilies, Jalapeños, Scotch Bonnets, and Habaneros. I personally love growing Serrano peppers; they’re prolific and pack a nice punch.
* Seed Starting Tray or Small Pots: These will be your nursery for the baby chili plants.
* Seed Starting Mix: This is a light, airy soil mix specifically designed for seedlings. It provides good drainage and nutrients.
* Larger Pots (at least 5 gallons): Once your seedlings are big enough, they’ll need a bigger home. Choose pots with good drainage holes.
* Potting Soil: A good quality potting mix is essential for healthy chili plants. Avoid using garden soil, as it can compact and drain poorly.
* Grow Lights: Unless you have a super sunny south-facing window, you’ll need grow lights to provide your chilies with enough light. LED grow lights are energy-efficient and work great.
* Watering Can or Spray Bottle: For gentle watering.
* Fertilizer: A balanced liquid fertilizer specifically formulated for tomatoes or peppers will provide your plants with the nutrients they need to thrive.
* Small Fan: This helps to strengthen the stems of your seedlings and prevent fungal diseases.
* Optional: Heat Mat: This can speed up germination, especially in cooler climates.
* Optional: Plant Labels: To keep track of your different chili varieties.
Phase 1: Germinating Your Chili Seeds
This is where the magic begins! Getting your seeds to sprout is the first crucial step.
1. Soaking the Seeds (Optional but Recommended): I like to soak my chili seeds in warm water for 24 hours before planting. This helps to soften the seed coat and speed up germination. Just place the seeds in a small bowl of warm water and let them sit overnight.
2. Preparing the Seed Starting Tray: Fill your seed starting tray or small pots with seed starting mix. Gently press the soil down to remove any air pockets.
3. Planting the Seeds: Make a small hole (about ¼ inch deep) in the center of each cell or pot. Place one or two chili seeds in each hole and cover them with soil. Gently water the soil to moisten it.
4. Creating a Humid Environment: Cover the seed starting tray with a clear plastic lid or plastic wrap to create a humid environment. This will help the seeds germinate.
5. Providing Warmth: Place the seed starting tray in a warm location. A heat mat can be helpful, but a warm windowsill or the top of your refrigerator can also work. The ideal temperature for germination is between 75-85°F (24-29°C).
6. Patience is Key: Chili seeds can take anywhere from 7 to 21 days to germinate, so be patient! Keep the soil moist but not soggy. Check the tray daily and mist with water if the soil is dry.
7. Remove the Cover: Once the seedlings emerge, remove the plastic lid or plastic wrap.
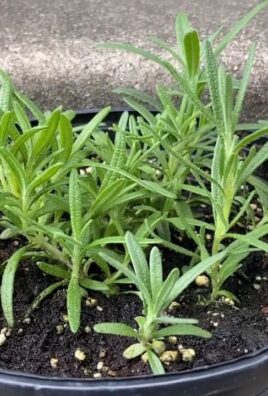
Phase 2: Nurturing Your Seedlings
Now that you have tiny chili plants, it’s time to give them the care they need to grow strong and healthy.
1. Providing Light: Place the seedlings under grow lights. Position the lights a few inches above the plants and keep them on for 14-16 hours per day. Adjust the height of the lights as the plants grow. If you’re using a windowsill, rotate the plants regularly to ensure they receive even light.
2. Watering Carefully: Water the seedlings when the soil feels dry to the touch. Avoid overwatering, as this can lead to root rot. Use a watering can or spray bottle to gently water the soil.
3. Providing Air Circulation: Place a small fan near the seedlings to provide air circulation. This will help to strengthen the stems and prevent fungal diseases. Run the fan for a few hours each day.
4. Thinning the Seedlings: If you planted more than one seed per cell or pot, thin the seedlings to one plant per cell or pot. Choose the strongest and healthiest seedling and snip off the others at the soil line.
5. Fertilizing Gently: Once the seedlings have their first set of true leaves (the leaves that look like miniature versions of the adult leaves), start fertilizing them with a diluted liquid fertilizer. Follow the instructions on the fertilizer label. I usually start with half the recommended dose.
Phase 3: Transplanting to Larger Pots
Once your seedlings have grown a few inches tall and have a well-developed root system, it’s time to transplant them to larger pots.
1. Choosing the Right Pot: Select pots that are at least 5 gallons in size. This will give your chili plants enough room to grow. Make sure the pots have good drainage holes.
2. Preparing the Potting Soil: Fill the pots with a good quality potting mix.
3. Carefully Removing the Seedlings: Gently remove the seedlings from their seed starting tray or small pots. Be careful not to damage the roots. If the roots are tightly bound, gently loosen them before planting.
4. Planting the Seedlings: Make a hole in the center of the potting soil that is large enough to accommodate the root ball. Place the seedling in the hole and cover the roots with soil. Gently press the soil down to secure the plant.
5. Watering Thoroughly: Water the newly transplanted seedlings thoroughly.
Phase 4: Caring for Your Mature Chili Plants
Now that your chili plants are in their permanent homes, it’s time to provide them with the ongoing care they need to thrive and produce a bountiful harvest.
1. Providing Adequate Light: Chili plants need at least 6-8 hours of direct sunlight per day. If you’re growing them indoors, you’ll need to supplement with grow lights. Keep the lights on for 14-16 hours per day.
2. Watering Regularly: Water your chili plants when the soil feels dry to the touch. Avoid overwatering, as this can lead to root rot. Water deeply, allowing the water to drain out of the drainage holes.
3. Fertilizing Consistently: Fertilize your
Hey there, fellow chili enthusiast! Ever dreamt of having a constant supply of fresh, fiery chilies right at your fingertips, regardless of the season? Well, you’ve come to the right place! I’m going to walk you through my tried-and-true method for growing chilies indoors, ensuring you’ll be harvesting a bumper crop of spicy goodness in no time. Trust me, it’s easier than you think!
What You’ll Need: The Chili Grower’s Toolkit
Before we dive in, let’s gather our supplies. Having everything ready beforehand will make the whole process smoother and more enjoyable. Here’s what you’ll need:
* Chili Seeds: Obviously! Choose varieties that suit your taste and growing space. Some good options for indoors include Thai chilies, Jalapeños, Scotch Bonnets, and Habaneros. I personally love growing Serrano peppers; they’re prolific and pack a nice punch.
* Seed Starting Tray or Small Pots: These will be your nursery for the baby chili plants.
* Seed Starting Mix: This is a light, airy soil mix specifically designed for seedlings. It provides good drainage and nutrients.
* Larger Pots (at least 5 gallons): Once your seedlings are big enough, they’ll need a bigger home. Choose pots with good drainage holes.
* Potting Soil: A good quality potting mix is essential for healthy chili plants. Avoid using garden soil, as it can compact and drain poorly.
* Grow Lights: Unless you have a super sunny south-facing window, you’ll need grow lights to provide your chilies with enough light. LED grow lights are energy-efficient and work great.
* Watering Can or Spray Bottle: For gentle watering.
* Fertilizer: A balanced liquid fertilizer specifically formulated for tomatoes or peppers will provide your plants with the nutrients they need to thrive.
* Small Fan: This helps to strengthen the stems of your seedlings and prevent fungal diseases.
* Optional: Heat Mat: This can speed up germination, especially in cooler climates.
* Optional: Plant Labels: To keep track of your different chili varieties.
Phase 1: Germinating Your Chili Seeds
This is where the magic begins! Getting your seeds to sprout is the first crucial step.
1. Soaking the Seeds (Optional but Recommended): I like to soak my chili seeds in warm water for 24 hours before planting. This helps to soften the seed coat and speed up germination. Just place the seeds in a small bowl of warm water and let them sit overnight.
2. Preparing the Seed Starting Tray: Fill your seed starting tray or small pots with seed starting mix. Gently press the soil down to remove any air pockets.
3. Planting the Seeds: Make a small hole (about ¼ inch deep) in the center of each cell or pot. Place one or two chili seeds in each hole and cover them with soil. Gently water the soil to moisten it.
4. Creating a Humid Environment: Cover the seed starting tray with a clear plastic lid or plastic wrap to create a humid environment. This will help the seeds germinate.
5. Providing Warmth: Place the seed starting tray in a warm location. A heat mat can be helpful, but a warm windowsill or the top of your refrigerator can also work. The ideal temperature for germination is between 75-85°F (24-29°C).
6. Patience is Key: Chili seeds can take anywhere from 7 to 21 days to germinate, so be patient! Keep the soil moist but not soggy. Check the tray daily and mist with water if the soil is dry.
7. Remove the Cover: Once the seedlings emerge, remove the plastic lid or plastic wrap.
Phase 2: Nurturing Your Seedlings
Now that you have tiny chili plants, it’s time to give them the care they need to grow strong and healthy.
1. Providing Light: Place the seedlings under grow lights. Position the lights a few inches above the plants and keep them on for 14-16 hours per day. Adjust the height of the lights as the plants grow. If you’re using a windowsill, rotate the plants regularly to ensure they receive even light.
2. Watering Carefully: Water the seedlings when the soil feels dry to the touch. Avoid overwatering, as this can lead to root rot. Use a watering can or spray bottle to gently water the soil.
3. Providing Air Circulation: Place a small fan near the seedlings to provide air circulation. This will help to strengthen the stems and prevent fungal diseases. Run the fan for a few hours each day.
4. Thinning the Seedlings: If you planted more than one seed per cell or pot, thin the seedlings to one plant per cell or pot. Choose the strongest and healthiest seedling and snip off the others at the soil line.
5. Fertilizing Gently: Once the seedlings have their first set of true leaves (the leaves that look like miniature versions of the adult leaves), start fertilizing them with a diluted liquid fertilizer. Follow the instructions on the fertilizer label. I usually start with half the recommended dose.
Phase 3: Transplanting to Larger Pots
Once your seedlings have grown a few inches tall and have a well-developed root system, it’s time to transplant them to larger pots.
1. Choosing the Right Pot: Select pots that are at least 5 gallons in size. This will give your chili plants enough room to grow. Make sure the pots have good drainage holes.
2. Preparing the Potting Soil: Fill the pots with a good quality potting mix.
3. Carefully Removing the Seedlings: Gently remove the seedlings from their seed starting tray or small pots. Be careful not to damage the roots. If the roots are tightly bound, gently loosen them before planting.
4. Planting the Seedlings: Make a hole in the center of the potting soil that is large enough to accommodate the root ball. Place the seedling in the hole and cover the roots with soil. Gently press the soil down to secure the plant.
5. Watering Thoroughly: Water the newly transplanted seedlings thoroughly.
Phase 4: Caring for Your Mature Chili Plants
Now that your chili plants are in their permanent homes, it’s time to provide them with the ongoing care they need to thrive and produce a bountiful harvest.
1. Providing Adequate Light: Chili plants need at least 6-8 hours of direct sunlight per day. If you’re growing them indoors, you’ll need to supplement with grow lights. Keep the lights on for 14-16 hours per day.
2. Watering Regularly: Water your chili plants when the soil feels dry to the touch. Avoid overwatering, as this can lead to root rot. Water deeply, allowing the water to drain out of the drainage holes.
3. Fertilizing Consistently: Fertilize your chili plants every 2-3 weeks with a balanced liquid fertilizer. Follow the instructions on the fertilizer label. As the plants start to flower and produce fruit, you can switch to a fertilizer that is higher in phosphorus and potassium.
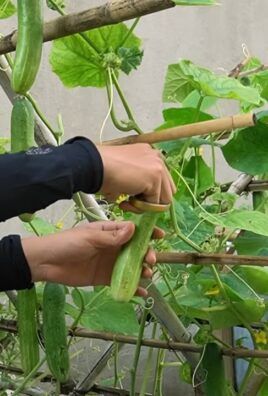
4. Providing Support: As your chili plants grow taller, they may need support to prevent them from falling over. You can use stakes or cages to support the plants.
5. Pollinating the Flowers: Chili plants are self-pollinating, but you can help them along by gently shaking the plants or using a small paintbrush to transfer pollen from one flower to another. This is especially important if you’re growing your plants indoors, where there are no bees or other pollinators.
6. Pruning (Optional): Pruning your chili plants can help to encourage bushier growth and increase fruit production. You can prune the plants by pinching off the tips of the branches.
7. Watching for Pests and Diseases: Keep an eye out for pests and diseases. Common pests that can affect chili plants include aphids, spider mites, and whiteflies. Common diseases include powdery mildew and blossom end rot. Treat any problems promptly with appropriate organic pesticides or fungicides. I personally prefer using neem oil for pest control.
Phase 5: Harvesting Your Chilies
The moment you’ve been waiting for! Harvesting your chilies is the most rewarding part of the process.
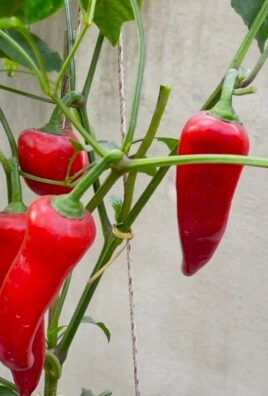
1. Knowing When to Harvest: The best time to harvest your chilies depends on the variety and your personal preference. Some chilies are best harvested when they are green, while others are best harvested when they are red or another color. Generally, chilies are ready to harvest when they have reached their full size and color.
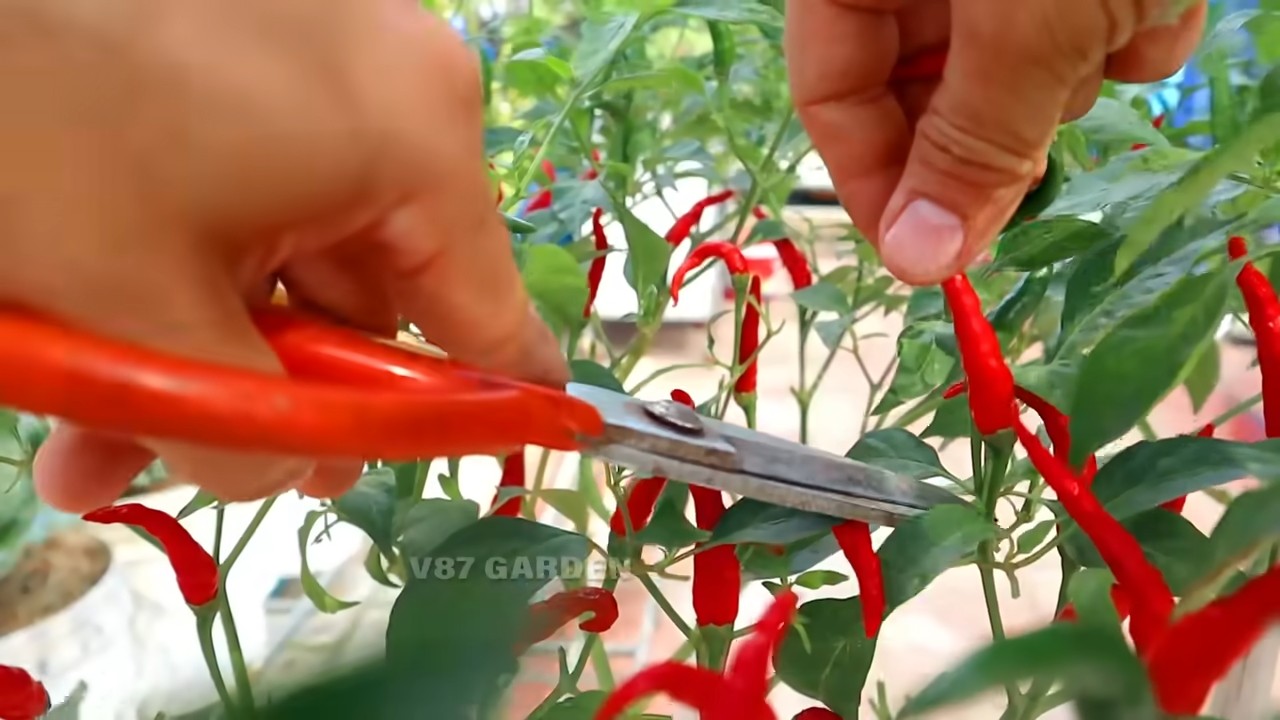
2. Harvesting Carefully: Use scissors or pruning shears to cut the chilies from the plant. Be careful not to damage the plant.
3. Enjoying Your Harvest: Use your fresh chilies in your favorite recipes, or dry them for later use. You can also freeze chilies for

Conclusion
So, there you have it! Growing chilies indoors easily is not just a possibility; it’s a rewarding and accessible project for anyone, regardless of their gardening experience. We’ve walked through the essential steps, from selecting the right chili varieties and providing optimal lighting to ensuring proper watering and pollination. This isn’t just about saving money on store-bought chilies; it’s about connecting with the natural world, experiencing the satisfaction of nurturing a plant from seed to harvest, and adding a vibrant, spicy touch to your culinary creations.
The beauty of this DIY approach lies in its adaptability. Feel free to experiment with different chili varieties to discover your personal favorites. Perhaps you’re a fan of the fiery Scotch Bonnet, or maybe you prefer the milder Anaheim. The choice is yours! Consider also exploring different container sizes and materials. Terracotta pots offer excellent drainage, while self-watering containers can simplify the watering process.
Don’t be afraid to get creative with your indoor chili garden. You could even try companion planting, pairing your chilies with herbs like basil or oregano, which can help deter pests and enhance the flavor of your chilies. Another variation is to explore hydroponic systems for growing chilies indoors. This soilless method can lead to faster growth and higher yields, although it requires a bit more initial investment and technical knowledge.
Ultimately, the success of your indoor chili garden depends on your dedication and willingness to learn. Observe your plants closely, paying attention to their leaves, stems, and overall health. Adjust your watering schedule, lighting, and fertilization as needed. Remember, every plant is unique, and what works for one chili variety may not work for another.
We strongly encourage you to embark on this exciting journey of growing chilies indoors easily. It’s a fantastic way to add fresh, flavorful ingredients to your meals, brighten up your living space, and connect with nature. And most importantly, don’t forget to share your experiences with us! We’d love to hear about your successes, challenges, and any unique tips or tricks you discover along the way. Share your photos and stories on social media using [Your Hashtag Here] or leave a comment below. Let’s create a community of indoor chili growers and inspire others to experience the joy of homegrown spice!
Frequently Asked Questions (FAQ)
What are the best chili varieties to grow indoors?
The best chili varieties for indoor growing are generally those that are compact and don’t require excessive sunlight. Some excellent choices include:
* **Thai Chilies:** These are small, prolific producers that thrive in containers. They offer a significant amount of heat and are perfect for Asian cuisine.
* **Jalapeños:** A classic choice, jalapeños are relatively easy to grow indoors and produce a moderate level of heat.
* **Serrano Peppers:** Similar to jalapeños but with a bit more kick, serranos are another great option for indoor cultivation.
* **Habaneros:** For those who crave intense heat, habaneros can be grown indoors, but they require more attention to detail and optimal growing conditions.
* **Cayenne Peppers:** These long, slender peppers are easy to dry and use in various dishes. They are also relatively easy to grow indoors.
* **Ornamental Peppers:** These are grown for their colorful fruits and compact size, making them ideal for indoor spaces. They often have a mild to moderate heat level.
Consider the size of your growing space and your personal preference for heat levels when selecting your chili varieties.
How much light do indoor chili plants need?
Chili plants require a significant amount of light to thrive and produce peppers. Ideally, they need at least 6-8 hours of direct sunlight per day. If you don’t have a sunny windowsill, you’ll need to supplement with artificial grow lights. LED grow lights are an excellent choice as they are energy-efficient and provide the full spectrum of light that chili plants need. Position the grow lights a few inches above the plants and adjust the height as they grow.
How often should I water my indoor chili plants?
Watering frequency depends on several factors, including the size of the pot, the type of soil, and the temperature and humidity of your home. As a general rule, water your chili plants when the top inch of soil feels dry to the touch. Avoid overwatering, as this can lead to root rot. Ensure that your pots have drainage holes to allow excess water to escape. During the hotter months, you may need to water more frequently.
How do I pollinate my indoor chili plants?
Indoor chili plants may need assistance with pollination, as they don’t have access to natural pollinators like bees and butterflies. You can hand-pollinate your plants by gently shaking the flowers or using a small paintbrush to transfer pollen from one flower to another. Do this during the morning when the pollen is most viable. You can also use a fan to circulate air around the plants, which can help with pollination.
What type of fertilizer should I use for my indoor chili plants?
Use a balanced fertilizer with an NPK ratio (nitrogen, phosphorus, potassium) of 10-10-10 or 14-14-14 during the early stages of growth. Once the plants start to flower and produce peppers, switch to a fertilizer with a higher phosphorus content (e.g., 5-10-5) to promote fruit development. Follow the instructions on the fertilizer packaging carefully and avoid over-fertilizing, as this can damage the plants.
How do I deal with pests on my indoor chili plants?
Indoor chili plants can be susceptible to pests like aphids, spider mites, and whiteflies. Regularly inspect your plants for signs of infestation. If you find pests, you can try washing them off with a strong stream of water or using insecticidal soap or neem oil. These are natural and effective ways to control pests without harming your plants.
When can I harvest my indoor chilies?
The time it takes for chilies to mature depends on the variety. Generally, you can harvest chilies when they have reached their mature color and size. The color will vary depending on the type of chili. Gently twist or cut the chilies from the plant, being careful not to damage the stems.
Can I grow chilies indoors year-round?
Yes, you can grow chilies indoors year-round, provided you provide them with the necessary light, water, and nutrients. You may need to adjust your care routine depending on the season. For example, you may need to provide more supplemental light during the winter months.
What size pot should I use for growing chilies indoors?
A pot that is at least 5 gallons in size is recommended for growing chilies indoors. This will give the roots enough room to grow and develop. Make sure the pot has drainage holes to prevent waterlogging.
How do I prevent my chili plants from getting leggy?
Leggy chili plants are often a sign of insufficient light. Ensure that your plants are receiving enough direct sunlight or supplemental grow lights. You can also prune your plants to encourage bushier growth. Pinch off the tips of the stems to promote branching.
Leave a Comment