

Grow Bitter Melon Terrace: Imagine stepping onto your terrace and being greeted by a lush, vibrant canopy of verdant leaves, dotted with the intriguing shapes of bitter melon. Sounds idyllic, right? Well, it’s more achievable than you think! For centuries, cultivating food in personal spaces has been a cornerstone of many cultures, from ancient rooftop gardens in Babylon to the modern-day victory gardens. This tradition speaks to our innate desire to connect with nature and provide for ourselves.
But let’s be honest, sometimes the idea of starting a garden, especially one that yields something as unique as bitter melon, can feel daunting. That’s where this DIY guide comes in! I’m going to share some simple, yet effective tricks and hacks to help you successfully grow bitter melon terrace, even if you’re a complete beginner. We’ll break down the process, from choosing the right container and soil to providing the perfect support system for your climbing vines.
Why bitter melon, you ask? Beyond its distinctive flavor and culinary versatility, bitter melon is packed with nutrients and has been used in traditional medicine for generations. Plus, growing your own food is incredibly rewarding! So, ditch the grocery store produce aisle and let’s embark on this exciting journey to transform your terrace into a thriving, edible oasis. Get ready to impress your friends and family with your green thumb and enjoy the satisfaction of harvesting your very own bitter melon!

Balkon-Bittermelone: Dein DIY-Leitfaden für eine reiche Ernte
Hallo liebe Gartenfreunde! Habt ihr Lust auf etwas Exotisches auf eurem Balkon? Dann lasst uns gemeinsam Bittermelone anbauen! Ich zeige euch, wie ihr diese ungewöhnliche Frucht auch ohne Garten erfolgreich kultivieren könnt. Keine Angst, es ist einfacher als ihr denkt!
Was du für dein Bittermelonen-Projekt brauchst:
* Samen: Bittermelonensamen (am besten aus dem Fachhandel oder online). Achtet auf Sorten, die für den Anbau in Töpfen geeignet sind.
* Anzuchttöpfe: Kleine Töpfe oder Anzuchtschalen für die Voranzucht.
* Anzuchterde: Spezielle Erde für die Anzucht von Sämlingen.
* Pflanztöpfe: Große Töpfe (mindestens 20 Liter Volumen) für die ausgewachsenen Pflanzen.
* Gute Blumenerde: Hochwertige Blumenerde mit guter Drainage.
* Rankhilfe: Ein Spalier, ein Rankgitter oder stabile Bambusstäbe, an denen die Bittermelone hochklettern kann.
* Dünger: Flüssigdünger für Gemüse oder ein Langzeitdünger.
* Gießkanne oder Schlauch: Zum regelmäßigen Gießen.
* Gartenschere: Zum Beschneiden der Pflanze.
* Handschuhe: Zum Schutz deiner Hände.
* Sonniger Standort: Bittermelonen lieben die Sonne!
* Geduld: Wie bei allen Pflanzen braucht es etwas Zeit und Pflege, bis die Bittermelone Früchte trägt.
Die Vorbereitung: Samen zum Leben erwecken
Bevor wir mit dem eigentlichen Pflanzen beginnen, müssen wir die Samen zum Keimen bringen. Das ist wichtig, um sicherzustellen, dass wir gesunde und kräftige Pflanzen bekommen.
1. Samen vorbereiten: Bittermelonensamen haben eine harte Schale. Um die Keimung zu beschleunigen, könnt ihr die Samen leicht anrauen. Nehmt dazu feines Schleifpapier oder eine Nagelfeile und reibt vorsichtig über die Oberfläche. Achtet darauf, die Samen nicht zu beschädigen!
2. Einweichen: Legt die angerauten Samen für 24 Stunden in lauwarmes Wasser. Das hilft, die Schale aufzuweichen und die Keimung zu fördern.
3. Aussaat: Füllt die Anzuchttöpfe mit Anzuchterde. Drückt die Erde leicht an und macht mit dem Finger kleine Löcher (ca. 1 cm tief). Legt in jedes Loch einen Samen und bedeckt ihn mit Erde.
4. Gießen: Gießt die Erde vorsichtig an, sodass sie feucht, aber nicht nass ist.
5. Warm und hell: Stellt die Anzuchttöpfe an einen warmen und hellen Ort. Eine Temperatur von 25-30°C ist ideal. Ihr könnt die Töpfe auch mit Frischhaltefolie abdecken, um die Luftfeuchtigkeit zu erhöhen. Achtet aber darauf, die Folie regelmäßig zu lüften, um Schimmelbildung zu vermeiden.
6. Geduldsprobe: Nach etwa 1-2 Wochen sollten die ersten Keimlinge zu sehen sein.
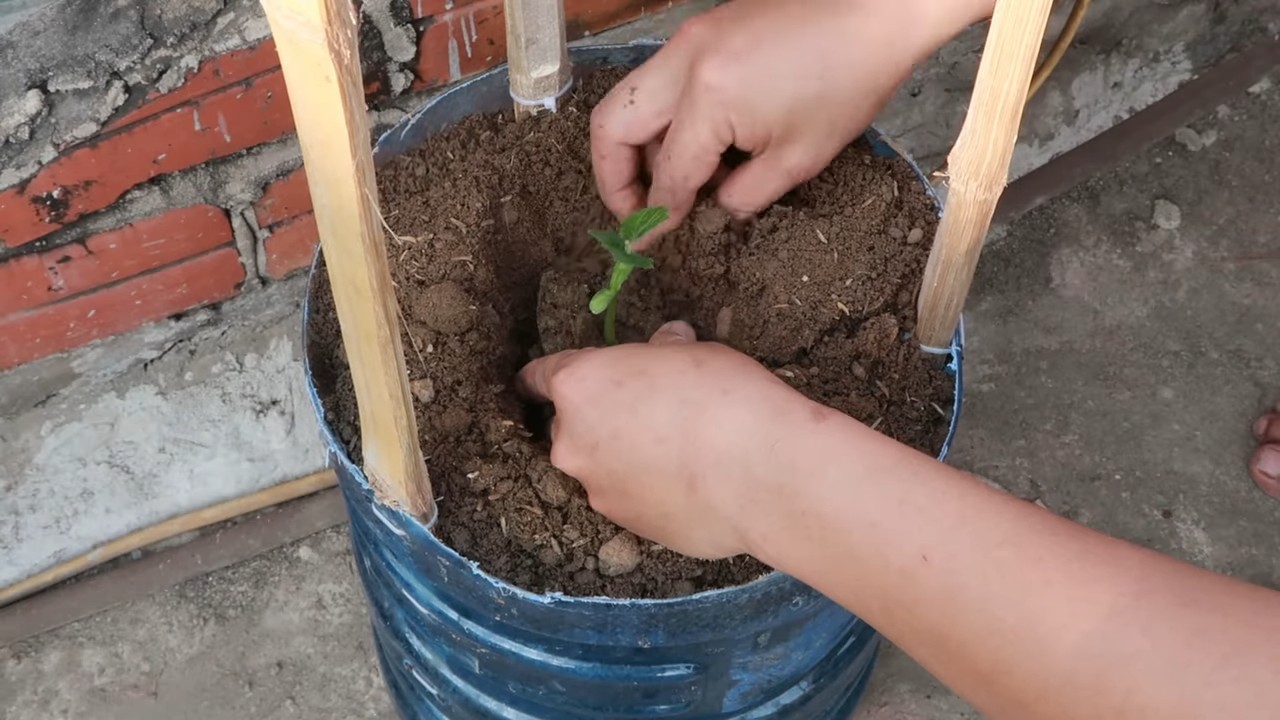
Umtopfen: Vom kleinen Topf in die große Welt
Sobald die Keimlinge ein paar Blätter entwickelt haben und kräftig genug aussehen, ist es Zeit, sie in größere Töpfe umzupflanzen.
1. Vorbereitung: Füllt die großen Pflanztöpfe mit guter Blumenerde. Achtet darauf, dass die Töpfe Abzugslöcher haben, damit überschüssiges Wasser ablaufen kann.
2. Umtopfen: Nehmt die kleinen Pflänzchen vorsichtig aus den Anzuchttöpfen. Achtet darauf, die Wurzeln nicht zu beschädigen.
3. Einpflanzen: Setzt die Pflänzchen in die großen Töpfe und füllt die Töpfe mit Erde auf. Drückt die Erde leicht an.
4. Angießen: Gießt die Pflanzen gründlich an.
5. Rankhilfe anbringen: Steckt die Rankhilfe in den Topf. Die Bittermelone wird sich daran festhalten und hochklettern.
Pflege: Damit deine Bittermelone sich wohlfühlt
Die Bittermelone ist eine relativ pflegeleichte Pflanze, aber ein paar Dinge solltet ihr beachten, damit sie sich wohlfühlt und viele Früchte trägt.
1. Gießen: Gießt die Bittermelone regelmäßig, besonders an heißen Tagen. Die Erde sollte immer leicht feucht sein, aber nicht nass. Vermeidet Staunässe, da dies zu Wurzelfäule führen kann.
2. Düngen: Düngt die Bittermelone regelmäßig mit Flüssigdünger für Gemüse oder einem Langzeitdünger. Beginnt mit dem Düngen etwa 2 Wochen nach dem Umtopfen.
3. Sonnenschein: Stellt die Bittermelone an einen sonnigen Standort. Sie braucht mindestens 6 Stunden Sonne pro Tag, um optimal zu wachsen und Früchte zu tragen.
4. Beschneiden: Beschneidet die Bittermelone regelmäßig, um das Wachstum anzuregen und die Fruchtbildung zu fördern. Entfernt Seitentriebe, die keine Blüten tragen.
5. Bestäubung: Bittermelonen sind einhäusig, das heißt, sie haben männliche und weibliche Blüten auf derselben Pflanze. Die Bestäubung erfolgt in der Regel durch Insekten. Wenn ihr sichergehen wollt, dass die Bestäubung erfolgreich ist, könnt ihr die Blüten auch von Hand bestäuben. Nehmt dazu einen kleinen Pinsel und übertragt den Blütenstaub von den männlichen auf die weiblichen Blüten. Die weiblichen Blüten erkennt ihr an dem kleinen Fruchtansatz unterhalb der Blüte.
6. Schutz vor Schädlingen: Achtet auf Schädlinge wie Blattläuse oder Spinnmilben. Bei Befall könnt ihr die Pflanze mit einem natürlichen Insektizid behandeln.
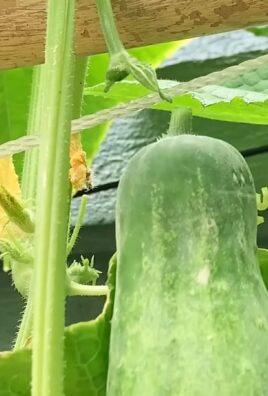
Ernte: Der Lohn deiner Mühe
Nach etwa 2-3 Monaten könnt ihr die ersten Bittermelonen ernten.
1. Reife erkennen: Die Bittermelonen sind reif, wenn sie eine intensive Farbe haben und sich leicht vom Stiel lösen lassen.
2. Ernten: Schneidet die Bittermelonen mit einer Gartenschere ab.
3. Genießen: Bittermelonen sind sehr gesund und vielseitig verwendbar. Sie können roh, gekocht, gebraten oder eingelegt werden. Achtung: Bittermelonen sind sehr bitter! Um den bitteren Geschmack zu mildern, könnt ihr die Melonen vor der Zubereitung in Salzwasser einlegen.
Zusätzliche Tipps für eine erfolgreiche Ernte
* Wähle die richtige Sorte: Es gibt verschiedene Bittermelonensorten. Informiere dich, welche Sorten für den Anbau im Topf geeignet sind.
* Achte auf eine gute Drainage: Staunässe kann zu Wurzelfäule führen. Stelle sicher, dass die Töpfe Abzugslöcher haben und verwende eine Blumenerde mit guter Drainage.
* Schütze die Pflanze vor Wind: Ein windgeschützter Standort ist ideal für die Bittermelone.
* Sei geduldig: Es kann etwas dauern, bis die Bittermelone Früchte trägt. Gib nicht auf und pflege die Pflanze weiterhin gut.
Häufige Probleme und Lösungen
* Gelbe Blätter: Gelbe Blätter können ein Zeichen für Nährstoffmangel sein. Dünge die Pflanze regelmäßig.
* Blattläuse: Blattläuse können mit einem natürlichen Insektizid bekämpft werden.
* Keine Früchte: Wenn die Bittermelone keine Früchte trägt, kann das an mangelnder Bestäubung liegen. Bestäube die Blüten von Hand.
Bittermelone als Kletterkünstler: Die richtige Rankhilfe
Die Bittermelone ist ein Kletterkünstler und braucht unbedingt eine Rankhilfe, um sich optimal zu entwickeln. Hier sind ein paar Ideen:
* Spalier: Ein Spalier ist eine klassische Rankhilfe, die sich gut für den Balkon eignet.
* Rankgitter: Ein Rankgitter ist eine einfache und kostengünstige Lösung.
* Bambusstäbe: Stabile Bambusstäbe können zu einem Tipi zusammengebunden werden.
* Seile: Spannt Seile zwischen zwei
Conclusion
So, there you have it! Transforming your outdoor space into a thriving bitter melon terrace is not only achievable but also incredibly rewarding. We’ve walked you through the steps, highlighted the benefits, and hopefully, inspired you to embark on this green adventure. But why is this DIY project a must-try?
Firstly, growing your own bitter melon offers unparalleled freshness. Imagine harvesting vibrant, healthy bitter melons right from your terrace, knowing exactly where they came from and how they were grown. This surpasses anything you can find at the grocery store, both in terms of taste and nutritional value.
Secondly, a bitter melon terrace is a stunning visual addition to your home. The cascading vines, the delicate flowers, and the unique fruit create a living tapestry that will impress your neighbors and provide a tranquil escape for you. It’s more than just a garden; it’s a statement.
Thirdly, and perhaps most importantly, this DIY project empowers you to take control of your food source. In a world increasingly concerned with sustainability and healthy eating, growing your own produce is a powerful act of self-sufficiency. You’ll reduce your carbon footprint, avoid harmful pesticides, and connect with nature in a meaningful way.
But the beauty of this project lies in its adaptability. Feel free to experiment with different trellis designs. Instead of a traditional vertical trellis, consider a horizontal pergola for a shaded seating area. You can also incorporate companion plants like basil or marigolds to deter pests and attract pollinators. Try different varieties of bitter melon, from the smaller, smoother types to the larger, more heavily textured ones. Each variety offers a unique flavor profile and growing experience.
Don’t be afraid to get creative with your container choices as well. While large pots are ideal, you can also repurpose old buckets or even build raised beds for a more permanent solution. Just ensure adequate drainage and sufficient space for the roots to thrive.
We understand that gardening can seem daunting, especially for beginners. But with a little patience, dedication, and the guidance provided in this article, you can successfully cultivate a flourishing bitter melon terrace. Remember to monitor your plants regularly, adjust your watering schedule based on the weather, and don’t hesitate to seek advice from local gardening experts.
The key to success in growing bitter melon is consistent care and attention. Pay close attention to the plant’s needs, and you’ll be rewarded with a bountiful harvest.
We wholeheartedly encourage you to give this DIY bitter melon terrace project a try. It’s an investment in your health, your home, and your connection to the natural world. And once you’ve experienced the joy of harvesting your own homegrown bitter melon, we’re confident you’ll be hooked.
Finally, we’d love to hear about your experiences! Share your photos, tips, and challenges in the comments section below. Let’s create a community of bitter melon enthusiasts and inspire others to embrace the joys of homegrown produce. Your insights could be invaluable to someone just starting out. So, get your hands dirty, embrace the challenge, and let’s grow some bitter melon together!
Frequently Asked Questions (FAQ)
What is the best time of year to start growing bitter melon?
Bitter melon thrives in warm weather, so the best time to start growing it is in late spring or early summer, after the last frost has passed. The soil temperature should be at least 65°F (18°C) for optimal germination. If you live in a region with a short growing season, you can start seeds indoors 4-6 weeks before the last expected frost and transplant them outdoors once the weather warms up. Starting indoors gives the plants a head start and ensures a longer growing season.
How much sunlight does bitter melon need?
Bitter melon requires at least 6-8 hours of direct sunlight per day to thrive. Choose a location for your terrace garden that receives ample sunlight throughout the day. If you’re growing bitter melon indoors, supplement with grow lights if necessary. Insufficient sunlight can lead to weak growth, reduced fruit production, and increased susceptibility to pests and diseases.
What kind of soil is best for growing bitter melon?
Bitter melon prefers well-draining, fertile soil with a slightly acidic to neutral pH (6.0-7.0). Amend your soil with compost or other organic matter to improve drainage and fertility. Avoid heavy clay soils, as they can become waterlogged and hinder root growth. A good potting mix for container gardening should contain a blend of peat moss, perlite, and vermiculite.
How often should I water my bitter melon plants?
Water your bitter melon plants regularly, especially during hot, dry weather. Keep the soil consistently moist, but avoid overwatering, which can lead to root rot. Water deeply at the base of the plant, rather than overhead, to prevent fungal diseases. Check the soil moisture regularly by sticking your finger into the soil. If the top inch feels dry, it’s time to water.
What kind of fertilizer should I use for bitter melon?
Bitter melon benefits from regular fertilization throughout the growing season. Use a balanced fertilizer (e.g., 10-10-10) or a fertilizer specifically formulated for vegetables. Apply fertilizer according to the package instructions. You can also supplement with organic fertilizers like compost tea or fish emulsion. Avoid over-fertilizing, as this can lead to excessive vegetative growth and reduced fruit production.
How do I control pests and diseases on my bitter melon plants?
Bitter melon can be susceptible to various pests and diseases, including aphids, spider mites, squash bugs, and powdery mildew. Regularly inspect your plants for signs of infestation or disease. Use organic pest control methods like insecticidal soap, neem oil, or horticultural oil to control pests. Ensure good air circulation around your plants to prevent fungal diseases. Remove any infected leaves or fruit promptly to prevent the spread of disease.
When is bitter melon ready to harvest?
Bitter melon is typically ready to harvest 8-12 weeks after planting. The fruit should be firm, green, and slightly immature. The size and shape of the fruit will vary depending on the variety. Harvest bitter melon before it turns yellow or orange, as this indicates that it is overripe and will become more bitter. Use a sharp knife or pruning shears to cut the fruit from the vine, leaving a short stem attached.
How do I store bitter melon after harvesting?
Store harvested bitter melon in the refrigerator for up to a week. Wrap the fruit in plastic wrap or place it in a plastic bag to prevent it from drying out. Bitter melon can also be frozen for longer storage. Blanch the fruit in boiling water for 2-3 minutes, then transfer it to an ice bath to stop the cooking process. Drain the fruit thoroughly and freeze it in airtight containers or freezer bags.
Can I grow bitter melon in containers?
Yes, bitter melon can be successfully grown in containers. Choose a large container (at least 10-15 gallons) with good drainage. Use a high-quality potting mix and provide a sturdy trellis for the vines to climb. Container-grown bitter melon may require more frequent watering and fertilization than plants grown in the ground.
Is bitter melon really that bitter? How can I reduce the bitterness?
Yes, bitter melon has a distinctively bitter taste, which is why it’s called “bitter” melon! However, there are ways to reduce the bitterness. Soaking the sliced bitter melon in salted water for 30 minutes to an hour can help draw out some of the bitter compounds. You can also blanch the sliced melon in boiling water for a few minutes before cooking. Cooking bitter melon with strong flavors like garlic, ginger, or chili peppers can also help mask the bitterness. Some varieties of bitter melon are naturally less bitter than others.

Leave a Comment