

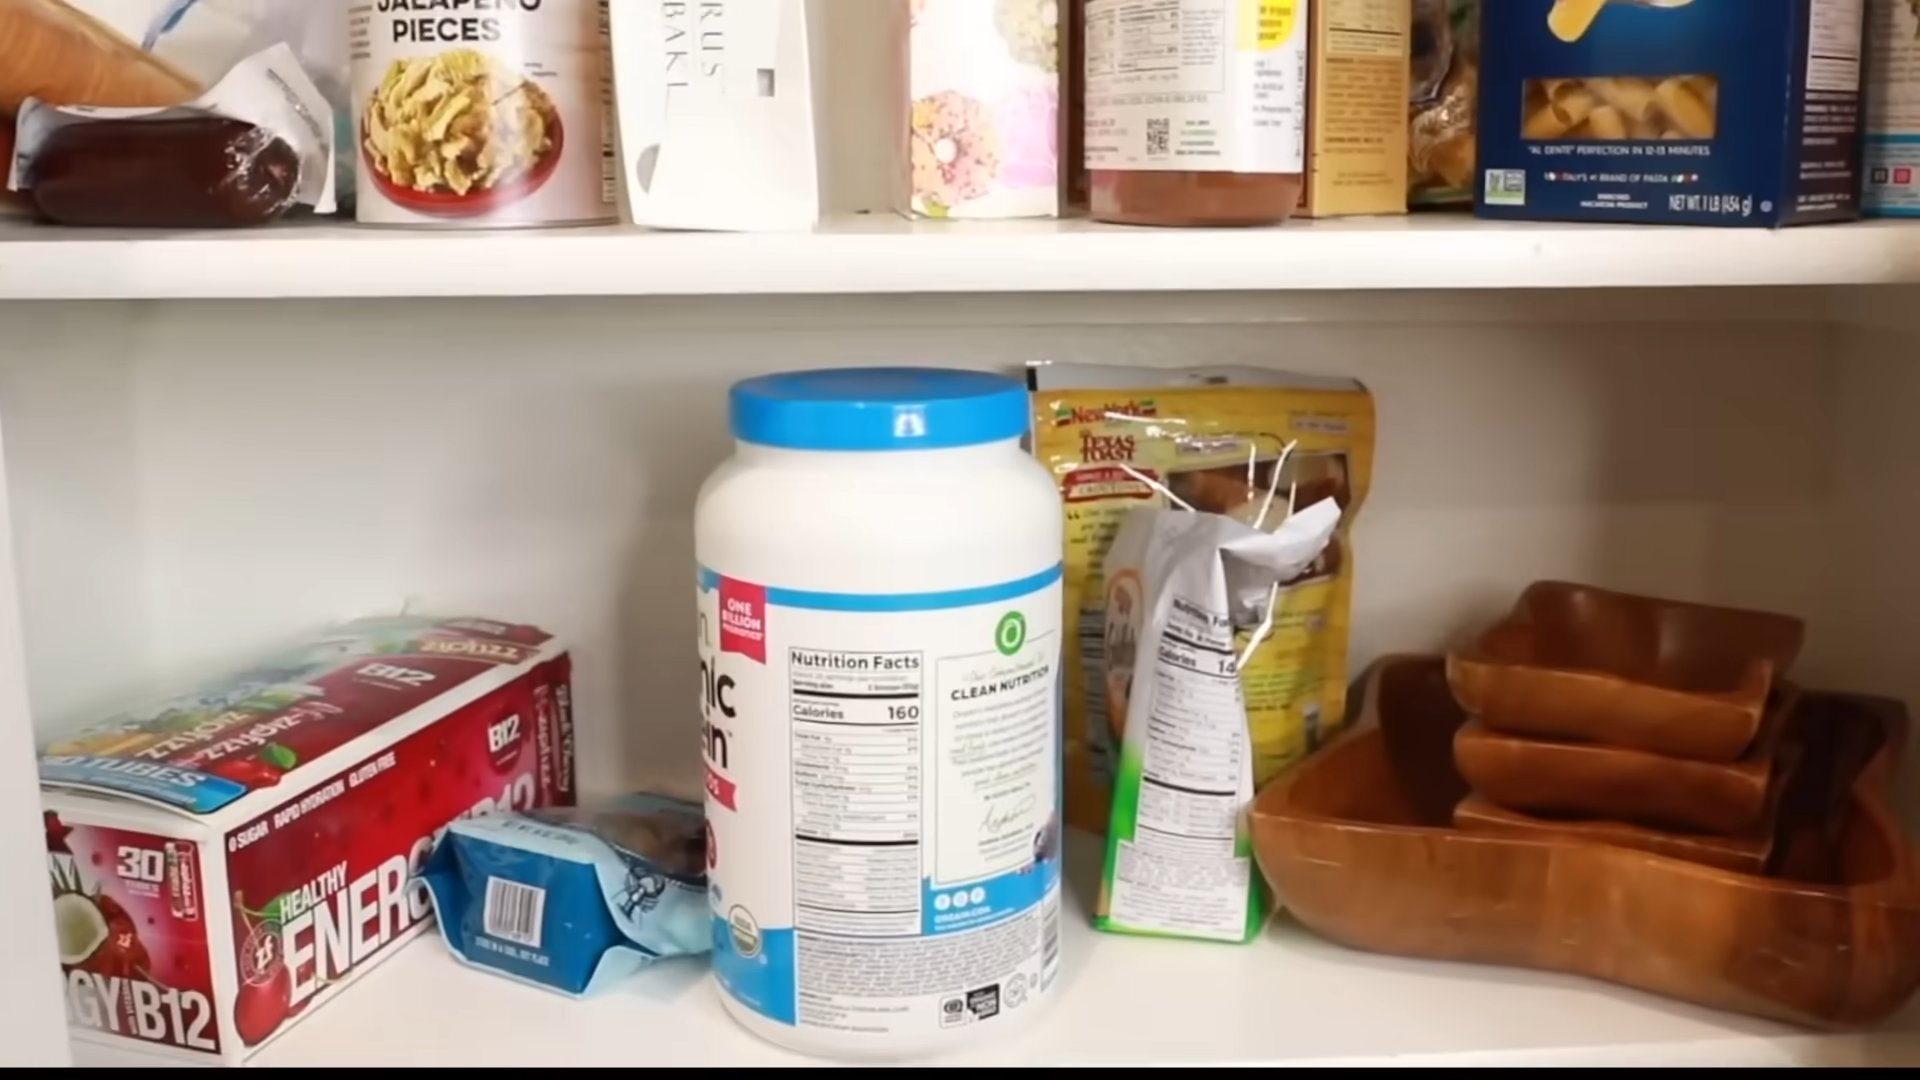
Genius Storage Hacks: Let’s face it, we all crave a clutter-free home, a sanctuary where we can relax and recharge. But sometimes, no matter how much we declutter, storage space seems to magically shrink! Are you tired of tripping over shoes in the entryway or struggling to find that one specific spice in your overflowing pantry? I know I have been!
Throughout history, resourceful individuals have devised clever ways to maximize their living spaces. From ancient Roman storage jars to the intricate built-in cabinets of Victorian homes, the need for efficient storage is a timeless human concern. Today, with smaller living spaces becoming increasingly common, the demand for innovative storage solutions is higher than ever.
That’s where these genius storage hacks come in! This isn’t just about tidying up; it’s about transforming your home into a more functional and enjoyable space. Imagine having a place for everything, knowing exactly where to find it, and feeling a sense of calm wash over you every time you walk through the door. These DIY tricks and hacks will help you reclaim your space, save money, and even add a touch of personal style to your home. So, let’s dive in and unlock the secrets to a clutter-free life!
Growing Tomatoes at Home: A Beginner’s Guide to Juicy Success
Okay, tomato lovers, let’s get our hands dirty! Growing your own tomatoes is seriously rewarding. Nothing beats the taste of a sun-ripened, homegrown tomato. It’s easier than you might think, and I’m here to guide you through every step. We’ll cover everything from choosing the right variety to troubleshooting common problems. Let’s get started!
Choosing Your Tomato Varieties
Before we even think about soil, we need to decide what kind of tomatoes we want to grow. There are literally hundreds of varieties, so it can be a little overwhelming. Here’s a breakdown to help you choose:
* Determinate vs. Indeterminate: This is the big one! Determinate tomatoes grow to a certain size and then produce all their fruit at once, making them great for canning. Indeterminate tomatoes keep growing and producing fruit throughout the season. I personally prefer indeterminate because I love having fresh tomatoes all summer long.
* Tomato Size: Do you want tiny cherry tomatoes, medium-sized slicers, or giant beefsteaks? Cherry tomatoes are perfect for snacking, slicers are great for sandwiches, and beefsteaks are… well, they’re just impressive!
* Disease Resistance: Look for varieties that are resistant to common tomato diseases like Verticillium wilt (V), Fusarium wilt (F), and nematodes (N). The seed packet or plant tag will usually list these resistances.
* Days to Maturity: This tells you how long it will take from planting to harvest. If you have a short growing season, choose varieties with a shorter maturity time.
* My Personal Recommendations: For cherry tomatoes, I love ‘Sungold’ (super sweet!) and ‘Black Cherry’ (beautiful and flavorful). For slicers, ‘Early Girl’ is a reliable choice, and ‘Brandywine’ is a classic heirloom with amazing flavor. If you want a paste tomato for sauce, ‘Roma’ is a good option.
Starting Your Tomato Seeds (or Buying Seedlings)
You have two options here: start your own seeds indoors or buy seedlings from a nursery. Starting seeds gives you more control over the varieties you grow, but it requires a little more effort. Buying seedlings is easier, but you’ll have fewer choices.
Starting Seeds Indoors:
1. Gather Your Supplies: You’ll need seed starting trays or small pots, seed starting mix (not regular potting soil!), tomato seeds, a spray bottle, and a grow light (optional, but highly recommended).
2. Sow the Seeds: Fill your trays or pots with seed starting mix. Moisten the mix with the spray bottle. Plant 2-3 seeds per cell or pot, about ¼ inch deep.
3. Provide Warmth and Light: Tomato seeds need warmth to germinate. Place the trays or pots in a warm location (around 70-75°F). A heat mat can be helpful. If you’re using a grow light, position it a few inches above the trays.
4. Keep the Soil Moist: Water gently with the spray bottle whenever the soil surface feels dry. Don’t overwater, or the seeds may rot.
5. Thin the Seedlings: Once the seedlings have their first true leaves (the second set of leaves that appear after the initial seed leaves), thin them to one seedling per cell or pot. Snip off the weaker seedlings at the soil line with scissors.
6. Harden Off the Seedlings: Before transplanting the seedlings outdoors, you need to “harden them off.” This means gradually exposing them to outdoor conditions over a period of 7-10 days. Start by placing them in a sheltered spot outdoors for an hour or two each day, gradually increasing the amount of time they spend outside. Protect them from direct sunlight and strong winds.
Buying Seedlings:
1. Choose Healthy Seedlings: Look for seedlings that are stocky, green, and have no signs of disease or pests. Avoid seedlings that are leggy (tall and spindly) or have yellowing leaves.
2. Check the Roots: Gently remove a seedling from its pot and inspect the roots. They should be white or light brown and not circling tightly around the pot.
3. Consider the Size: Choose seedlings that are a manageable size for transplanting.
Preparing Your Garden Bed
Tomatoes need at least 6-8 hours of sunlight per day and well-drained soil.
1. Choose a Sunny Location: Find a spot in your garden that gets plenty of sunlight.
2. Test Your Soil: A soil test will tell you the pH and nutrient levels of your soil. Tomatoes prefer a slightly acidic soil pH of 6.0-6.8. You can buy a soil test kit at most garden centers.
3. Amend the Soil: Based on your soil test results, amend the soil with compost, aged manure, or other organic matter. This will improve drainage, fertility, and water retention. I usually add a generous amount of compost to my tomato beds.
4. Consider Raised Beds: If your soil is poor or poorly drained, consider growing tomatoes in raised beds. Raised beds provide better drainage and allow you to control the soil quality.
Transplanting Your Tomato Seedlings
Now for the fun part – getting those little plants into the ground!
1. Wait for Warm Weather: Don’t transplant your tomato seedlings until the danger of frost has passed. Tomatoes are very sensitive to frost.
2. Dig a Hole: Dig a hole that is deep enough to bury the bottom part of the stem.
3. Plant Deep: This is a key trick for growing strong tomato plants. Remove the bottom leaves from the seedling and bury the stem up to the first set of leaves. Tomatoes can grow roots along their stems, which will result in a stronger, healthier plant.
4. Add Fertilizer: Add a slow-release tomato fertilizer to the hole. Follow the instructions on the fertilizer package.
5. Water Thoroughly: Water the seedlings well after transplanting.
6. Mulch: Apply a layer of mulch around the plants to help retain moisture, suppress weeds, and regulate soil temperature. I like to use straw or shredded leaves.
Supporting Your Tomato Plants
Tomato plants, especially indeterminate varieties, need support to keep them from sprawling on the ground.
* Staking: Drive a sturdy stake into the ground next to each plant. As the plant grows, tie the stem to the stake with soft twine or plant ties.
* Caging: Place a tomato cage around each plant. Cages provide good support and allow the plant to grow naturally.
* Trellising: Train the tomato plants to grow up a trellis. This is a good option for smaller gardens.
Watering and Fertilizing
Tomatoes need consistent watering and regular fertilization to produce a good crop.
* Watering: Water deeply and regularly, especially during hot, dry weather. Aim to water at the base of the plant to avoid wetting the foliage, which can lead to disease.
* Fertilizing: Fertilize every 2-3 weeks with a tomato fertilizer. Follow the instructions on the fertilizer package.
Pruning Your Tomato Plants
Pruning can help improve air circulation, reduce disease, and encourage fruit production.
* Suckers: Remove the suckers that grow in the “armpit” between the main stem and the branches. These suckers will eventually produce their own stems and fruit, but they will also take energy away from the main plant.
* Bottom Leaves: Remove any yellowing or diseased leaves from the bottom of the plant.
Dealing with Pests and Diseases
Tomatoes are susceptible to a variety of pests and diseases. Here are some common problems and how to deal with them:
* Aphids: These tiny insects suck the sap from plants. Spray them with insecticidal soap or blast them off with a strong stream of water.
* Tomato Hornworms: These large caterpillars can quickly defoliate a tomato plant. Pick them off by hand or spray them with Bacillus thuringiensis (Bt).
* Blossom End Rot: This is caused by a calcium deficiency. Make sure your soil has enough calcium and water regularly.
* Early Blight: This fungal disease causes brown spots on the leaves. Remove infected leaves and spray with a fungicide.
* Septoria Leaf Spot: This fungal disease causes small, circular spots on the leaves. Remove infected leaves and spray with a fungicide.
Harvesting Your Tomatoes
The moment we’ve all been waiting for!
1. Wait for Ripeness: Tomatoes are ripe when they are fully colored and slightly soft to the touch.
2. Gently Twist: Gently twist the tomato off the vine.
3. Enjoy! Eat your tomatoes fresh, or use them in your favorite recipes.
Troubleshooting Common Tomato Problems
Even with the best care, you might encounter some problems along the way. Here are a few common issues and how to
Conclusion
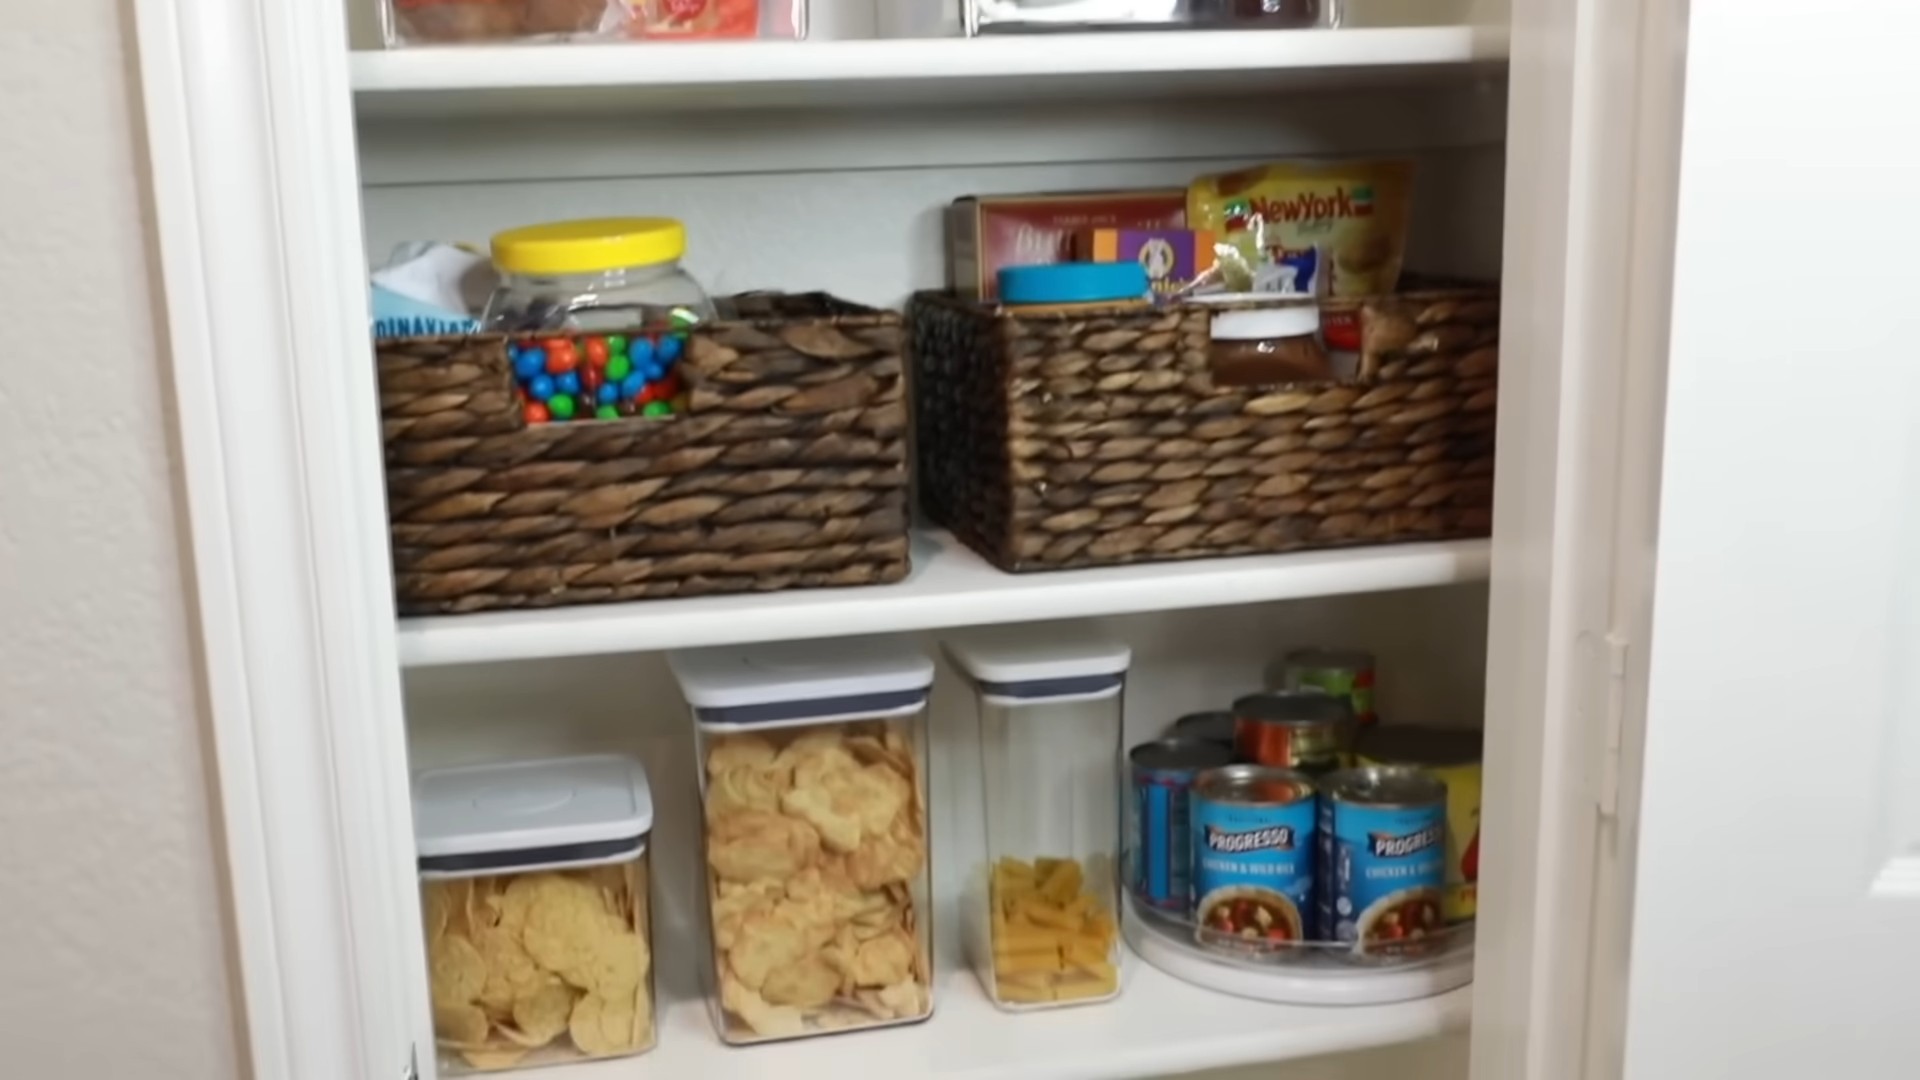
So, there you have it! These genius storage hacks aren’t just about decluttering; they’re about reclaiming your space and your sanity. We’ve explored simple yet transformative techniques that can revolutionize how you organize everything from your kitchen pantry to your overflowing closet. The beauty of these hacks lies in their adaptability. They’re not rigid rules but rather flexible guidelines that you can tailor to your specific needs and the unique characteristics of your home.
Think about the possibilities. Imagine opening your linen closet and being greeted by neatly folded towels and perfectly organized sheets, all thanks to the rolling method and shelf dividers. Picture your spice rack, no longer a chaotic jumble of bottles, but a streamlined display where you can instantly find the exact seasoning you need. Envision your garage, transformed from a dumping ground into a functional workspace with clearly labeled bins and strategically placed hooks.
These aren’t just pipe dreams; they’re achievable realities with a little bit of effort and the right approach. And the best part? You don’t need to spend a fortune on expensive storage solutions. Many of these hacks utilize items you already have around the house or can easily acquire at a minimal cost. Repurposed jars, cardboard boxes, and even old clothing can be transformed into ingenious storage containers.
But the real magic happens when you start to personalize these techniques. Experiment with different folding methods to find what works best for your fabrics. Use different colors of labels to categorize your belongings. Add decorative touches to your storage containers to make them more visually appealing. The possibilities are endless!
Don’t be afraid to get creative and think outside the box. Maybe you can use a shoe organizer to store cleaning supplies under your sink, or perhaps you can hang a wire basket on the inside of your cabinet door to hold pot lids. The key is to find solutions that are both functional and aesthetically pleasing.
And remember, decluttering is an ongoing process, not a one-time event. Make it a habit to regularly assess your belongings and get rid of anything you no longer need or use. This will not only free up space but also make it easier to stay organized in the long run.
We truly believe that these **genius storage hacks** can make a significant difference in your life. They can help you reduce stress, save time, and create a more peaceful and harmonious living environment. So, what are you waiting for? Give them a try!
We’re confident that you’ll be amazed at the results. And we’d love to hear about your experience. Share your before-and-after photos, your favorite storage hacks, and any tips or tricks you’ve discovered along the way. Let’s create a community of organized and inspired individuals who are passionate about making the most of their space.
So, go forth and conquer the clutter! Your organized and stress-free life awaits.
Frequently Asked Questions (FAQs)
What if I don’t have a lot of money to spend on storage containers?
That’s perfectly fine! Many of the most effective storage hacks utilize items you already have around the house. Repurpose old jars, cardboard boxes, and even clothing. For example, old t-shirts can be cut and sewn into reusable shopping bags or storage bins. Mason jars are excellent for storing pantry staples like rice, beans, and spices. Shoe boxes can be covered in decorative paper and used to organize items in your closet or under your bed. The key is to get creative and think about how you can repurpose items that you already own. You can also check out thrift stores and garage sales for affordable storage solutions. Often, you can find gently used containers and organizers for a fraction of the price of buying them new.
How do I know where to start when decluttering?
Decluttering can feel overwhelming, especially if you have a lot of stuff. A good starting point is to focus on one area at a time. Choose a small space, such as a drawer or a shelf, and commit to decluttering it completely before moving on to the next area. This will help you feel less overwhelmed and more motivated to continue. As you declutter, ask yourself these questions about each item:
* Have I used this item in the past year?
* Do I love this item?
* Is this item useful?
* Would I buy this item again if I didn’t already own it?
If the answer to all of these questions is no, then it’s probably time to get rid of the item. You can donate it, sell it, or throw it away, depending on its condition.
What are some good ways to label my storage containers?
Labeling your storage containers is essential for staying organized. It helps you quickly identify what’s inside each container without having to rummage through everything. There are several ways to label your containers:
* Use a label maker: Label makers are a quick and easy way to create professional-looking labels.
* Write on labels with a permanent marker: This is a simple and affordable option.
* Use chalkboard labels: Chalkboard labels are reusable and allow you to easily change the contents of your containers.
* Print labels from your computer: You can design and print custom labels using your computer and printer.
No matter which method you choose, make sure your labels are clear, concise, and easy to read.
How can I make my storage solutions more aesthetically pleasing?
Storage doesn’t have to be boring! There are many ways to make your storage solutions more visually appealing. Here are a few ideas:
* Use matching containers: Using containers that are the same color and style can create a more cohesive and organized look.
* Add decorative touches: Decorate your storage containers with paint, fabric, or other embellishments.
* Use clear containers: Clear containers allow you to see what’s inside, which can be both functional and aesthetically pleasing.
* Arrange your containers in an organized way: Group similar items together and arrange your containers in a neat and orderly fashion.
How can I maintain my organized space after I’ve decluttered and organized it?
Maintaining an organized space requires ongoing effort. Here are a few tips to help you stay organized:
* Put things away immediately after using them.
* Declutter regularly.
* Don’t let clutter accumulate.
* Make it a habit to tidy up for a few minutes each day.
* Involve your family members in the organization process.
By following these tips, you can create a system that works for you and maintain an organized space for years to come. Remember, the goal is not perfection, but rather to create a space that is functional, comfortable, and enjoyable to live in. These **genius storage hacks** are just the beginning of your journey to a more organized and fulfilling life.


Leave a Comment