

DIY Upside Down Planter: Imagine plucking ripe, juicy tomatoes hanging right at eye level, or snipping fresh herbs without even bending over! Sounds like something out of a futuristic garden, right? Well, it’s not! It’s the magic of the DIY Upside Down Planter, and I’m here to show you how to create your own little vertical paradise.
While the modern resurgence of upside-down gardening feels quite trendy, the concept actually has roots in ancient practices. Hanging gardens, like the legendary Hanging Gardens of Babylon, have captivated imaginations for centuries. Though not exactly the same, they share the principle of utilizing vertical space for cultivation. Today, we’re bringing that concept home with a practical and accessible twist.
Why should you embrace the DIY Upside Down Planter? Because it’s a game-changer for small spaces! If you’re like me, living in an apartment or with a tiny balcony, you know the struggle of limited gardening real estate. This method lets you maximize your yield without sacrificing precious ground space. Plus, it’s a fantastic way to deter pests and diseases, as your plants are elevated and less susceptible to soil-borne problems. Ready to ditch the backaches and embrace a more efficient and visually stunning way to garden? Let’s get started building your very own DIY Upside Down Planter!

DIY Hängender Garten: So baust du einen umgedrehten Pflanztopf
Hey Pflanzenfreunde! Habt ihr Lust auf ein ungewöhnliches und platzsparendes Gartenprojekt? Dann ist ein umgedrehter Pflanztopf genau das Richtige für euch! Ich zeige euch, wie ihr ganz einfach einen solchen “Upside-Down”-Garten selber bauen könnt. Es ist nicht nur ein echter Hingucker, sondern auch super praktisch, besonders wenn ihr wenig Platz habt oder einfach mal etwas Neues ausprobieren wollt.
Was du für deinen umgedrehten Pflanztopf brauchst:
* Einen stabilen Pflanztopf (Kunststoff oder Terrakotta, je nach Geschmack)
* Eine junge Pflanze (Tomaten, Erdbeeren, Kräuter eignen sich besonders gut)
* Blumenerde
* Ein Stück Stoff oder Vlies (ca. 10×10 cm)
* Ein scharfes Messer oder eine Lochsäge
* Eine Aufhängung (Kette, Seil, Draht – je nachdem, was dir gefällt)
* Eventuell: Handschuhe (um deine Hände sauber zu halten)
Schritt-für-Schritt-Anleitung: So baust du deinen umgedrehten Pflanztopf
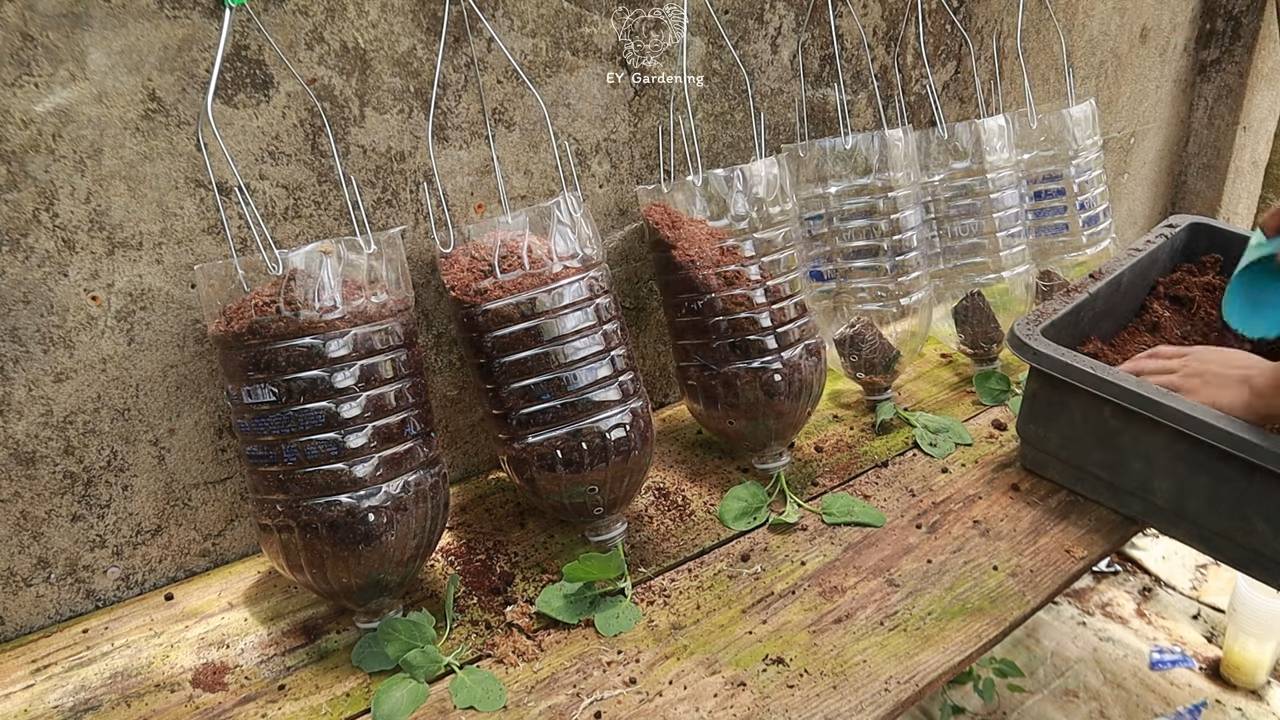
1. Das Loch vorbereiten: Zuerst müssen wir ein Loch in den Boden des Pflanztopfs schneiden. Dieses Loch sollte groß genug sein, damit die Pflanze hindurchpasst, aber nicht zu groß, damit die Erde später nicht herausfällt. Ich empfehle, den Durchmesser des Lochs an der Größe des Wurzelballens deiner Pflanze anzupassen. Markiere die Stelle mit einem Stift und verwende dann ein scharfes Messer oder eine Lochsäge, um das Loch vorsichtig auszuschneiden. Sei dabei bitte vorsichtig, damit du dich nicht verletzt! Bei Terrakotta-Töpfen kann es hilfreich sein, das Loch mit einem Bohrer vorzubereiten, um Risse zu vermeiden.
2. Den Stoff einsetzen: Jetzt kommt das Stück Stoff oder Vlies zum Einsatz. Dieses legen wir über das Loch, um zu verhindern, dass die Erde herausfällt, aber gleichzeitig das Wasser ablaufen kann. Fixiere den Stoff am besten mit etwas Erde oder kleinen Steinen, damit er nicht verrutscht. Du kannst den Stoff auch leicht in das Loch stopfen, sodass er eine Art “Stopfen” bildet.
3. Die Pflanze einsetzen: Nun kommt der spannende Teil: Wir setzen die Pflanze von unten durch das Loch in den Topf. Sei dabei ganz vorsichtig, um die Wurzeln nicht zu beschädigen. Halte die Pflanze fest und fülle den Topf vorsichtig mit Blumenerde auf. Achte darauf, dass die Erde gut um die Wurzeln verteilt ist und die Pflanze stabil steht. Klopfe den Topf leicht ab, damit sich die Erde setzt.
4. Den Topf befüllen: Fülle den restlichen Topf mit Blumenerde auf. Lass oben noch etwas Platz, damit das Gießwasser nicht gleich überläuft. Drücke die Erde leicht an, aber nicht zu fest, damit die Wurzeln noch genug Luft bekommen.
5. Die Aufhängung anbringen: Jetzt müssen wir den Topf noch aufhängen. Je nachdem, welche Aufhängung du gewählt hast, befestige sie am Topf. Bei einem Kunststofftopf kannst du Löcher bohren und die Aufhängung daran befestigen. Bei einem Terrakottatopf kannst du eine spezielle Aufhängung verwenden, die um den Topf gelegt wird. Achte darauf, dass die Aufhängung stabil ist und das Gewicht des Topfes mit Erde und Pflanze tragen kann.
6. Gießen und aufhängen: Bevor du den Topf aufhängst, gieße die Pflanze gründlich. Das hilft der Erde, sich zu setzen und die Wurzeln zu befeuchten. Lass das überschüssige Wasser ablaufen, bevor du den Topf an seinen endgültigen Platz hängst. Wähle einen sonnigen Standort, an dem die Pflanze genügend Licht bekommt.
Spezielle Tipps für verschiedene Pflanzen
* Tomaten: Tomaten sind ideal für umgedrehte Pflanzgefäße. Achte darauf, eine kleinwüchsige Sorte zu wählen, die nicht zu schwer wird. Regelmäßiges Gießen und Düngen sind wichtig, da Tomaten Starkzehrer sind.
* Erdbeeren: Auch Erdbeeren fühlen sich in einem umgedrehten Topf wohl. Sie bilden lange Ranken, die schön herabhängen. Achte auf eine gute Drainage, um Staunässe zu vermeiden.
* Kräuter: Kräuter wie Basilikum, Petersilie oder Minze sind ebenfalls eine gute Wahl. Sie sind pflegeleicht und du hast sie immer griffbereit.
Häufige Probleme und Lösungen
* Erde fällt heraus: Wenn die Erde aus dem Loch fällt, hast du entweder das Loch zu groß gemacht oder den Stoff nicht richtig befestigt. Versuche, das Loch mit etwas mehr Stoff abzudecken oder verwende eine feinere Erde.
* Pflanze wächst nicht: Wenn die Pflanze nicht wächst, kann das verschiedene Ursachen haben. Möglicherweise bekommt sie nicht genug Licht, Wasser oder Nährstoffe. Überprüfe die Standortbedingungen und dünge die Pflanze gegebenenfalls.
* Topf ist zu schwer: Wenn der Topf zu schwer wird, kann die Aufhängung brechen. Wähle eine stabilere Aufhängung oder verwende einen leichteren Topf.
Zusätzliche Tipps und Tricks
* Drainage verbessern: Um Staunässe zu vermeiden, kannst du eine Schicht Kies oder Blähton auf den Boden des Topfes legen, bevor du die Erde einfüllst.
* Düngen: Verwende einen Langzeitdünger, um die Pflanze regelmäßig mit Nährstoffen zu versorgen.
* Schnecken bekämpfen: Wenn du Probleme mit Schnecken hast, kannst du den Topf mit Schneckenkorn oder Schneckenkragen schützen.
* Dekoration: Du kannst den Topf zusätzlich mit Farbe, Steinen oder anderen Materialien dekorieren, um ihn noch individueller zu gestalten.
Die richtige Erde wählen
Die Wahl der richtigen Erde ist entscheidend für den Erfolg deines umgedrehten Pflanztopfs. Ich empfehle, eine hochwertige Blumenerde zu verwenden, die gut durchlässig ist und ausreichend Nährstoffe enthält. Du kannst auch etwas Kompost oder Hornspäne untermischen, um die Erde zusätzlich anzureichern. Vermeide es, Gartenerde zu verwenden, da diese oft zu schwer ist und nicht genügend Nährstoffe enthält.
Die richtige Pflanze auswählen
Nicht jede Pflanze eignet sich für einen umgedrehten Pflanztopf. Am besten funktionieren Pflanzen, die nicht zu groß und schwer werden und deren Triebe nach unten hängen. Tomaten, Erdbeeren, Paprika, Gurken, Kräuter und Hängepetunien sind eine gute Wahl. Achte darauf, eine junge und gesunde Pflanze zu wählen, die gut angewachsen ist.
Die richtige Bewässerung
Die Bewässerung ist bei einem umgedrehten Pflanztopf besonders wichtig, da das Wasser schnell abfließen kann. Gieße die Pflanze regelmäßig, aber nicht zu viel, um Staunässe zu vermeiden. Am besten testest du mit dem Finger, ob die Erde noch feucht genug ist. An heißen Tagen kann es notwendig sein, die Pflanze mehrmals täglich zu gießen.
Der richtige Standort
Der Standort spielt eine wichtige Rolle für das Wachstum der Pflanze. Wähle einen sonnigen Standort, an dem die Pflanze mindestens sechs Stunden Sonne pro Tag bekommt. Achte darauf, dass der Standort windgeschützt ist, um die Pflanze vor Beschädigungen zu schützen.
Die richtige Pflege
Regelmäßige Pflege ist wichtig, um die Pflanze gesund und vital zu halten. Entferne regelmäßig welke Blätter und Blüten, um die Bildung neuer Triebe zu fördern. Dünge die Pflanze regelmäßig, um sie mit ausreichend Nährstoffen zu versorgen. Kontrolliere die Pflanze regelmäßig auf Schädlinge und Krankheiten und bekämpfe diese gegebenenfalls.
Ich hoffe, diese Anleitung hilft dir dabei, deinen eigenen umgedrehten Pflanztopf zu bauen. Viel Spaß beim Gärtnern! Und denk daran: Experimentieren ist erlaubt! Probiere verschiedene Pflanzen und Materialien aus, um deinen ganz persönlichen “Upside-Down”-Garten zu gestalten.
Conclusion
So, there you have it! Creating your own DIY Upside Down Planter is not just a fun weekend project; it’s a gateway to a more sustainable, space-saving, and visually stunning gardening experience. We’ve walked you through the steps, highlighted the benefits, and hopefully, inspired you to ditch the traditional and embrace the unconventional.
Why is this a must-try? Because it’s more than just a planter. It’s a conversation starter, a testament to your resourcefulness, and a practical solution for anyone with limited space or a desire to add a unique touch to their garden or balcony. Imagine the vibrant cascade of cherry tomatoes, strawberries, or herbs hanging gracefully, transforming your outdoor area into a living work of art. The visual appeal alone is worth the effort, but the added benefits of pest control, improved air circulation, and easier harvesting make it an absolute winner.
But don’t stop there! The beauty of DIY is the freedom to customize. Feel free to experiment with different materials. Instead of a plastic bucket, consider using a repurposed metal container for a rustic look. Or, if you’re feeling ambitious, try building a wooden frame to support multiple upside-down planters, creating a vertical garden wall. Think about painting your planter with vibrant colors or adding decorative elements to match your personal style. The possibilities are truly endless.
Consider these variations to truly make your DIY Upside Down Planter your own:
* **Herb Garden Delight:** Plant a variety of herbs like basil, mint, oregano, and thyme for a readily available source of fresh flavor right outside your door.
* **Strawberry Sensation:** Strawberries thrive in upside-down planters, producing abundant fruit while keeping them safe from slugs and other ground-dwelling pests.
* **Tomato Triumph:** Cherry tomatoes are particularly well-suited for this method, creating a stunning display of cascading red fruit.
* **Flowering Fantasy:** Plant trailing flowers like petunias, fuchsias, or lobelia for a burst of color that will brighten any space.
Remember to choose plants that are well-suited for container gardening and that will thrive in the amount of sunlight your chosen location receives. Regular watering and fertilization are also crucial for success.
We’re confident that you’ll find this DIY project both rewarding and enjoyable. So, gather your materials, unleash your creativity, and get ready to experience the joy of upside-down gardening.
Now, we want to hear from you! Have you tried making your own DIY Upside Down Planter? What plants did you choose? What challenges did you encounter, and how did you overcome them? Share your experiences, tips, and photos in the comments below. Let’s build a community of upside-down gardening enthusiasts and inspire others to give this fantastic technique a try. Your insights could be invaluable to someone just starting out. Let’s get growing!
Frequently Asked Questions (FAQ)
What types of plants are best suited for an upside-down planter?
The best plants for upside-down planters are typically those that are relatively lightweight, have a trailing growth habit, and don’t require extensive root systems. Some excellent choices include:
* **Tomatoes (especially cherry tomatoes):** They are a classic choice and thrive in this environment.
* **Strawberries:** They produce abundant fruit and are protected from ground pests.
* **Herbs (basil, mint, oregano, thyme, rosemary):** They are easy to grow and provide fresh flavor.
* **Peppers (smaller varieties):** They can be grown successfully, but ensure adequate support.
* **Flowers (petunias, fuchsias, lobelia, impatiens):** They create a beautiful cascading display of color.
* **Lettuce and Salad Greens:** These are easy to harvest and enjoy fresh.
Avoid plants that are too heavy, have deep root systems, or require a lot of support, as they may not thrive in an upside-down planter.
How often should I water my upside-down planter?
Watering frequency depends on several factors, including the type of plant, the weather conditions, and the size of the planter. However, as a general rule, you’ll likely need to water your upside-down planter more frequently than a traditional planter, as it tends to dry out faster.
Check the soil moisture daily by sticking your finger about an inch into the soil. If it feels dry, it’s time to water. Water thoroughly until water drains out of the drainage holes. During hot, sunny weather, you may need to water twice a day.
What kind of soil should I use for an upside-down planter?
Use a high-quality potting mix that is lightweight, well-draining, and rich in nutrients. Avoid using garden soil, as it can become compacted and doesn’t drain well in containers. A good potting mix will provide adequate aeration and drainage, which are essential for healthy root growth. You can also amend the potting mix with compost or other organic matter to improve its fertility.
How do I fertilize my upside-down planter?
Regular fertilization is crucial for plants growing in upside-down planters, as the limited soil volume can quickly become depleted of nutrients. Use a balanced, water-soluble fertilizer according to the package directions. Fertilize every 2-4 weeks, or as needed, to ensure that your plants receive the nutrients they need to thrive. You can also use slow-release fertilizer granules mixed into the potting mix at planting time.
How do I prevent my plants from falling out of the planter?
The key to preventing plants from falling out is to ensure that the root ball is securely wrapped in burlap or landscape fabric before inserting it into the planter. Make sure the opening in the fabric is just large enough for the plant’s stem to pass through. You can also use a piece of foam or sponge to further secure the plant and prevent soil from falling out. When you first hang the planter, keep a close eye on it and gently adjust the plant if needed.
How do I protect my upside-down planter from pests?
Upside-down planters can actually help reduce pest problems, as they elevate the plants off the ground and away from many common pests. However, you may still need to take some precautions. Regularly inspect your plants for signs of pests, such as aphids, whiteflies, or spider mites. If you find any pests, treat them with an appropriate insecticide or insecticidal soap. You can also use companion planting to deter pests. For example, planting basil near tomatoes can help repel tomato hornworms.
Can I use any type of container for an upside-down planter?
While plastic buckets are a popular choice, you can use a variety of containers for upside-down planters, as long as they are sturdy, have drainage holes, and are the right size for your plants. Other options include:
* **Metal buckets or containers:** These can add a rustic touch to your garden.
* **Hanging baskets:** These are already designed for hanging and can be easily converted into upside-down planters.
* **Repurposed containers:** Get creative and use old tires, watering cans, or other items to create unique planters.
Make sure the container is clean and free of any harmful chemicals before using it for planting.
How much sunlight do my plants need in an upside-down planter?
The amount of sunlight your plants need depends on the type of plant you are growing. Most vegetables and herbs require at least 6-8 hours of sunlight per day, while some flowers can tolerate partial shade. Choose a location for your upside-down planter that receives the appropriate amount of sunlight for your chosen plants. If you don’t have enough natural sunlight, you can supplement with grow lights.
What if my plant starts to grow upwards instead of downwards?
It’s natural for plants to initially grow upwards towards the light. However, as the plant matures, it will eventually start to grow downwards due to gravity. You can encourage downward growth by gently training the stems downwards. You can also prune the plant to encourage branching and a more cascading growth habit.
How do I overwinter my upside-down planter?
If you live in a climate with cold winters, you’ll need to take steps to protect your plants from frost and freezing temperatures. For annual plants, you can simply remove them from the planter and dispose of them. For perennial plants, you can either bring the entire planter indoors or insulate it to protect the roots from freezing. You can also prune the plant back and reduce watering during the winter months.

Leave a Comment