

DIY Grape Growing: Imagine stepping into your backyard and plucking juicy, sun-ripened grapes straight from the vine. Sounds like a dream, right? Well, it doesn’t have to be! This article is your ultimate guide to transforming your garden into a miniature vineyard, even if you’re a complete beginner. We’re diving deep into the world of DIY grape growing, sharing insider secrets and simple hacks that will have you harvesting your own delicious grapes in no time.
Grape cultivation has a rich history, dating back thousands of years to ancient civilizations like the Egyptians and Romans, who revered grapes not only for their fruit but also for the wine they produced. Today, the tradition continues, and you can be a part of it, right in your own backyard.
Why should you embark on this DIY adventure? Because store-bought grapes simply can’t compare to the flavor and satisfaction of growing your own. Plus, it’s a fantastic way to connect with nature, learn new skills, and impress your friends and family with your green thumb. Let’s face it, who wouldn’t want to say, “Oh, these grapes? I grew them myself!” So, grab your gardening gloves, and let’s get started on your DIY grape growing journey!
DIY Grape Growing: From Vine to Wine (or Juice!) in Your Own Backyard
Okay, so you’re thinking about growing grapes? Awesome! It’s a rewarding experience, and trust me, there’s nothing quite like enjoying grapes you’ve nurtured yourself. It might seem daunting, but with a little planning and effort, you can absolutely have your own mini-vineyard. I’m going to walk you through everything you need to know, from choosing the right variety to harvesting your delicious bounty.
Choosing Your Grape Variety: The Foundation of Success
Before you even think about digging a hole, you need to pick the right grape variety. This is crucial because not all grapes thrive in all climates. Consider your local climate, soil type, and what you want to *do* with your grapes.
* **Climate:** This is the big one. Some grapes are cold-hardy, while others need long, hot summers. Check your USDA plant hardiness zone to narrow down your options.
* **Soil:** Grapes generally prefer well-drained soil. If your soil is heavy clay, you’ll need to amend it. More on that later!
* **Purpose:** Are you dreaming of making wine? Or do you want table grapes for snacking and juice? Wine grapes tend to be smaller and have thicker skins. Table grapes are larger and sweeter.
* **Disease Resistance:** Some grape varieties are more resistant to common diseases like powdery mildew and black rot. Choosing a disease-resistant variety can save you a lot of headaches (and fungicide!).
Here are a few popular options, depending on your needs:
* **For Cold Climates:** ‘Marquette’, ‘Frontenac’, ‘Valiant’ (These are often used for winemaking)
* **For Warmer Climates:** ‘Thompson Seedless’, ‘Flame Seedless’, ‘Cabernet Sauvignon’, ‘Chardonnay’
* **For Table Grapes:** ‘Concord’, ‘Niagara’, ‘Reliance’
Do your research! Talk to local nurseries or grape growers to get recommendations specific to your area.
Preparing Your Site: Location, Location, Location!
Grapes need sunshine, and lots of it! Aim for at least 6-8 hours of direct sunlight per day. A south-facing slope is ideal, as it maximizes sun exposure.
* **Sunlight:** As I mentioned, this is non-negotiable. More sun equals more grapes!
* **Soil Drainage:** Grapes hate wet feet. Make sure your soil drains well. You can test this by digging a hole and filling it with water. If it takes more than 24 hours to drain, you have a drainage problem.
* **Air Circulation:** Good air circulation helps prevent fungal diseases. Avoid planting grapes in low-lying areas where air tends to stagnate.
* **Space:** Grape vines need room to grow. Allow at least 8-10 feet between vines, and 10-12 feet between rows.
Planting Your Grape Vines: Getting Started
Okay, you’ve chosen your variety and prepared your site. Now it’s time to plant!
1. **Timing:** The best time to plant grape vines is in early spring, after the last frost, or in late fall, before the ground freezes.
2. **Dig the Hole:** Dig a hole that’s twice as wide as the root ball and just as deep.
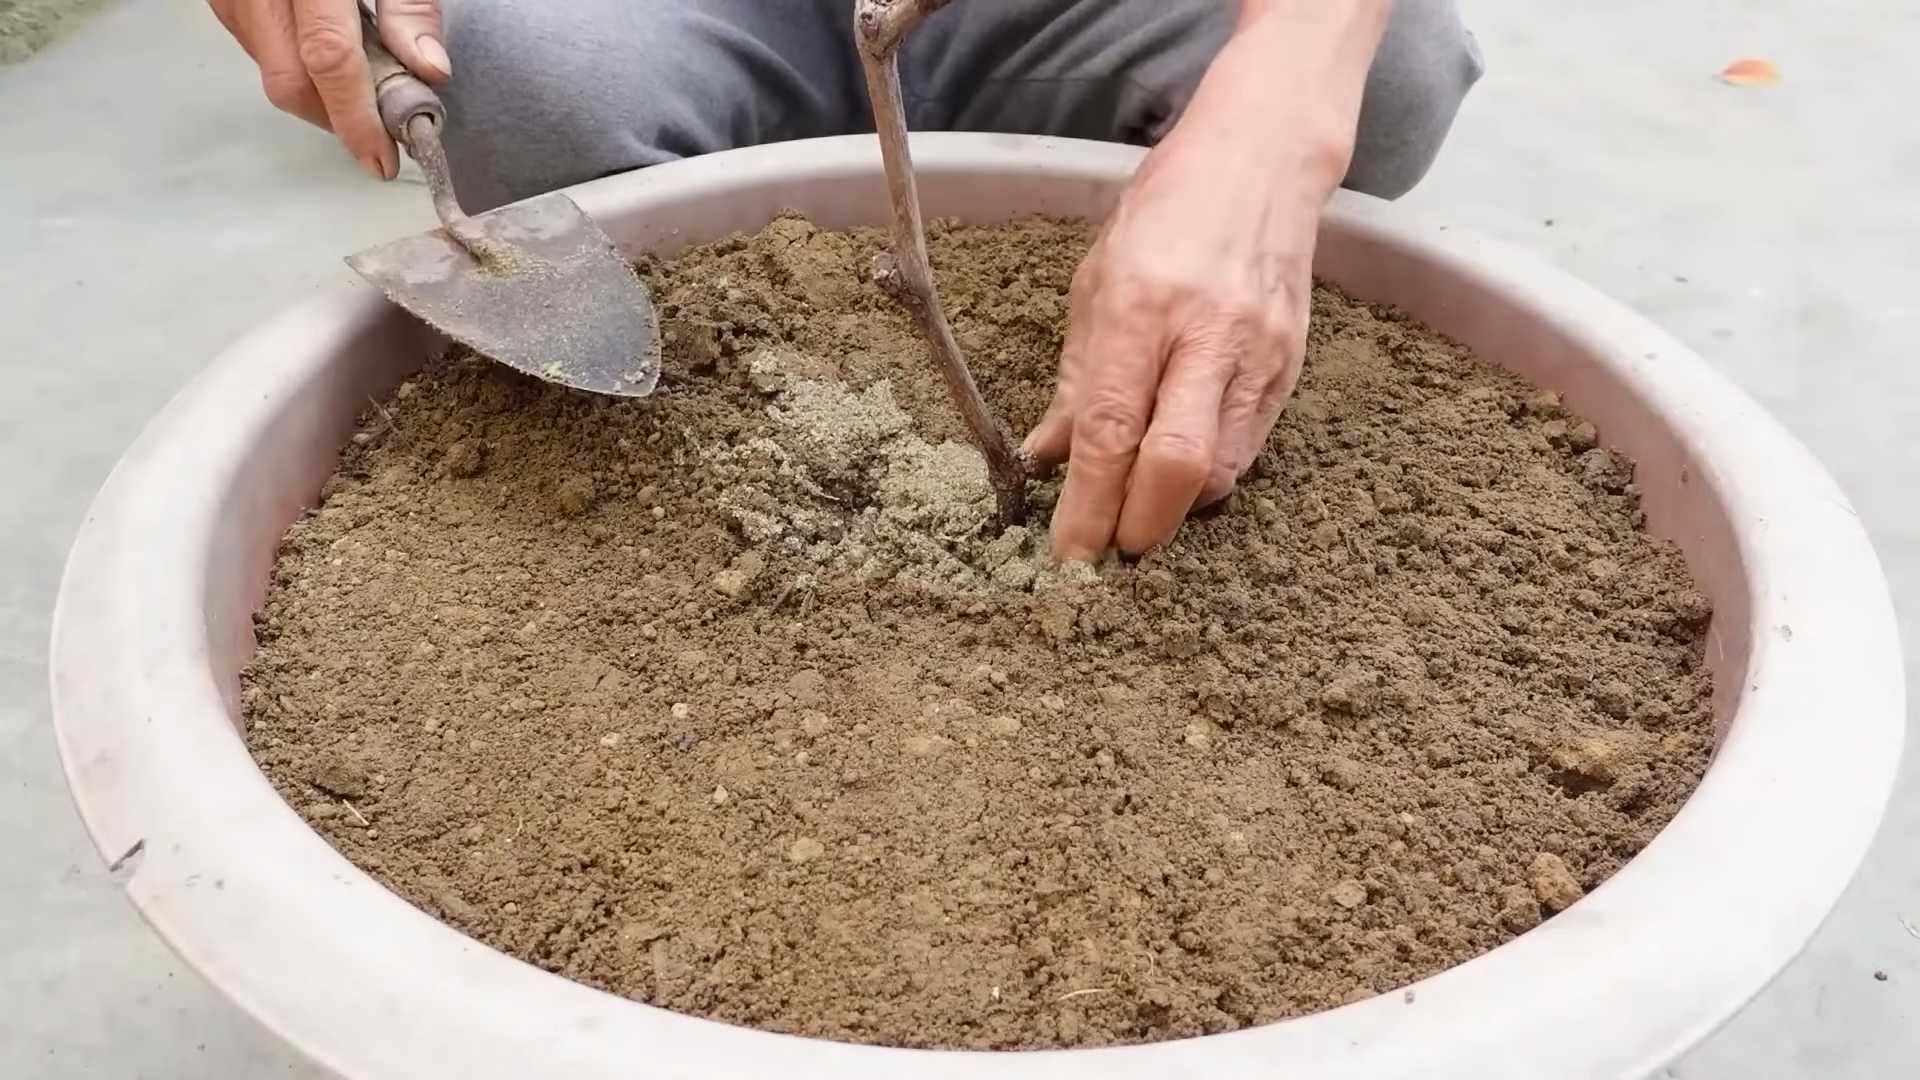
3. **Amend the Soil:** If your soil is poor, amend it with compost or well-rotted manure. Mix the amendment into the soil you removed from the hole.
4. **Remove the Vine from the Container:** Gently remove the grape vine from its container. If the roots are circling the pot, gently loosen them.
5. **Plant the Vine:** Place the vine in the hole, making sure the top of the root ball is level with the ground.
6. **Backfill the Hole:** Backfill the hole with the amended soil, gently tamping it down as you go.
7. **Water Thoroughly:** Water the newly planted vine thoroughly.
8. **Mulch:** Apply a layer of mulch around the base of the vine to help retain moisture and suppress weeds.
Training and Pruning: Shaping Your Vineyard
Grape vines need to be trained and pruned to produce a good crop of grapes. This might seem intimidating, but it’s essential for long-term success.
Year 1: Establishing the Trunk
The first year is all about establishing a strong trunk.
1. **Choose a Training System:** There are several different training systems you can use, such as the single-trunk cordon, the double-trunk cordon, or the head-trained system. I recommend starting with the single-trunk cordon, as it’s relatively easy to manage.
2. **Install a Support System:** You’ll need a trellis or some other type of support system for your grape vines to climb on. A simple trellis can be made from posts and wire.
3. **Select the Strongest Shoot:** Choose the strongest, most upright shoot on the vine. This will become the trunk.
4. **Tie the Shoot to the Support:** Gently tie the shoot to the support system using soft twine or plant ties.
5. **Remove All Other Shoots:** Remove all other shoots that are growing from the vine. This will force the plant to put all its energy into developing the trunk.
6. **Pinch Back the Tip:** Once the shoot reaches the desired height (usually about 3-4 feet), pinch back the tip to encourage lateral growth.
Year 2 and Beyond: Developing the Cordons and Spurs
In the second year, you’ll start developing the cordons (horizontal arms) and spurs (short shoots that produce fruit).
1. **Select Two Cordons:** Choose two strong, healthy shoots that are growing horizontally from the trunk. These will become the cordons.
2. **Tie the Cordons to the Support:** Tie the cordons to the support system, one on each side of the trunk.
3. **Prune the Cordons:** Prune the cordons back to about 3-4 feet long.
4. **Select Spurs:** Choose spurs (short shoots) that are spaced about 6-8 inches apart along the cordons.
5. **Prune the Spurs:** Prune the spurs back to 2-3 buds each. These buds will produce the fruit.
6. **Remove Unwanted Shoots:** Remove any other shoots that are growing from the trunk or cordons.
Pruning is crucial! Don’t be afraid to prune your grape vines. It’s better to prune too much than too little. Pruning encourages fruit production and helps maintain the shape of the vine.
Annual Pruning: Maintaining Your Vineyard
Each year, you’ll need to prune your grape vines to maintain their shape and productivity.
1. **Timing:** The best time to prune grape vines is in late winter or early spring, before the buds begin to swell.
2. **Remove Dead or Diseased Wood:** Start by removing any dead, damaged, or diseased wood.
3. **Prune the Spurs:** Prune the spurs back to 2-3 buds each.
4. **Thin Out the Shoots:** Thin out the shoots to prevent overcrowding.
5. **Maintain the Shape:** Maintain the overall shape of the vine by removing any unwanted shoots.
Watering and Fertilizing: Keeping Your Vines Healthy
Grapes need consistent watering, especially during dry periods.
* **Watering:** Water deeply and regularly, especially during the first year. Once established, grapes are relatively drought-tolerant, but they still need water during dry spells.
* **Fertilizing:** Fertilize your grape vines in early spring with a balanced fertilizer. Avoid over-fertilizing, as this can lead to excessive vegetative growth and reduced fruit production. A soil test can help you determine what nutrients your soil is lacking.
Pest and Disease Control: Protecting Your Investment
Grapes are susceptible to a variety of pests and diseases. Here are a few common problems and how to deal with them:
* **Powdery Mildew:** This fungal disease causes a white, powdery coating on the leaves and fruit. Prevent it by ensuring good air circulation and using a fungicide if necessary.
* **Black Rot:** This fungal disease causes black spots on the leaves and fruit. Prevent it by removing infected leaves and using a fungicide if necessary.
* **Japanese Beetles:** These pests can skeletonize the leaves. Hand-pick them off the vines or use an insecticide if necessary.
* **Birds:** Birds love grapes! Protect your crop by netting the vines.
Prevention is key! Regularly inspect your grape vines for signs of pests and diseases. The sooner you catch a problem, the easier it will be to control.
Harvesting Your Grapes: The Sweet Reward
After all your hard work, it’s finally time to harvest your grapes!
1. **Timing:** The timing of the harvest depends on the grape variety and your desired use. Table grapes are usually harvested when they are fully ripe and sweet. Wine grapes are harvested based on their sugar and acid levels.
2. **Taste Test:** The best way to
Conclusion
So, there you have it! Embarking on the journey of DIY grape growing might seem daunting at first, but with a little patience, the right knowledge, and a dash of enthusiasm, you can transform your backyard into a personal vineyard. The satisfaction of harvesting your own juicy, sun-ripened grapes is an experience unlike any other. Forget the supermarket varieties that often lack the depth of flavor; homegrown grapes offer a taste of pure, unadulterated goodness.
This isn’t just about saving money (though that’s certainly a perk!). It’s about connecting with nature, understanding the growing process, and enjoying the fruits (literally!) of your labor. Imagine the pride you’ll feel serving a homemade grape pie, crafting your own grape juice, or even venturing into the world of winemaking with grapes you nurtured from vine to table.
But the benefits extend beyond the culinary. Grapevines are beautiful additions to any landscape, providing shade, adding visual interest, and attracting beneficial insects. They can be trained to climb pergolas, arbors, or fences, creating stunning focal points in your garden.
Don’t be afraid to experiment! There are countless grape varieties to choose from, each with its own unique flavor profile and growing requirements. Consider your local climate, soil conditions, and personal preferences when selecting your vines. Perhaps you’re drawn to the classic Concord grape, known for its intense flavor and versatility. Or maybe you’re intrigued by the delicate sweetness of a seedless variety like Thompson Seedless. For those in cooler climates, consider hardy options like Frontenac or Marquette.
And why stop at just one variety? Plant a selection of different grapes to create a diverse and flavorful harvest. You can even try grafting different varieties onto a single rootstock to maximize your yield and experiment with unique flavor combinations.
Remember, DIY grape growing is a learning process. Don’t be discouraged if you encounter challenges along the way. Every gardener faces setbacks, but the key is to learn from your mistakes and keep moving forward. Research, ask questions, and connect with other grape growers in your area. There’s a wealth of knowledge and support available to help you succeed.
We strongly encourage you to give this DIY grape growing method a try. The rewards are well worth the effort. And once you’ve experienced the joy of harvesting your own grapes, we’re confident you’ll be hooked.
We’d love to hear about your experiences! Share your photos, tips, and challenges in the comments below. Let’s build a community of DIY grape growers and learn from each other. What varieties are you growing? What techniques have you found most effective? What are your favorite ways to use your homegrown grapes? Your insights could inspire and help others on their grape-growing journey. So, get out there, get your hands dirty, and start growing your own delicious grapes today!
Frequently Asked Questions (FAQ)
1. What is the best time of year to plant grapevines?
The ideal time to plant grapevines is in early spring, after the last frost has passed, or in late fall, before the ground freezes. Planting during these periods allows the vines to establish their root systems before the stresses of summer heat or winter cold. If you live in a region with mild winters, fall planting is often preferred, as it gives the vines a head start in the spring. However, if you experience harsh winters, spring planting may be a safer option. When planting in the fall, be sure to mulch heavily around the base of the vines to protect them from freezing temperatures.
2. How much space do grapevines need?
Grapevines need ample space to grow and thrive. The exact spacing will depend on the variety of grape and the training system you choose. As a general rule, allow at least 8-10 feet between vines in a row and 10-12 feet between rows. Some vigorous varieties may require even more space. Consider the mature size of the vine when planning your vineyard layout. Proper spacing is crucial for air circulation, sunlight penetration, and ease of maintenance. Overcrowded vines are more susceptible to disease and pests.
3. What type of soil is best for growing grapes?
Grapes prefer well-drained soil with a slightly acidic to neutral pH (between 6.0 and 7.0). The soil should be rich in organic matter and have good drainage to prevent root rot. Before planting, it’s a good idea to conduct a soil test to determine the pH and nutrient levels. Amend the soil as needed with compost, manure, or other organic materials to improve its fertility and drainage. Avoid planting in heavy clay soils, as they tend to retain too much moisture. If you have clay soil, consider amending it with sand and organic matter to improve its drainage.
4. How often should I water my grapevines?
Newly planted grapevines need regular watering to establish their root systems. Water deeply and frequently, especially during dry periods. Once the vines are established, they are relatively drought-tolerant. However, they will still benefit from occasional watering during prolonged dry spells. Avoid overwatering, as this can lead to root rot. A good rule of thumb is to water deeply when the top inch of soil feels dry to the touch. During the growing season, you may need to water more frequently, especially during fruit development.
5. Do grapevines need fertilizer?
Grapevines benefit from regular fertilization, especially during the growing season. Use a balanced fertilizer that is specifically formulated for grapes or fruit trees. Apply the fertilizer in early spring, before the vines begin to grow actively. Avoid over-fertilizing, as this can lead to excessive vegetative growth and reduced fruit production. A soil test can help you determine the specific nutrient needs of your vines. Organic fertilizers, such as compost and manure, are also excellent options for feeding your grapevines.
6. How do I prune grapevines?
Pruning is essential for maintaining the health and productivity of grapevines. Prune annually in late winter or early spring, before the buds begin to swell. The goal of pruning is to remove dead, damaged, or diseased wood, as well as to shape the vine and promote fruit production. Different grape varieties and training systems require different pruning techniques. Research the specific pruning requirements of your grape variety before you begin. A good rule of thumb is to remove about 90% of the previous year’s growth, leaving only a few buds on each cane.
7. What are some common pests and diseases that affect grapevines?
Grapevines are susceptible to a variety of pests and diseases, including aphids, Japanese beetles, powdery mildew, downy mildew, and black rot. Monitor your vines regularly for signs of infestation or disease. Take preventative measures, such as spraying with organic fungicides or insecticides, to control pests and diseases. Good air circulation and sunlight penetration can also help to prevent disease. Remove any infected leaves or fruit promptly to prevent the spread of disease. Consider planting disease-resistant grape varieties to minimize the risk of problems.
8. How long does it take for grapevines to produce fruit?
It typically takes 2-3 years for grapevines to produce a significant crop of fruit. The first year after planting, the vines will focus on establishing their root systems. In the second year, they may produce a small amount of fruit. By the third year, you should be able to harvest a more substantial crop. The exact time frame will depend on the variety of grape, the growing conditions, and the care you provide. Be patient and continue to nurture your vines, and you will be rewarded with a bountiful harvest in due time.
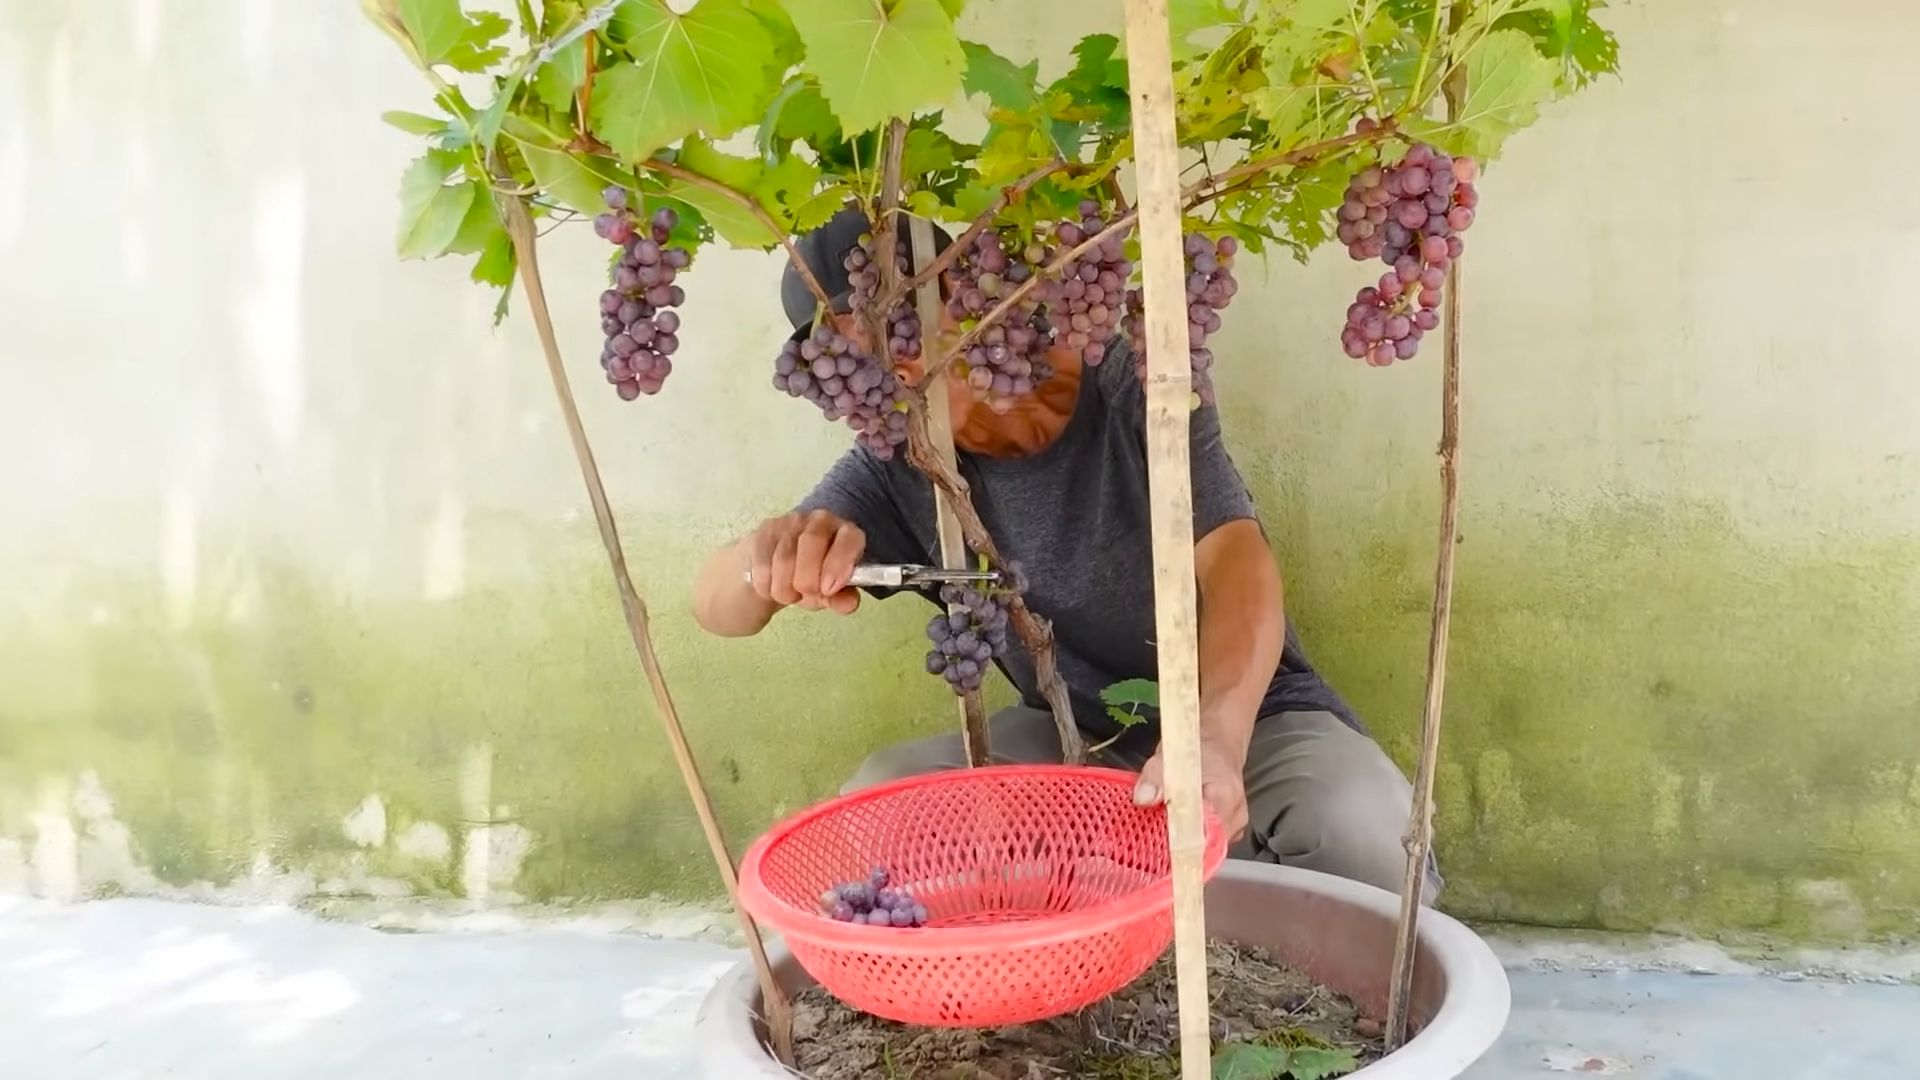
9. Can I grow grapes in containers?
Yes, you can grow grapes in containers, but it requires careful planning and attention. Choose a large container (at least 20 gallons) with good drainage. Select a dwarf or compact grape variety that is well-suited for container growing. Use a high-quality potting mix and fertilize regularly. Water frequently, especially during hot weather. Provide support for the vines to climb. Container-grown grapes may require more frequent pruning and repotting than those grown in the ground.
10. What can I do with my homegrown grapes?
The possibilities are endless! You can eat them fresh, make grape juice, jelly, jam, or wine. You can also use them in pies, tarts, and other desserts. Grapes can be dried to make raisins or frozen for later use. Get creative and experiment with different recipes and techniques. The satisfaction of using your own homegrown grapes in your culinary creations is truly rewarding.
Leave a Comment