

DIY cleaning solutions: Who knew saving money and the planet could be so rewarding? I’m always on the lookout for ways to make my home sparkle without breaking the bank or exposing my family to harsh chemicals. For generations, resourceful homemakers have relied on simple, natural ingredients to keep their homes clean and fresh. Think about it – before the age of mass-produced cleaning products, vinegar, baking soda, and lemon were the go-to powerhouses for tackling grime and dirt.
These aren’t just old wives’ tales, though! The beauty of DIY cleaning solutions lies in their effectiveness and their eco-friendliness. In today’s world, where we’re increasingly aware of the impact of our choices on the environment, switching to homemade cleaners is a small but significant step we can all take. Plus, let’s be honest, who doesn’t love the satisfaction of creating something useful with their own two hands?
This article is your ultimate guide to creating your own arsenal of powerful, safe, and affordable cleaning products. I’ll share my favorite recipes, tips, and tricks for tackling everything from stubborn stains to everyday messes. Get ready to ditch those expensive store-bought cleaners and embrace the power of DIY!
DIY Cleaning Solutions: Ditch the Chemicals, Embrace the Natural!
Okay, friends, let’s talk cleaning. I know, it’s not the most glamorous topic, but it’s a necessary one! And honestly, I’ve gotten *so* tired of all the harsh chemicals in store-bought cleaners. They smell awful, they’re expensive, and I’m always worried about my pets and kids getting into them. So, I decided to dive into the world of DIY cleaning solutions, and let me tell you, it’s been a game-changer! Not only are these recipes super effective, but they’re also budget-friendly and much gentler on the environment (and your lungs!).
This guide will walk you through some of my favorite DIY cleaning recipes, using ingredients you probably already have in your pantry. Get ready to say goodbye to those chemical-laden bottles and hello to a sparkling clean home, naturally!
All-Purpose Cleaner: Your New Best Friend
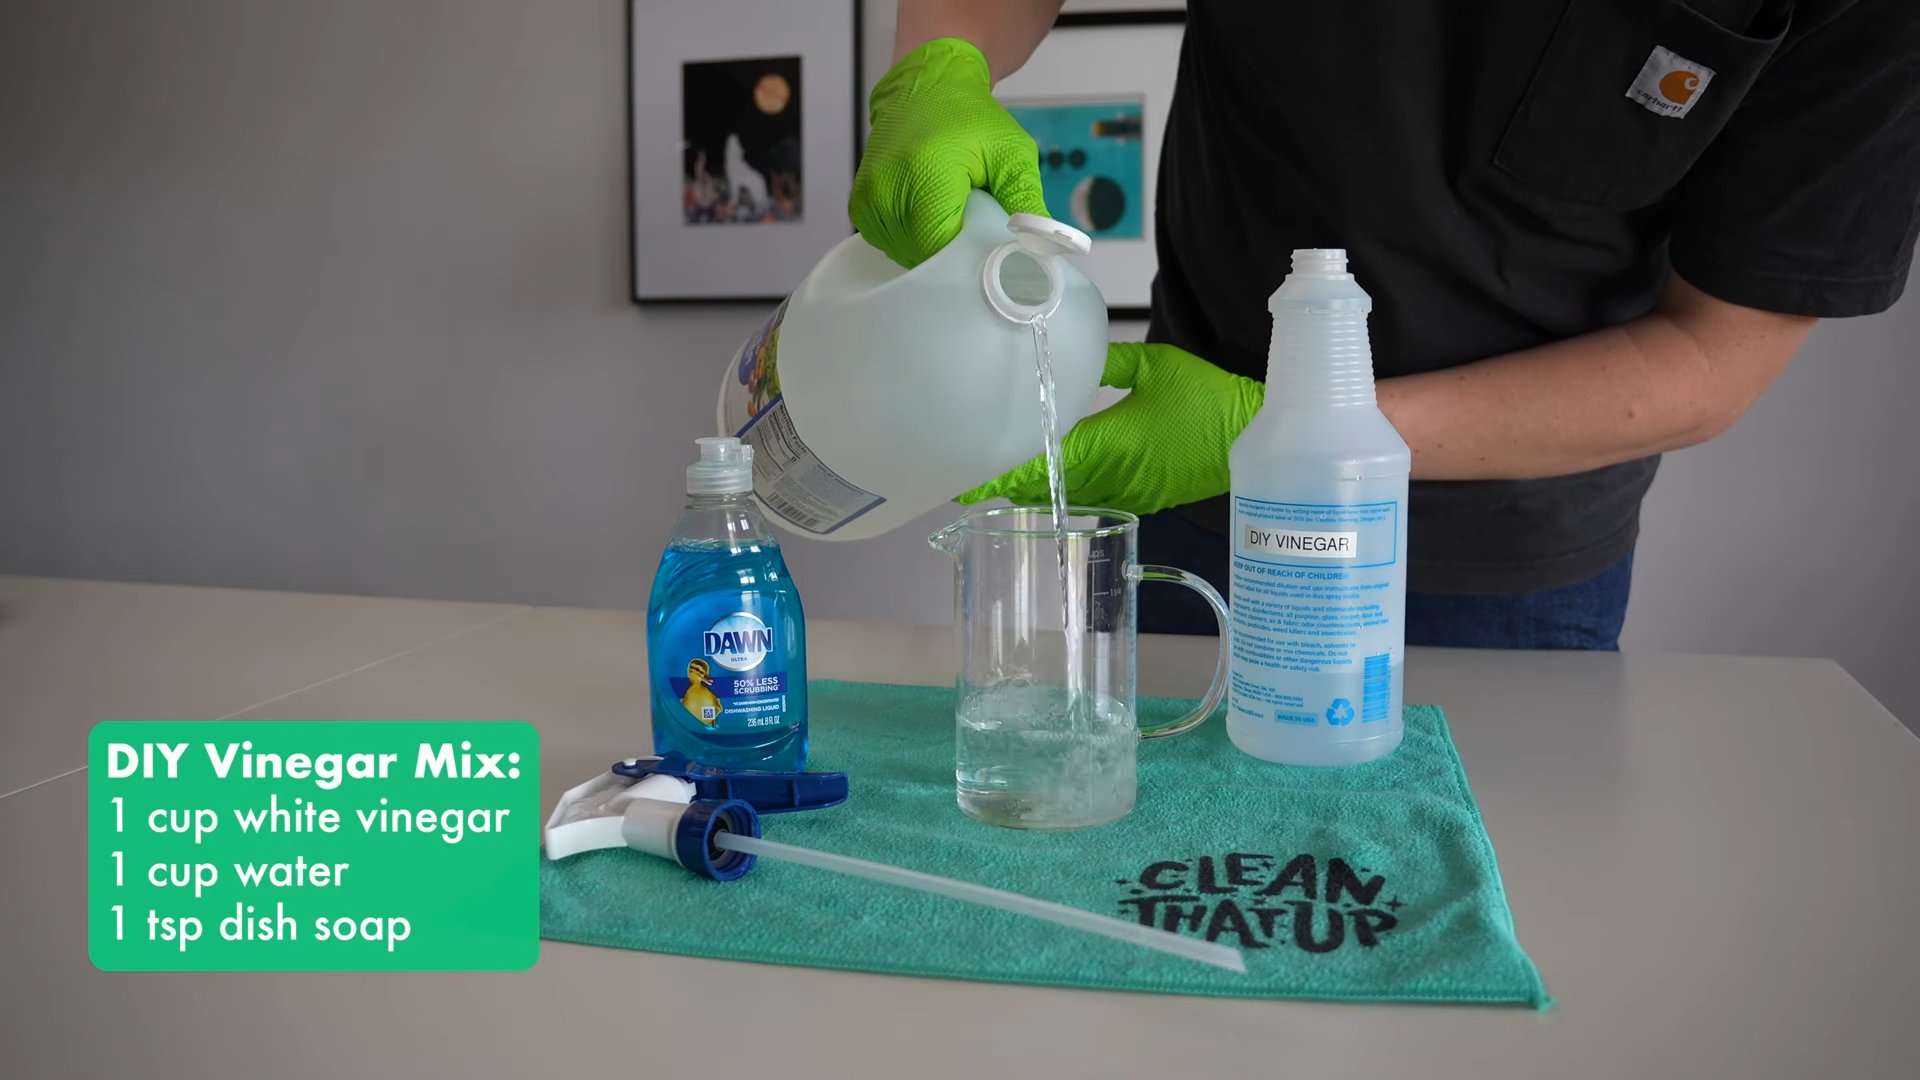
This is my go-to cleaner for pretty much everything – countertops, sinks, appliances, you name it! It’s simple, effective, and smells amazing.
What you’ll need:
* Spray bottle
* 1 cup white vinegar
* 1 cup water
* 10-20 drops of your favorite essential oil (lemon, lavender, tea tree, and eucalyptus are all great choices)
Step-by-step instructions:
1. Combine the ingredients: In your spray bottle, pour in the white vinegar and water.
2. Add essential oils: Add your chosen essential oils. I usually go for a mix of lemon and tea tree for their cleaning and antibacterial properties.
3. Shake it up: Close the spray bottle tightly and shake well to combine all the ingredients.
4. Spray and wipe: To use, simply spray the solution onto the surface you want to clean and wipe with a clean cloth or sponge. For tougher messes, let the solution sit for a few minutes before wiping.
Important Note: Avoid using vinegar-based cleaners on natural stone surfaces like granite or marble, as the acidity can damage them.
Glass Cleaner: Streak-Free Shine Guaranteed
Say goodbye to streaks and hello to sparkling clean windows and mirrors with this easy glass cleaner.
What you’ll need:
* Spray bottle
* 2 cups water
* 1/4 cup white vinegar
* 1/2 teaspoon liquid dish soap (optional, but helps cut through grease)
Step-by-step instructions:
1. Mix the ingredients: In your spray bottle, combine the water, white vinegar, and dish soap (if using).
2. Shake well: Close the spray bottle and shake gently to mix.
3. Spray and wipe: Spray the solution onto your windows or mirrors and wipe with a clean microfiber cloth. Microfiber cloths are key to achieving a streak-free finish! You can also use newspaper, which is surprisingly effective.
4. Buff to shine: For an extra shine, buff the surface with a dry microfiber cloth after wiping.
Toilet Bowl Cleaner: Naturally Fresh and Clean
This toilet bowl cleaner uses the power of baking soda and vinegar to fizz away grime and leave your toilet smelling fresh.
What you’ll need:
* 1 cup baking soda
* 1/2 cup white vinegar
* Toilet brush
Step-by-step instructions:
1. Sprinkle baking soda: Sprinkle the baking soda into the toilet bowl, making sure to coat the sides as much as possible.
2. Pour in vinegar: Slowly pour the white vinegar over the baking soda. It will fizz!
3. Let it sit: Let the mixture sit for at least 15-20 minutes, or even longer for tougher stains.
4. Scrub and flush: Use your toilet brush to scrub the bowl thoroughly, paying attention to any stains or buildup.
5. Flush: Flush the toilet to rinse away the cleaner.
Bonus Tip: For extra cleaning power, add a few drops of tea tree oil to the baking soda before adding the vinegar. Tea tree oil is a natural disinfectant.
Oven Cleaner: No More Harsh Fumes!
Cleaning the oven is probably my least favorite chore, but this DIY oven cleaner makes it a little less painful. It’s fume-free and surprisingly effective.
What you’ll need:
* Baking soda
* Water
* Spray bottle
* Spatula or scraper
* Gloves (optional, but recommended)
Step-by-step instructions:
1. Prepare the paste: In a bowl, mix together baking soda and water to form a thick paste. You’ll want it to be spreadable but not too runny.
2. Coat the oven: Using your hands (with gloves on, if you prefer) or a spatula, spread the baking soda paste all over the inside of your oven, avoiding the heating elements. Be sure to coat the walls, floor, and door.
3. Let it sit overnight: This is the key! Let the baking soda paste sit in your oven overnight, or for at least 12 hours. This gives it time to loosen the baked-on grime.
4. Scrub and scrape: The next day, use a spatula or scraper to remove as much of the dried baking soda paste as possible. It should come off fairly easily.
5. Wipe clean: Fill a spray bottle with water and spray down the inside of the oven to loosen any remaining baking soda residue. Wipe clean with a damp cloth or sponge. You may need to rinse and repeat a few times to get rid of all the baking soda.
Important Note: For self-cleaning ovens, consult your oven’s manual before using this method. Some manufacturers advise against using baking soda.
Drain Cleaner: Unclog Those Drains Naturally
Forget those harsh chemical drain cleaners that can damage your pipes and harm the environment. This DIY drain cleaner is a safe and effective alternative.
What you’ll need:
* 1 cup baking soda
* 1 cup white vinegar
* Boiling water
Step-by-step instructions:
1. Pour in baking soda: Pour the baking soda down the clogged drain.
2. Add vinegar: Pour the white vinegar down the drain after the baking soda. It will fizz!
3. Let it fizz: Let the mixture fizz for about 30 minutes. This will help to break down the clog.
4. Flush with boiling water: After 30 minutes, carefully pour a pot of boiling water down the drain. This will help to flush away the loosened debris.
5. Repeat if necessary: If the drain is still clogged, repeat the process. For stubborn clogs, you may need to repeat it several times.
Preventative Maintenance: To prevent future clogs, pour a cup of boiling water down your drains once a week.
Furniture Polish: Restore Shine and Protect Wood
This DIY furniture polish will help restore the shine to your wooden furniture and protect it from scratches and water damage.
What you’ll need:
* Spray bottle or clean cloth
* 1/4 cup olive oil
* 1 tablespoon lemon juice (or white vinegar)
Step-by-step instructions:
1. Combine ingredients: In a small bowl or spray bottle, combine the olive oil and lemon juice (or white vinegar).
2. Mix well: Stir or shake well to combine the ingredients.
3. Apply to furniture: If using a spray bottle, lightly spray the polish onto your wooden furniture. If using a cloth, dampen the cloth with the polish.
4. Wipe and buff: Wipe the furniture with a clean, soft cloth to spread the polish evenly. Then, buff the furniture with a dry cloth to remove any excess polish and bring out the shine.
Important Note: Always test the polish on an inconspicuous area of your furniture first to make sure it doesn’t damage the finish.
Laundry Detergent: Clean Clothes, Happy Wallet
Making your own laundry detergent is surprisingly easy and can save you a lot of money. This recipe is for a powdered detergent, which is easy to store and use.
What you’ll need:
* 1 cup washing soda (sodium carbonate)
* 1 cup borax (sodium borate)
* 1 bar of castile soap (like Dr. Bronner’s), grated
Step-by-step instructions:
1. Grate the soap: Grate the castile soap using a cheese grater or food processor.
2. Combine ingredients: In a large bowl, combine the washing soda, borax, and grated castile soap.
3. Mix well: Mix the ingredients thoroughly until they are evenly distributed.
4. Store in an airtight container: Store the detergent in an airtight container in a cool, dry place.
5.
Conclusion
So, there you have it! Ditching those expensive, chemical-laden store-bought cleaners and embracing the world of DIY cleaning solutions is not just a trend; it’s a smart, sustainable, and surprisingly effective way to keep your home sparkling. We’ve explored some fantastic recipes, highlighting their simplicity and the incredible cleaning power hidden within everyday ingredients.
Why is this a must-try? Because it’s about more than just saving money (though that’s a definite perk!). It’s about taking control of what you bring into your home, reducing your exposure to harsh chemicals, and minimizing your environmental impact. You’ll be amazed at how well these homemade concoctions work, often outperforming their commercial counterparts. Plus, the satisfaction of creating something yourself, knowing exactly what’s in it, is truly rewarding.
But the beauty of DIY lies in its adaptability. Feel free to experiment with these recipes to suit your specific needs and preferences. For instance, if you’re not a fan of vinegar’s scent, try adding a few drops of your favorite essential oil to your all-purpose cleaner. Lavender, lemon, and tea tree oil are all excellent choices, not only for their fragrance but also for their added antibacterial properties. If you have particularly stubborn stains, consider boosting your baking soda paste with a touch of hydrogen peroxide. Remember to always test any new cleaning solution in an inconspicuous area first to ensure it doesn’t damage the surface.
Consider these variations:
* **Citrus Power:** Infuse your vinegar with citrus peels (lemon, orange, grapefruit) for a more pleasant scent and added cleaning power. Simply soak the peels in vinegar for a few weeks, then strain and use as usual.
* **Herbal Infusion:** Add fresh herbs like rosemary, thyme, or mint to your vinegar for a unique and refreshing scent.
* **Essential Oil Blends:** Create your own signature scent by blending different essential oils. Experiment with combinations like eucalyptus and peppermint for a stimulating and invigorating clean.
* **Borax Boost:** For extra cleaning power on tough stains, add a tablespoon of borax to your all-purpose cleaner. However, use borax with caution and always wear gloves.
Ultimately, the best DIY cleaning solution is the one that works best for you and your home. Don’t be afraid to tweak the recipes, experiment with different ingredients, and find what you love.
We wholeheartedly encourage you to give these DIY cleaning solutions a try. Start with one recipe, see how it works for you, and then gradually incorporate more into your cleaning routine. You might be surprised at how easy and effective it is to create your own eco-friendly cleaning arsenal.
And most importantly, we want to hear about your experience! Share your tips, tricks, and variations in the comments below. Let us know which recipes you tried, what worked well, and what you would do differently. Your feedback will not only help other readers but also contribute to a community of eco-conscious cleaners who are passionate about creating a healthier and more sustainable home. Let’s revolutionize the way we clean, one DIY solution at a time!
Frequently Asked Questions (FAQs)
What are the benefits of using DIY cleaning solutions compared to store-bought ones?
DIY cleaning solutions offer a multitude of benefits. Firstly, they are significantly more cost-effective. The ingredients used in homemade cleaners, such as vinegar, baking soda, and lemon juice, are typically much cheaper than commercial cleaning products. Secondly, DIY cleaners are environmentally friendly. They reduce the amount of plastic waste generated by disposable bottles and minimize the release of harmful chemicals into the environment. Thirdly, you have complete control over the ingredients, avoiding harsh chemicals, artificial fragrances, and dyes that can trigger allergies or sensitivities. Finally, making your own cleaning solutions can be a fun and empowering experience, allowing you to customize scents and formulas to your specific needs.
Are DIY cleaning solutions as effective as store-bought cleaners?
In many cases, yes! While some heavy-duty cleaning tasks might require specialized products, DIY cleaning solutions are surprisingly effective for everyday cleaning. Vinegar, for example, is a powerful disinfectant and degreaser. Baking soda is a gentle abrasive that can scrub away grime and deodorize surfaces. Lemon juice is a natural brightener and stain remover. When combined correctly, these ingredients can tackle a wide range of cleaning tasks, from wiping down countertops to cleaning bathrooms. The key is to use the right solution for the right job and to allow sufficient contact time for the ingredients to work their magic.
Are there any surfaces or materials that I should avoid using DIY cleaning solutions on?
Yes, there are certain surfaces and materials that can be damaged by DIY cleaning solutions. Acidic ingredients like vinegar and lemon juice can etch or dull natural stone surfaces like marble, granite, and limestone. Avoid using these ingredients on these surfaces. Also, be cautious when using vinegar on waxed wood floors, as it can strip away the wax. Always test any new cleaning solution in an inconspicuous area first to ensure it doesn’t cause any damage or discoloration. For delicate surfaces like antiques or fine fabrics, it’s best to consult with a professional cleaner.
How should I store my DIY cleaning solutions?
Proper storage is essential for maintaining the effectiveness and safety of your DIY cleaning solutions. Always store your cleaners in labeled containers to avoid confusion. Use spray bottles for liquids and airtight containers for powders and pastes. Keep your cleaning solutions out of reach of children and pets. Store them in a cool, dark place away from direct sunlight and heat, which can degrade the ingredients. Avoid storing vinegar-based cleaners in metal containers, as the acid can react with the metal. Glass or plastic containers are the best options.
How long do DIY cleaning solutions typically last?
The shelf life of DIY cleaning solutions varies depending on the ingredients used. Vinegar-based cleaners can last indefinitely, as vinegar is a natural preservative. Baking soda-based cleaners also have a long shelf life, as baking soda is stable and doesn’t degrade easily. However, solutions containing fresh ingredients like lemon juice or herbs may have a shorter shelf life, typically a few weeks. It’s best to make smaller batches of these solutions and use them within a reasonable timeframe. If you notice any changes in color, odor, or consistency, it’s best to discard the solution and make a fresh batch.
Can I use essential oils in my DIY cleaning solutions?
Absolutely! Essential oils can add a pleasant fragrance and boost the cleaning power of your DIY solutions. Many essential oils have antibacterial, antiviral, and antifungal properties. Some popular choices for cleaning include lemon, tea tree, lavender, eucalyptus, and peppermint. When using essential oils, be sure to use pure, therapeutic-grade oils. Add a few drops to your cleaning solutions and shake well before each use. Be cautious when using essential oils around pets, as some oils can be toxic to animals. Always research the safety of essential oils before using them around your furry friends.
What safety precautions should I take when making and using DIY cleaning solutions?
Safety should always be a top priority when making and using DIY cleaning solutions. Wear gloves to protect your hands from irritation. Avoid mixing different cleaning solutions together, as this can create dangerous fumes. For example, never mix bleach with vinegar or ammonia. Work in a well-ventilated area to avoid inhaling fumes. If you accidentally get a cleaning solution in your eyes, flush them immediately with water for several minutes. Keep your cleaning solutions out of reach of children and pets. Always label your containers clearly to avoid accidental ingestion. If you have any concerns about the safety of a particular ingredient, consult with a professional.
What are some common mistakes to avoid when making DIY cleaning solutions?
One common mistake is using the wrong proportions of ingredients. Always follow the recipe carefully and measure ingredients accurately. Another mistake is using ingredients that are not compatible with each other. For example, mixing acidic ingredients with alkaline ingredients can neutralize their effectiveness. Avoid using harsh abrasives on delicate surfaces. Always test any new cleaning solution in an inconspicuous area first. Finally, don’t expect DIY cleaning solutions to work miracles. Some stains and messes may require multiple treatments or specialized cleaning products.
Where can I find reliable recipes for DIY cleaning solutions?
There are many reliable sources for DIY cleaning solution recipes online and in books. Look for recipes from reputable websites and blogs that focus on natural cleaning and sustainable living. Be sure to read reviews and comments from other users to get an idea of the effectiveness of the recipes. Choose recipes that use simple, readily available ingredients. Avoid recipes that call for obscure or potentially harmful chemicals. Always double-check the ingredients and instructions before making a cleaning solution.
How can I make my DIY cleaning routine more sustainable?
There are many ways to make your DIY cleaning routine more sustainable. Use reusable containers for storing your cleaning solutions. Choose ingredients that are biodegradable and environmentally friendly. Avoid using disposable cleaning wipes and paper towels. Instead, opt for reusable cloths and sponges. Compost food scraps and other organic waste to reduce your environmental impact. Support companies that are committed to sustainable practices. By making small changes to your cleaning routine, you can significantly reduce your environmental footprint.

Leave a Comment