

Dish soap and oil sink: Ever stared into your kitchen sink, a murky pool of grease and food scraps swirling stubbornly, and felt a wave of defeat wash over you? I know I have! It’s a common kitchen woe, a battle fought in countless homes, and frankly, it’s a real drag. But what if I told you there’s a simple, effective, and surprisingly satisfying way to conquer that greasy beast lurking in your drain?
For generations, resourceful home cooks have been battling kitchen grime with clever hacks and DIY solutions. Think of your grandmother, armed with her trusty vinegar and baking soda, fearlessly tackling any household mess. These time-tested methods are more than just cleaning tricks; they’re a legacy of resourcefulness and a testament to the power of simple ingredients. And when it comes to unclogging a sink gummed up with dish soap and oil sink residue, a little DIY magic can go a long way.
Let’s face it, a clogged sink is more than just an inconvenience. It’s a breeding ground for bacteria, a source of unpleasant odors, and a potential plumbing nightmare waiting to happen. Nobody wants that! That’s why I’m so excited to share this easy-to-follow DIY guide. We’ll ditch the harsh chemicals and embrace a gentler, more effective approach to keeping your kitchen sink sparkling clean and flowing freely. Get ready to say goodbye to greasy sink woes and hello to a happier, healthier home!

DIY Drain De-Clogger: The Dish Soap & Oil Powerhouse
Okay, so your sink is gurgling, the water’s backing up, and you’re staring down the barrel of a potential plumbing disaster. Don’t panic! Before you call a plumber (and empty your wallet), let’s try a surprisingly effective DIY drain de-clogger using just dish soap and oil. Yes, you read that right! This isn’t your grandma’s baking soda and vinegar trick (though that works too sometimes!). This method is particularly good for grease clogs, which are a common culprit in kitchen sinks. I’ve used this trick countless times, and it’s saved me a fortune.
What You’ll Need
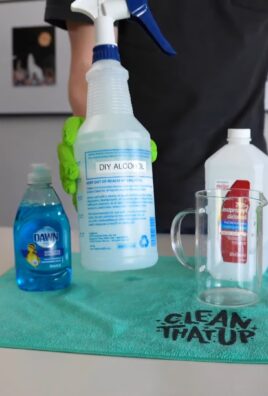
* Dish Soap (Dawn is my go-to, but any grease-cutting dish soap will do)
* Cooking Oil (Vegetable, canola, or even olive oil – whatever you have on hand)
* Kettle or Pot of Boiling Water
* Optional: Plunger
* Optional: Baking Soda
* Optional: White Vinegar
Understanding the Science (A Little Bit!)
The magic here lies in the way the dish soap and oil interact with the clog. The dish soap, being a surfactant, helps to break down the grease and grime that’s causing the blockage. The oil, surprisingly, acts as a lubricant, helping to loosen the clog and allow it to move more freely down the drain. The boiling water then flushes everything away. It’s a simple but effective combination!
Step-by-Step Instructions: Unleashing the De-Clogging Power
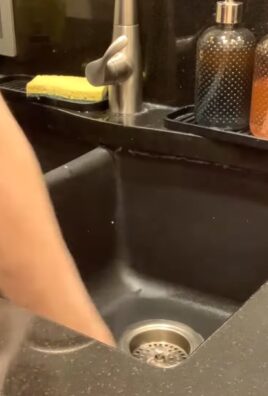
1. Clear the Standing Water: This is crucial. If your sink is full of water, the dish soap and oil won’t be able to reach the clog effectively. Use a cup or small container to scoop out as much standing water as possible. Be patient; this might take a few tries.
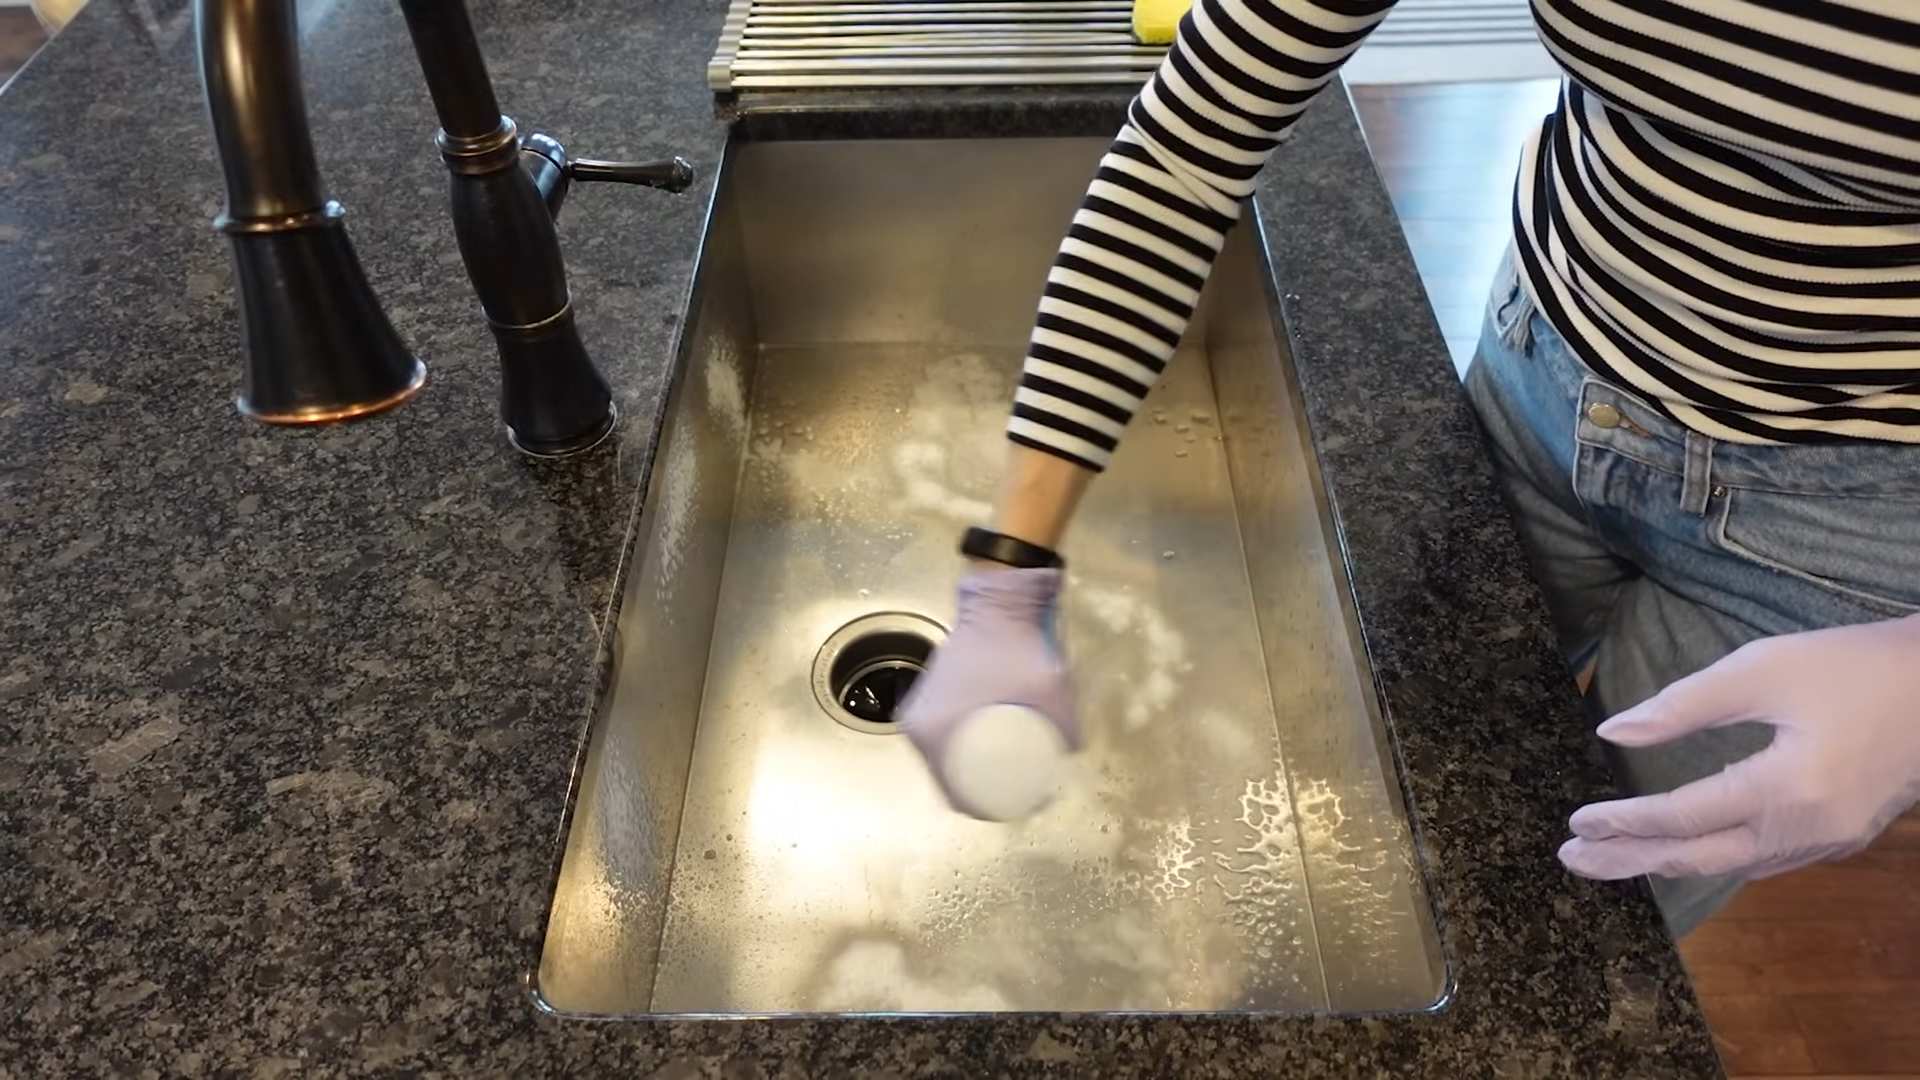
2. Pour in the Dish Soap: Generously squirt about 1/2 to 1 cup of dish soap directly into the drain. Don’t be shy! We want to coat that clog thoroughly.
3. Add the Oil: Now, pour in about 1/4 to 1/2 cup of cooking oil. Again, the type of oil isn’t super critical here. Just use what you have.
4. Let it Sit (The Waiting Game): This is where the magic happens. Let the dish soap and oil mixture sit in the drain for at least 30 minutes, but ideally, an hour or even overnight for stubborn clogs. This gives the soap and oil time to work their way into the clog and start breaking it down. I usually do this before I go to bed and let it sit overnight.
5. Boil the Water: While you’re waiting, boil a kettle or pot of water. Make sure it’s a good amount – at least a gallon or two.
6. Carefully Pour the Boiling Water: Once the waiting period is over, carefully pour the boiling water down the drain. Be cautious! Boiling water can splash and burn. Pour slowly and steadily to avoid any accidents.
7. Observe and Repeat (If Necessary): Watch to see if the water drains freely. If it does, congratulations! You’ve successfully de-clogged your drain. If the water is still draining slowly or not at all, repeat steps 2-6. Sometimes, it takes a couple of tries to fully clear a stubborn clog.
8. Optional: Plunger Power: If the dish soap, oil, and boiling water aren’t doing the trick on their own, grab your trusty plunger. Make sure there’s enough water in the sink to cover the cup of the plunger. Create a tight seal around the drain opening and plunge vigorously for several minutes. This can help to dislodge the clog and push it down the drain.
Boosting the Power: Baking Soda and Vinegar Addition
If the dish soap and oil method alone isn’t quite cutting it, you can add baking soda and vinegar to the mix for an extra boost. This is a classic drain-cleaning combination that can help to break down organic matter and further loosen the clog.
1. Pour in Baking Soda: After clearing any standing water, pour about 1 cup of baking soda down the drain.
2. Add the Vinegar: Follow the baking soda with 1 cup of white vinegar.
3. The Fizzing Frenzy: You’ll notice a fizzing reaction as the baking soda and vinegar combine. This is normal and helps to break down the clog.
4. Let it Sit (Again!): Let the baking soda and vinegar mixture sit in the drain for about 30 minutes.
5. Follow with Dish Soap and Oil: After the 30 minutes, proceed with steps 2 and 3 from the original instructions (dish soap and oil).
6. Boiling Water Flush: Finally, pour the boiling water down the drain to flush everything away.
Dealing with Stubborn Clogs: A Few Extra Tips
Sometimes, despite your best efforts, a clog just won’t budge. Here are a few extra tips for dealing with those particularly stubborn blockages:
* The Wire Hanger Trick: Straighten out a wire coat hanger and bend one end into a small hook. Carefully insert the hooked end into the drain and try to fish out any visible debris, such as hair or food particles. Be gentle to avoid pushing the clog further down the drain.
* Check the P-Trap: The P-trap is the curved pipe under your sink. It’s designed to trap debris and prevent sewer gases from entering your home. Sometimes, the clog is located right in the P-trap. Place a bucket under the P-trap to catch any water, then carefully loosen the slip nuts that connect the P-trap to the drain pipes. Remove the P-trap and clean out any debris that you find inside. Reassemble the P-trap and tighten the slip nuts.
* Enzyme Drain Cleaners: If all else fails, you can try using an enzyme drain cleaner. These cleaners contain enzymes that break down organic matter, such as hair and food particles. They’re generally safer for your pipes than chemical drain cleaners, but they may take longer to work. Follow the instructions on the product label carefully.
* Avoid Chemical Drain Cleaners: I strongly advise against using chemical drain cleaners. They’re highly corrosive and can damage your pipes, especially if you have older plumbing. They can also be dangerous to handle and can release harmful fumes. Plus, they often just push the clog further down the drain, making the problem worse.
Prevention is Key: Keeping Your Drains Clear
The best way to deal with clogs is to prevent them from happening in the first place. Here are a few tips for keeping your drains clear:
* Use a Drain Strainer: Place a drain strainer in your sink to catch hair, food particles, and other debris before they go down the drain.
* Avoid Pouring Grease Down the Drain: Grease is a major culprit when it comes to drain clogs. Never pour grease down the drain. Instead, let it cool and solidify, then scrape it into the trash.
* Flush with Hot Water Regularly: Run hot water down your drain for a few minutes each week to help flush away any buildup.
* Don’t Overload the Garbage Disposal: Avoid putting large amounts of food waste down the garbage disposal at once. Cut food into smaller pieces and run plenty of water while the disposal is running.
* Consider a Professional Cleaning: If you’re prone to frequent drain clogs, consider having your drains professionally cleaned every year or two. A professional plumber can use specialized equipment to remove any buildup and keep your drains flowing freely.
Important Safety Considerations
* Boiling Water: Be extremely careful when handling boiling water. Wear oven mitts or gloves to protect your hands from burns. Pour the water slowly and steadily to avoid splashing.
* Chemical Drain Cleaners: As mentioned earlier, I strongly advise against using chemical drain cleaners. If you do choose to use them, follow the instructions on the product label carefully and wear appropriate protective gear, such as gloves and eye protection.
* Plumbing Repairs: If you’re not comfortable performing plumbing repairs yourself, it’s always best to call a professional plumber. They have the expertise and equipment to diagnose and fix plumbing problems safely and effectively.
I hope this guide helps you tackle that stubborn drain clog! Remember to be patient, persistent, and always prioritize safety. Good luck, and happy de-clogging!
Conclusion
So, there you have it! This simple yet incredibly effective DIY trick using dish soap and oil is a game-changer for anyone battling stubborn sink clogs. It’s a must-try because it’s not only cost-effective, utilizing ingredients you likely already have in your kitchen, but it’s also a safer alternative to harsh chemical drain cleaners. Forget about the fumes, the potential damage to your pipes, and the environmental concerns – this method offers a gentle yet powerful solution.
The beauty of this DIY approach lies in its adaptability. While the basic recipe of dish soap and oil works wonders, feel free to experiment with variations to suit your specific needs. For instance, if you suspect a grease buildup is the primary culprit, consider using a slightly larger proportion of dish soap, known for its grease-cutting properties. Conversely, for a clog that seems more solid or stubborn, a touch more oil might help to lubricate and dislodge the blockage.
Don’t be afraid to get creative! Some people swear by adding a cup of hot (but not boiling) water after the dish soap and oil mixture to further aid in dissolving the clog. Others find that a plunger, used gently after the solution has had time to sit, provides that extra push needed to clear the drain completely. The key is to observe how your sink responds and adjust your approach accordingly.
This DIY sink unclogging method is more than just a quick fix; it’s a sustainable and responsible way to maintain your plumbing. By avoiding harsh chemicals, you’re not only protecting your pipes but also contributing to a healthier environment. Plus, the satisfaction of solving a common household problem with simple, readily available ingredients is truly rewarding.
We wholeheartedly encourage you to give this DIY trick a try. We are confident that you’ll be amazed by its effectiveness. And most importantly, we want to hear about your experience! Share your results, any variations you tried, and any tips you discovered in the comments below. Your feedback will not only help other readers but also contribute to a collective knowledge base of effective and eco-friendly home maintenance solutions. Let’s ditch the harsh chemicals and embrace a simpler, safer, and more sustainable way to keep our sinks flowing freely! Remember, a little dish soap and oil can go a long way in conquering those pesky sink clogs.
Frequently Asked Questions (FAQ)
What kind of dish soap works best for this DIY trick?
Any standard liquid dish soap will work for this method. However, dish soaps specifically formulated for grease-cutting are generally more effective, especially if you suspect that grease buildup is the primary cause of your sink clog. Look for dish soaps that advertise their ability to dissolve grease and food particles. Avoid using dish soap that contains added moisturizers or lotions, as these can sometimes leave a residue that could potentially contribute to future clogs.
What type of oil should I use? Can I use cooking oil?
Yes, you can absolutely use cooking oil! Vegetable oil, canola oil, or even olive oil are all suitable options. The purpose of the oil is to lubricate the clog and help it slide down the drain. You don’t need to use expensive or high-quality oil for this purpose. In fact, using older or slightly rancid cooking oil that you might otherwise discard is a great way to repurpose it. Avoid using very thick oils like coconut oil in its solid form, as it could solidify further down the drain and exacerbate the problem.
How long should I let the dish soap and oil mixture sit in the drain?
Ideally, you should let the mixture sit in the drain for at least 30 minutes, but longer is generally better. For particularly stubborn clogs, consider letting it sit for several hours or even overnight. This allows the dish soap to break down the grease and grime, while the oil lubricates the blockage, making it easier to dislodge. If you’re leaving it overnight, be sure to cover the drain to prevent any unpleasant odors from escaping.
Will this DIY trick work for all types of sink clogs?
While this DIY trick is effective for many common sink clogs, particularly those caused by grease, food particles, and hair, it may not work for all types of blockages. For example, if you have a solid object lodged deep within the drainpipe, such as a toy or a large piece of food, this method is unlikely to be successful. In such cases, you may need to use a plumbing snake or call a professional plumber. This method is best suited for clogs that are primarily composed of organic matter and grease.
Is this method safe for all types of pipes?
This DIY method is generally safe for most types of pipes, including PVC, copper, and metal pipes. Unlike harsh chemical drain cleaners, dish soap and oil are not corrosive and are unlikely to damage your plumbing. However, if you have very old or fragile pipes, it’s always a good idea to exercise caution and avoid using excessive force when plunging or using a plumbing snake. If you’re unsure about the condition of your pipes, it’s best to consult with a professional plumber before attempting any DIY drain cleaning methods.
What if the dish soap and oil mixture doesn’t work the first time?
If the mixture doesn’t work the first time, don’t give up! Try repeating the process a second or even a third time. You can also try adjusting the proportions of dish soap and oil, or letting the mixture sit for a longer period. If you’ve tried the dish soap and oil method multiple times without success, you can try using a plunger or a plumbing snake to further dislodge the clog. As a last resort, you may need to call a professional plumber to diagnose and resolve the problem.
Can I use this method to prevent sink clogs from forming in the first place?
Yes, absolutely! Using this DIY trick periodically can help prevent sink clogs from forming in the first place. Pouring a small amount of dish soap and oil down the drain once a week or every other week can help to break down grease and grime before they have a chance to accumulate and cause a blockage. This is a great way to maintain your plumbing and avoid the hassle of dealing with stubborn clogs in the future.
Is there anything else I can add to the mixture to make it more effective?
Some people find that adding baking soda and vinegar to the dish soap and oil mixture can further enhance its effectiveness. The combination of baking soda and vinegar creates a fizzing action that can help to loosen and dislodge clogs. To try this method, pour about a cup of baking soda down the drain, followed by a cup of vinegar. Let it fizz for about 30 minutes, then pour in the dish soap and oil mixture and let it sit for another 30 minutes before flushing with hot water.
How do I know if I need to call a plumber instead of trying this DIY method?
If you’ve tried this DIY method and other simple solutions like plunging or using a plumbing snake without success, it may be time to call a plumber. Other signs that you need professional help include:
* Recurring clogs that keep coming back.
* Slow draining sinks that never fully clear.
* Foul odors coming from your drains.
* Water backing up into your sink from other drains.
* Any signs of water damage or leaks around your sink or pipes.
A professional plumber can diagnose the underlying cause of your plumbing problems and provide a more permanent solution.

Leave a Comment