

Clean Wooden Cutting Board: Ah, the unsung hero of the kitchen! We all rely on our trusty wooden cutting boards for everything from chopping veggies to slicing bread, but let’s be honest, they can get a little… well, *grimy*. Have you ever wondered how to truly get your wooden cutting board sparkling and sanitized without harsh chemicals? I know I have! For generations, wooden cutting boards have been a staple in kitchens worldwide, prized for their durability and natural antibacterial properties. But those very properties can also make them a breeding ground for bacteria if not properly cared for.
That’s where this DIY guide comes in! I’m going to share my favorite, tried-and-true methods for keeping your clean wooden cutting board in tip-top shape. Forget expensive cleaners and complicated routines. These simple hacks use ingredients you probably already have in your pantry. Why is this so important? Because a clean cutting board is essential for food safety, preventing cross-contamination and keeping your family healthy. Plus, a well-maintained board will last for years, saving you money in the long run. So, grab your apron, and let’s get started on giving your wooden cutting board the TLC it deserves!
DIY: Reviving Your Beloved Wooden Cutting Board
Hey there, fellow DIY enthusiasts! I’m so excited to share this project with you. We’re going to breathe new life into your tired, scratched, and maybe even a little smelly, wooden cutting board. Don’t throw it away! With a little elbow grease and some simple ingredients, you can restore it to its former glory and keep it sanitary for years to come. I promise, it’s easier than you think!
What You’ll Need: The Essential Supplies
Before we dive in, let’s gather our supplies. Having everything ready will make the process smooth and enjoyable. Here’s what I recommend:
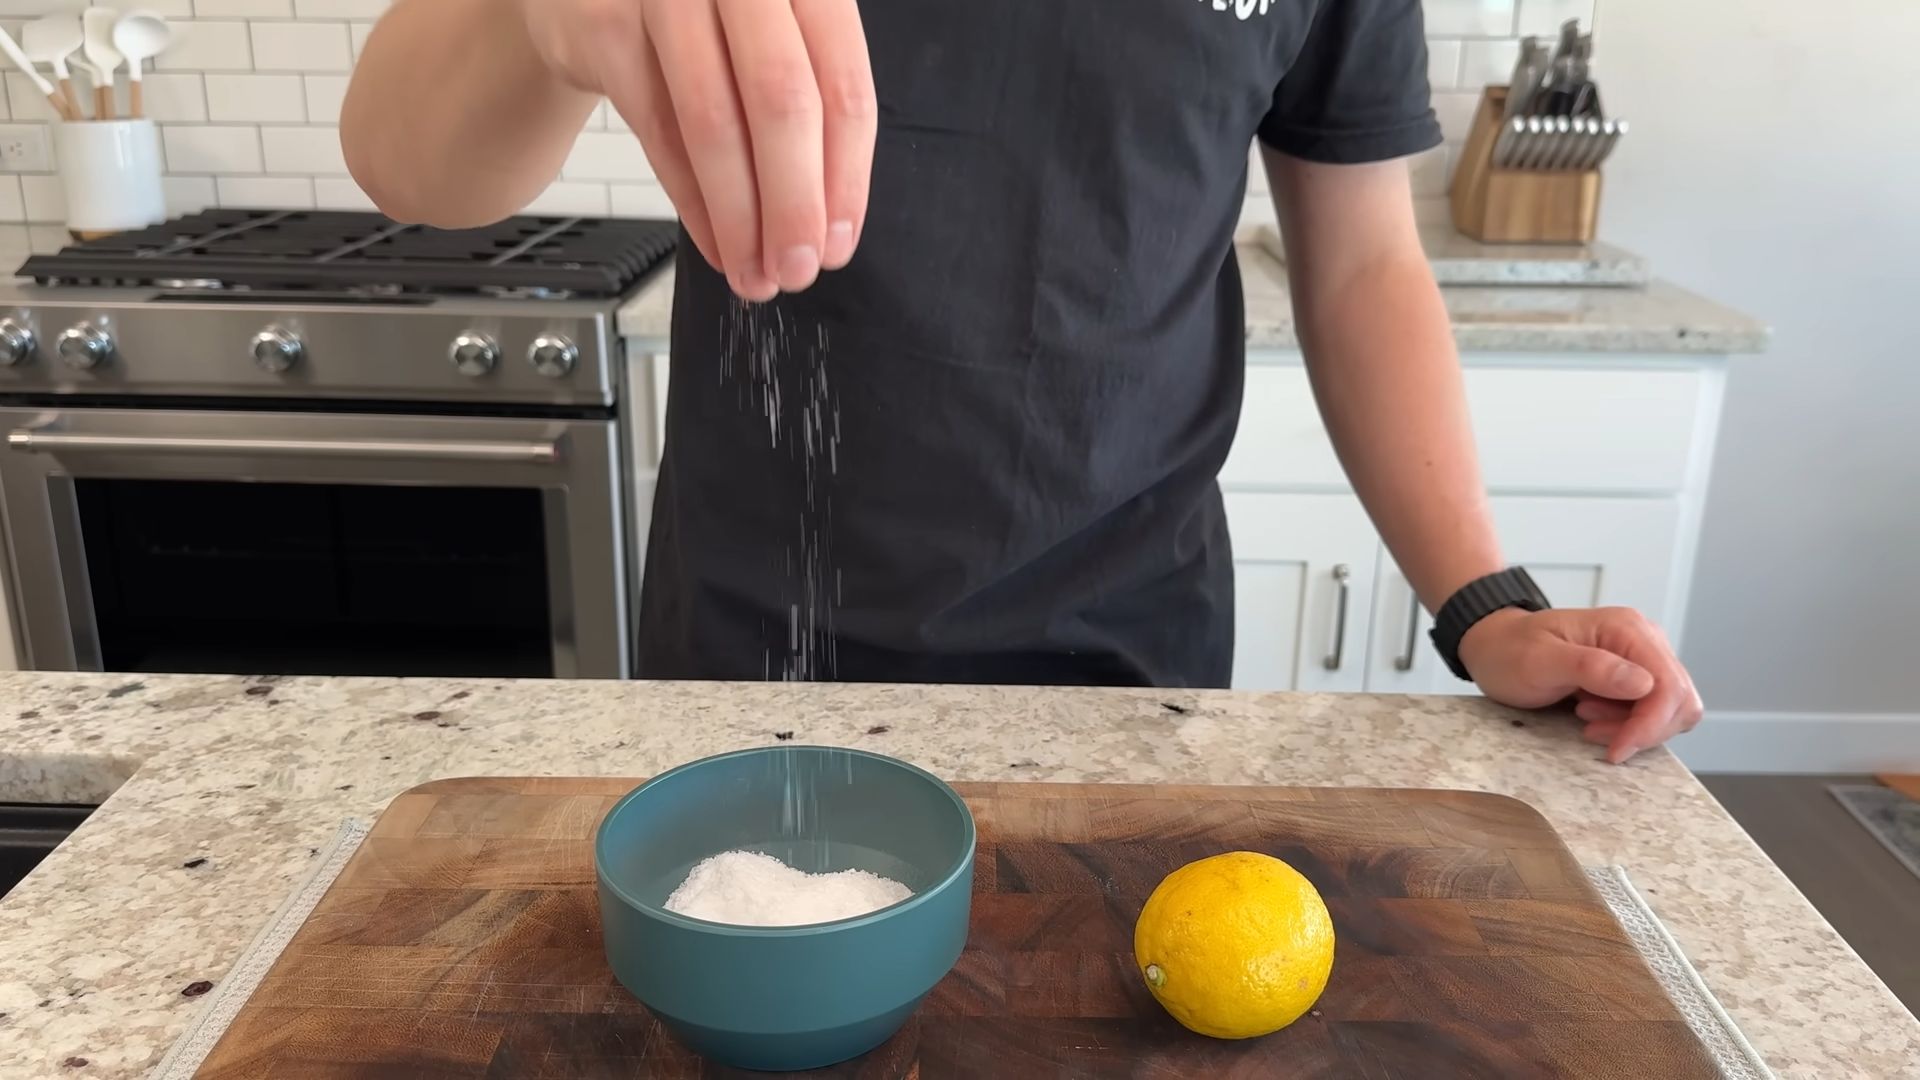
* Coarse Salt: Think kosher salt or sea salt. The larger granules will act as a gentle abrasive.
* Lemons: Fresh lemons are key! Their acidity helps disinfect and deodorize.
* White Vinegar: Another cleaning powerhouse. It’s great for sanitizing.
* Food-Grade Mineral Oil: This is crucial for rehydrating the wood and preventing it from cracking. Don’t use cooking oils; they can go rancid.
* Beeswax (Optional): If you want an extra layer of protection and a beautiful sheen, beeswax is a fantastic addition.
* Clean Rags or Paper Towels: You’ll need plenty for cleaning and wiping.
* Scraper or Spatula: For removing stubborn food particles.
* Sandpaper (Various Grits): We’ll use different grits to smooth out the surface. I suggest 80-grit, 120-grit, 220-grit, and maybe even a super-fine 400-grit for a really polished finish.
* Sanding Block (Optional): Makes sanding easier and more even.
* Soft Cloth or Brush: For applying the mineral oil and beeswax.
* Heat-Safe Bowl (If using beeswax): For melting the beeswax.
* Double Boiler or Microwave (If using beeswax): For melting the beeswax safely.
* Gloves (Optional): To protect your hands, especially during sanding.
Phase 1: The Deep Cleanse
This is where we get rid of all the gunk and grime that’s built up on your cutting board. Trust me, you’ll be amazed at what comes off!
1. Scrape Away Debris: Use your scraper or spatula to remove any loose food particles or dried-on residue. Be thorough!
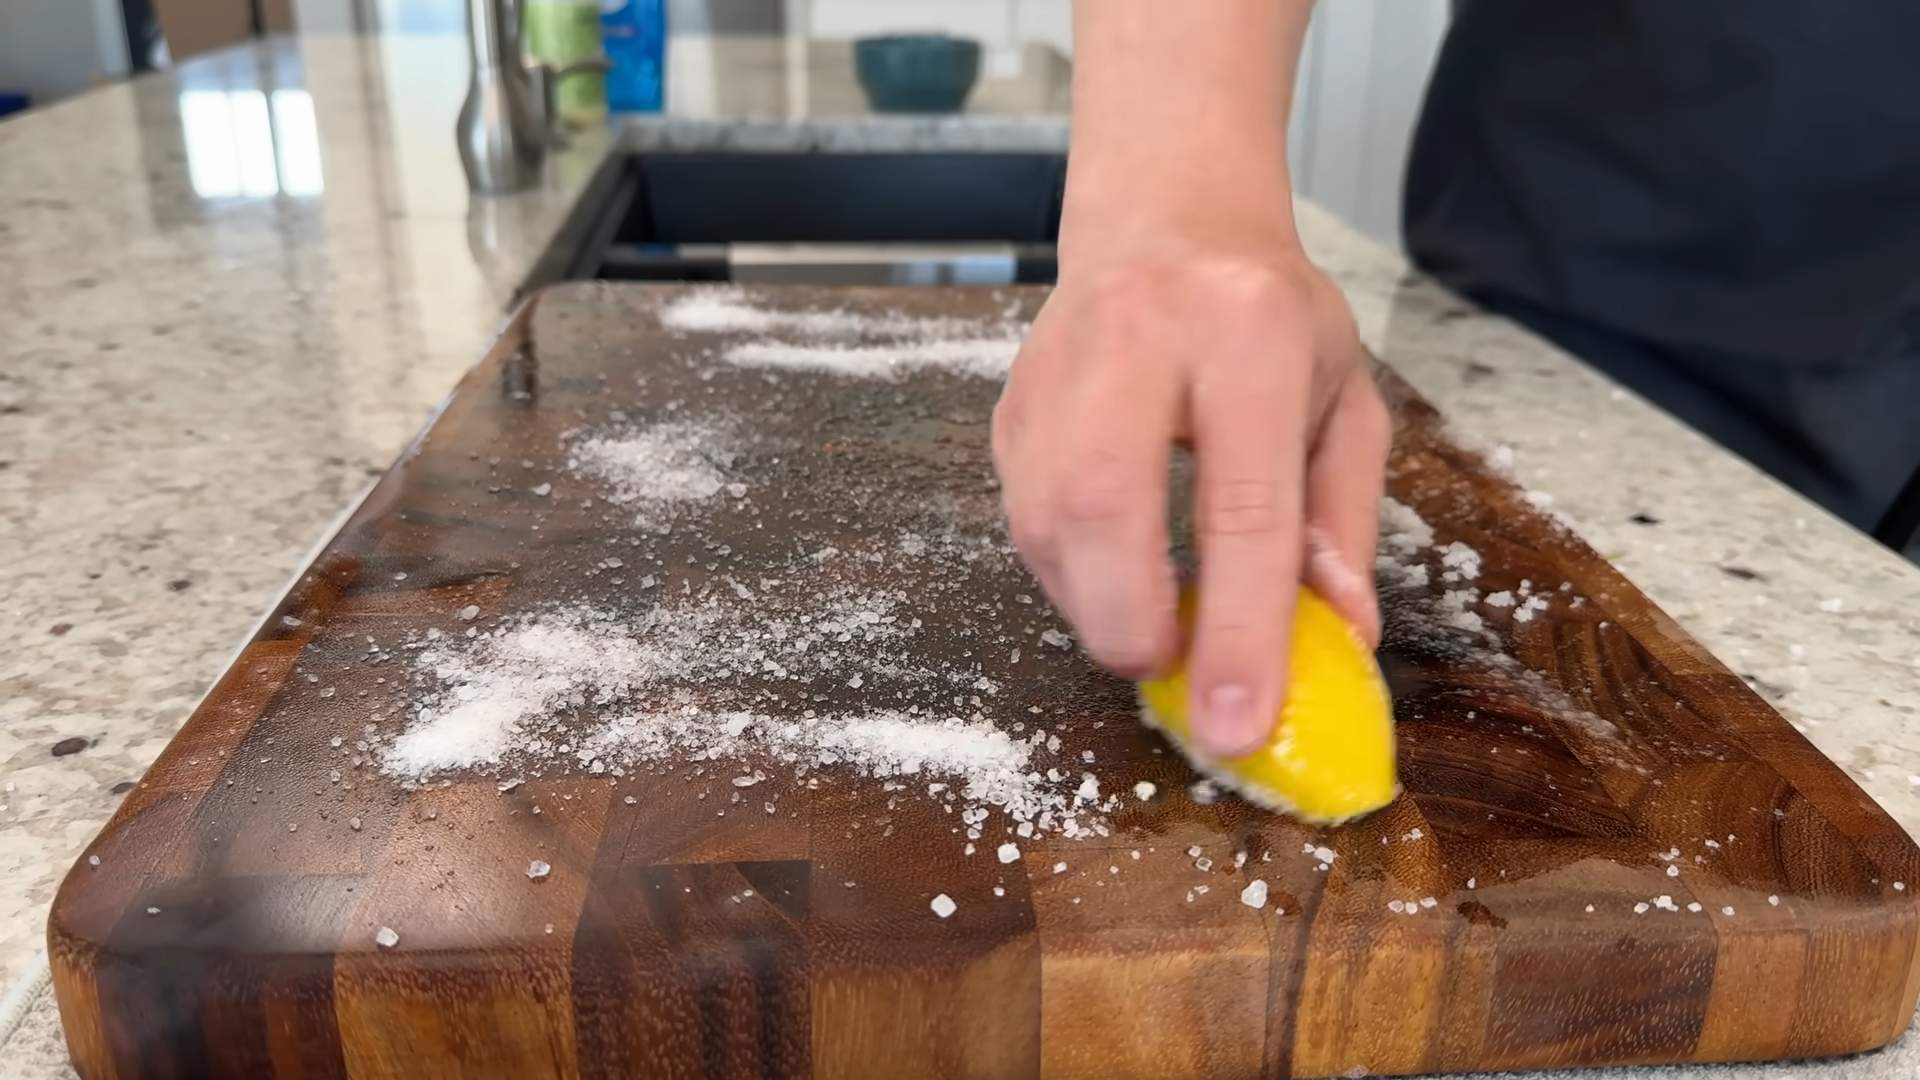
2. Salt and Lemon Scrub: Cut a lemon in half. Sprinkle a generous amount of coarse salt all over the cutting board surface. Now, use the cut side of the lemon to scrub the salt into the wood in a circular motion. Apply some pressure, but don’t go overboard. The salt acts as an abrasive, while the lemon juice disinfects and deodorizes. I usually scrub for about 5-10 minutes, focusing on any particularly stained or dirty areas.
3. Vinegar Rinse: Rinse the cutting board thoroughly with white vinegar. This will help neutralize the lemon juice and further disinfect the surface.
4. Wash with Soap and Water: Wash the cutting board with warm, soapy water. Use a mild dish soap and a clean sponge or cloth.
5. Rinse and Dry: Rinse the cutting board thoroughly with clean water and pat it dry with a clean towel. Let it air dry completely before moving on to the next step. This is important to prevent mold growth.
Phase 2: Sanding for Smoothness
Sanding is key to removing scratches, knife marks, and any unevenness on the surface of your cutting board. It’s a bit of work, but the results are so worth it!
1. Start with Coarse Grit (80-grit): If your cutting board has deep scratches or significant damage, start with the 80-grit sandpaper. If it’s in relatively good condition, you can skip this step and move on to the 120-grit. Using a sanding block (optional) or your hand, sand the entire surface of the cutting board in the direction of the wood grain. Apply even pressure and avoid sanding in circles, as this can create swirl marks. Sand until the scratches are significantly reduced or removed.
2. Move to Medium Grit (120-grit): After the 80-grit (if used), switch to the 120-grit sandpaper. Sand the entire surface again, following the wood grain. This will smooth out the surface and remove any scratches left by the coarser grit.
3. Fine Grit (220-grit): Now, use the 220-grit sandpaper to further refine the surface. Sand lightly and evenly, still following the wood grain. This will create a very smooth and even surface.
4. Super-Fine Grit (400-grit – Optional): If you want an exceptionally smooth finish, you can use a 400-grit sandpaper. This is optional, but it will give your cutting board a professional-looking feel. Sand very lightly and evenly.
5. Clean the Dust: After sanding, use a clean, dry cloth or a vacuum cleaner with a brush attachment to remove all the sanding dust. Make sure the surface is completely clean before moving on to the next step. I sometimes use a slightly damp cloth to wipe away the dust, but make sure to let the board dry completely before oiling.
Phase 3: Rehydrating and Protecting the Wood
This is where we bring the wood back to life and protect it from future damage. Mineral oil is your best friend here!
1. Apply Mineral Oil: Pour a generous amount of food-grade mineral oil onto the cutting board surface. Use a clean cloth or brush to spread the oil evenly over the entire surface, including the edges and bottom.
2. Let it Soak: Allow the mineral oil to soak into the wood for at least a few hours, or even overnight. The longer it soaks, the better. You’ll notice the wood absorbing the oil, becoming richer and more vibrant in color.
3. Apply More Oil (If Needed): After a few hours, check the cutting board. If it looks dry or the oil has been completely absorbed, apply another coat of mineral oil. Repeat this process until the wood is saturated and no longer absorbs the oil.
4. Wipe Off Excess Oil: Once the wood is saturated, use a clean cloth to wipe off any excess mineral oil. You don’t want the surface to be sticky or greasy.
5. Let it Dry: Allow the cutting board to dry completely for at least 24 hours before using it. This will give the oil time to fully penetrate the wood and create a protective barrier.
Phase 4: Beeswax Finish (Optional)
If you want to add an extra layer of protection and a beautiful sheen to your cutting board, a beeswax finish is a great option.
1. Melt the Beeswax: In a heat-safe bowl, combine equal parts beeswax and mineral oil. I usually use about 1/4 cup of each for a standard-sized cutting board. Melt the mixture in a double boiler or in the microwave in short intervals, stirring frequently, until the beeswax is completely melted. Be careful not to overheat the mixture.
2. Apply the Beeswax Mixture: Once the beeswax mixture is melted, use a clean cloth or brush to apply a thin, even layer to the entire cutting board surface.
3. Let it Cool: Allow the beeswax mixture to cool and harden on the cutting board. This will take about 30 minutes to an hour.
4. Buff the Surface: Once the beeswax is hardened, use a clean, soft cloth to buff the surface of the cutting board. This will remove any excess beeswax and create a smooth, glossy finish. Buff until you achieve the desired sheen.
Maintaining Your Revived Cutting Board
Now that you’ve put in all this effort, you’ll want to keep your cutting board in tip-top shape. Here are a few tips:
* Wash After Each Use: Wash your cutting board with warm, soapy water after each use. Avoid soaking it in water, as this can cause it to warp or crack.
* Dry Thoroughly: Always dry your cutting board thoroughly after washing it.
* Sanitize Regularly: Sanitize your cutting board regularly with a solution of white vinegar and water.
* Oil Regularly: Reapply mineral oil to your cutting board every few weeks, or whenever it starts to look dry.
* Avoid Dishwasher: Never put your wooden cutting board in the dishwasher. The high heat and harsh detergents can damage the wood.
* Store Properly: Store your cutting board in a dry place, away from direct sunlight or heat.
And that’s it! You’ve successfully revived your wooden cutting board. I hope you enjoyed this DIY project as much as I did. Now go forth and chop with confidence!
Conclusion
So, there you have it! A simple, effective, and surprisingly satisfying method for keeping your wooden cutting boards pristine. We’ve walked through the steps, highlighting the importance of each stage, from the initial scrub to the final oiling. But why is this DIY cleaning trick a must-try? Because it’s more than just cleaning; it’s about preserving a valuable kitchen tool, extending its lifespan, and ensuring a safe and hygienic food preparation surface. A clean wooden cutting board is a happy cutting board, and a happy cutting board leads to happier cooking!
Think about it: your cutting board is the unsung hero of your kitchen. It’s there for every chop, dice, and mince. It deserves a little TLC. And while commercially available cleaners might seem convenient, they often contain harsh chemicals that can leach into your food or damage the wood over time. This DIY method, on the other hand, uses natural ingredients that are gentle yet powerful, leaving your board clean, refreshed, and ready for its next culinary adventure.
But don’t stop there! Feel free to experiment with variations. For a deeper clean, consider adding a tablespoon of baking soda to the salt and lemon mixture. Baking soda’s mild abrasive properties can help lift stubborn stains and odors. Or, if you’re looking for a more fragrant finish, infuse your mineral oil with herbs like rosemary or thyme. Simply add a few sprigs of your chosen herb to the oil and let it sit for a week or two before straining and applying. This will impart a subtle, delightful aroma to your cutting board.
Another variation involves the type of oil you use. While mineral oil is a popular choice due to its food-safe and non-drying properties, you can also use coconut oil or beeswax. Coconut oil adds a subtle sweetness, while beeswax creates a protective barrier against moisture. Just be mindful that coconut oil can sometimes become rancid over time, so use it sparingly and monitor your board for any changes in smell or texture.
Ultimately, the best way to find what works for you is to experiment and adapt the method to your specific needs and preferences. The key is to be consistent with your cleaning routine. Regular cleaning and oiling will not only keep your cutting board looking its best but also prevent the buildup of bacteria and ensure a safe and hygienic food preparation surface.
We’re confident that once you try this DIY cleaning trick, you’ll be amazed at the results. Your wooden cutting board will look and feel like new, and you’ll have the satisfaction of knowing that you’re using a natural and effective method to keep it clean and protected.
So, what are you waiting for? Grab your lemon, salt, and oil, and give your wooden cutting board the spa treatment it deserves! And most importantly, we want to hear about your experience. Share your before-and-after photos, your favorite variations, and any tips or tricks you’ve discovered along the way. Let’s build a community of clean cutting board enthusiasts! Share your experience on social media using #CleanCuttingBoardDIY and let us know how it worked for you! We can’t wait to see your sparkling clean cutting boards!
FAQ
Frequently Asked Questions About Cleaning Your Wooden Cutting Board
1. How often should I clean my wooden cutting board?
The frequency of cleaning depends on how often you use your cutting board. For daily use, a quick wipe down with soap and water after each use is sufficient. However, for a deeper clean using the lemon and salt method, aim for once a week or whenever you notice stains or odors. If you’ve been cutting raw meat or poultry, it’s crucial to clean and disinfect the board immediately after use.
2. Can I use dish soap to clean my wooden cutting board?
Yes, you can use dish soap, but use it sparingly. Excessive use of dish soap can dry out the wood and cause it to crack. Opt for a mild, natural dish soap and rinse thoroughly with warm water. Always dry the board completely after washing.
3. What type of salt should I use for cleaning?
Coarse salt, such as sea salt or kosher salt, is ideal for cleaning wooden cutting boards. The larger granules provide a gentle abrasive action that helps to scrub away stains and debris without damaging the wood. Avoid using fine table salt, as it may dissolve too quickly and not provide sufficient scrubbing power.
4. What kind of oil should I use to condition my wooden cutting board?
Mineral oil is the most commonly recommended oil for conditioning wooden cutting boards because it’s food-safe, odorless, and doesn’t go rancid. You can also use specially formulated cutting board oils or beeswax. Avoid using vegetable oils like olive oil or canola oil, as they can become sticky and rancid over time.
5. How do I know when my cutting board needs to be oiled?
A dry, dull appearance is a good indication that your cutting board needs to be oiled. You can also test it by sprinkling a few drops of water on the surface. If the water beads up, the board is adequately oiled. If the water soaks in quickly, it’s time to apply another coat of oil.
6. How do I disinfect my wooden cutting board after cutting raw meat?
After cleaning with soap and water, you can disinfect your wooden cutting board with a solution of one part white vinegar to five parts water. Apply the solution to the board, let it sit for a few minutes, and then rinse thoroughly with warm water. Alternatively, you can use a diluted bleach solution (one tablespoon of bleach per gallon of water), but be sure to rinse the board very well to remove any traces of bleach.
7. Can I put my wooden cutting board in the dishwasher?
No, never put your wooden cutting board in the dishwasher. The high heat and harsh detergents can warp the wood, cause it to crack, and strip away its natural oils. Always hand wash your wooden cutting board with soap and water.
8. How do I remove stubborn odors from my wooden cutting board?
If your cutting board has absorbed strong odors, such as garlic or onions, try rubbing it with a paste of baking soda and water. Let the paste sit on the board for a few minutes, then rinse thoroughly with warm water. You can also try cutting a lemon in half and rubbing it over the surface of the board. The citric acid in the lemon will help to neutralize odors.
9. How do I store my wooden cutting board?
Store your wooden cutting board in a dry, well-ventilated area. Avoid storing it flat on a countertop, as this can trap moisture and lead to warping. Instead, store it on its side or prop it up against a wall to allow air to circulate around it.
10. My wooden cutting board has scratches and knife marks. Can I fix it?
Yes, you can often repair scratches and knife marks on your wooden cutting board by sanding it down. Use a fine-grit sandpaper to smooth out the surface, working with the grain of the wood. After sanding, be sure to clean the board thoroughly and re-oil it. For deep gouges or cracks, you may need to consult a professional woodworker. Keeping your **clean wooden cutting board** in top shape is easy with regular maintenance.

Leave a Comment