

Clean Bathtub and Shower – are you tired of battling stubborn soap scum, mildew, and hard water stains in your bathroom? I know I was! For centuries, keeping bathing spaces clean has been a constant chore. From ancient Roman bathhouses meticulously maintained by slaves to modern homes with endless cleaning products, the struggle is real. But what if I told you that you could achieve a sparkling clean bathtub and shower with simple, DIY solutions that are not only effective but also eco-friendly and budget-conscious?
Let’s face it, nobody enjoys spending hours scrubbing away at grime. We all crave a clean and inviting bathroom, a sanctuary where we can relax and unwind. But harsh chemicals can be damaging to our health and the environment. That’s where these DIY tricks come in! I’m going to share some of my favorite, tried-and-tested methods to clean bathtub and shower surfaces, leaving them gleaming without the need for expensive or toxic cleaners. These hacks will save you time, money, and effort, allowing you to enjoy a pristine bathroom without the headache. Get ready to transform your cleaning routine and say goodbye to bathroom grime forever!
DIY Sparkling Clean Bathtub and Shower: My Secret Weapon!
Okay, let’s be honest, cleaning the bathtub and shower is nobody’s favorite chore. But a sparkling clean bathroom makes a huge difference, right? I’ve tried countless products and methods over the years, and I’ve finally landed on a DIY solution that’s not only effective but also uses ingredients you probably already have at home. Get ready to say goodbye to stubborn soap scum, mildew, and hard water stains!
What You’ll Need: Your Arsenal of Cleaning Supplies
Before we dive in, let’s gather our supplies. This is key to making the process smooth and efficient. Trust me, you don’t want to be running around mid-scrub trying to find something!
* **Spray Bottle:** A sturdy spray bottle is essential for applying our cleaning solution.
* **White Vinegar:** This is our star ingredient! Vinegar’s acidity helps break down soap scum and hard water deposits.
* **Dish Soap:** Good old dish soap helps cut through grease and grime. I prefer using a clear dish soap to avoid any potential staining, but any kind will work in a pinch.
* **Baking Soda:** This is our gentle abrasive. It helps scrub away stubborn stains without scratching surfaces.
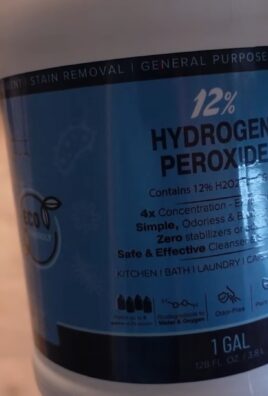
* **Hydrogen Peroxide:** A natural disinfectant that helps kill mold and mildew.
* **Essential Oil (Optional):** A few drops of your favorite essential oil (like tea tree, lavender, or eucalyptus) can add a pleasant scent and boost the cleaning power. Tea tree is especially good for fighting mold.
* **Scrub Brush:** Choose a scrub brush with stiff bristles for tackling tough stains. I like to have a smaller brush for grout lines.
* **Sponge:** A sponge is great for wiping down surfaces and applying cleaning solutions.
* **Microfiber Cloths:** These are perfect for drying and polishing, leaving your bathtub and shower sparkling.
* **Rubber Gloves:** Protect your hands from the cleaning solution and any potential irritants.
* **Old Toothbrush:** An old toothbrush is perfect for cleaning grout lines and other hard-to-reach areas.
* **Squeegee:** A squeegee is your best friend for preventing water spots after each shower.
Phase 1: The Vinegar Power Soak
This first phase is all about loosening up the grime and soap scum. We’re going to let vinegar do its magic!
1. **Prepare the Vinegar Solution:** In your spray bottle, mix equal parts white vinegar and warm water. I usually start with about one cup of each, but you can adjust the amount depending on the size of your bathtub and shower.
2. **Warm Up the Surfaces (Optional):** If you have a particularly stubborn buildup of soap scum, you can run a hot shower for a few minutes to warm up the surfaces. This will help the vinegar solution penetrate the grime more effectively. Be careful not to burn yourself!
3. **Spray Generously:** Liberally spray the vinegar solution all over the bathtub and shower surfaces, including the walls, floor, shower door, and fixtures. Make sure to get into all the nooks and crannies.
4. **Let it Soak:** This is the most important part! Let the vinegar solution soak for at least 30 minutes, or even longer for really tough stains. I sometimes let it soak for a few hours or even overnight. The longer it soaks, the easier it will be to scrub away the grime.
5. **Ventilate the Bathroom:** Vinegar has a strong smell, so make sure to open a window or turn on the exhaust fan to ventilate the bathroom.
Phase 2: The Baking Soda Scrub Down
Now that the vinegar has loosened up the grime, it’s time to bring in the baking soda for some gentle scrubbing action.
1. **Create a Baking Soda Paste:** In a small bowl, mix baking soda with a little bit of water to create a thick paste. You want the consistency to be like toothpaste.
2. **Apply the Paste:** Using a sponge or your fingers (with gloves on, of course!), apply the baking soda paste to the areas with the most stubborn stains, such as soap scum buildup, hard water deposits, and mildew spots.
3. **Scrub Gently:** Using your scrub brush or sponge, gently scrub the areas where you applied the baking soda paste. Avoid using too much pressure, as baking soda can be abrasive. Focus on circular motions to lift the grime.
4. **Grout Line Attention:** Use your old toothbrush to scrub the grout lines. This is where mildew and grime tend to accumulate. Dip the toothbrush in the baking soda paste and scrub back and forth along the grout lines.
5. **Rinse Thoroughly:** Once you’ve scrubbed all the areas, rinse the bathtub and shower thoroughly with warm water. Make sure to remove all traces of baking soda paste.
Phase 3: The Dish Soap and Hydrogen Peroxide Power Wash
This phase is all about removing any remaining grime and disinfecting the surfaces.
1. **Prepare the Cleaning Solution:** In a clean spray bottle, mix equal parts dish soap and hydrogen peroxide. Add a few drops of your favorite essential oil, if desired.
2. **Spray and Scrub:** Spray the dish soap and hydrogen peroxide solution all over the bathtub and shower surfaces. Use your scrub brush or sponge to scrub any remaining grime.
3. **Focus on Fixtures:** Pay special attention to the faucets, showerhead, and other fixtures. Use a sponge or microfiber cloth to polish them and remove any water spots.
4. **Rinse Again:** Rinse the bathtub and shower thoroughly with warm water to remove all traces of the cleaning solution.
Phase 4: The Final Touches: Drying and Prevention
This final phase is crucial for preventing future buildup and keeping your bathtub and shower sparkling clean.
1. **Dry Thoroughly:** Use a clean microfiber cloth to dry all the surfaces of the bathtub and shower. This will prevent water spots and mildew growth.
2. **Squeegee After Each Shower:** This is the single most effective thing you can do to prevent soap scum and hard water buildup. After each shower, use a squeegee to remove excess water from the walls, shower door, and floor.
3. **Ventilate the Bathroom:** Always make sure to ventilate the bathroom after each shower to allow moisture to escape. This will help prevent mildew growth.
4. **Regular Cleaning:** To keep your bathtub and shower sparkling clean, repeat this cleaning process every one to two weeks, depending on how often you use them.
Bonus Tips and Tricks: Level Up Your Cleaning Game!
* Lemon Power: For extra cleaning power, cut a lemon in half and rub it directly on soap scum and hard water stains. The citric acid in the lemon will help break down the grime.
* Showerhead Soak: To clean your showerhead, remove it and soak it in a bowl of white vinegar overnight. This will dissolve any mineral deposits that are clogging the spray nozzles.
* Prevent Mildew: To prevent mildew growth, spray the bathtub and shower surfaces with a solution of tea tree oil and water after each cleaning. Tea tree oil is a natural antifungal agent.
* Magic Eraser: For really stubborn stains, try using a magic eraser. These are great for removing scuff marks and other blemishes. Be careful not to use them on delicate surfaces, as they can be abrasive.
* DIY Shower Cleaner Spray: For daily maintenance, create a DIY shower cleaner spray by mixing equal parts white vinegar, rubbing alcohol, and water in a spray bottle. Spray the shower after each use to prevent buildup.
* Consider a Water Softener: If you have hard water, consider installing a water softener. This will help prevent hard water stains and make cleaning much easier.
Safety First!
* Always wear rubber gloves to protect your hands from the cleaning solutions.
* Avoid mixing vinegar and bleach, as this can create toxic fumes.
* Ventilate the bathroom well during cleaning.
* Test any cleaning solution on a small, inconspicuous area before applying it to the entire surface.
* Keep cleaning supplies out of reach of children and pets.
I hope these tips and tricks help you achieve a sparkling clean bathtub and shower! Remember, consistency is key. By incorporating these simple steps into your cleaning routine, you can keep your bathroom looking its best with minimal effort. Happy cleaning!
Conclusion
So, there you have it! This simple, yet incredibly effective DIY trick for cleaning your bathtub and shower is a game-changer. Forget spending a fortune on harsh chemical cleaners that leave behind lingering odors and potentially damage your surfaces. This method utilizes readily available ingredients, is gentle on your skin and the environment, and delivers sparkling results.
Why is this a must-try? Because it’s efficient, economical, and eco-friendly. It tackles soap scum, hard water stains, and mildew with ease, leaving your bathroom smelling fresh and clean without the use of overpowering artificial fragrances. You’ll be amazed at how quickly and effortlessly you can achieve a professional-level clean, all while saving money and reducing your exposure to harmful chemicals.
But the best part? This DIY bathtub and shower cleaner is incredibly versatile. Feel free to experiment with variations to suit your specific needs and preferences. For instance, if you have particularly stubborn stains, you can increase the concentration of vinegar or add a few drops of tea tree oil for its antifungal properties. If you prefer a different scent, try adding a few drops of your favorite essential oil, such as lavender, lemon, or eucalyptus. Just be sure to test any essential oils on an inconspicuous area first to ensure they don’t stain your surfaces.
Another variation involves using baking soda as a gentle abrasive. After spraying the vinegar solution, sprinkle baking soda onto the affected areas and let it sit for a few minutes before scrubbing. The combination of vinegar and baking soda creates a fizzing action that helps to lift away dirt and grime.
For those with sensitive skin, consider wearing gloves while cleaning. While the ingredients are generally gentle, prolonged exposure to vinegar can sometimes cause irritation.
We are confident that once you try this DIY trick, you’ll never go back to store-bought cleaners again. It’s a simple, effective, and sustainable way to keep your bathtub and shower sparkling clean.
Now, it’s your turn! Give this DIY bathtub and shower cleaning method a try and see the amazing results for yourself. We encourage you to share your experiences, tips, and variations in the comments below. Let’s build a community of clean-bathroom enthusiasts and help each other discover the best ways to maintain a sparkling and healthy home. We can’t wait to hear how this DIY trick has transformed your cleaning routine!
Frequently Asked Questions (FAQs)
1. What are the ingredients needed for this DIY bathtub and shower cleaner?
The basic recipe typically calls for white vinegar and dish soap. Some variations may include baking soda, essential oils (like tea tree, lavender, lemon, or eucalyptus), and water. The exact proportions can vary depending on the specific recipe you choose, but a common starting point is a 1:1 ratio of vinegar and dish soap.
2. Is this DIY cleaner safe for all types of bathtubs and showers?
While generally safe, it’s always a good idea to test the cleaner on an inconspicuous area first, especially if you have a delicate or antique bathtub or shower. Avoid using abrasive scrub brushes on easily scratched surfaces. For natural stone surfaces like marble or granite, vinegar can be too acidic and may cause etching. In those cases, opt for a pH-neutral cleaner specifically designed for stone.
3. How often should I use this DIY cleaner?
The frequency of cleaning depends on how often you use your bathtub and shower and how quickly they accumulate soap scum and mildew. A weekly cleaning is generally recommended to prevent buildup. However, if you notice stains or mildew forming more quickly, you may need to clean more frequently.
4. Can I use this cleaner on shower doors and glass?
Yes, this DIY cleaner is effective on shower doors and glass. The vinegar helps to dissolve hard water stains and soap scum, leaving the glass sparkling clean. You can use a squeegee after cleaning to prevent water spots.
5. What if I don’t have white vinegar? Can I use apple cider vinegar instead?
While white vinegar is the preferred choice due to its higher acidity and lack of color, you can use apple cider vinegar as a substitute. However, apple cider vinegar may have a slightly stronger odor and may not be as effective at removing stubborn stains.
6. How do I deal with stubborn mildew stains?
For stubborn mildew stains, you can try a few different approaches. First, ensure the area is well-ventilated. You can increase the concentration of vinegar in your cleaning solution or add a few drops of tea tree oil, which has antifungal properties. Another option is to make a paste of baking soda and water and apply it to the mildew stains. Let it sit for several minutes before scrubbing. In severe cases, you may need to use a commercial mildew remover, but always follow the manufacturer’s instructions carefully and wear appropriate safety gear.
7. Can I store the leftover DIY cleaner?
Yes, you can store the leftover DIY cleaner in a spray bottle for future use. Be sure to label the bottle clearly and keep it out of reach of children and pets. The cleaner should remain effective for several weeks.
8. What are the benefits of using a DIY cleaner over commercial cleaners?
DIY cleaners offer several benefits over commercial cleaners. They are typically more affordable, use readily available ingredients, are gentler on the environment, and reduce your exposure to harsh chemicals. You also have more control over the ingredients, allowing you to customize the cleaner to your specific needs and preferences.
9. My shower has a strong odor. Will this DIY cleaner help?
Yes, this DIY cleaner can help eliminate odors in your shower. The vinegar helps to neutralize odors, and the dish soap provides a fresh scent. You can also add a few drops of your favorite essential oil to further enhance the fragrance. Be sure to clean all surfaces thoroughly, including the showerhead and drain, to eliminate any sources of odor.
10. How can I prevent soap scum and mildew from building up in my shower?
There are several things you can do to prevent soap scum and mildew from building up in your shower. First, ensure adequate ventilation by opening a window or turning on the exhaust fan after each shower. Wipe down the shower walls and door with a squeegee after each use to remove excess water. Use liquid soap instead of bar soap, as bar soap tends to leave more residue. Regularly clean your shower with this DIY cleaner or another effective cleaning solution.

Leave a Comment