

Bumper pumpkin harvest tips are what every gardener dreams of, right? Imagine a vibrant autumn scene, your porch overflowing with plump, orange pumpkins – the envy of the neighborhood! But let’s be honest, achieving that picture-perfect harvest can feel like a daunting task. I know I’ve certainly struggled in the past, battling pests, unpredictable weather, and just plain not knowing the best techniques.
Pumpkins have a rich history, deeply intertwined with fall festivals and traditions. From their humble beginnings in Central America, where they were cultivated thousands of years ago, to their iconic status as jack-o’-lanterns, pumpkins hold a special place in our hearts. But beyond their decorative appeal, they’re also incredibly nutritious and versatile in the kitchen.
That’s why I’m so excited to share these DIY tricks and hacks with you! Whether you’re a seasoned gardener or just starting out, these bumper pumpkin harvest tips will help you maximize your yield and grow the biggest, healthiest pumpkins possible. We’ll cover everything from soil preparation and pollination techniques to pest control and harvesting secrets. So, get ready to roll up your sleeves and transform your garden into a pumpkin paradise! Because who doesn’t want a show-stopping pumpkin display and a delicious pumpkin pie to boot?
How to Grow a Pumpkin Patch That’ll Make Your Neighbors Green With Envy
Okay, pumpkin lovers, let’s talk about how to get a pumpkin harvest so massive, you’ll be giving them away to everyone you know! I’ve spent years perfecting my pumpkin-growing game, and I’m excited to share my secrets with you. It’s not rocket science, but it does take a little planning and effort. Trust me, the payoff is worth it when you’re carving your own giant jack-o’-lanterns!
Choosing the Right Pumpkin Variety
First things first, you need to decide what kind of pumpkins you want to grow. Are you dreaming of giant prize-winners, perfect pie pumpkins, or cute little gourds for decorating? This choice will influence everything from the space you need to the time it takes to harvest.
* **Giant Pumpkins:** If you’re aiming for a behemoth, varieties like ‘Atlantic Giant’ are your best bet. Be warned, these guys need a LOT of space and attention.
* **Pie Pumpkins:** For delicious pies and other baked goods, ‘Sugar Pie’ or ‘Baby Pam’ are excellent choices. They’re smaller and easier to manage than the giants.
* **Ornamental Pumpkins:** If you’re all about the aesthetics, consider ‘Jack Be Little’ (tiny and adorable), ‘Gourds’ (come in all shapes and sizes), or ‘Fairytale’ (flat and ribbed, with a beautiful color).
Preparing Your Pumpkin Patch
Pumpkins are hungry plants, so soil preparation is key. They need well-drained soil that’s rich in organic matter.
* **Sunlight:** Pumpkins need at least 6 hours of direct sunlight per day. More is even better!
* **Soil Testing:** Ideally, get your soil tested to determine its pH and nutrient levels. Pumpkins prefer a slightly acidic to neutral pH (around 6.0 to 7.0).
* **Amending the Soil:** If your soil is lacking, amend it with plenty of compost, well-rotted manure, or other organic matter. This will improve drainage, fertility, and water retention.
* **Creating Mounds:** I like to plant my pumpkins on slightly raised mounds. This helps with drainage and warms the soil up faster in the spring.
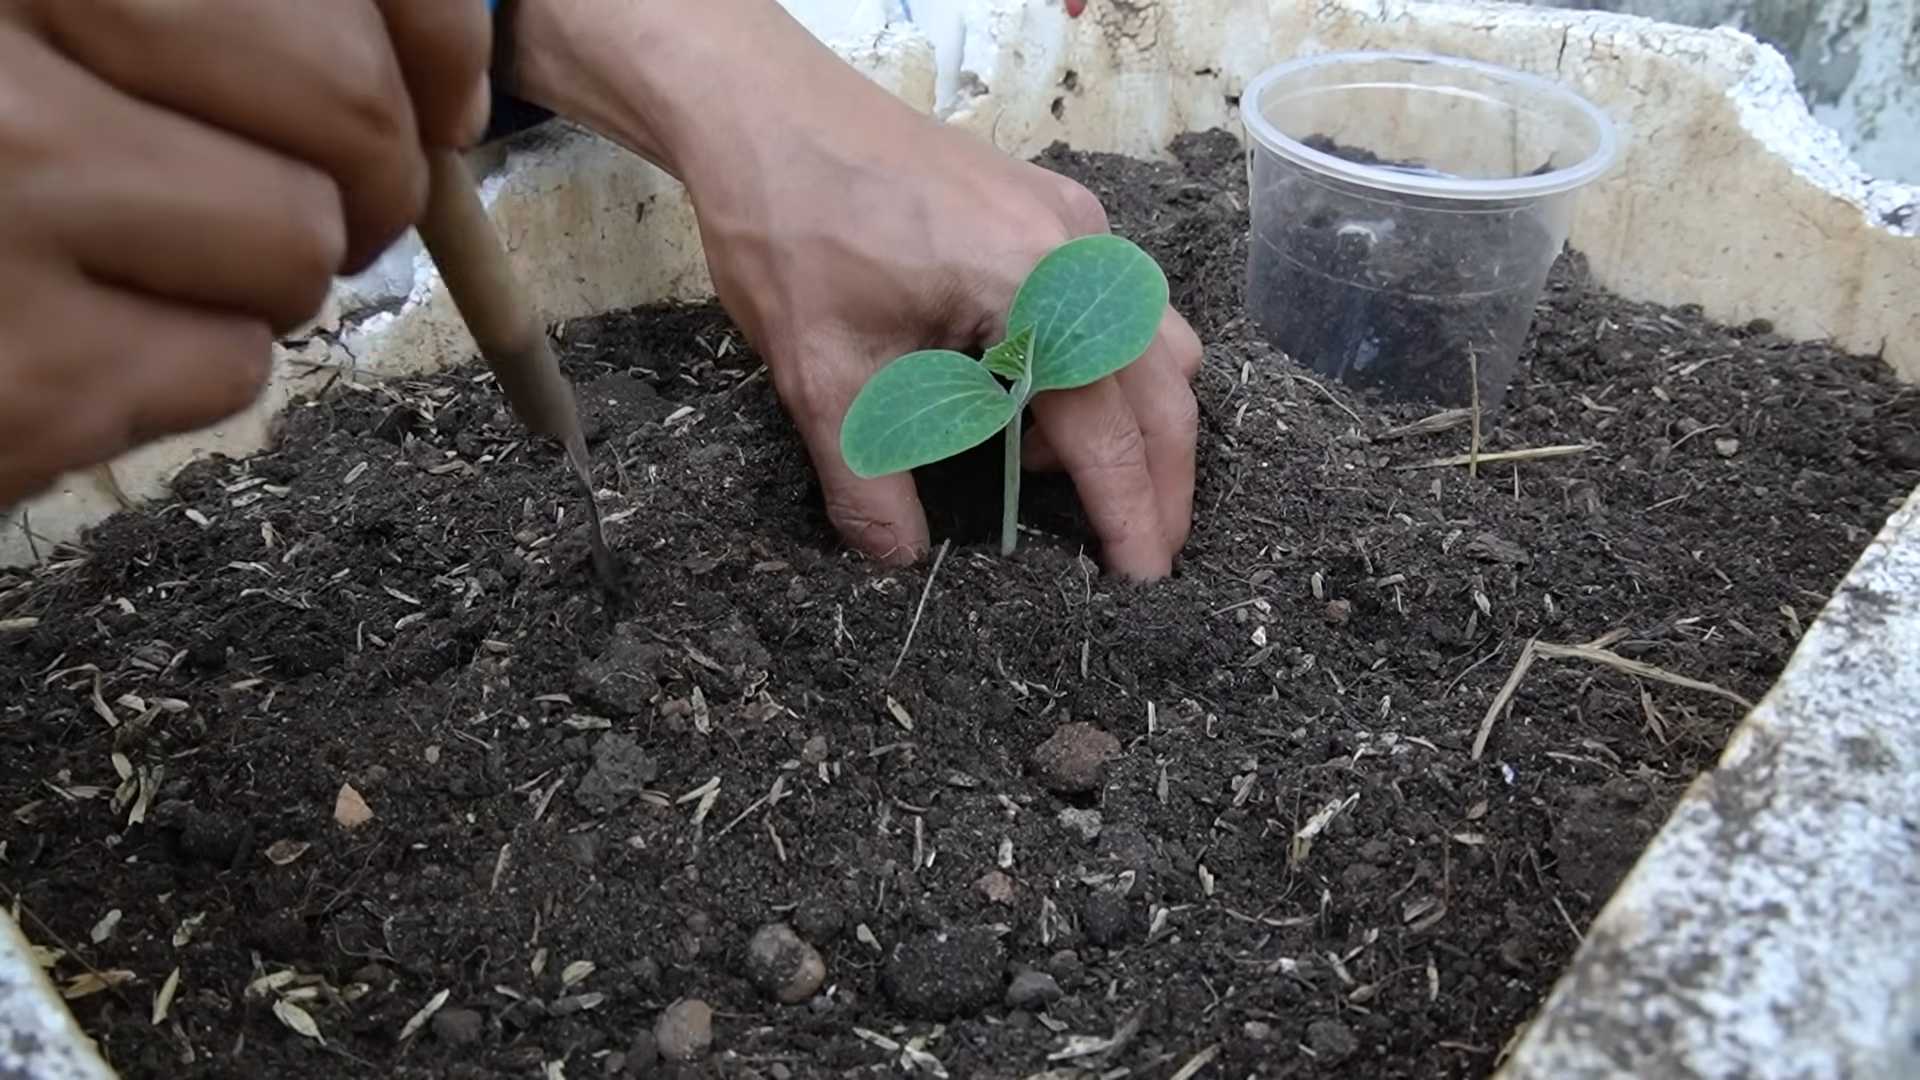
Planting Your Pumpkin Seeds
Now for the fun part – planting! Timing is crucial, as pumpkins need a long growing season.
* **Timing:** Check your local frost dates and plant your seeds after the last expected frost. You can also start seeds indoors 2-3 weeks before the last frost to get a head start.
* **Direct Sowing:** If you’re planting directly in the ground, sow 3-4 seeds per mound, about 1 inch deep. Space the mounds according to the variety you’re growing (giant pumpkins need a lot more space than pie pumpkins).
* **Starting Indoors:** If you’re starting seeds indoors, use peat pots or biodegradable pots to avoid disturbing the roots when transplanting. Plant 1-2 seeds per pot.
* **Watering:** Keep the soil consistently moist, but not waterlogged, until the seeds germinate.
* **Thinning:** Once the seedlings emerge, thin them to the strongest plant per mound or pot.
Caring for Your Pumpkin Plants
Once your pumpkin plants are established, it’s time to provide them with the care they need to thrive.
* **Watering:** Pumpkins need consistent watering, especially during hot, dry weather. Water deeply at the base of the plants, avoiding wetting the foliage, which can lead to fungal diseases.
* **Fertilizing:** Feed your pumpkin plants regularly with a balanced fertilizer. I like to use a fertilizer that’s high in phosphorus and potassium to promote strong root growth and fruit development.
* **Weeding:** Keep the area around your pumpkin plants free of weeds, which can compete for nutrients and water.
* **Pest Control:** Keep an eye out for common pumpkin pests like squash bugs, squash vine borers, and cucumber beetles. Hand-picking pests, using insecticidal soap, or covering young plants with row covers can help prevent infestations.
* **Pollination:** Pumpkins have separate male and female flowers. Bees are essential for pollination. If you’re not seeing a lot of bee activity, you can hand-pollinate the flowers yourself. To do this, use a small paintbrush to transfer pollen from the male flower to the female flower.
* **Pruning:** For giant pumpkins, pruning is essential to direct the plant’s energy into developing a single, massive fruit. Remove all but one or two pumpkins per plant. For other varieties, pruning is less critical, but you can still remove some of the excess foliage to improve air circulation and sunlight penetration.
Protecting Your Pumpkins
As your pumpkins grow, you’ll need to protect them from pests, diseases, and the elements.
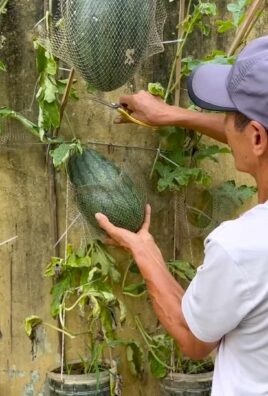
* **Elevating Pumpkins:** As the pumpkins get larger, place them on a bed of straw or cardboard to prevent them from rotting on the ground.
* **Sun Protection:** If your pumpkins are exposed to intense sunlight, you can shade them with a piece of cloth or cardboard to prevent sunburn.
* **Pest Control:** Continue to monitor your pumpkins for pests and diseases and take appropriate action.
* **Disease Prevention:** To prevent fungal diseases, avoid overhead watering and ensure good air circulation around the plants. You can also apply a fungicide if necessary.
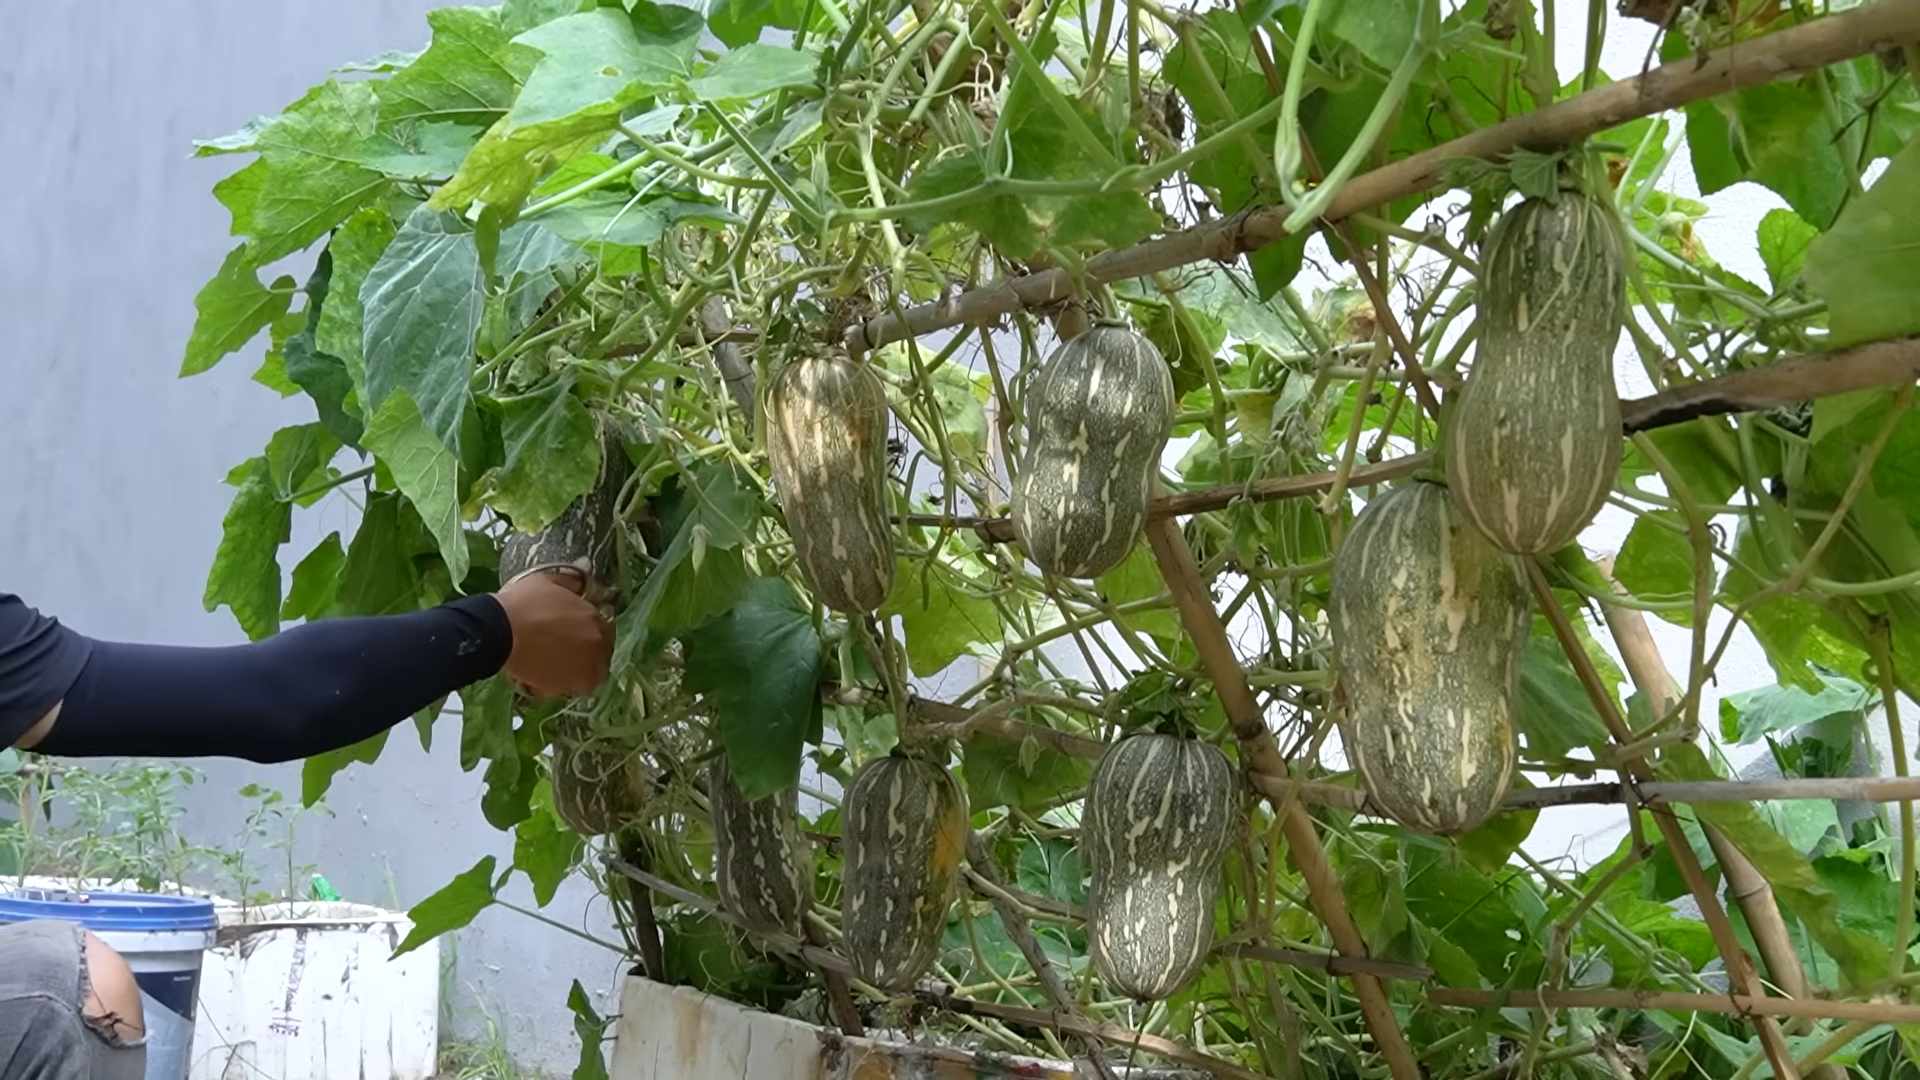
Harvesting Your Pumpkins
The moment you’ve been waiting for – harvesting your pumpkins!
* **Timing:** Pumpkins are typically ready to harvest in the fall, when the vines start to die back and the skin of the pumpkin becomes hard and resistant to scratching.
* **Checking for Ripeness:** A ripe pumpkin will have a deep, rich color and a hard rind. You should also be able to hear a hollow sound when you tap it.
* **Harvesting:** Use a sharp knife or pruning shears to cut the pumpkin from the vine, leaving a few inches of stem attached.
* **Curing:** Cure your pumpkins in a warm, dry place for 1-2 weeks to harden the skin and improve their storage life.
Specific Tips for Giant Pumpkins
Growing giant pumpkins is a whole different ball game. Here are some extra tips to help you grow a prize-winning pumpkin:
1. **Choose the Right Seeds:** Start with seeds from proven giant pumpkin varieties. Look for seeds from pumpkins that have won competitions in the past.
2. **Soil Preparation is Critical:** Giant pumpkins need a lot of nutrients. Amend your soil with massive amounts of compost, manure, and other organic matter.
3. **Watering and Fertilizing:** Giant pumpkins need a LOT of water and fertilizer. Water deeply and frequently, and fertilize regularly with a high-nitrogen fertilizer early in the season, followed by a high-phosphorus and potassium fertilizer as the pumpkin starts to develop.
4. **Pruning is Essential:** Prune your giant pumpkin plant to a single vine and one or two pumpkins. Remove all other flowers and fruits.
5. **Pollination:** Hand-pollinate the female flowers to ensure successful pollination.
6. **Sun Protection:** Protect your giant pumpkin from sunburn with shade cloth or cardboard.
7. **Weighing and Moving:** Giant pumpkins are extremely heavy. You’ll need special equipment to weigh and move them.
Troubleshooting Common Pumpkin Problems
Even with the best care, you may encounter some problems when growing pumpkins. Here are some common issues and how to address them:
* **Powdery Mildew:** This fungal disease causes a white, powdery coating on the leaves. Improve air circulation, avoid overhead watering, and apply a fungicide if necessary.
* **Squash Bugs:** These pests suck the sap from pumpkin plants, causing them to wilt and die. Hand-pick the bugs, use insecticidal soap, or cover young plants with row covers.
* **Squash Vine Borers:** These pests bore into the stems of pumpkin plants, causing them to wilt and die. Wrap the stems of young plants with aluminum foil or netting to prevent borers from entering. You can also inject Bacillus thuringiensis (Bt) into the stems to kill the borers.
* **Blossom End Rot:** This condition causes the end of the pumpkin to rot. It’s usually caused by a calcium deficiency. Amend your soil with calcium-rich amendments like bone meal or gypsum.
* **Poor Pollination:** If your pumpkins aren’t setting fruit, it could be due to poor pollination. Hand-pollinate the flowers yourself to ensure successful pollination.
Storing Your Pumpkin Harvest
Once you’ve harvested your pumpkins, you’ll want to store them properly to keep them fresh for as long as possible.
1. **Curing:** Cure your pumpkins in a warm, dry place for 1-2 weeks to harden the skin and improve their storage life.
2. **Storage Conditions:** Store your pumpkins in a cool, dry place with good air circulation. Ideal storage temperatures are between 50 and 60 degrees Fahrenheit.
3. **Avoid Bruising:** Handle your pumpkins carefully to avoid bruising, which can lead to rot.
4. **Check Regularly:** Check your
Conclusion
So, there you have it! Transforming a potential bumper pumpkin harvest into a pantry stocked with deliciousness is not only achievable but surprisingly simple. We’ve walked through the steps, highlighted the key considerations, and hopefully, demystified the process of preserving your pumpkin bounty.
Why is this DIY trick a must-try? Because it empowers you to take control of your food source, reduce waste, and enjoy the fruits (or rather, vegetables!) of your labor long after the autumn leaves have fallen. Imagine the satisfaction of serving a homemade pumpkin pie at Thanksgiving, knowing that the key ingredient came straight from your garden. Think of the cozy winter evenings warmed by a bowl of creamy pumpkin soup, crafted from pumpkins you nurtured and preserved yourself. This isn’t just about saving money; it’s about connecting with the seasons, embracing sustainability, and creating lasting memories.
Beyond the basic method, there’s a world of variations to explore. Experiment with different pumpkin varieties to discover your favorite flavor profile. Add a touch of spice – cinnamon, nutmeg, ginger – during the cooking process to infuse your pumpkin puree with warmth and depth. Consider roasting your pumpkin before pureeing for a richer, more caramelized flavor. You can even freeze your pumpkin puree in ice cube trays for perfectly portioned servings, ideal for smoothies or single-serving recipes.
Don’t be afraid to get creative! Use your preserved pumpkin in everything from breads and muffins to pasta sauces and even dog treats. The possibilities are truly endless.
We understand that embarking on a new DIY project can sometimes feel daunting, but we promise, this one is worth the effort. The reward of having a readily available supply of fresh, homemade pumpkin puree far outweighs the time and energy invested. Plus, it’s a fantastic way to involve the whole family in the process, teaching valuable skills and fostering a love for homegrown food.
Now, it’s your turn! We wholeheartedly encourage you to try this DIY trick for preserving your bumper pumpkin harvest. Don’t let those beautiful pumpkins go to waste. Embrace the challenge, get your hands dirty, and experience the joy of creating something truly special.
And most importantly, we want to hear about your experience! Share your tips, tricks, and triumphs in the comments below. Let us know what pumpkin varieties you used, what recipes you created, and any challenges you encountered along the way. Your feedback will not only help us improve this guide but also inspire other readers to embark on their own pumpkin-preserving adventures. Let’s build a community of pumpkin enthusiasts, sharing our knowledge and celebrating the bounty of the harvest together. So, go forth and conquer that **bumper pumpkin harvest**! We can’t wait to hear your stories.
Frequently Asked Questions (FAQ)
1. What types of pumpkins are best for preserving?
While you can technically preserve any type of pumpkin, some varieties are better suited for cooking and preserving than others. Pie pumpkins, also known as sugar pumpkins, are generally considered the best choice due to their sweet flavor, smooth texture, and high flesh-to-seed ratio. Popular varieties include ‘Small Sugar,’ ‘Baby Pam,’ and ‘New England Pie.’ Avoid using carving pumpkins, as they tend to be stringy and less flavorful. However, if you only have carving pumpkins available, you can still use them, but be prepared for a less intense flavor and potentially a slightly coarser texture. Butternut squash can also be used in a similar way to pumpkin, offering a slightly different flavor profile.
2. How long does homemade pumpkin puree last?
Properly stored homemade pumpkin puree can last for several months in the freezer. When freezing, ensure the puree is completely cooled before transferring it to freezer-safe containers or bags. Leave some headspace in the containers to allow for expansion during freezing. Label each container with the date and contents. Frozen pumpkin puree can last for up to 12 months. In the refrigerator, homemade pumpkin puree will typically last for 3-4 days. Always check for any signs of spoilage, such as an off odor or mold, before using.
3. Can I can pumpkin puree instead of freezing it?
While it is possible to can pumpkin puree, it’s crucial to follow strict guidelines to ensure safety. Due to pumpkin’s low acidity, it must be pressure canned to prevent botulism. The USDA recommends only canning cubed pumpkin, not puree, as the density of the puree can affect heat penetration during the canning process. If you choose to can cubed pumpkin, follow a tested recipe from a reputable source, such as the USDA Complete Guide to Home Canning. Ensure you have a pressure canner and understand how to use it safely. Freezing is generally considered a safer and easier option for preserving pumpkin.
4. My pumpkin puree seems watery. What can I do?
If your pumpkin puree is watery, there are a few things you can do to improve its consistency. First, make sure you’ve drained the cooked pumpkin well before pureeing it. You can also try placing the puree in a fine-mesh sieve lined with cheesecloth and allowing the excess liquid to drain off for a few hours or overnight in the refrigerator. Another option is to simmer the puree in a saucepan over low heat, stirring occasionally, until some of the excess moisture evaporates. This will concentrate the flavor and thicken the puree.
5. Can I use this method for other types of squash?
Yes, this method can be adapted for preserving other types of winter squash, such as butternut squash, acorn squash, and spaghetti squash. The cooking times may vary depending on the size and density of the squash, so be sure to check for doneness by piercing it with a fork. The same principles of draining excess moisture and storing the puree properly apply to all types of winter squash. Experiment with different varieties to discover your favorite flavors and textures.
6. What are some creative ways to use homemade pumpkin puree?
Beyond the classic pumpkin pie, there are countless ways to incorporate homemade pumpkin puree into your cooking. Add it to smoothies for a boost of vitamins and fiber. Use it as a base for creamy soups and sauces. Stir it into oatmeal or yogurt for a healthy and flavorful breakfast. Bake it into breads, muffins, and cakes for a moist and delicious treat. You can even use it to make pumpkin butter, pumpkin spice lattes, or pumpkin dog treats. Don’t be afraid to experiment and get creative in the kitchen!
7. How do I know if my pumpkin is ripe and ready to harvest?
A ripe pumpkin will have a deep, solid color, depending on the variety. The rind should be hard and resistant to scratching. The stem should be dry and brown. You can also try tapping the pumpkin; a ripe pumpkin will sound hollow. Avoid harvesting pumpkins that are damaged or have soft spots.
8. What’s the best way to store whole pumpkins before preserving them?
Store whole pumpkins in a cool, dry place with good air circulation. A temperature between 50-60°F (10-15°C) is ideal. Avoid storing pumpkins directly on the ground, as this can lead to rot. Place them on a pallet or piece of cardboard to allow for air circulation. Handle pumpkins carefully to avoid bruising or damaging the rind. Properly stored pumpkins can last for several weeks or even months before needing to be preserved.
9. Can I use a food processor instead of a blender to puree the pumpkin?
Yes, you can use a food processor to puree the pumpkin. A food processor is often preferred for larger quantities of pumpkin, as it can handle more volume at once. However, be careful not to over-process the pumpkin, as this can result in a gummy texture. Pulse the pumpkin in short bursts until it is smooth and creamy. You may need to scrape down the sides of the bowl occasionally to ensure even pureeing.
10. What if my pumpkins have blemishes or bruises?
If your pumpkins have minor blemishes or bruises, you can still use them for preserving. Simply cut away the damaged areas before cooking the pumpkin. Avoid using pumpkins with significant damage or signs of rot, as these may affect the flavor and quality of the puree.

Leave a Comment