

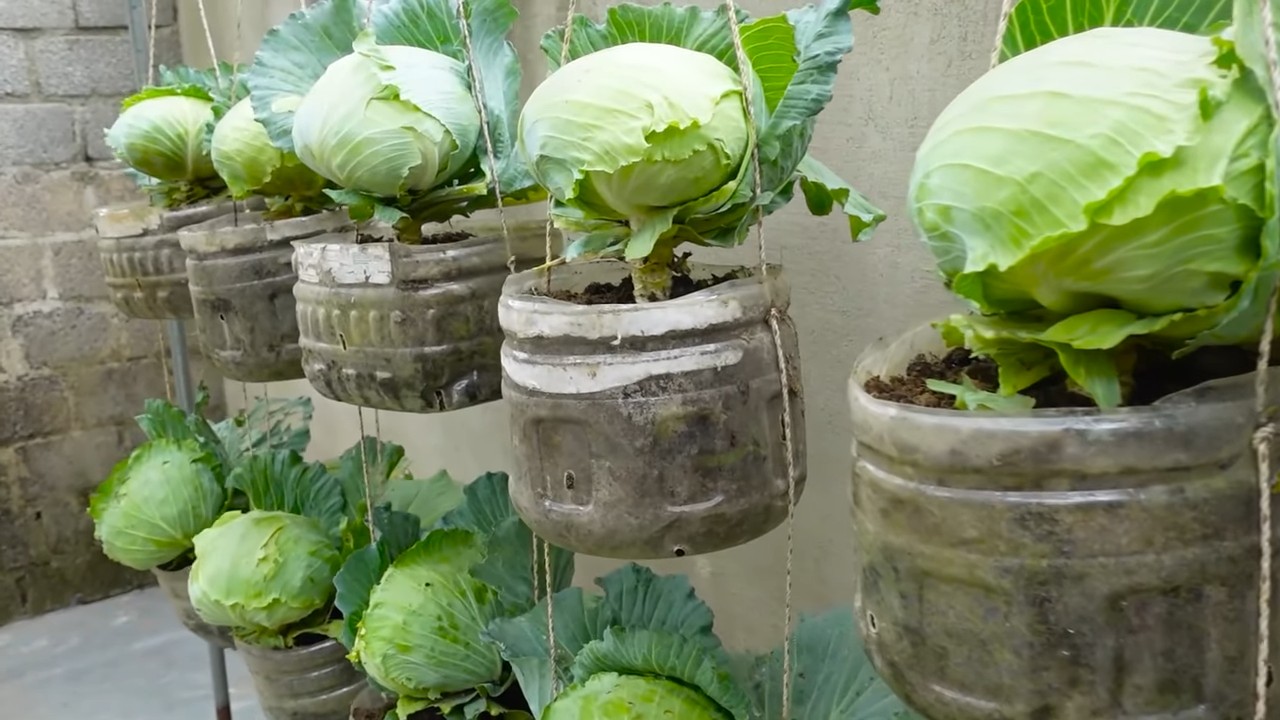
Bottle Grown Cabbage: Imagine harvesting fresh, crisp cabbage right from your windowsill, even if you don’t have a sprawling garden! Sounds too good to be true? Well, get ready to be amazed because this DIY guide will show you exactly how to cultivate your own miniature cabbage patch using nothing more than recycled bottles.
The concept of container gardening, including using repurposed materials, has roots stretching back centuries. From ancient hanging gardens to resourceful wartime victory gardens, people have always found innovative ways to grow food in limited spaces. Today, with increasing urbanization and a growing desire for sustainable living, the need for space-saving gardening techniques is more relevant than ever.
Let’s face it, not everyone has access to a large garden. Apartment dwellers, city residents, and even those with limited mobility can feel excluded from the joys of growing their own food. But with this simple bottle grown cabbage trick, anyone can experience the satisfaction of nurturing a plant from seed to harvest. Plus, it’s a fantastic way to reduce waste by giving those plastic bottles a new lease on life! I’m excited to share this easy and rewarding project with you, so let’s get started and transform those empty bottles into thriving mini-gardens!
Bottle Grown Cabbage: A Fun and Easy DIY Project!
Hey there, fellow gardening enthusiasts! Ever thought about growing cabbage in a bottle? It sounds a little crazy, I know, but trust me, it’s a super fun and surprisingly effective way to cultivate these leafy greens, especially if you’re short on space or just looking for a unique gardening project. Plus, it’s a great conversation starter!
This guide will walk you through the entire process, from choosing the right bottle to harvesting your very own bottle-grown cabbage. Let’s get started!
What You’ll Need
Before we dive in, let’s gather all the necessary materials. Here’s a comprehensive list:
* A Large Plastic Bottle: Think about those big water cooler bottles (3-5 gallons). The bigger, the better, as it gives your cabbage more room to grow. Make sure it’s clean and clear.
* Cabbage Seeds: Choose a variety that’s known for its compact size, like ‘Dwarf Morden’ or ‘Golden Acre’. These varieties are better suited for container gardening.
* Potting Mix: A good quality potting mix is crucial. Avoid using garden soil, as it can compact and hinder drainage. Look for a mix that’s well-draining and contains perlite or vermiculite.
* Seed Starting Tray (Optional): If you prefer to start your seeds indoors, you’ll need a seed starting tray or small pots.
* Spray Bottle: For misting the seedlings.
* Sharp Knife or Box Cutter: For cutting the bottle. Be careful!
* Drill (Optional): For creating drainage holes.
* Fertilizer: A balanced liquid fertilizer, like 10-10-10, will provide your cabbage with the nutrients it needs.
* Water: Clean, fresh water for watering your cabbage.
* Gloves: To protect your hands.
* Measuring Cup: For measuring fertilizer.
* Small Trowel or Spoon: For transplanting seedlings.
* Patience: Gardening always requires a bit of patience!
Preparing the Bottle
Okay, let’s get our hands dirty! The first step is preparing the bottle to become a cozy home for our cabbage.
1. Clean the Bottle: Thoroughly wash the plastic bottle with soap and water to remove any residue. Rinse it well to ensure no soap remains.
2. Cut the Bottle: This is where the sharp knife or box cutter comes in. Carefully cut off the top portion of the bottle, about 6-8 inches from the top. You can discard the top or save it to use as a mini-greenhouse later.
3. Create Drainage Holes: Drainage is essential to prevent root rot. If your bottle doesn’t have drainage holes, use a drill or carefully poke holes in the bottom of the bottle with your knife. Aim for at least 5-6 holes.
4. (Optional) Add a Gravel Layer: Some gardeners like to add a layer of gravel or small stones at the bottom of the bottle to further improve drainage. This is optional, but it can be helpful.
Starting the Seeds
Now, let’s get those cabbage seeds germinating! You have two options here: direct sowing or starting seeds indoors. I personally prefer starting them indoors, as it gives them a head start.
Starting Seeds Indoors (Recommended)
1. Fill the Seed Starting Tray: Fill your seed starting tray or small pots with potting mix.
2. Sow the Seeds: Sow 2-3 cabbage seeds in each cell or pot, about ¼ inch deep.
3. Water Gently: Gently water the seeds with a spray bottle to moisten the soil.
4. Provide Warmth and Light: Place the tray in a warm location with plenty of sunlight or under grow lights. Cabbage seeds need warmth to germinate.
5. Keep the Soil Moist: Keep the soil consistently moist, but not soggy. Check the soil daily and water as needed.
6. Thin the Seedlings: Once the seedlings emerge and have a few true leaves (usually after a week or two), thin them to one seedling per cell or pot. Choose the strongest seedling and gently snip off the others at the soil line.
Direct Sowing (Alternative)
1. Fill the Bottle: Fill the prepared bottle with potting mix, leaving about an inch of space at the top.
2. Sow the Seeds: Sow the cabbage seeds directly into the potting mix, about ¼ inch deep. Space them about 2-3 inches apart.
3. Water Gently: Gently water the seeds to moisten the soil.
4. Keep the Soil Moist: Keep the soil consistently moist until the seeds germinate.
5. Thin the Seedlings: Once the seedlings emerge and have a few true leaves, thin them to the strongest seedlings, spacing them about 6-8 inches apart.
Transplanting (If Starting Seeds Indoors)
Once your seedlings have developed a few true leaves and are about 2-3 inches tall, it’s time to transplant them into the bottle.
1. Fill the Bottle: Fill the prepared bottle with potting mix, leaving about an inch of space at the top.
2. Gently Remove the Seedlings: Carefully remove the seedlings from the seed starting tray or pots. Be gentle to avoid damaging the roots.
3. Make a Hole: Use a small trowel or spoon to create a hole in the potting mix in the bottle, large enough to accommodate the seedling’s roots.
4. Transplant the Seedlings: Gently place the seedling into the hole and cover the roots with potting mix.
5. Space the Seedlings: Space the seedlings about 6-8 inches apart in the bottle.
6. Water Gently: Water the transplanted seedlings gently to settle the soil.
Caring for Your Bottle-Grown Cabbage
Now that your cabbage is planted, it’s time to provide it with the care it needs to thrive.
1. Sunlight: Cabbage needs at least 6 hours of sunlight per day. Place your bottle-grown cabbage in a sunny location. If you don’t have enough sunlight, you can supplement with grow lights.
2. Watering: Water your cabbage regularly, especially during hot and dry weather. The soil should be consistently moist, but not soggy. Check the soil moisture by sticking your finger into the soil. If the top inch feels dry, it’s time to water.
3. Fertilizing: Fertilize your cabbage every 2-3 weeks with a balanced liquid fertilizer. Follow the instructions on the fertilizer label. A 10-10-10 fertilizer works well.
4. Pest Control: Keep an eye out for pests, such as aphids, cabbage worms, and slugs. You can control these pests with organic methods, such as hand-picking, insecticidal soap, or Bacillus thuringiensis (Bt).
5. Weed Control: Remove any weeds that may grow in the bottle. Weeds can compete with your cabbage for nutrients and water.
6. Rotation: Rotate the bottle regularly to ensure that all sides of the cabbage receive equal sunlight. This will help prevent the cabbage from leaning towards the sun.
Harvesting Your Cabbage
After about 60-80 days, your bottle-grown cabbage should be ready to harvest.
1. Check for Firmness: The cabbage head should be firm and compact.
2. Cut the Head: Use a sharp knife to cut the cabbage head from the stem. Leave a few outer leaves on the stem, as these may produce smaller side shoots.
3. Enjoy Your Harvest: Enjoy your fresh, bottle-grown cabbage in salads, coleslaw, soups, or stir-fries!
Troubleshooting
Even with the best care, you might encounter some challenges along the way. Here are a few common problems and how to address them:
* Yellowing Leaves: This could be a sign of overwatering, underwatering, or nutrient deficiency. Check the soil moisture and adjust your watering accordingly. Fertilize your cabbage with a balanced fertilizer.
* Slow Growth: This could be due to insufficient sunlight, poor soil, or pests. Make sure your cabbage is getting enough sunlight and that the soil is well-draining and fertile. Check for pests and take appropriate action.
* Root Rot: This is caused by overwatering and poor drainage. Make sure your bottle has adequate drainage holes and avoid overwatering.
* Pest Infestation: Regularly inspect your cabbage for pests and take action as soon as you notice them.
Tips for Success
Here are a few extra tips to help you succeed with your bottle-grown cabbage:
* Choose the Right Variety: As mentioned earlier, choose a compact cabbage variety that’s well-suited for container gardening.
*
Conclusion
So, there you have it! Growing cabbage in a bottle might sound unconventional, but it’s a surprisingly effective and rewarding method, especially for urban gardeners or those with limited space. This DIY trick isn’t just about novelty; it’s about maximizing your yield, minimizing pest problems, and enjoying fresh, homegrown cabbage even if you only have a balcony or a sunny windowsill.
Think about it: no more battling cabbage worms decimating your precious leaves! The enclosed environment of the bottle offers a natural barrier against many common pests, allowing your cabbage to thrive without the need for harsh chemicals. Plus, the controlled environment allows for better water management, reducing the risk of overwatering or underwatering, both of which can stunt growth.
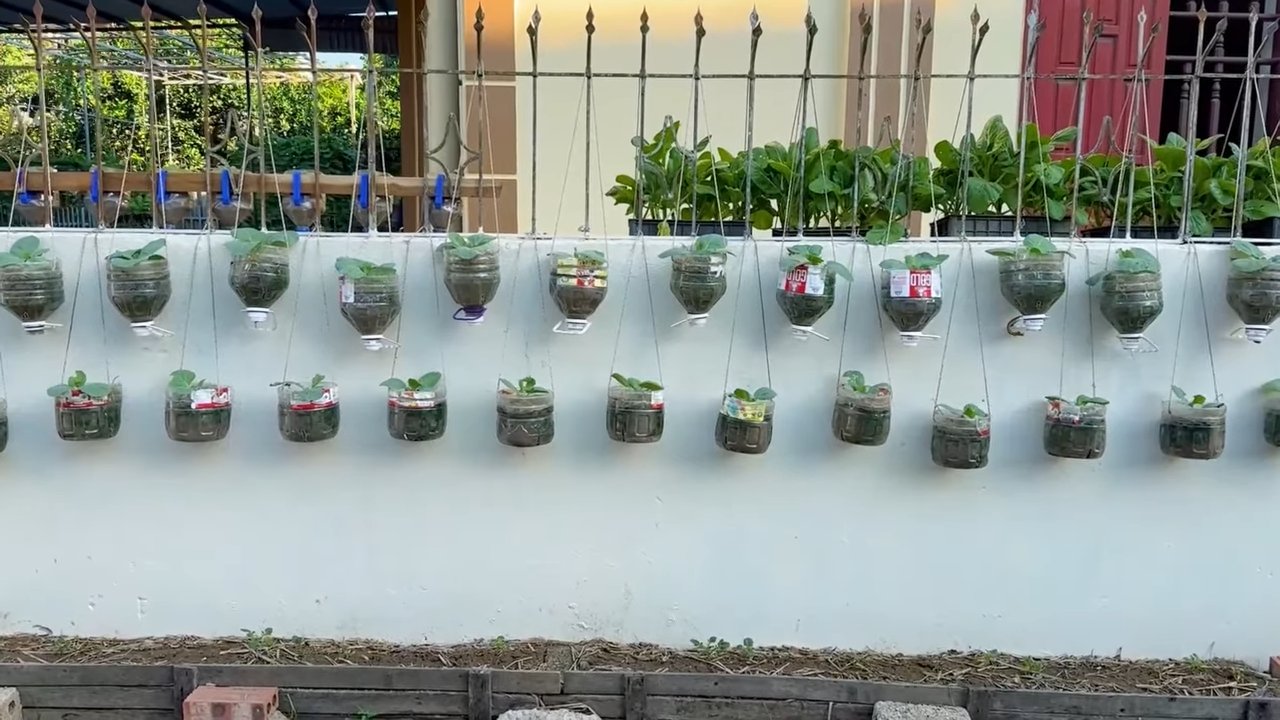
But the benefits don’t stop there. Bottle-grown cabbage is also incredibly space-efficient. Imagine a vertical garden of cabbages, each nestled snugly in its own recycled bottle. It’s a beautiful and practical way to add greenery to your home and enjoy fresh produce at the same time.
Ready to take your bottle-grown cabbage to the next level? Consider experimenting with different varieties of cabbage. Red cabbage, savoy cabbage, or even bok choy can all be successfully grown using this method. You can also add companion plants, such as marigolds or basil, to the bottle to further deter pests and enhance the flavor of your cabbage.
Another variation to explore is hydroponic bottle gardening. By using a nutrient-rich water solution instead of soil, you can further accelerate growth and maximize yields. This method requires a bit more attention to detail, but the results can be truly impressive.
Don’t be afraid to get creative with your bottle selection, too. While clear plastic bottles are ideal for allowing sunlight to reach the plant, you can also use colored bottles to add a decorative touch to your garden. Just be sure to monitor the temperature inside the bottle, as dark-colored bottles can heat up quickly in direct sunlight.
The key to success with bottle-grown cabbage is patience and observation. Pay close attention to your plants, monitor their growth, and adjust your watering and feeding schedule as needed. With a little bit of care and attention, you’ll be rewarded with a bountiful harvest of delicious, homegrown cabbage.
We strongly encourage you to try this DIY trick and experience the joy of growing your own cabbage in a bottle. It’s a fun, educational, and rewarding project that’s perfect for gardeners of all skill levels. And most importantly, it’s a sustainable way to reduce your carbon footprint and enjoy fresh, healthy food.
Once you’ve tried it, we’d love to hear about your experience! Share your photos, tips, and tricks in the comments below. Let’s build a community of bottle-grown cabbage enthusiasts and inspire others to embrace this innovative gardening technique. Let us know what worked for you, what challenges you faced, and any creative variations you came up with. Together, we can unlock the full potential of bottle-grown cabbage and revolutionize the way we grow our food.
Ready to Grow?
Don’t delay! Gather your bottles, prepare your soil, and start your bottle-grown cabbage journey today. You’ll be amazed at what you can achieve with a little bit of ingenuity and a recycled bottle. Happy gardening!
Frequently Asked Questions (FAQ)
What type of cabbage is best for bottle growing?
While most cabbage varieties can be grown in bottles, smaller varieties like dwarf cabbage or bok choy tend to be more successful due to their compact size. Red cabbage and savoy cabbage can also be grown, but may require larger bottles or more frequent pruning. Experiment with different varieties to see what works best for your climate and growing conditions.
What size bottle should I use?
A 2-liter plastic bottle is a good starting point for growing cabbage in a bottle. However, the ideal size will depend on the variety of cabbage you’re growing. For larger varieties, you may need to use a 3-liter or even a 5-liter bottle. Make sure the bottle is clean and has drainage holes at the bottom.
What type of soil should I use?
A well-draining potting mix is essential for growing cabbage in a bottle. Avoid using garden soil, as it can be too heavy and may not provide adequate drainage. You can also amend your potting mix with compost or other organic matter to improve its fertility and water retention.
How often should I water my bottle-grown cabbage?
Water your cabbage regularly, keeping the soil consistently moist but not waterlogged. The frequency of watering will depend on the climate, the size of the bottle, and the type of soil you’re using. Check the soil moisture regularly and water when the top inch feels dry to the touch.
How much sunlight does bottle-grown cabbage need?
Cabbage needs at least 6 hours of sunlight per day to thrive. Place your bottle-grown cabbage in a sunny location, such as a south-facing window or a balcony. If you don’t have enough natural sunlight, you can supplement with grow lights.
How do I fertilize my bottle-grown cabbage?
Fertilize your cabbage regularly with a balanced liquid fertilizer. Follow the instructions on the fertilizer label and avoid over-fertilizing, as this can damage the plant. You can also add compost tea or other organic fertilizers to the soil to provide additional nutrients.
How do I prevent pests and diseases?
The enclosed environment of the bottle helps to protect cabbage from many common pests and diseases. However, it’s still important to monitor your plants regularly for any signs of problems. If you notice any pests, such as aphids or whiteflies, you can try spraying them with insecticidal soap or neem oil. To prevent fungal diseases, ensure good air circulation around the plant and avoid overwatering.
How long does it take to grow cabbage in a bottle?
The time it takes to grow cabbage in a bottle will depend on the variety of cabbage, the growing conditions, and your level of care. Generally, it takes about 60-90 days from planting to harvest.
Can I grow other vegetables in bottles?
Yes, many other vegetables can be grown in bottles, including lettuce, spinach, herbs, and even tomatoes. The key is to choose varieties that are well-suited to container gardening and to provide them with the right growing conditions.
What are the benefits of growing cabbage in a bottle?
Growing cabbage in a bottle offers several benefits, including:
* Space efficiency: Perfect for urban gardeners or those with limited space.
* Pest control: The enclosed environment helps to protect plants from pests.
* Water management: Easier to control watering and prevent overwatering or underwatering.
* Sustainability: A great way to recycle plastic bottles and reduce your carbon footprint.
* Educational: A fun and educational project for gardeners of all ages.
How do I harvest my bottle-grown cabbage?
Harvest your cabbage when the head is firm and the desired size. Use a sharp knife to cut the head from the stem, leaving a few outer leaves intact. You can then use these leaves to start a new plant or simply compost them.
What if my bottle-grown cabbage starts to bolt (flower)?
Bolting occurs when cabbage plants are stressed, usually due to heat or lack of water. Once a cabbage plant bolts, the leaves become bitter and the head is no longer edible. To prevent bolting, ensure your cabbage plants are adequately watered and protected from extreme heat. If your cabbage plant does bolt, you can still harvest the leaves for use in salads or soups, but be aware that they may have a slightly bitter taste.
Can I reuse the bottles for multiple growing seasons?
Yes, you can reuse the bottles for multiple growing seasons. Just be sure to clean them thoroughly between uses to prevent the spread of diseases. You can wash the bottles with soap and water or use a diluted bleach solution.
Is bottle-grown cabbage as nutritious as traditionally grown cabbage?
Yes, bottle-grown cabbage can be just as nutritious as traditionally grown cabbage, provided it is given the proper nutrients and growing conditions. In some cases, bottle-grown cabbage may even be more nutritious, as it is less likely to be exposed to pesticides and other harmful chemicals.
What if I don’t have access to plastic bottles?
While plastic bottles are a convenient and readily available option, you can also use other types of containers for growing cabbage, such as buckets, pots, or even repurposed food containers. Just be sure the container has drainage holes and is large enough to accommodate the plant’s root system.
Leave a Comment