

Bottle Gourd Urban Gardening: Ever dreamt of harvesting your own fresh, crisp bottle gourds right in the heart of the city? I know I have! There’s something incredibly satisfying about growing your own food, and you don’t need acres of land to do it. This DIY guide will unlock the secrets to successfully cultivating bottle gourds, even if you’re limited to a balcony, patio, or small urban garden.
Bottle gourds, also known as calabash, boast a rich history, deeply intertwined with various cultures across the globe. For centuries, they’ve been more than just a food source; they’ve been crafted into utensils, musical instruments, and even decorative art. Imagine growing a piece of living history right outside your door!
But why should you try bottle gourd urban gardening? Well, beyond the historical charm, growing your own bottle gourds offers a fantastic way to enjoy fresh, organic produce, reduce your carbon footprint, and connect with nature. Plus, it’s a rewarding and therapeutic hobby. In this article, I’ll share my tried-and-tested DIY tricks and hacks to help you navigate common challenges, from choosing the right variety to maximizing your yield. Get ready to transform your urban space into a thriving bottle gourd oasis!
Kürbisflasche im urbanen Garten anbauen: Dein DIY-Leitfaden
Hallo liebe Gartenfreunde! Hast du schon mal darüber nachgedacht, Kürbisflaschen (auch bekannt als Kalebasse) in deinem eigenen kleinen urbanen Garten anzubauen? Es ist einfacher als du denkst und super befriedigend, wenn du dann deine eigenen, selbstgezogenen Gefäße, Musikinstrumente oder sogar Kunstobjekte in den Händen hältst. Ich zeige dir, wie es geht!
Was du für den Anbau von Kürbisflaschen brauchst:
* Samen: Besorge dir qualitativ hochwertige Kürbisflaschen-Samen. Achte darauf, dass sie für dein Klima geeignet sind. Es gibt verschiedene Sorten, also wähle die, die dir am besten gefällt.
* Anzuchttöpfe oder Eierkartons: Für die Voranzucht im Haus.
* Anzuchterde: Spezielle Erde für die Anzucht, die nährstoffarm und locker ist.
* Gartenerde: Gute, nährstoffreiche Gartenerde für das Beet oder den Kübel.
* Kompost oder organischer Dünger: Um den Boden anzureichern.
* Großer Kübel (optional): Wenn du keinen Garten hast, kannst du die Kürbisflasche auch in einem großen Kübel anbauen. Er sollte mindestens 50 Liter Fassungsvermögen haben.
* Rankhilfe: Kürbisflaschen sind Kletterpflanzen und brauchen eine stabile Rankhilfe. Das kann ein Zaun, ein Spalier, ein Gerüst oder eine Pergola sein.
* Gießkanne oder Gartenschlauch: Zum regelmäßigen Gießen.
* Gartenschere: Zum Beschneiden der Pflanze.
* Geduld: Kürbisflaschen brauchen Zeit zum Wachsen und Reifen!
Die Vorbereitung: Der Schlüssel zum Erfolg
Bevor wir loslegen, ist eine gute Vorbereitung das A und O. Kürbisflaschen sind etwas anspruchsvoll, aber mit den richtigen Vorkehrungen klappt es bestimmt!
1. Die Samen vorbereiten:
Manchmal haben Kürbisflaschen-Samen eine harte Schale, die das Keimen erschwert. Um den Prozess zu beschleunigen, kannst du die Samen vorquellen lassen:
1. Lege die Samen für 24 Stunden in lauwarmes Wasser.
2. Wechsle das Wasser nach 12 Stunden.
3. Nach 24 Stunden sollten die Samen leicht aufgequollen sein.
2. Die Anzucht:
Ich ziehe meine Kürbisflaschen immer im Haus vor, um ihnen einen Vorsprung zu geben.
1. Fülle die Anzuchttöpfe oder Eierkartons mit Anzuchterde.
2. Drücke in jeden Topf oder jede Zelle ein bis zwei Samen etwa 1-2 cm tief in die Erde.
3. Bedecke die Samen leicht mit Erde und gieße sie vorsichtig an.
4. Stelle die Töpfe an einen warmen, hellen Ort. Eine Fensterbank oder ein Gewächshaus sind ideal.
5. Halte die Erde feucht, aber nicht nass.
6. Nach etwa 1-2 Wochen sollten die Samen keimen.
3. Den Standort vorbereiten:
Kürbisflaschen lieben die Sonne! Wähle einen sonnigen Standort mit mindestens 6 Stunden direkter Sonneneinstrahlung pro Tag.
1. Lockere die Erde gut auf und entferne Unkraut.
2. Reichere die Erde mit Kompost oder organischem Dünger an.
3. Wenn du die Kürbisflasche in einem Kübel anbaust, wähle einen großen Kübel mit guter Drainage.
4. Installiere die Rankhilfe. Sie sollte stabil genug sein, um das Gewicht der wachsenden Pflanze und der Früchte zu tragen.
Der Anbau: Schritt für Schritt zum Erfolg
Jetzt geht es ans Eingemachte! Hier sind die einzelnen Schritte, um deine Kürbisflasche erfolgreich anzubauen:
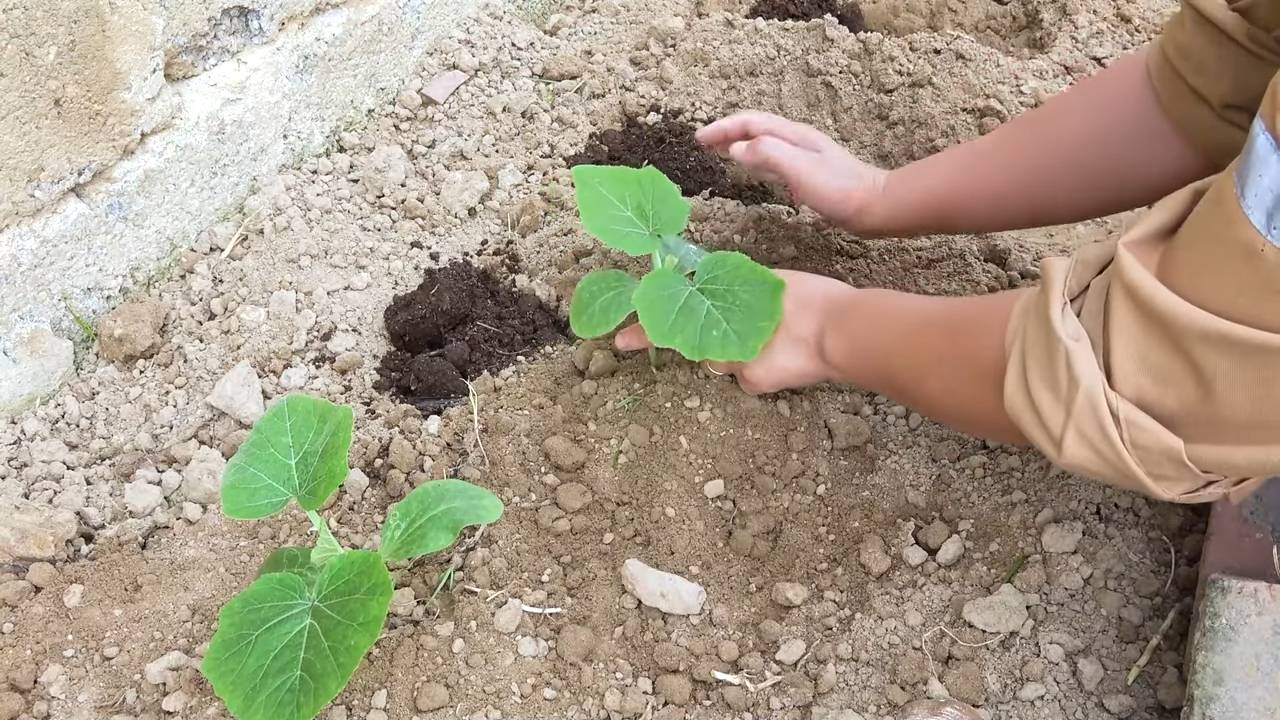
1. Auspflanzen: Sobald die Jungpflanzen kräftig genug sind (etwa 10-15 cm hoch) und keine Frostgefahr mehr besteht, kannst du sie ins Freie pflanzen.
* Hebe ein Loch aus, das doppelt so groß ist wie der Wurzelballen.
* Setze die Pflanze vorsichtig in das Loch und fülle es mit Erde auf.
* Gieße die Pflanze gut an.
* Achte darauf, dass die Pflanze genügend Platz hat, um sich auszubreiten.
2. Gießen: Kürbisflaschen brauchen viel Wasser, besonders während der Wachstums- und Fruchtbildungsphase.
* Gieße die Pflanze regelmäßig, besonders an heißen Tagen.
* Vermeide Staunässe, da dies zu Wurzelfäule führen kann.
* Gieße am besten morgens, damit die Blätter über den Tag abtrocknen können.
3. Düngen: Um ein gesundes Wachstum und eine reiche Ernte zu fördern, solltest du die Kürbisflasche regelmäßig düngen.
* Verwende einen organischen Dünger oder Komposttee.
* Dünge die Pflanze alle 2-3 Wochen.
4. Beschneiden: Das Beschneiden der Kürbisflasche kann helfen, das Wachstum zu kontrollieren und die Fruchtbildung zu fördern.
* Entferne regelmäßig Seitentriebe, die nicht fruchten.
* Kürze die Haupttriebe ein, wenn sie zu lang werden.
* Achte darauf, dass die Pflanze genügend Luft und Licht bekommt.
5. Rankhilfe: Leite die Triebe der Kürbisflasche an der Rankhilfe entlang.
* Binde die Triebe vorsichtig fest, damit sie nicht abbrechen.
* Achte darauf, dass die Früchte genügend Platz haben, um zu wachsen.
6. Schutz vor Schädlingen und Krankheiten: Kürbisflaschen können von verschiedenen Schädlingen und Krankheiten befallen werden.
* Kontrolliere die Pflanze regelmäßig auf Schädlinge wie Blattläuse, Schnecken oder Mehltau.
* Entferne befallene Blätter oder Früchte.
* Verwende bei Bedarf biologische Schädlingsbekämpfungsmittel.
Die Ernte: Der Lohn deiner Mühe
Die Erntezeit ist der spannendste Teil! Aber wann ist der richtige Zeitpunkt, um die Kürbisflaschen zu ernten?
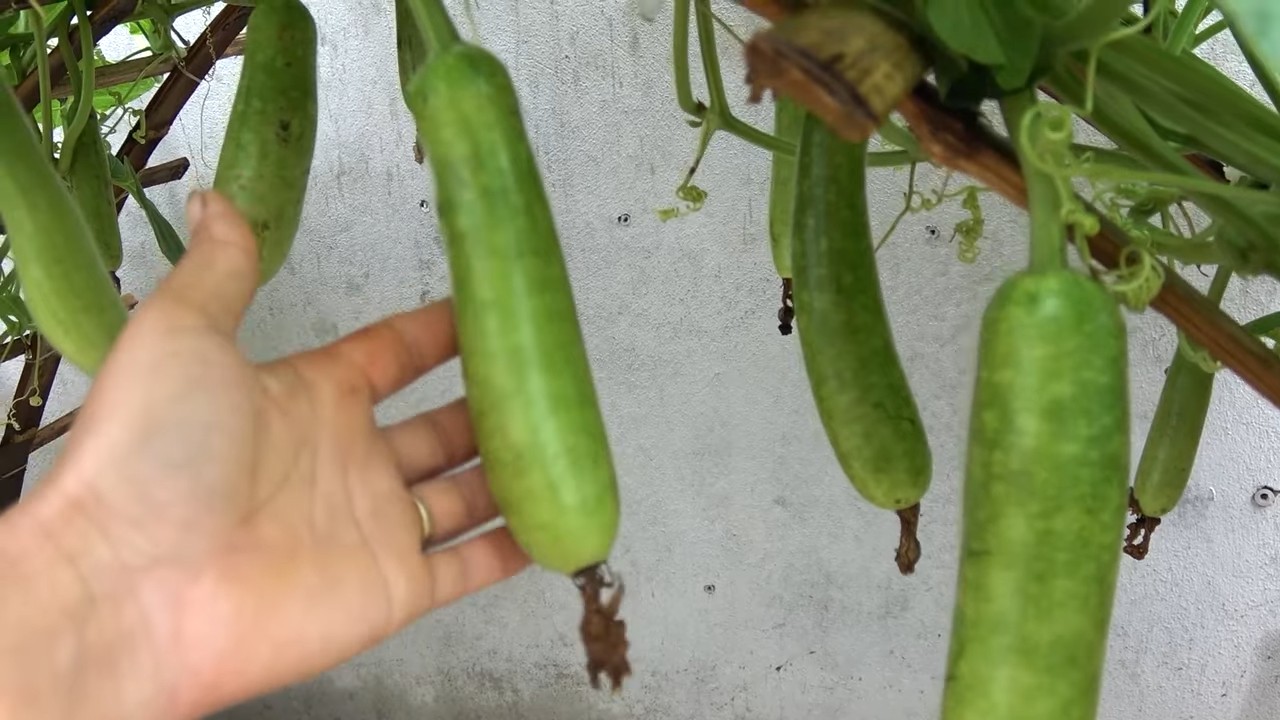
1. Der richtige Zeitpunkt: Die Kürbisflaschen sind reif, wenn die Schale hart und trocken ist und sich nicht mehr mit dem Fingernagel eindrücken lässt. Die Blätter der Pflanze beginnen zu welken und abzusterben.
2. Die Ernte: Schneide die Kürbisflasche mit einer Gartenschere vom Stiel ab. Lasse dabei einen etwa 5-10 cm langen Stielansatz stehen.
3. Die Trocknung: Die geernteten Kürbisflaschen müssen getrocknet werden, bevor sie weiterverarbeitet werden können.
* Reinige die Kürbisflaschen vorsichtig mit einem feuchten Tuch.
* Lege die Kürbisflaschen an einen trockenen, gut belüfteten Ort.
* Wende die Kürbisflaschen regelmäßig, damit sie gleichmäßig trocknen.
* Die Trocknung kann mehrere Wochen oder sogar Monate dauern, je nach Größe und Dicke der Kürbisflasche.
* Du erkennst, dass die Kürbisflasche trocken ist, wenn sie leicht und hohl klingt, wenn du darauf klopfst.
Nach der Trocknung: Was du mit deinen Kürbisflaschen machen kannst
Nach der Trocknung sind deiner Kreativität keine Grenzen gesetzt! Hier sind ein paar Ideen, was du mit deinen selbstgezogenen Kürbisflaschen machen kannst:
* Gefäße: Schneide die Kürbisflasche auf und entferne das Innere. Du kannst sie als Vase, Schale oder Behälter für andere Dinge verwenden.
* Musikinstrumente: Kürbisflaschen eignen sich hervorragend für den Bau von Musikinstrumenten wie Rasseln, Trommeln oder Saiteninstrumenten.
* Kunstobjekte: Bemalen, schnitzen oder bekleben deine Kürbisflaschen und verwandle sie in einzigartige Kunstobjekte.
* Vogelhäuser: Baue ein Vogelhaus aus einer Kürbisflasche.
* Laternen: Bohre Löcher in die Kürbisflasche und setze eine Kerze oder eine Lichterkette hinein.
Conclusion
So, there you have it! Cultivating your own bottle gourd, right in the heart of your urban jungle, is not only achievable but also incredibly rewarding. This DIY trick, transforming your balcony, patio, or even a sunny windowsill into a thriving gourd patch, is a must-try for several compelling reasons.
Firstly, imagine the satisfaction of harvesting fresh, organic bottle gourds, knowing exactly where they came from and what went into their growth. No more wondering about pesticides or long-distance transportation – just pure, homegrown goodness. Secondly, this project is a fantastic way to connect with nature, even in the midst of city life. Tending to your bottle gourd plants offers a calming, meditative experience, a welcome respite from the daily grind. Watching them climb and flourish, bearing fruit right before your eyes, is a truly magical process.
But beyond the personal benefits, growing your own bottle gourd contributes to a more sustainable lifestyle. You’re reducing your carbon footprint by sourcing food locally, minimizing packaging waste, and potentially even inspiring others to embrace urban gardening. It’s a small step with a significant impact.
And the best part? This DIY trick is incredibly versatile. While we’ve outlined a basic approach, feel free to experiment and adapt it to your specific circumstances.
Variations and Suggestions:
* Trellis Designs: Get creative with your trellis! Use bamboo poles, repurposed metal fencing, or even sturdy branches to create unique and visually appealing support structures for your bottle gourd vines.
* Container Gardening: If space is truly limited, consider using larger containers (at least 15-20 gallons) filled with a high-quality potting mix. Ensure adequate drainage to prevent root rot.
* Companion Planting: Enhance your bottle gourd’s growth by planting beneficial companion plants nearby. Marigolds can deter pests, while legumes like beans or peas can fix nitrogen in the soil.
* Gourd Art: Once harvested, your bottle gourds can be transformed into stunning works of art! Explore different carving, painting, and decorating techniques to create unique and personalized pieces.
* Seed Saving: Save seeds from your best-performing bottle gourds to ensure a continuous supply for future seasons. Properly dry and store the seeds in a cool, dark place.
* Different Varieties: Don’t limit yourself to just one type of bottle gourd! Explore different varieties with varying shapes, sizes, and textures. Experiment with long, slender gourds or round, bulbous ones.
We wholeheartedly encourage you to give this DIY bottle gourd urban gardening trick a try. It’s a rewarding, sustainable, and surprisingly easy way to bring a touch of nature into your urban environment.
But the journey doesn’t end here! We’re eager to hear about your experiences. Share your photos, tips, and challenges in the comments section below. Let’s build a community of urban gardeners, sharing our knowledge and inspiring each other to grow our own food, one bottle gourd at a time. Your insights could be invaluable to others embarking on this exciting adventure. So, grab your seeds, prepare your soil, and get ready to experience the joy of growing your own bottle gourd!
Frequently Asked Questions (FAQs)
Q1: What is the best time of year to plant bottle gourd seeds?
The ideal time to plant bottle gourd seeds is during the late spring or early summer, after the last frost has passed and the soil has warmed up. Bottle gourds thrive in warm weather and require a long growing season (typically 100-120 days). In warmer climates, you may be able to start seeds earlier, but be sure to protect young seedlings from any unexpected cold snaps. Check your local climate data for the average last frost date to determine the optimal planting time for your region.
Q2: How much sunlight do bottle gourd plants need?
Bottle gourd plants require at least 6-8 hours of direct sunlight per day to thrive. Choose a location that receives ample sunlight throughout the day. If you’re growing bottle gourds indoors, supplement with grow lights if necessary to ensure they receive sufficient light. Insufficient sunlight can lead to weak growth, reduced flowering, and smaller fruit.
Q3: What type of soil is best for growing bottle gourds?
Bottle gourds prefer well-draining, fertile soil that is rich in organic matter. Amend your soil with compost, aged manure, or other organic materials to improve its fertility and drainage. A slightly acidic to neutral soil pH (around 6.0-7.0) is ideal. Avoid heavy clay soils that retain too much water, as this can lead to root rot.
Q4: How often should I water my bottle gourd plants?
Water your bottle gourd plants regularly, especially during hot, dry weather. Aim to keep the soil consistently moist but not waterlogged. Water deeply at the base of the plant, avoiding wetting the foliage, which can increase the risk of fungal diseases. Mulching around the base of the plant can help retain moisture and suppress weeds. Check the soil moisture regularly by sticking your finger into the soil – if the top inch feels dry, it’s time to water.
Q5: How do I provide support for my bottle gourd vines?
Bottle gourd vines are vigorous climbers and require strong support to grow properly. Use a sturdy trellis, fence, or other structure to provide vertical support for the vines. Ensure that the support is strong enough to handle the weight of the mature vines and developing gourds. Train the vines to climb the support structure by gently guiding them and tying them loosely with twine or plant ties.
Q6: What are some common pests and diseases that affect bottle gourds?
Common pests that can affect bottle gourds include aphids, squash bugs, and vine borers. Regularly inspect your plants for signs of infestation and take appropriate action, such as using insecticidal soap or hand-picking pests. Common diseases include powdery mildew and fungal leaf spots. Improve air circulation around the plants and avoid overhead watering to prevent these diseases. Use organic fungicides if necessary.
Q7: How do I know when my bottle gourds are ready to harvest?
The time to harvest bottle gourds depends on the intended use. For ornamental purposes, harvest the gourds when they are fully mature and the skin has hardened. The stem should be dry and brown. For culinary use, harvest the gourds when they are young and tender, before the skin becomes too tough. The skin should be easily pierced with your fingernail.
Q8: Can I grow bottle gourds in containers?
Yes, you can grow bottle gourds in containers, but you’ll need to use a large container (at least 15-20 gallons) filled with a high-quality potting mix. Ensure that the container has adequate drainage holes to prevent waterlogging. Provide a sturdy trellis or support structure for the vines to climb. Water and fertilize regularly, as container-grown plants tend to dry out and deplete nutrients more quickly than those grown in the ground.
Q9: How do I pollinate bottle gourd flowers?
Bottle gourds have separate male and female flowers. Pollination is typically carried out by insects, but if you’re growing bottle gourds indoors or in an area with limited pollinators, you may need to hand-pollinate the flowers. Use a small paintbrush to transfer pollen from the male flower to the female flower. The female flower has a small, immature gourd at its base.
Q10: How can I use my harvested bottle gourds?
Bottle gourds can be used for a variety of purposes, including culinary dishes, ornamental decorations, and crafting projects. Young, tender gourds can be used in soups, stews, and stir-fries. Mature, dried gourds can be carved, painted, and decorated to create unique works of art. They can also be used to make birdhouses, musical instruments, and other functional items. The possibilities are endless!

Leave a Comment