

Black corn container gardening might sound a little unconventional, but trust me, it’s a game-changer for anyone looking to grow this unique and beautiful variety of corn, even without a sprawling backyard! For centuries, corn has been a staple crop, deeply woven into the cultures of indigenous peoples across the Americas. Beyond its nutritional value, black corn, with its striking color, holds cultural significance, often used in traditional ceremonies and crafts.
But why should you consider growing black corn in a container? Well, imagine harvesting your own vibrant, nearly black kernels, perfect for grinding into a stunning blue-purple cornmeal or creating eye-catching decorations. More practically, container gardening allows you to control the soil quality, watering, and sunlight exposure, leading to a healthier and more productive harvest, especially if you’re dealing with less-than-ideal garden conditions. Plus, it’s a fantastic way to add a touch of the extraordinary to your patio or balcony.
In this DIY guide, I’m going to share my tried-and-true secrets for successful black corn container gardening. We’ll cover everything from choosing the right container and soil to preventing pests and ensuring a bountiful yield. Get ready to unlock the secrets to growing this captivating crop, no matter how small your space!
Schwarzer Mais im Container anbauen: Eine Schritt-für-Schritt-Anleitung
Hallo liebe Gartenfreunde! Habt ihr schon mal darüber nachgedacht, schwarzen Mais anzubauen? Es ist nicht nur eine tolle Möglichkeit, eurem Garten etwas Farbe zu verleihen, sondern auch eine super interessante und lohnende Erfahrung. Ich habe es selbst ausprobiert und möchte euch heute zeigen, wie ihr das auch ganz einfach in Containern hinbekommt. Keine Angst, es ist gar nicht so schwer, wie es vielleicht klingt!
Warum schwarzer Mais?
Bevor wir loslegen, kurz ein paar Worte, warum ich schwarzen Mais so faszinierend finde. Abgesehen von seiner auffälligen Farbe, die wirklich ein Hingucker ist, hat schwarzer Mais auch einige gesundheitliche Vorteile. Er ist reich an Antioxidantien, insbesondere Anthocyanen, die auch in Blaubeeren vorkommen. Außerdem schmeckt er leicht süßlich und nussig, was ihn zu einer tollen Zutat für viele Gerichte macht.
Was ihr für den Anbau von schwarzem Mais im Container braucht
Bevor wir mit dem Pflanzen beginnen, müssen wir sicherstellen, dass wir alles haben, was wir brauchen. Hier ist eine Liste der Materialien und Werkzeuge, die ihr bereithalten solltet:
* Samen von schwarzem Mais: Achtet darauf, hochwertiges Saatgut von einem vertrauenswürdigen Anbieter zu kaufen. Es gibt verschiedene Sorten von schwarzem Mais, also wählt diejenige, die euch am besten gefällt. Ich habe gute Erfahrungen mit der Sorte ‘Black Aztec’ gemacht.
* Große Container: Mais braucht Platz, um zu wachsen. Wählt Container mit einem Durchmesser von mindestens 45 cm und einer Tiefe von mindestens 30 cm. Je größer, desto besser!
* Hochwertige Blumenerde: Verwendet eine gut durchlässige Blumenerde, die reich an Nährstoffen ist. Ihr könnt auch etwas Kompost oder gut verrotteten Mist untermischen, um die Erde noch weiter anzureichern.
* Dünger: Mais ist ein Starkzehrer, das heißt, er braucht viele Nährstoffe. Ein ausgewogener Dünger (z.B. 10-10-10) ist ideal.
* Gießkanne oder Gartenschlauch: Um eure Pflanzen regelmäßig zu gießen.
* Pflanzschaufel: Zum Ausheben der Pflanzlöcher.
* Stützpfähle (optional): Wenn eure Maispflanzen sehr hoch werden, können sie bei starkem Wind umknicken. Stützpfähle können hier Abhilfe schaffen.
* Mulch (optional): Mulch hilft, die Feuchtigkeit im Boden zu halten und Unkraut zu unterdrücken.
Die Vorbereitung: Der Schlüssel zum Erfolg
Eine gute Vorbereitung ist das A und O für einen erfolgreichen Anbau. Hier sind die Schritte, die ihr im Vorfeld erledigen solltet:
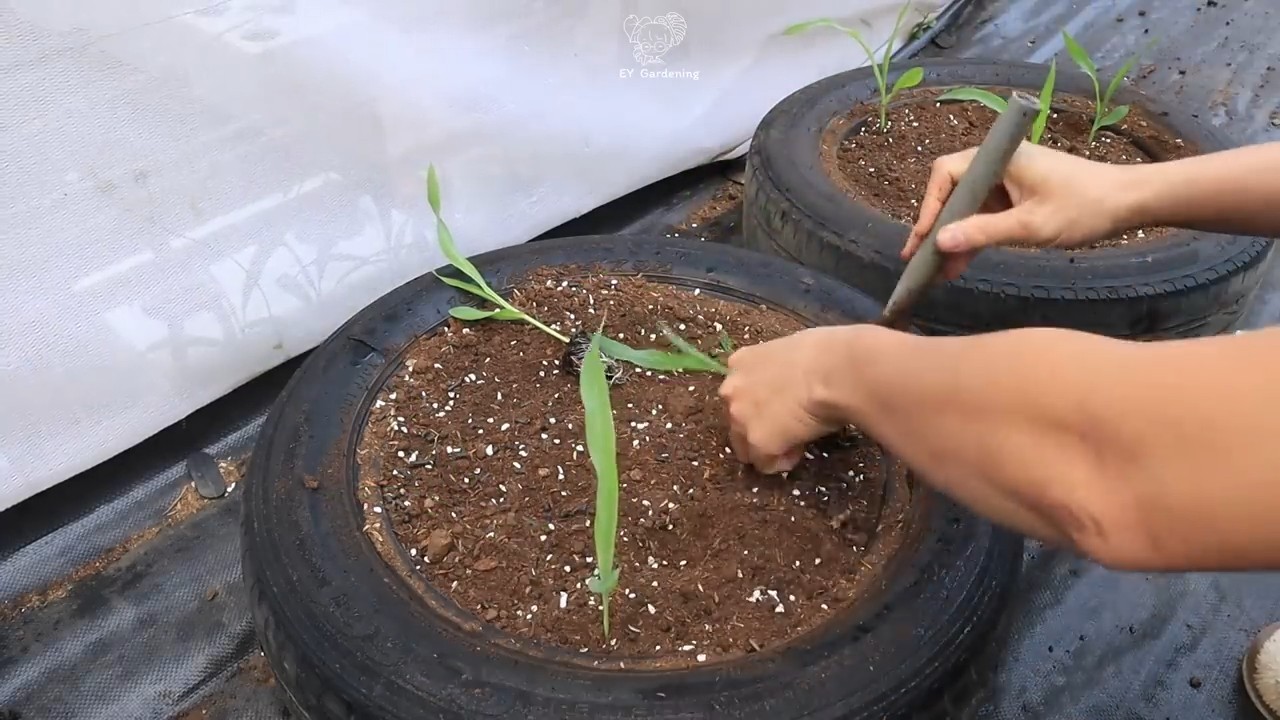
1. Die Container vorbereiten: Stellt sicher, dass eure Container Abzugslöcher haben, damit überschüssiges Wasser ablaufen kann. Füllt die Container mit Blumenerde, lasst aber etwa 5 cm Platz bis zum Rand.
2. Die Samen vorbereiten (optional): Ihr könnt die Samen vor dem Pflanzen für 24 Stunden in lauwarmem Wasser einweichen. Das beschleunigt die Keimung. Ich mache das meistens, aber es geht auch ohne.
3. Den Standort wählen: Mais braucht viel Sonne, mindestens 6-8 Stunden pro Tag. Wählt einen sonnigen Standort für eure Container.
Die Aussaat: Jetzt geht’s los!
Jetzt kommt der spannende Teil: das Pflanzen der Samen!
1. Pflanzlöcher ausheben: Macht mit eurer Pflanzschaufel kleine Löcher in die Erde, etwa 2-3 cm tief. Achtet darauf, dass die Löcher etwa 15-20 cm voneinander entfernt sind.
2. Samen einlegen: Legt in jedes Loch 2-3 Samen. Das erhöht die Wahrscheinlichkeit, dass mindestens ein Samen keimt.
3. Mit Erde bedecken: Bedeckt die Samen mit Erde und drückt sie leicht an.
4. Gießen: Gießt die Erde vorsichtig an, damit sie feucht, aber nicht nass ist.
Die Pflege: Damit euer Mais prächtig gedeiht
Nach der Aussaat ist es wichtig, eure Maispflanzen gut zu pflegen, damit sie gesund und kräftig wachsen.
1. Gießen: Gießt eure Maispflanzen regelmäßig, besonders während trockener Perioden. Die Erde sollte immer leicht feucht sein, aber nicht durchnässt.
2. Düngen: Düngt eure Maispflanzen alle 2-3 Wochen mit einem ausgewogenen Dünger. Befolgt dabei die Anweisungen auf der Verpackung.
3. Unkraut entfernen: Entfernt regelmäßig Unkraut, das in euren Containern wächst. Unkraut konkurriert mit euren Maispflanzen um Nährstoffe und Wasser.
4. Stützen (optional): Wenn eure Maispflanzen sehr hoch werden, könnt ihr sie mit Stützpfählen stabilisieren. Steckt die Pfähle einfach in die Erde und bindet die Pflanzen locker daran fest.
5. Bestäubung unterstützen: Mais ist windbestäubt. Wenn ihr nur wenige Pflanzen habt, kann es hilfreich sein, die Bestäubung manuell zu unterstützen. Schüttelt dazu einfach die Pflanzen leicht, wenn die männlichen Blüten (die “Fahnen” oben an der Pflanze) Pollen freisetzen.
Schädlinge und Krankheiten: Was tun, wenn’s Probleme gibt?
Auch beim Anbau von Mais im Container können Schädlinge und Krankheiten auftreten. Hier sind einige der häufigsten Probleme und wie ihr sie bekämpfen könnt:
* Maiszünsler: Diese Schädlinge bohren sich in die Stängel und Kolben der Maispflanzen. Ihr könnt sie mit biologischen Insektiziden bekämpfen oder die befallenen Pflanzenteile entfernen.
* Blattläuse: Blattläuse saugen den Saft aus den Blättern der Maispflanzen. Ihr könnt sie mit einem Wasserstrahl abspritzen oder mit Insektizidseife behandeln.
* Pilzkrankheiten: Bei feuchtem Wetter können Pilzkrankheiten wie Maisbeulenbrand auftreten. Sorgt für eine gute Belüftung und entfernt befallene Pflanzenteile.
Die Ernte: Der Lohn eurer Mühe
Nach etwa 90-120 Tagen, je nach Sorte, ist euer schwarzer Mais reif für die Ernte.
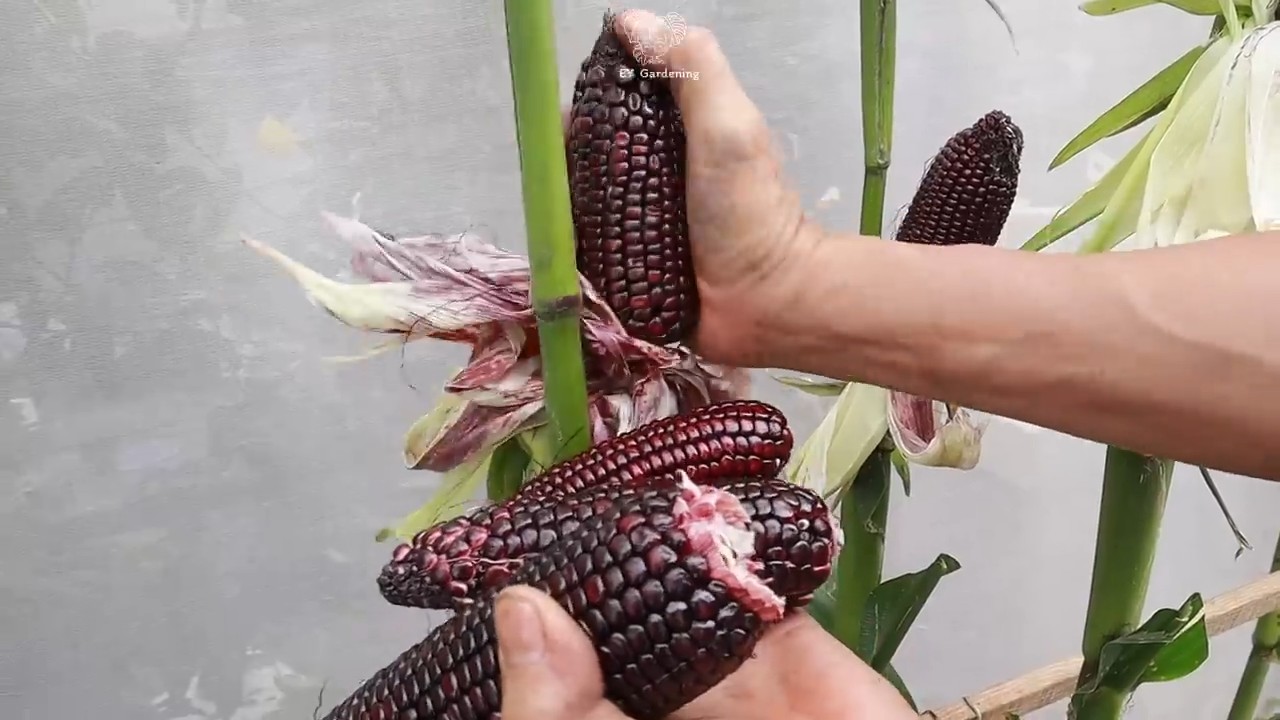
1. Reife erkennen: Die Kolben sind reif, wenn die Hüllblätter trocken und braun werden und die Körner prall und fest sind. Wenn ihr ein Korn mit dem Fingernagel ansticht, sollte es milchig sein.
2. Ernten: Brecht die Kolben vorsichtig von den Pflanzen ab.
3. Trocknen (optional): Wenn ihr den Mais für längere Zeit lagern möchtet, solltet ihr ihn trocknen. Hängt die Kolben dazu an einem luftigen Ort auf oder legt sie in einem Dörrautomaten aus.
Verwendung von schwarzem Mais
Schwarzer Mais ist vielseitig verwendbar. Ihr könnt ihn frisch vom Kolben essen, grillen, kochen oder zu Mehl verarbeiten. Das Mehl eignet sich hervorragend für Tortillas, Polenta oder Brot. Und natürlich ist er auch eine tolle Dekoration für eure Gerichte!
Zusätzliche Tipps für den erfolgreichen Anbau
* Rotation: Baut Mais nicht jedes Jahr am selben Standort an, um Krankheiten und Schädlingen vorzubeugen.
* Begleitpflanzung: Pflanzt Bohnen und Kürbis neben euren Mais, um die Nährstoffaufnahme zu verbessern und Schädlinge abzuschrecken.
* Geduld: Habt Geduld! Der Anbau von Mais braucht Zeit und Mühe, aber es lohnt sich.
Ich hoffe, diese Anleitung hat euch geholfen und inspiriert, euren eigenen schwarzen Mais im Container anzubauen. Es ist wirklich eine tolle Erfahrung und ich bin sicher, ihr werdet viel Freude daran haben. Viel Erfolg und happy gardening!
Conclusion
So, there you have it! Transforming your garden (or even just a sunny balcony) with black corn container gardening is not just a fun project; it’s a gateway to enjoying fresh, unique produce right at your fingertips. We’ve walked you through the simple steps, highlighting the ease and accessibility of this method, even for those with limited space or gardening experience.
Why is this a must-try? Because it offers a blend of beauty and practicality. The striking visual appeal of black corn stalks and ears adds a dramatic flair to your outdoor space, making it a conversation starter and a source of pride. Beyond aesthetics, you’re gaining access to a nutritious and delicious ingredient that’s often hard to find in stores. Imagine the satisfaction of harvesting your own black corn, knowing exactly where it came from and how it was grown.
But the benefits don’t stop there. Container gardening, in general, offers superior control over soil quality, watering, and pest management. This means you can create the ideal environment for your black corn to thrive, maximizing your yield and minimizing the risk of common garden problems. Plus, the portability of containers allows you to move your plants to chase the sun or protect them from harsh weather conditions.
Looking for variations? Absolutely! Consider companion planting within your containers. Marigolds can deter pests, while beans can help fix nitrogen in the soil, benefiting your corn. You could also experiment with different container sizes and materials to find what works best for your space and aesthetic preferences. Try using a self-watering container for even easier maintenance. For a truly unique touch, paint your containers with vibrant colors that complement the dark hues of the corn.
Don’t be afraid to experiment with different black corn varieties too. Some are better suited for specific climates or purposes. Research different types to find one that aligns with your taste and growing conditions. You can even save seeds from your harvest to plant again next year, creating a sustainable cycle of homegrown goodness.
We wholeheartedly encourage you to give black corn container gardening a try. It’s a rewarding experience that connects you with nature, enhances your culinary creations, and adds a touch of magic to your surroundings.
Once you’ve embarked on this gardening adventure, we’d love to hear about your experiences! Share your photos, tips, and challenges in the comments below. Let’s build a community of black corn enthusiasts and learn from each other’s successes and failures. Your insights could inspire others to take the plunge and discover the joys of growing their own food. So, grab your containers, seeds, and soil, and get ready to cultivate something truly special. Happy gardening!
Frequently Asked Questions (FAQ)
What exactly is black corn, and is it different from regular corn?
Black corn, also known as blue corn or purple corn depending on the variety, is a type of corn that gets its dark color from high levels of anthocyanins, the same antioxidants that give blueberries and other dark fruits their vibrant hues. While it’s still corn, it has a slightly different flavor profile than yellow or white corn, often described as nuttier and earthier. Nutritionally, it’s also richer in antioxidants, making it a healthy and delicious addition to your diet. The growing requirements are generally similar to other corn varieties, making it relatively easy to cultivate.
What size container is best for growing black corn?
A general rule of thumb is to use a container that is at least 12 inches in diameter and 12 inches deep for each corn stalk. However, for optimal growth and yield, we recommend using a container that is 18-24 inches in diameter and at least 18 inches deep. This provides ample space for the roots to develop and access nutrients. If you’re planting multiple stalks in one container, ensure there’s enough space between them (around 8-12 inches) to prevent overcrowding. Larger containers also retain moisture better, reducing the frequency of watering.
What type of soil should I use for black corn container gardening?
Black corn thrives in well-draining, fertile soil. A good potting mix specifically designed for vegetables is ideal. You can also create your own mix by combining equal parts of compost, peat moss (or coconut coir), and perlite or vermiculite. Compost provides essential nutrients, peat moss or coconut coir helps retain moisture, and perlite or vermiculite improves drainage. Avoid using garden soil directly in containers, as it can become compacted and hinder root growth. Adding a slow-release fertilizer to the soil mix at planting time will provide a steady supply of nutrients throughout the growing season.
How often should I water my black corn in containers?
Watering frequency depends on several factors, including the size of the container, the weather, and the stage of growth. Generally, you should water your black corn whenever the top inch of soil feels dry to the touch. During hot, dry weather, you may need to water daily, or even twice a day. Ensure the water drains freely from the bottom of the container to prevent waterlogging, which can lead to root rot. Using a moisture meter can help you accurately assess the soil moisture level.
Does black corn need full sun?
Yes, black corn requires at least 6-8 hours of direct sunlight per day to thrive. Choose a location for your containers that receives ample sunlight throughout the day. If you live in a particularly hot climate, providing some afternoon shade can help prevent the plants from overheating. If you don’t have access to enough natural sunlight, you can supplement with grow lights.
How do I pollinate black corn in containers?
Corn is wind-pollinated, so in a container setting, you may need to assist with pollination. When the tassels (the male flowers at the top of the plant) begin to shed pollen and the silks (the female flowers emerging from the developing ears) are receptive, gently shake the stalks to release pollen. You can also collect pollen from the tassels and dust it onto the silks using a small brush. Repeat this process every day for several days to ensure adequate pollination.
What are some common pests and diseases that affect black corn, and how can I prevent them?
Common pests that can affect black corn include corn earworms, aphids, and spider mites. Diseases include corn smut and leaf blight. To prevent these problems, inspect your plants regularly for signs of infestation or disease. Use organic pest control methods such as insecticidal soap or neem oil to control pests. Ensure good air circulation around the plants to prevent fungal diseases. Remove any infected leaves or plants promptly to prevent the spread of disease. Companion planting with marigolds can also help deter pests.
When is the best time to harvest black corn?
The harvesting time for black corn depends on the variety and your intended use. For fresh eating, harvest when the silks have turned brown and dry, and the kernels are plump and milky when pierced. For drying and grinding into cornmeal, allow the ears to dry on the stalk until the husks are completely dry and papery. The kernels should be hard and difficult to dent with your fingernail.
Can I save seeds from my black corn harvest for planting next year?
Yes, you can save seeds from your black corn harvest, but be aware that if you’re growing other types of corn nearby, there’s a chance of cross-pollination, which could affect the characteristics of the next generation. To minimize cross-pollination, isolate your black corn from other corn varieties by at least 200 feet. Select healthy, well-formed ears for seed saving. Allow the ears to dry completely on the stalk, then remove the kernels and store them in a cool, dry place.
Is black corn container gardening suitable for beginners?
Absolutely! Black corn container gardening is a relatively simple and rewarding project, even for beginners. The controlled environment of containers makes it easier to manage soil quality, watering, and pest control. With a little research and attention, anyone can successfully grow black corn in containers and enjoy the unique flavors and beauty of this special crop. Don’t be afraid to experiment and learn from your experiences.

Leave a Comment