

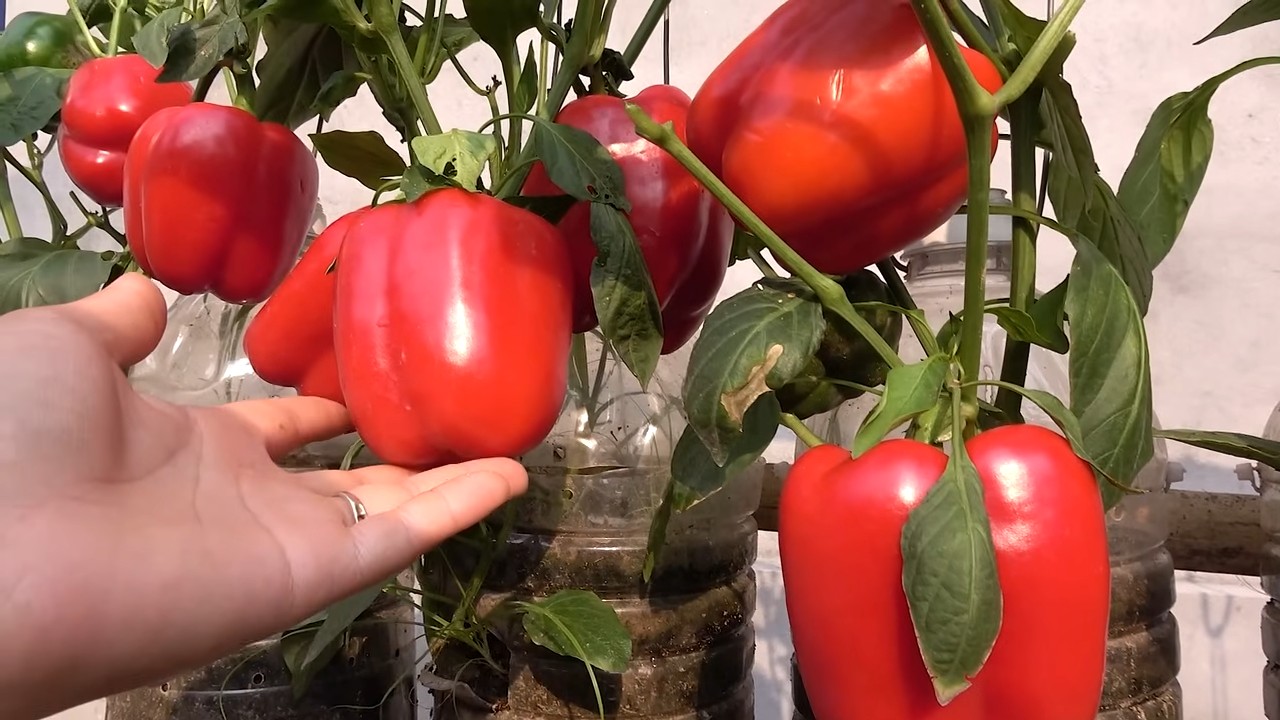
Bell peppers in bottles – sounds a little crazy, right? But trust me, this quirky DIY trick might just revolutionize your home garden! Forget struggling with limited space or battling unpredictable weather; we’re about to unlock a simple, yet surprisingly effective, method for growing vibrant, healthy bell peppers, even if you only have a balcony or a sunny windowsill.
For centuries, resourceful gardeners have sought innovative ways to maximize their yields, often repurposing everyday items. While the exact origins of using bottles for growing aren’t precisely documented, the spirit of upcycling and adapting to limited resources resonates deeply within gardening history. Think of the ancient hanging gardens or the modern-day vertical farms – it’s all about ingenuity!
So, why should you try growing bell peppers in bottles? Well, imagine enjoying fresh, homegrown peppers in your salads, stir-fries, or even stuffed dishes, all year round. This method offers several advantages: it protects your precious plants from pests and harsh weather, conserves water, and allows you to grow in small spaces. Plus, let’s be honest, it’s a fantastic conversation starter! I’m excited to share this simple, step-by-step guide that will have you harvesting your own delicious bell peppers in no time. Let’s get started!
Paprika in Flaschen ziehen: So gelingt dir die DIY-Anzucht!
Hey Gärtnerfreunde! Habt ihr euch jemals gefragt, wie ihr eure Paprikapflanzen noch besser unterstützen könnt, besonders wenn der Platz im Garten begrenzt ist oder das Wetter mal wieder verrückt spielt? Ich habe da eine super Idee für euch: Paprika in Flaschen ziehen! Klingt komisch? Ist aber genial! Es ist nicht nur eine platzsparende Methode, sondern schützt eure Pflanzen auch vor Wind und Wetter und sorgt für ein kleines Mini-Gewächshaus-Klima. Lasst uns loslegen!
Was du für dein Paprika-Flaschen-Projekt brauchst:
* Paprikasamen: Wähle deine Lieblingssorten aus! Ob rot, gelb, grün oder sogar die scharfen Chilis – alles ist möglich.
* Leere Plastikflaschen: Am besten eignen sich 1,5- oder 2-Liter-Flaschen. Je größer die Flasche, desto mehr Platz haben die Wurzeln. Achte darauf, dass sie sauber sind!
* Anzuchterde: Diese ist nährstoffarm und locker, ideal für die Keimung.
* Blumenerde: Später, wenn die Pflänzchen größer sind, brauchen sie mehr Nährstoffe.
* Schere oder Messer: Zum Zuschneiden der Flaschen.
* Sprühflasche: Zum Befeuchten der Erde.
* Kleiner Topf oder Anzuchtschale: Für die Vorkultur.
* Gießkanne oder ähnliches: Zum Bewässern der Pflanzen.
* Etiketten und Stift: Um die verschiedenen Paprikasorten zu kennzeichnen.
* Optional: Drainagematerial (z.B. Blähton oder Kies) für den Boden der Flasche.
Die Vorbereitung: Flaschen schneiden und vorbereiten
Bevor wir mit dem eigentlichen Anpflanzen beginnen, müssen wir die Flaschen vorbereiten. Keine Sorge, das ist einfacher als es klingt!
1. Flaschen reinigen: Spüle die leeren Plastikflaschen gründlich mit warmem Wasser und etwas Spülmittel aus. Entferne alle Etiketten und Klebereste. Trockne die Flaschen gut ab.
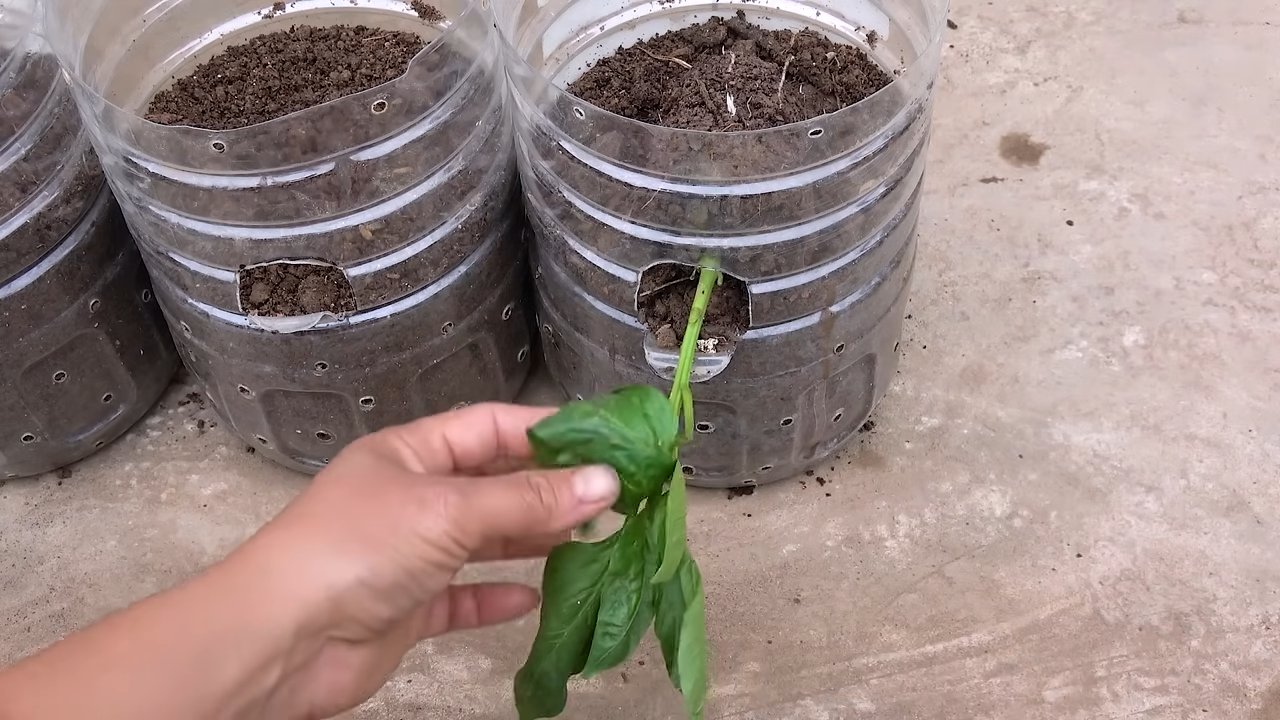
2. Flaschen schneiden: Jetzt kommt der spannende Teil! Schneide die Flasche etwa 10-15 cm unterhalb des Flaschenhalses durch. Du erhältst also zwei Teile: den oberen Teil mit dem Flaschenhals und den unteren Teil. Der obere Teil wird später wie ein kleiner Deckel auf den unteren Teil gesteckt.
3. Drainagelöcher bohren (optional): Wenn du möchtest, kannst du in den Boden des unteren Flaschenteils ein paar kleine Löcher bohren oder schneiden. Das sorgt für eine bessere Drainage und verhindert Staunässe. Ich persönlich mache das immer, da es mir ein besseres Gefühl gibt.
4. Drainageschicht einfüllen (optional): Fülle eine dünne Schicht Drainagematerial (z.B. Blähton oder Kies) in den Boden des unteren Flaschenteils. Das verbessert die Drainage zusätzlich.
Die Aussaat: Paprikasamen zum Leben erwecken
Jetzt geht es ans Eingemachte! Wir säen die Paprikasamen aus und warten gespannt darauf, dass sie keimen.
1. Anzuchtschale vorbereiten: Fülle die Anzuchtschale oder die kleinen Töpfe mit Anzuchterde. Drücke die Erde leicht an.
2. Samen aussäen: Verteile die Paprikasamen gleichmäßig auf der Erde. Achte darauf, dass sie nicht zu dicht beieinander liegen. Bedecke die Samen mit einer dünnen Schicht Anzuchterde (ca. 0,5 cm).
3. Befeuchten: Befeuchte die Erde vorsichtig mit einer Sprühflasche. Die Erde sollte feucht, aber nicht nass sein.
4. Warm stellen: Stelle die Anzuchtschale an einen warmen und hellen Ort. Paprika keimt am besten bei Temperaturen zwischen 22 und 28 Grad Celsius. Ein Mini-Gewächshaus oder eine Fensterbank über der Heizung sind ideal.
5. Feucht halten: Halte die Erde während der Keimung gleichmäßig feucht. Besprühe sie bei Bedarf mit der Sprühflasche.
6. Geduld haben: Die Keimung kann je nach Sorte und Temperatur 1-3 Wochen dauern. Hab Geduld und gib nicht auf!
Das Pikieren: Den kleinen Pflänzchen mehr Raum geben
Sobald die Paprikapflänzchen ihre ersten richtigen Blätter (nach den Keimblättern) entwickelt haben, ist es Zeit zum Pikieren. Das bedeutet, dass wir die Pflänzchen vorsichtig vereinzeln und in größere Töpfe umsetzen.
1. Vorbereitung: Fülle die vorbereiteten Flaschen (unterer Teil) mit Blumenerde. Lasse oben ca. 2-3 cm Platz.
2. Pflänzchen ausheben: Lockere die Erde in der Anzuchtschale vorsichtig auf. Hebe die Pflänzchen mit einem Pikierstab oder einem Löffel vorsichtig aus der Erde. Achte darauf, die Wurzeln nicht zu beschädigen.
3. Einpflanzen: Setze die Pflänzchen in die vorbereiteten Flaschen. Achte darauf, dass die Wurzeln genügend Platz haben. Fülle die Flaschen mit Erde auf und drücke sie leicht an.
4. Angießen: Gieße die Pflänzchen vorsichtig an.
5. Beschriften: Beschrifte die Flaschen mit den Namen der Paprikasorten. So behältst du den Überblick.
Die Pflege: Paprika-Glück in der Flasche
Jetzt, wo die Paprikapflänzchen in ihren Flaschen wohnen, ist es wichtig, sie gut zu pflegen.
1. Standort: Stelle die Flaschen an einen sonnigen und warmen Ort. Paprika liebt die Sonne!
2. Gießen: Gieße die Pflanzen regelmäßig, aber vermeide Staunässe. Die Erde sollte immer leicht feucht sein. Ich prüfe das immer mit dem Finger, indem ich ihn ca. 2 cm tief in die Erde stecke.
3. Düngen: Dünge die Paprikapflanzen regelmäßig mit einem Flüssigdünger für Gemüse. Beginne damit ca. 2-3 Wochen nach dem Pikieren.
4. Belüften: Um Schimmelbildung zu vermeiden, solltest du die Flaschen regelmäßig belüften. Nimm dazu einfach den oberen Teil der Flasche ab. Besonders wichtig ist das, wenn es sehr feucht ist.
5. Schutz vor Schädlingen: Kontrolliere die Pflanzen regelmäßig auf Schädlinge wie Blattläuse oder Spinnmilben. Bei Bedarf kannst du biologische Schädlingsbekämpfungsmittel einsetzen.
6. Flaschenhälse aufsetzen: Setze die abgeschnittenen Flaschenhälse wie kleine Mini-Gewächshäuser auf die unteren Teile. Das schützt die jungen Pflanzen vor Wind und Wetter und sorgt für ein wärmeres Klima. Achte aber darauf, dass die Pflanzen genügend Luft bekommen, indem du die Flaschenhälse regelmäßig abnimmst oder leicht öffnest.
Das Umtopfen (optional): Wenn die Flasche zu klein wird
Wenn die Paprikapflanze zu groß für die Flasche wird, kannst du sie in einen größeren Topf oder ins Freiland umtopfen.
1. Vorbereitung: Wähle einen Topf, der ausreichend groß ist. Fülle den Topf mit Blumenerde.
2. Pflanze aus der Flasche nehmen: Schneide die Flasche vorsichtig auf oder drücke sie leicht zusammen, um die Pflanze herauszulösen. Achte darauf, die Wurzeln nicht zu beschädigen.
3. Einpflanzen: Setze die Pflanze in den neuen Topf. Fülle den Topf mit Erde auf und drücke sie leicht an.
4. Angießen: Gieße die Pflanze vorsichtig an.
Die Ernte: Endlich eigene Paprika!
Nach einigen Wochen oder Monaten (je nach Sorte) kannst du endlich deine eigenen Paprika ernten!
1. Reife erkennen: Die Paprika sind reif, wenn sie ihre typische Farbe erreicht haben und sich leicht vom Stiel lösen lassen.
2. Ernten: Schneide die Paprika mit einem scharfen Messer oder einer Schere ab.
3. Genießen: Verwende die Paprika für deine Lieblingsgerichte! Ob roh im Salat,
Conclusion
So, there you have it! Transforming ordinary bell peppers into vibrant, shelf-stable delights using this simple bottling technique is more than just a kitchen experiment; it’s a gateway to preserving the flavors of summer and enjoying them year-round. This method allows you to savor the sweetness and crispness of bell peppers long after they’ve disappeared from the local farmers market.
Why is this DIY trick a must-try? Because it empowers you to take control of your food supply, reduce waste, and create delicious, healthy ingredients for countless recipes. Imagine adding a burst of color and flavor to your winter stews, omelets, or pizzas with bell peppers you preserved yourself. Think of the satisfaction of knowing exactly where your food comes from and what it contains – no artificial preservatives, just pure, unadulterated bell pepper goodness.
Beyond the practical benefits, this bottling process is surprisingly therapeutic. The methodical steps, the vibrant colors of the peppers, and the satisfying “pop” of the sealed jars create a sense of accomplishment and connection to the food you’re preparing. It’s a wonderful way to slow down, engage your senses, and appreciate the simple pleasures of cooking.
But don’t stop there! This technique is incredibly versatile. Feel free to experiment with different varieties of bell peppers – red, yellow, orange, and even green – to create a colorful medley. Add a touch of heat by including a few slices of jalapeño or other chili peppers in each jar. Infuse the brine with herbs like rosemary, thyme, or oregano for an extra layer of flavor. Consider adding a clove or two of garlic to each jar for a savory kick. You can even pickle the bell peppers using a vinegar-based brine for a tangy twist. The possibilities are endless!
We encourage you to embrace this DIY adventure and discover the joy of preserving your own bell peppers in bottles. It’s a rewarding experience that will transform the way you think about food preservation. Once you’ve tried it, you’ll wonder why you didn’t start sooner.
Don’t be afraid to experiment, adapt the recipe to your liking, and most importantly, have fun! We’re confident that you’ll be delighted with the results.
Now, it’s your turn! Grab some bell peppers, gather your supplies, and get bottling. We can’t wait to hear about your experiences. Share your photos, tips, and variations in the comments below. Let’s build a community of bell pepper bottling enthusiasts and inspire others to embrace the art of food preservation. Happy bottling!
Frequently Asked Questions (FAQ)
What kind of bell peppers are best for bottling?
Any type of bell pepper can be used for bottling, but the best choices are those that are firm, ripe, and free from blemishes. Red, yellow, and orange bell peppers tend to be sweeter and more flavorful than green bell peppers, but green bell peppers can also be used, especially if you prefer a slightly more bitter taste. Experiment with different varieties to find your favorites. Consider using a mix of colors for a visually appealing result. Organic bell peppers are always a great choice if available, as they are free from pesticides and herbicides.
Do I need special equipment for bottling bell peppers?
While some specialized canning equipment can be helpful, you don’t necessarily need it to get started. At a minimum, you’ll need:
* Glass canning jars with lids and bands (ensure they are specifically designed for canning).
* A large pot or stockpot that is tall enough to completely submerge the jars.
* Jar lifters (these are essential for safely removing hot jars from the boiling water).
* A wide-mouth funnel (this helps to prevent spills when filling the jars).
* A clean kitchen towel.
Optional but helpful equipment includes a canning rack (to keep the jars from sitting directly on the bottom of the pot) and a bubble remover (to release trapped air bubbles from the jars).
How long will bottled bell peppers last?
When properly processed and stored, bottled bell peppers can last for up to a year or even longer. It’s crucial to follow the canning instructions carefully to ensure a proper seal. Always check the seal before using a jar of bell peppers. The lid should be concave and not flex when pressed. If the seal is broken, discard the contents. Store bottled bell peppers in a cool, dark, and dry place.
Can I add other vegetables to the jars with the bell peppers?
Yes, you can! Adding other vegetables can create interesting flavor combinations and add nutritional value. Some good options include onions, garlic, carrots, and celery. Just be sure to clean and prepare the vegetables properly before adding them to the jars. Keep in mind that adding other vegetables may affect the processing time, so it’s important to consult a reliable canning resource for specific instructions.
What if I don’t have a water bath canner?
If you don’t have a water bath canner, you can use a large stockpot with a rack at the bottom. The pot must be tall enough to completely submerge the jars with at least 1-2 inches of water above the lids. Make sure the jars are not touching each other or the sides of the pot during processing.
How do I know if the jars are properly sealed?
After processing, remove the jars from the water bath and let them cool completely on a towel-lined surface. As the jars cool, you should hear a “popping” sound as the lids seal. After 12-24 hours, check the seals by pressing down on the center of each lid. If the lid is concave and doesn’t flex, the jar is properly sealed. If the lid flexes, the jar is not sealed and should be reprocessed with a new lid or stored in the refrigerator and used within a few days.
Can I use this method to bottle other vegetables?
While this method is specifically designed for bell peppers, it can be adapted for other vegetables with similar acidity levels. However, it’s crucial to consult a reliable canning resource for specific instructions and processing times for each vegetable. Different vegetables require different processing times to ensure safe preservation.
What are some ways to use bottled bell peppers?
Bottled bell peppers are incredibly versatile and can be used in a wide variety of dishes. Here are a few ideas:
* Add them to stews, soups, and chili for a burst of flavor and color.
* Use them as a topping for pizzas, sandwiches, and salads.
* Incorporate them into omelets, frittatas, and quiches.
* Serve them as a side dish with grilled meats or fish.
* Use them to make homemade salsa or relish.
* Add them to pasta sauces for a sweet and savory flavor.
* Puree them into dips and spreads.
Can I adjust the sweetness or spiciness of the brine?
Absolutely! Feel free to adjust the amount of sugar or vinegar in the brine to suit your taste preferences. If you prefer a sweeter brine, add more sugar. If you prefer a tangier brine, add more vinegar. You can also add spices like red pepper flakes or chili powder for a spicy kick. Experiment with different combinations to find your perfect flavor profile.
What if my bell peppers are not completely submerged in the brine?
It’s important to ensure that the bell peppers are completely submerged in the brine to prevent spoilage. If necessary, use a clean utensil to gently press the peppers down into the jar. You can also add more brine to the jar, leaving the appropriate headspace (usually about 1/2 inch).

Leave a Comment