

Bay Leaf Cuttings Indoor Planting: Ever dreamt of having a constant supply of fresh, aromatic bay leaves right at your fingertips? Imagine never having to run to the store again when your favorite recipe calls for that distinct, savory flavor. Well, stop dreaming and start doing! This DIY guide will walk you through the surprisingly simple process of propagating your own bay laurel plant from cuttings, all within the cozy confines of your home.
Bay leaves have been prized for centuries, not just for their culinary uses, but also for their medicinal and symbolic significance. In ancient Greece and Rome, bay laurel wreaths adorned the heads of victors and scholars, representing honor and achievement. Today, while we might not be crowning ourselves with bay leaves, we can certainly appreciate their versatility in the kitchen and the satisfaction of growing our own.
Why bother with bay leaf cuttings indoor planting? Because it’s economical, rewarding, and frankly, quite fun! Buying fresh bay leaves can be expensive, and dried ones often lack the vibrant aroma of freshly picked leaves. Plus, propagating your own plant allows you to control the growing conditions and ensure you have a healthy, thriving bay laurel. I’m excited to share these simple tricks and hacks that will empower you to cultivate your own little piece of culinary paradise indoors. Let’s get started!
Propagating Bay Laurel from Cuttings: A Beginner’s Guide
Hey there, fellow plant enthusiasts! Ever wanted to have your own endless supply of bay leaves for cooking? Well, you’re in luck! Propagating bay laurel ( *Laurus nobilis*) from cuttings is totally doable, even if you don’t have a green thumb. I’m going to walk you through the whole process, step-by-step, so you can have your own little bay leaf forest in no time.
What You’ll Need
Before we dive in, let’s gather our supplies. Having everything ready beforehand will make the whole process smoother and more enjoyable. Trust me, preparation is key!
* A Healthy Bay Laurel Plant: This is the most important ingredient! You’ll need a mature bay laurel plant to take cuttings from. Make sure it’s healthy and free from any signs of disease or pests.
* Sharp, Clean Pruning Shears or Knife: Sterilize your cutting tools with rubbing alcohol or a bleach solution (1 part bleach to 9 parts water) to prevent the spread of disease. A clean cut is crucial for successful rooting.
* Rooting Hormone (Optional, but Recommended): Rooting hormone encourages root development and increases your chances of success. You can find it at most garden centers. I personally prefer using a powdered rooting hormone.
* Rooting Medium: This is what your cuttings will root in. A well-draining mix is essential. I recommend a mix of perlite and peat moss (or coco coir) in equal parts. You can also use a commercial seed starting mix.
* Small Pots or Containers: Choose pots that are about 2-3 inches in diameter. Make sure they have drainage holes!
* Clear Plastic Bags or a Humidity Dome: Bay laurel cuttings need high humidity to root successfully. A plastic bag or humidity dome will help create a mini-greenhouse environment.
* Spray Bottle: For misting the cuttings to keep them hydrated.
* Water: Filtered or distilled water is best, but tap water that has sat out for 24 hours to allow chlorine to dissipate will also work.
* Labels: To keep track of when you planted your cuttings.
Taking the Cuttings
Okay, let’s get to the fun part! Taking the cuttings is a delicate process, but don’t worry, I’ll guide you through it.
1. Choose the Right Stems: Look for semi-hardwood stems that are about 4-6 inches long. These are stems that have started to mature but are not completely woody. They should be from the current year’s growth. Avoid stems that are too soft and green or too hard and woody.
2. Make the Cut: Using your sterilized pruning shears or knife, make a clean cut just below a node (the point where a leaf or branch grows from the stem). A node is where the plant’s hormones are concentrated, which will help with root development.
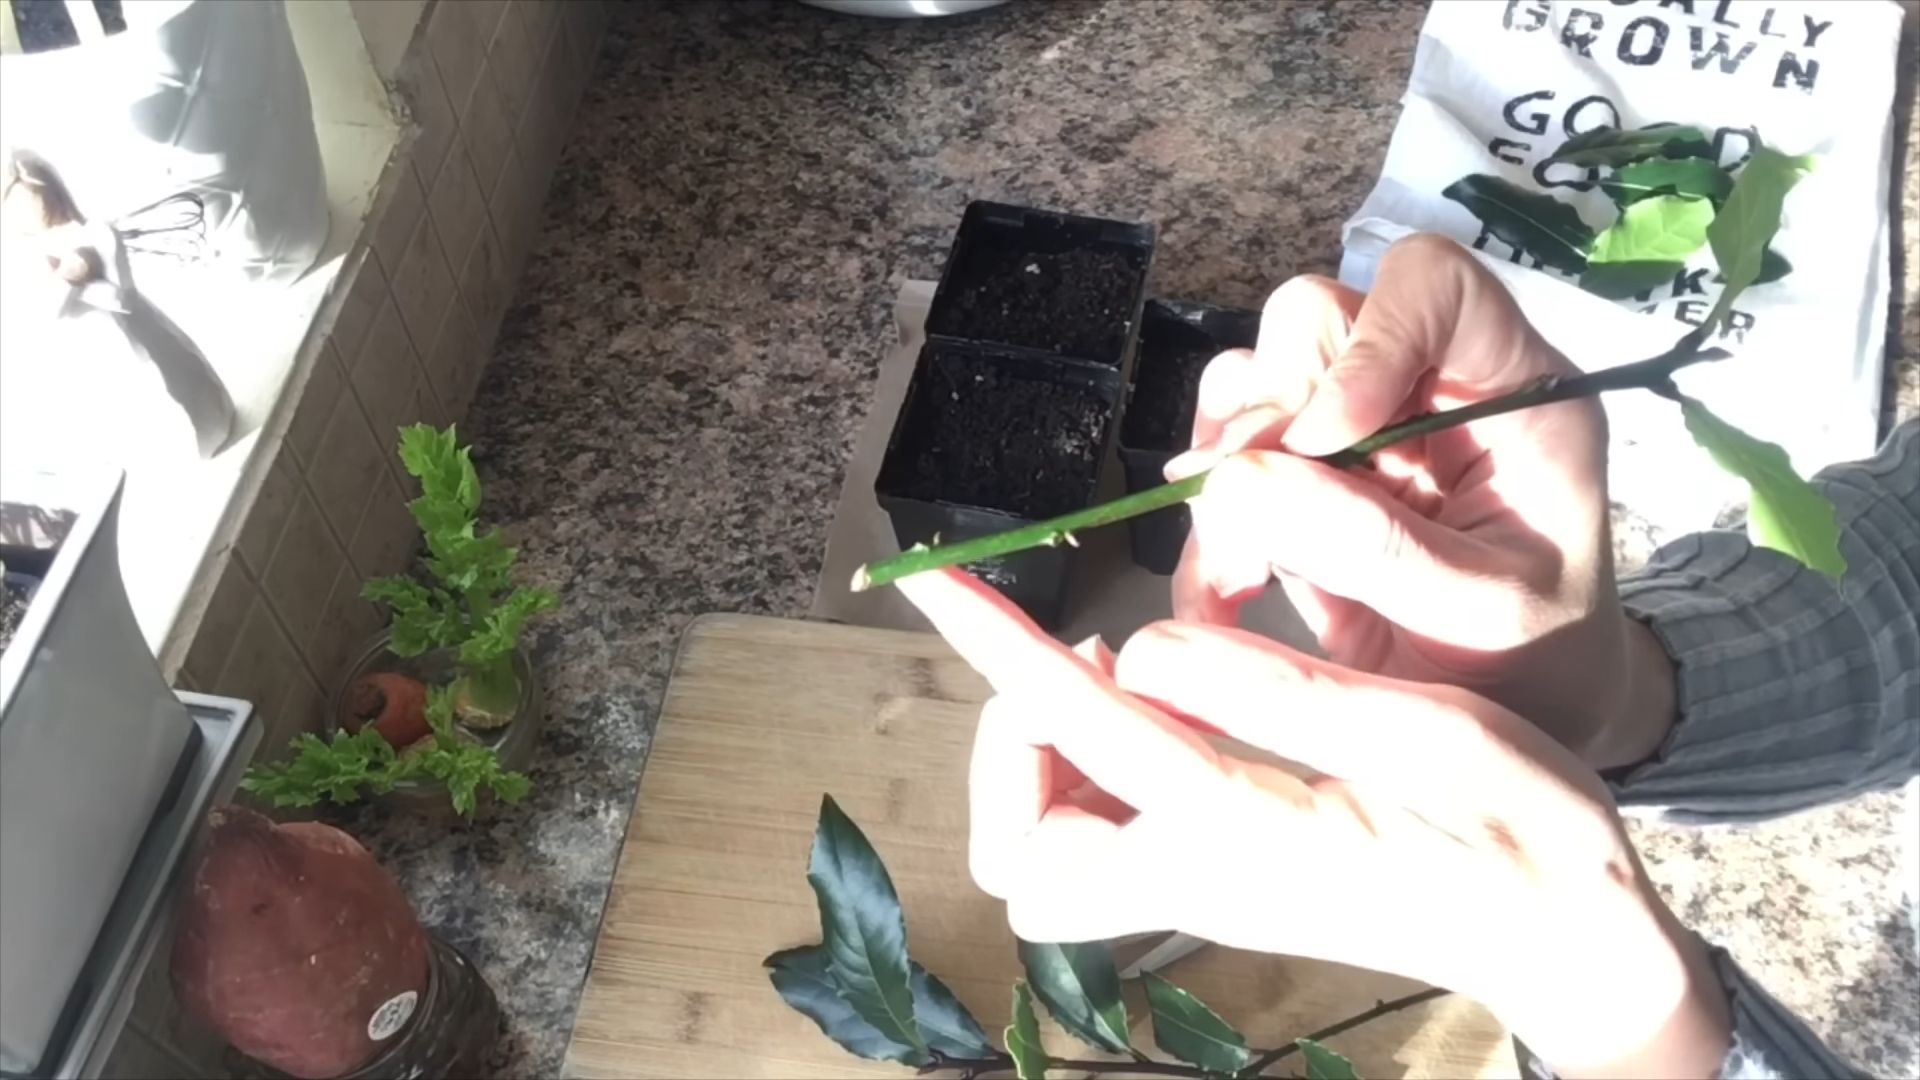
3. Remove the Lower Leaves: Remove the leaves from the bottom 1-2 inches of the cutting. This will prevent them from rotting when they’re buried in the rooting medium. Be careful not to damage the stem while removing the leaves.
4. Prepare the Cutting: Gently scrape the bottom inch of the cutting with your knife. This will lightly wound the stem and encourage root formation.
5. Apply Rooting Hormone (Optional): If you’re using rooting hormone, dip the bottom inch of the cutting into the powder. Tap off any excess.
Planting the Cuttings
Now that we have our cuttings prepared, it’s time to plant them!
1. Prepare the Potting Mix: Moisten your rooting medium with water until it’s damp but not soggy. You want it to be evenly moist, not dripping wet.
2. Fill the Pots: Fill your pots with the moistened rooting medium, leaving about half an inch of space at the top.
3. Make a Hole: Use a pencil or your finger to create a hole in the center of the potting mix, deep enough to accommodate the bottom inch of the cutting.
4. Plant the Cutting: Gently insert the cutting into the hole, making sure the bottom inch is buried in the rooting medium.
5. Gently Press the Soil: Gently press the soil around the cutting to secure it in place.
6. Water the Cutting: Water the cutting gently to settle the soil.
Creating a Humid Environment
Bay laurel cuttings need high humidity to root successfully. Here’s how to create a mini-greenhouse environment:
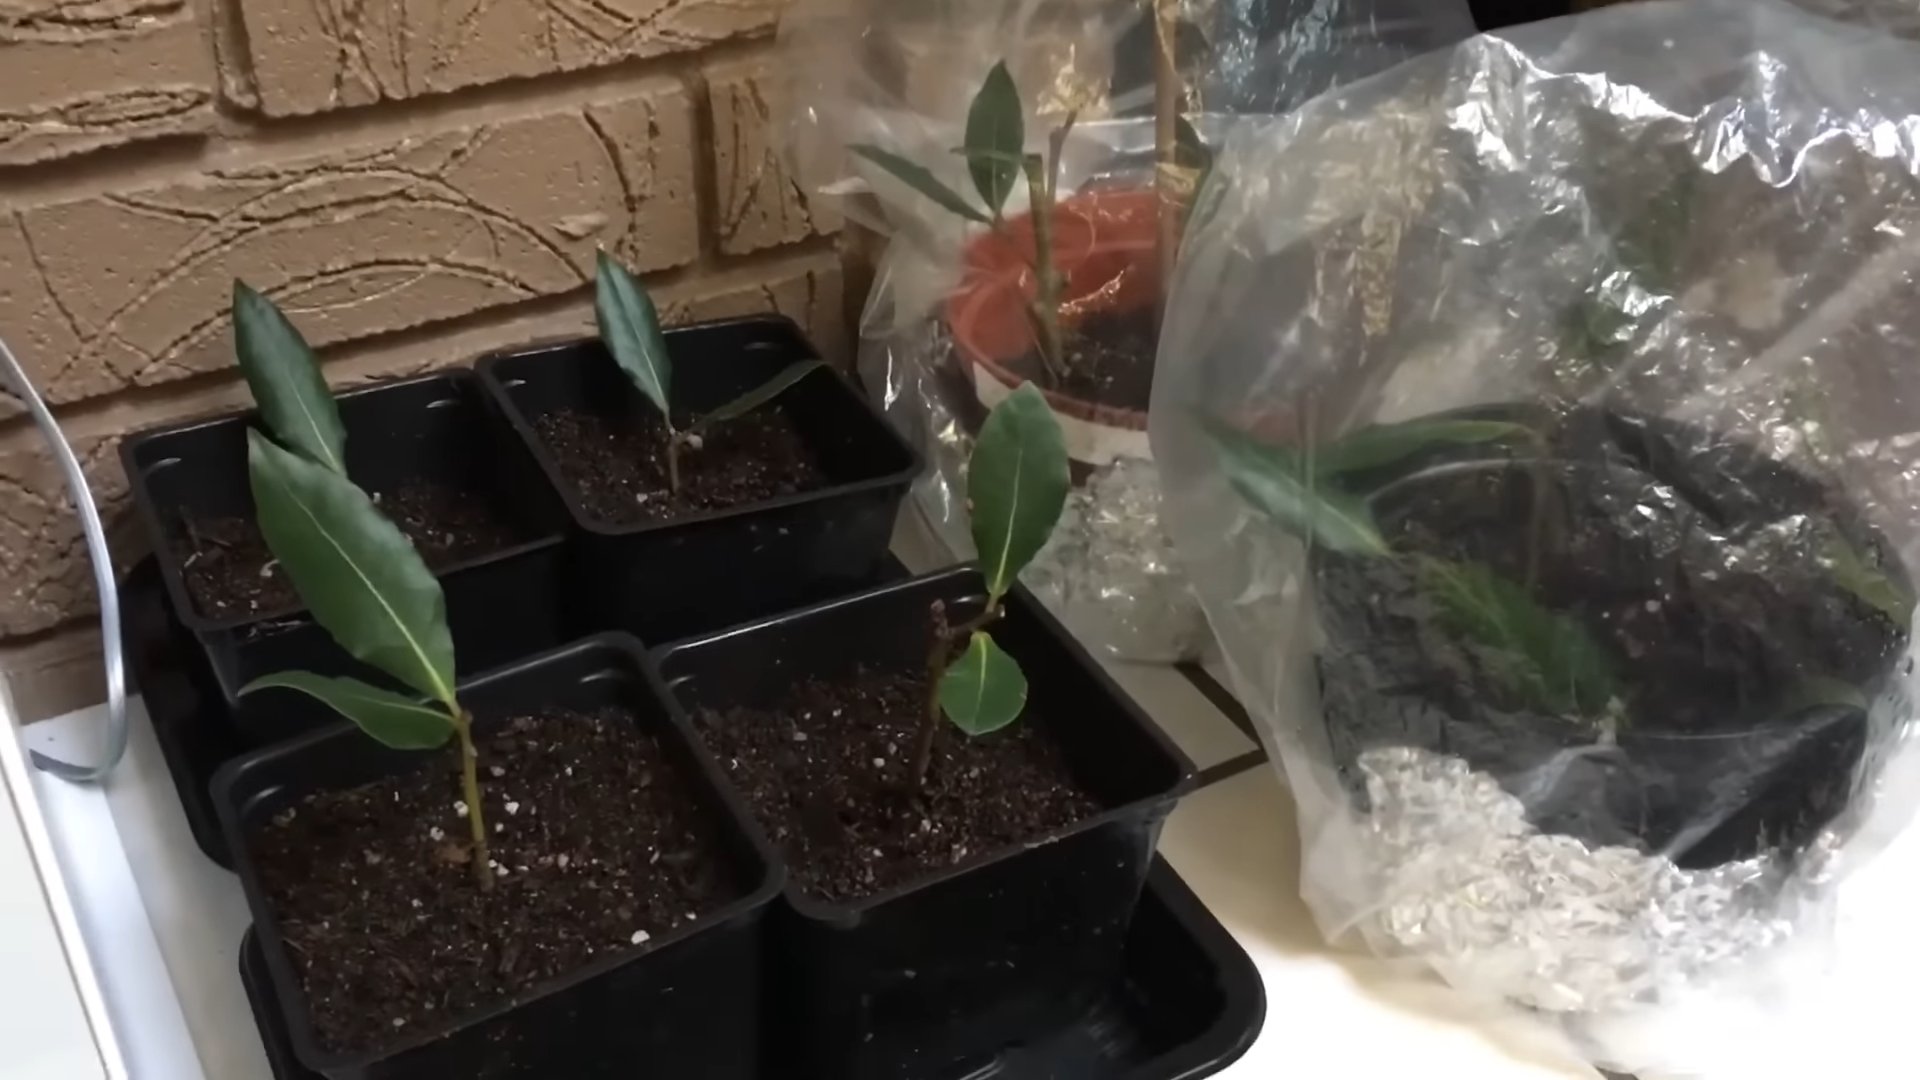
1. Place the Pots in a Plastic Bag or Humidity Dome: Place the pots inside a clear plastic bag or under a humidity dome. This will help trap moisture and create a humid environment.
2. Seal the Bag or Dome: If using a plastic bag, seal it loosely with a rubber band or twist tie. If using a humidity dome, make sure it’s properly sealed.
3. Provide Indirect Light: Place the cuttings in a location that receives bright, indirect light. Avoid direct sunlight, which can scorch the leaves. A north-facing window is ideal.
Caring for the Cuttings
Patience is key! Rooting can take several weeks, so don’t get discouraged if you don’t see results right away.
1. Maintain Humidity: Check the humidity levels regularly. If the soil feels dry or the leaves start to wilt, mist the cuttings with water. You may need to open the bag or dome occasionally to prevent mold growth.
2. Water Sparingly: Water the cuttings only when the soil feels dry to the touch. Overwatering can lead to root rot.
3. Check for Rooting: After about 4-6 weeks, gently tug on the cuttings to see if they have rooted. If you feel resistance, it means roots have formed. You can also gently remove a cutting from the pot to check for roots.
4. Gradually Acclimate: Once the cuttings have rooted, gradually acclimate them to lower humidity levels. You can do this by opening the bag or dome for a few hours each day, gradually increasing the amount of time over a week or two.
Transplanting Your New Bay Laurel Plants
Congratulations! You’ve successfully propagated bay laurel from cuttings. Now it’s time to transplant your new plants into larger pots.
1. Choose a Larger Pot: Select a pot that is a few inches larger in diameter than the current pot.
2. Prepare the Potting Mix: Use a well-draining potting mix. A mix of potting soil, perlite, and compost is a good option.
3. Gently Remove the Plant: Gently remove the bay laurel plant from its current pot. Be careful not to damage the roots.
4. Loosen the Root Ball: Gently loosen the root ball with your fingers.
5. Place the Plant in the New Pot: Place the plant in the center of the new pot and fill in around the root ball with potting mix.
6. Water Thoroughly: Water the plant thoroughly to settle the soil.
7. Provide Bright, Indirect Light: Place the plant in a location that receives bright, indirect light.
Ongoing Care
Now that your bay laurel plant is established, here are some tips for ongoing care:
* Watering: Water your bay laurel plant when the soil feels dry to the touch. Avoid overwatering, which can lead to root rot.
* Fertilizing: Fertilize your bay laurel plant every 2-3 months with a balanced fertilizer.
* Pruning: Prune your bay laurel plant regularly to maintain its shape and size. You can also harvest leaves for cooking as needed.
* Pest Control: Keep an eye out for pests such as aphids and scale. Treat any infestations promptly with insecticidal soap or neem oil.
* Winter Care: Bay laurel is hardy to about 20°F (-6°C). If you live in a colder climate, you’ll need to bring your plant indoors during the winter.
Troubleshooting
Sometimes things don’t go as planned. Here are some common problems you might encounter and how to fix them:
* Cuttings Not Rooting: If your cuttings are not rooting, make sure they are receiving enough humidity and indirect light. You can also try using a stronger rooting hormone.
* Cuttings Rotting: If your cuttings are rotting, it’s likely due to overwatering. Make sure the soil is well-draining and avoid watering too frequently.
* Leaves Turning Yellow: If the leaves are turning yellow, it could be due to a number of factors, such as overwatering, underwatering, or nutrient deficiency. Check the soil moisture and fertilize if necessary.
Final Thoughts
Propagating bay laurel from cuttings is a rewarding experience. With a little patience and care, you can have your own thriving bay laurel plant
Conclusion
So, there you have it! Propagating bay leaf cuttings indoors isn’t just a fun gardening project; it’s a gateway to having a constant supply of fresh, aromatic bay leaves right at your fingertips. Imagine the satisfaction of seasoning your favorite soups, stews, and sauces with bay leaves you nurtured from a simple cutting. Forget those brittle, often flavorless dried leaves from the grocery store – this is about experiencing the vibrant, potent essence of homegrown bay.
This DIY trick is a must-try for several compelling reasons. First, it’s incredibly cost-effective. Instead of repeatedly purchasing bay leaves, you can create a self-sustaining supply from a single established plant or even a generous friend’s garden. Second, it’s a sustainable practice. You’re reducing your reliance on commercially grown and transported herbs, contributing to a smaller carbon footprint. Third, it’s a rewarding experience. Watching your cuttings take root and flourish is a testament to your green thumb and a source of immense pride. Finally, and perhaps most importantly, it allows you to control the quality of your bay leaves, ensuring they are free from pesticides and other unwanted chemicals.
But the beauty of this method lies in its adaptability. Feel free to experiment with different rooting mediums. While we’ve highlighted the success of using a well-draining potting mix, you could also try perlite, vermiculite, or even a combination of these. Consider using a rooting hormone to further enhance the chances of successful propagation, especially if you’re working with more mature or woody cuttings. And don’t be afraid to play around with the humidity levels. If you don’t have a humidity dome, a simple plastic bag placed over the cutting can work wonders.
For those looking to add a touch of elegance to their indoor garden, consider planting your rooted bay leaf cuttings in decorative pots. Choose containers that complement your home décor and provide adequate drainage. You can even train your bay leaf plant into a topiary, adding a touch of sophistication to your living space. Another variation is to experiment with different bay leaf varieties. While the common bay laurel (Laurus nobilis) is the most widely used, there are other cultivars with slightly different flavor profiles and growth habits.
Ultimately, the success of propagating bay leaf cuttings indoors depends on patience, attention to detail, and a willingness to experiment. Don’t be discouraged if your first attempt isn’t entirely successful. Gardening is a learning process, and every failure is an opportunity to refine your technique. The key is to provide the cuttings with the right conditions – adequate moisture, warmth, and light – and to monitor their progress regularly.
We wholeheartedly encourage you to embark on this rewarding gardening adventure. Take the plunge, gather your supplies, and give this DIY trick a try. We’re confident that you’ll be amazed by the results. And once you’ve successfully propagated your bay leaf cuttings, we’d love to hear about your experience. Share your tips, tricks, and photos in the comments below. Let’s create a community of bay leaf enthusiasts and inspire others to embrace the joy of homegrown herbs. Let us know if you have any questions about **bay leaf cuttings indoor planting**! Happy gardening!
Frequently Asked Questions (FAQ)
Q: How long does it take for bay leaf cuttings to root?
A: Rooting time can vary depending on several factors, including the health of the cutting, the rooting medium, and the environmental conditions. Generally, you can expect to see roots develop within 4 to 8 weeks. Be patient and avoid disturbing the cuttings too frequently. Gently tug on the cutting after a month or so. If you feel resistance, it likely means roots have started to form.
Q: What is the best time of year to take bay leaf cuttings?
A: The best time to take bay leaf cuttings is typically in the spring or early summer, when the plant is actively growing. This is when the cuttings are most likely to root successfully. However, you can also take cuttings in the late summer or early fall, although the rooting process may be slower. Avoid taking cuttings during the dormant winter months.
Q: What kind of soil should I use for rooting bay leaf cuttings?
A: A well-draining potting mix is essential for rooting bay leaf cuttings. You can use a commercially available seed starting mix or create your own by combining equal parts peat moss, perlite, and vermiculite. The key is to ensure that the soil is moist but not waterlogged, as this can lead to root rot.
Q: How much light do bay leaf cuttings need?
A: Bay leaf cuttings need bright, indirect light to root successfully. Avoid placing them in direct sunlight, as this can scorch the leaves. A north- or east-facing window is ideal. You can also use a grow light to provide supplemental lighting, especially during the winter months.
Q: How often should I water bay leaf cuttings?
A: Keep the rooting medium consistently moist but not waterlogged. Water the cuttings when the top inch of soil feels dry to the touch. Avoid overwatering, as this can lead to root rot. It’s also a good idea to mist the cuttings regularly to increase humidity.
Q: Do I need to use rooting hormone for bay leaf cuttings?
A: While not essential, using a rooting hormone can significantly increase the chances of successful propagation. Rooting hormones contain auxins, which are plant hormones that stimulate root growth. Dip the cut end of the cutting in rooting hormone powder or liquid before planting it in the rooting medium.
Q: How do I know if my bay leaf cuttings have rooted?
A: The best way to tell if your bay leaf cuttings have rooted is to gently tug on them. If you feel resistance, it likely means roots have started to form. You can also carefully remove a cutting from the rooting medium and inspect the roots. Look for small, white roots emerging from the cut end of the stem.
Q: What do I do after my bay leaf cuttings have rooted?
A: Once your bay leaf cuttings have rooted, you can transplant them into individual pots filled with a well-draining potting mix. Gradually acclimate the plants to brighter light conditions before placing them in their permanent location. Water regularly and fertilize with a balanced fertilizer every few weeks during the growing season.
Q: Can I grow bay leaf cuttings indoors permanently?
A: Yes, bay leaf plants can be grown indoors permanently, provided they receive adequate light, water, and nutrients. Choose a sunny location, such as a south-facing window, and provide supplemental lighting if necessary. Water regularly and fertilize every few weeks during the growing season. Prune the plant regularly to maintain its shape and size.
Q: My bay leaf cuttings are turning yellow. What should I do?
A: Yellowing leaves on bay leaf cuttings can be a sign of several problems, including overwatering, underwatering, nutrient deficiency, or pest infestation. Check the soil moisture and adjust your watering schedule accordingly. Fertilize with a balanced fertilizer to provide essential nutrients. Inspect the leaves for signs of pests, such as aphids or spider mites, and treat accordingly.
Q: Can I use bay leaves from my rooted cuttings right away?
A: While you can technically use bay leaves from your rooted cuttings as soon as they are large enough, it’s generally best to wait until the plant is more established before harvesting too many leaves. This will allow the plant to focus its energy on growth and development. Harvest leaves sparingly during the first year or two.
Leave a Comment